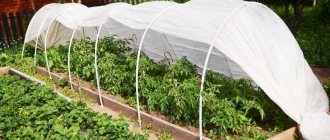
In this article we will tell you about what a polycarbonate greenhouse with an opening roof is. You will find out what advantages this technology has, what models of greenhouses with sliding lids are on sale, and how much such greenhouses cost in Moscow and the Moscow region. In addition, the article contains useful tips for installing an opening greenhouse and interesting videos on this topic.
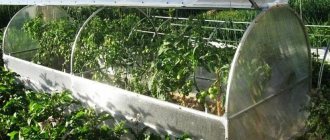
Any crop grows well in greenhouses with opening roofs Source kroystroy.ru
Advantages of a greenhouse with an opening roof
This technology has a lot of advantages, and if you choose a greenhouse for your garden plot, then you should pay attention to greenhouses with a sliding roof, because they:
- You can work in such a greenhouse during extreme heat , since the room is well ventilated thanks to the sliding lid.
- The lid itself is quite light , so it can be manipulated even with one hand.
- If you open the greenhouse, it will be easy for you to load fertilizers and soil inside .
- In such a greenhouse it is possible to organize natural watering , because you just need to leave it open during rain.
- a large amount of snow falls in your region in winter , then you can fold the lid so that it does not break due to too much load.
It can be seen that it is very convenient to operate a greenhouse with a sliding lid. Therefore, now such greenhouses are very popular.
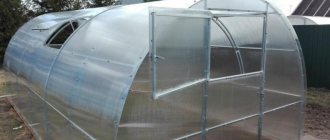
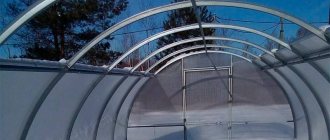
The greenhouse lid opens easily and conveniently Source veda-com.ru
In addition to the fact that greenhouses with sliding lids are not only convenient to use, they create comfortable and favorable conditions for the growth of crops:
- Plants in such a greenhouse are protected from overheating due to the ability to ventilate the room.
- An open greenhouse lid allows the sun to dry the air in the greenhouse. The fact is that at high humidity, late blight often appears in closed greenhouses.
- The sliding lid allows pollinators to enter the greenhouse .
- Rainwater is most beneficial for plants.
- In winter , snow falls inside the greenhouse, where it melts. This enriches the soil with minerals and avoids desalination.
- If you open the lid for the winter, the temperature in the greenhouse will be the same as outside. This will help prevent seeking shelter from the cold from getting inside
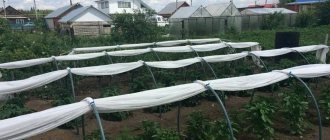
Many gardeners have noticed that crops grow and ripen better in greenhouses that open.
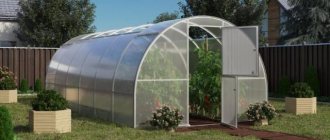
A greenhouse with an opening lid will create comfortable conditions for plants Source tpk-aksai.ru
Operating rules
In order for a pop-up greenhouse to last as long as possible, it must be properly cared for.
- For the winter, fully extend the roof, regardless of the design features of the structure. Check the operation of the sliding parts, lubricate and tighten the hinges, clean the grooves from dirt and dust.
- Place the structure in a well-lit area, as a lack of light negatively affects the development of garden crops.
- Regularly clear the greenhouse of snow, especially wet snow, because its heavy weight can lead to subsidence of the roof and the formation of gaps (tightness failure). At the same time, the ice crust formed during a thaw can also cause deformation of the structure.
- Systematically ventilate the greenhouse even in the cold season, otherwise microorganisms may develop on the roof, which can subsequently cause serious harm to the plants.
- In the fall, carry out general cleaning. To do this, you need to clear the soil of plant debris, dig it up and fertilize it. The walls should be washed with soapy water, paying special attention to the joints and seams of the structure. Chemical solutions cannot be used, as the aggressive substances they contain can damage the finish of the structure.
In conclusion, I would like to note that greenhouses with a folding top are extremely convenient and easy to use. The main thing is to adhere to the above operating rules, and then the greenhouse will properly serve its owner for many years.
Greenhouse with opening lid “Botanist”
The frame of such a greenhouse consists of strong, solidly bent arches with a cross-section of 40x20 mm. The stiffening ribs bear the main load and are fastened with metal strips. The entire system of arches and struts is coated with an anti-corrosion compound. In addition, the metal tubes are galvanized inside and outside using the “hot” method. Therefore, we can say that the greenhouse is relevant in almost any region of our country. The sheathing is durable and thick polycarbonate, which can easily withstand heavy rains and light snowfalls.
The Botanik greenhouse can be used in any part of Russia Source huvybo.trybahen.ru.net
An important advantage of such a greenhouse is simple and quick assembly. The structure is designed in such a way that it can be erected within just a few hours. The frame elements are supported by bolted connections. The kit also includes lugs.
In general, the greenhouse is designed to be installed directly on the ground. In theory, it does not require the use of a foundation. However, some gardeners believe that it is better to build a wooden box for such a greenhouse.
An important feature of this greenhouse is the “Crab” strut system, which allows you to evenly distribute all external loads. The meaning of this innovation lies in the special fastening of the connecting strip to the arc, thanks to which the polycarbonate fits closely to the frame at all points.
See also: Catalog of popular plots in the Moscow region for the construction of a country house
Forms
There are four main forms of the buildings we are considering.
- Arched . The frame is made in the form of a semicircle, which contributes to the uniform distribution of moisture inside the structure and the flow of condensate along the walls of the greenhouse. For ease of use, such structures are divided into segments connected to each other at the top.
- Triangular . The greenhouse is covered with a gable roof, externally forming a triangular shape. Moreover, each of the planes can open independently of the other.
- Flat. The configuration of the building resembles a greenhouse with a pitched roof that can be opened and closed. But it is worth considering that if the angle of its inclination is insufficient, precipitation will constantly accumulate on the greenhouse.
OLYMPUS DIGITAL CAMERA
- Dome. The structure is assembled from several triangular elements sheathed with special material. The roof in such greenhouses can be opened either entirely or partially.
Making a greenhouse with an opening roof with your own hands allows you to not only save a lot of money, but also choose the most convenient construction option using an individual project. However, in order for a self-made structure to be as useful as possible, you need to choose the right optimal dimensions.
Greenhouse with sliding lid “Tulip”
There are models on sale with different coating options: glass, polyethylene, polycarbonate. The frame can also be made of plastic, wood or metal. All models are equipped with opening or sliding windows. The cover can be removable or sliding.
The “Tulip” greenhouse is designed in such a way that when the lid is open in winter, a fairly large amount of snow gets inside, and this helps protect the soil from freezing and preserve soil microflora favorable for plants.
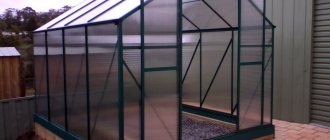
This is what a greenhouse with an opening “Tulip” lid looks like Source novosibirsk.tiu.ru
It has been noted that with careful and careful handling, the service life of a greenhouse can be more than ten years.
The Tulip greenhouse is available in different lengths: 4, 6, 8 and 10 m. The width and height are standard and are 3 and 2.1 m, respectively. Thus, even if you have very little space on your site, a small 3x4 m structure will still suit you. In this case, you can choose a greenhouse with a sliding lid rather than windows that open outward, which will make it possible to place the greenhouse close to the beds. There is a door with a window at both ends.
Now a little about materials. Most greenhouses of this model are made of galvanized pipe with a cross-section of 20x40 mm. Welded structures. Collapsible options have 20 mm thinner pipes than stationary ones. If we talk about the polycarbonate coating, its thickness is approximately 5 mm. The greenhouse can also be covered with a film with a density of 65 g/cm3. The manufacturer guarantees that all materials are resistant to ultraviolet rays and are not destroyed by their exposure.
The manufacturer also offers a “Tulip” greenhouse with opening sides and top. This design is made only from galvanized pipe.
Greenhouse “Tulip” with opening sides and top Source fermerslife.ru
Now about the configuration of a prefabricated greenhouse with an opening roof “Tulip”. The kit includes everything you need to assemble the greenhouse frame: screws, bolts, hardware, stiffeners, spacers, lugs. The kit also includes special guides that are necessary to hold the shutters open. The problem is that if you choose this model, you will have to buy the casing separately.
The foundation is not a mandatory component of the Tulip greenhouse, however, for better stability and a more even distribution of loads, the manufacturer recommends constructing it. In this case, the base can be of three options: strip, monolithic, timber. If you still decide to install the structure directly on the ground, then the lugs that are included in the frame kit will help you.
Assembling the ends of the “Nurse-Umnitsa” greenhouse
The process of assembling the “Clever Nurse” begins with the ends, also called gables. Let's present this stage in the form of step-by-step instructions.
General view of the greenhouse frame
Step 1. Unpack the frame parts shown in the table.
A set of parts and materials for assembling the “Nurse-Umnitsa” greenhouse
Table. List of parts for one end of the “Nurse-Umnitsa” greenhouse.
| Name, photo | Quantity |
| Doorway | 1 PC. |
| Upper end bow | 1 PC. |
| Left end bow | 1 PC. |
| Right end bow | 1 PC. |
| Upper horizontal struts | 2 pcs. |
| Horizontal lower struts | 2 pcs. |
Step 2. Mount horizontal spacers on both sides of the doorway. Do not confuse them with each other - the upper ones are 11 cm longer than the lower ones.
Doorway with spacers installed
Step 3. Place the top arch on top of the doorway. Check that this part of the greenhouse arch is mounted level, without tilting to the left or right.
Installation of the upper arc
Step 4. Fix the upper end arch and horizontal struts with the doorway using M6x30 bolts and nuts with washers inserted into the corresponding holes in the above frame parts.
Important! The use of a screwdriver with special attachments for the nut will help to significantly speed up the pace of assembling the frame.
Using a screwdriver to assemble the frame
Connection point of frame elements
Step 5. Install the left and right side bars. Connect them to the horizontal struts using bolts and nuts, and to the upper arch using a T-shaped connector with the expectation of subsequent connection of the ties between the arches of the greenhouse.
Installing the side bar
Step 6. Check to see if any parts were forgotten when assembling the end and how secure all connections are.
Assembled end
Step 7. Unpack the sheet of cellular polycarbonate, remove the protective film and cut off the half needed to cover the end of the greenhouse.
Removing protective film from polycarbonate
Step 8. Seal the unprotected edges of the cellular polycarbonate sheet with sealing tape.
The edges are sealed with sealing tape
Step 9. Place the assembled end on a flat surface and attach the SPK to it, the layer with the stabilizing coating should “look” outward.
The end is installed on a flat surface
Polycarbonate is applied to the end
Step 10. Fasten the cellular polycarbonate to the frame using 5.5x19 mm roofing screws. When screwing them in, be careful not to overtighten the fasteners and damage the cellular polycarbonate itself.
Polycarbonate is attached with a self-tapping screw
Fastening cellular polycarbonate
Step 11: Use a utility knife to cut off the excess honeycomb polycarbonate. While doing this, attach the finished template or roof arc to the top of the end, as shown in one of the images below.
Trimming excess material
The arc is applied to the end
Step 12. The first end for the greenhouse is ready, repeat all the previous steps, making the second copy.
The finished end of the “Nurse-Clever” greenhouse should look something like this
Useful tips for installing a greenhouse
The yield that you can get from a greenhouse without a roof depends on many factors, for example, on its location. Therefore, it is worth paying great attention to the installation of the structure.
It is important to correctly position the opening greenhouse on the site Source homeli.ru
Here are the basic principles for installing a greenhouse:
- The area where the greenhouse is located should be sunny and not subject to drafts , then the room will quickly warm up.
- You should not place the greenhouse next to trees , because leaves and fruits will fall from them, and the crown will block the sun .
- Before installation, you need to level the site so that the greenhouse does not skew. It is better if the soil is hard .
- It is more rational to locate the greenhouse near the harvest storage areas and close to the water supply .
- You should not place the greenhouse right next to the garden bed , because then you will have no access and no room to work.
Foundation for a greenhouse
It is important to understand that it is not enough to buy the greenhouse itself - you need to build a foundation for it on your summer cottage. This will be a kind of support, as well as thermal insulation, which will prevent the soil inside the greenhouse from freezing too much during unexpected frosts. Also, using the foundation, you can build a cushion of organic remains, which, when decomposing, will also release heat and additionally warm the greenhouse from the inside.
On a note! In theory, due to the low weight of polycarbonate greenhouses, there is no need to make a foundation. But still, according to all the rules, it should be.
Non-buried timber foundation
You can make a foundation from timber or concrete, brick, stone, etc. In short, those materials that have sufficient weight and can hold their shape are suitable. The easiest way to make a foundation is this: mark the soil around the perimeter of the greenhouse structure, dig a small trench, pour a sand cushion into it and lay timber or brick on it. You can also fill it with concrete. The remaining depth of the trench can be filled with gravel or soil. The greenhouse itself should be secured above the foundation using long reinforcing pins dug into the ground.
Arranging the foundation also allows you to securely fix the greenhouse itself in one place. In this case, he will not be afraid even of the winds, which will not be able to tear him from his place. But it is important to understand that in fact the foundation is needed more for arranging thermal insulation.
Foundation arrangement
Prices for timber
timber
How much does a greenhouse with an opening roof cost?
One of the most budget-friendly options for a sliding greenhouse is “Marusya”. The frame is made of galvanized pipe 25x25 mm, its standard pitch is 1-0.5 m. The Marusya greenhouse can be installed either on a foundation or without a foundation. Please note that its length along the center line should be 2.07 / 4.11 / 6.15 / 8.19 / 10.23 meters, in accordance with the length of the greenhouse, and its width should be 2, 2.5 or 3 meters.
The Marusya greenhouse is well adapted to the Russian winter Source poradum.com.ua
A two-meter version of “Marusya” with an arc pitch of 70 cm will cost 12,000 rubles. A four-meter one will cost 16,900 rubles, and a ten-meter one will cost as much as 35,000. Moreover, many companies and trading platforms offer their assembly services. This option in the Moscow region costs approximately 6,000 - 10,000 rubles, depending on the length.
A 3x4 m "Tulip" greenhouse will cost approximately 13,500 rubles, and the same model 6 m long will cost 17,500 - 18,500 rubles. The same greenhouse with an opening top 10 m long costs about 46,000 rubles. The price is indicated taking into account the cost of polycarbonate.
“Botanik” costs even more. Such a 3x2 greenhouse with a glass coating and an aluminum frame will cost 60,000 rubles. If you increase the length by another 2 m, the price will be approximately 74,000 in Russian currency. The ten-meter “Botanist” costs about 136,000 rubles. Such high prices are associated with two features of this model: firstly, the manufacture of glass cladding is quite expensive and time-consuming, and, secondly, the frame itself has a rather complex design.
The “botanist” greenhouse is a high-quality, but expensive option Source rusremontstroy.ru
Coating material
Various building materials are used to cover greenhouses with retractable roofs.
Polyethylene
Polyethylene film is very popular among gardeners. There are many reasons for this, but the most significant are:
- high strength;
- low cost;
- long service life (up to 6 years);
- high light transmittance.
Depending on the technical characteristics, the material can be:
- ordinary;
- warm;
- sun-resistant;
- reinforced.
In order not to damage the film when covering the greenhouse, it is necessary to control the degree of tension of the material, and cover the sharp corners of the frame with special protection.
Cellular polycarbonate
Distinctive features of polycarbonate:
- high strength;
- heat preservation;
- cellular structure;
- multi-layering.
Rigid ribs located between layers of cellular polycarbonate transmit sunlight in different directions, scattering them at the required angle.
Today, many manufacturers produce polycarbonate that prevents the penetration of ultraviolet radiation, has high impact resistance and is resistant to mechanical damage.
It should be noted that sheets of such material bend easily, so structures of any shape can be sheathed with it.
Awning
Among the types of non-woven fabric for cladding greenhouse structures, the most commonly used are:
- agril;
- lutrasil;
- thermoselect.
Despite its obvious versatility, the awning does not reflect the light spectrum well, so the structures covered with it retain heat well only during the daytime, while at night the plants can become overcooled. Thus, it is impossible to use greenhouses with an awning for growing early seedlings - such a greenhouse will not save you from frost.
Glass
The most expensive material for cladding greenhouses. Structures of this type require the construction of a solid foundation and reinforced frame, but they are environmentally friendly and create excellent microclimatic conditions for growing crops.
Moreover, glass is resistant to heat, low temperatures, and can also withstand the weight of precipitation. At the same time, the material is quite fragile, so it should be installed with extreme caution.
Sliding greenhouse: what to make the base of the structure from
To create the frame of the greenhouse, you can use different materials - steel or aluminum profiles, wooden beams, metal-plastic curved pipes.
We recommend reading: Roofing sealant for metal: types, instructions for use
To build a high-quality and durable greenhouse with a sliding roof, they mainly use a rectangular steel profile of different diameters. Today you can purchase ready-made structures with polycarbonate covering material. Greenhouses come in different widths and lengths, and their heights also vary.
Greenhouses made of wood are also very popular, in the manufacture of which both timber and window frames are used.
Residents of Soviet-era apartment buildings, when replacing wooden windows with metal-plastic structures, are wondering what to do with the old frames. Many owners of dachas or country cottages manage to adapt them as greenhouses for growing early vegetables and herbs. The covering material can be glass or a thick film that will protect from wind and precipitation.
Making a greenhouse from frames is quite simple - the frame is assembled from entire wooden frames into a single box, fastened together with self-tapping screws or bolts. The greenhouse can be rectangular or square. After installing the walls, you can attach the roof - most likely a gable roof. The cost of manufacturing a greenhouse is much lower than purchasing a polycarbonate “Oasis” or “Botanik”.
For compact greenhouses, a frame made of metal-plastic pipe is also suitable. It bends easily, so the structure can be given absolutely any shape - arched or gable. Such a greenhouse is covered mainly with dense polyethylene film.
The choice of frame and covering material depends on how long the greenhouse will be assembled, whether it will be stationary or portable, and what size the structure will be. A greenhouse with a retractable roof can be purchased at a store or built with your own hands.
Types of greenhouses
Rectangular greenhouses can have a roof of various shapes - it can be arched, lean-to and gable. A large number of greenhouse models have a curved top design, so it is relatively easy to make by bending the frame parts, while reducing the number of welded elements. However, this scheme has several disadvantages compared to single- and double-slope frames:
- Difficult ventilation;
- Reducing the landing area;
- Reduced roof strength.
The arched structure is usually quite wide and has difficulties with ventilation, which consists in the impossibility of installing ventilation windows on curved roof surfaces. All this makes it difficult for air circulation inside the greenhouse, then a gable roof with a rectangular shape can be equipped with an opening window or a sliding roof.
Unlike structures with an arched top, the frame of a greenhouse with a polycarbonate house roof has rectangular sections, which provide a larger planting area due to the fact that the smaller angle of the roof allows for an increase in the number of plants at the edges. At the same time, the height of both structures remains the same.
As for the strength of the structure, an arched greenhouse, due to its curvature, is able to withstand less weight of snow that accumulates on the roof in winter than rectangular greenhouses with a flat roof, from which the snow can roll off on its own if the angle is large enough.
In addition, a correctly chosen angle of inclination of the roof will reduce the negative impact of gusts of wind on the greenhouse with a polycarbonate house.
Roof repair
This place is the most vulnerable in the entire structure, being under direct influence of ultraviolet radiation and physical factors. Therefore, it requires special attention during periodic maintenance inspections and operation. Pay attention to the following factors:
- On metal frames - on the condition of the material. Damage on it manifests itself in the form of rust. They are opened and processed mechanically or chemically to pure metal. After this, the part is primed and painted again.
- On wooden frames - for cracks and rot. If the damage is deep, the part or part of it is cut out and replaced. To eliminate leaks in the roof, remove the glass, clean the surface, apply silicone sealant and put the glass back.
- A characteristic defect on a polycarbonate coating is the penetration of moisture and dust into the internal channels. As a result, the translucency of the structure decreases. This sheet is removed from the frame, then the channels are blown out with compressed air. If necessary, they are washed with soapy water. The cleaned sheet is dried and the ends are sealed with adhesive tape.
To protect polycarbonate from dust and moisture, its ends are sealed with special tape.
If mechanical damage is found on the outside of the coating, it is better to replace the material. The minimum service life of polycarbonate is about 8–10 years, and earlier failure indicates poor quality of the material or an installation error. Local damage to the polycarbonate coating is repaired in three ways:
- Using adhesive tape or electrical tape: degrease the surface and stick the tape, heat the edges with a hairdryer to improve the adhesion of the material.
- Liquid nails are used to seal small through holes or close openings at the end.
- Using rubber glue, apply a patch of thick film or polycarbonate trim to extensive damage in the coating.
When using plastic for the frame, there is no need to talk about repairs: the material is very strong and durable. Over time (after 10 years or more) it becomes fragile. In this case, a complete replacement of the frame is performed.
Damage and tears in the plastic film are repaired with tape to maintain the greenhouse until the end of the season. Annual replacement of such a shelter is inevitable. A frame that has sunk under the snow indicates errors in its development, including the wrong choice of material. It is better to revise the project taking into account the errors and make a new design.
Video: polycarbonate roof repair
Installing polycarbonate as a roof
How to make a removable roof with your own hands from polycarbonate:
- A metal profile is prepared, which serves as a support for the installation of the roof. Polycarbonate is a durable and relatively heavy material, so the profile should not bend.
- Polycarbonate is fixed to the profiles with screws.
- The last step is to coat the screws with bitumen.
In order for the roof to be removable, the sheets are secured with removable screws. They can simply be unscrewed and removed so that the plants are exposed to the open sun. There is also another, but more complex option. How to make a retractable roof on a greenhouse yourself? Here you will need a mechanism that will correspond to the design of the entire building. A sliding system is purchased in a specialized store and installed on special elements.
Depending on the size of the greenhouse, the sizes of polycarbonate sheets are selected. It is not recommended to settle on a size larger than two meters.
It is important to remove gaps and cracks, since they can negate all work, and the microclimate in the greenhouse will be disrupted, as well as the temperature regime in particular.
To install a retractable roof, it is better to find several helpers. It’s much easier for three people to do the work than alone. How to attach a polycarbonate greenhouse roof? Additional items and tools: screws, screwdriver.
Polycarbonate for a sliding roof can be mounted on both a wooden and metal greenhouse.
All work is divided into the following stages:
- profile preparation;
- installation;
- fastening materials;
- fastening materials to the frame;
- waterproofing.
It’s not difficult to figure out how to make a roof for a wooden greenhouse from this material. Fastening to wood is even easier than to metal. In this case, the width of the beams should not be less than 5 centimeters, otherwise the strength will be at risk.
How to check the strength of a greenhouse, or rather its roof? To do this, you need to try to lean on the top crossbar, if there is one. The method is relevant for large greenhouses more than five meters long. If the crossbar can withstand the weight of an average man, the strength is at a high level.
If the wooden frame is not too strong, then polycarbonate is not used. It is better to choose metal for this type of material.
Fastening of polycarbonate sheets must be done before installing them - on the ground. The elements are secured to each other with self-tapping screws coated with bitumen. If this is not done, moisture will get into the cracks at the first rain, the screws will begin to rust, and the structure will rot if it is made of wood. Bitumen prevents such consequences.
How to make a retractable roof on a greenhouse? You will also need to purchase sliding elements. This roof option cannot be installed on a wooden frame - only on a metal one. The actions are similar to the sliding type.