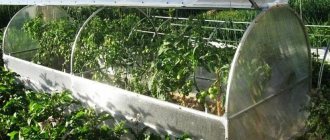
Installing a greenhouse allows you to plant seedlings or grown plants much earlier than the weather allows.
Proper use of manure and its derivatives greatly increases the efficiency of the greenhouse, which accelerates plant growth, and the harvest can be harvested several weeks or even months earlier.
However, improper use of manure or droppings can completely destroy young growth and also make the land infertile for several years.
From this article you will learn:
- how manure can be used in greenhouses;
- how to make warm beds with your own hands;
- how to properly put manure in them, including cow, horse, etc., and how to “ignite” it;
- what to do with rotted manure from greenhouses and greenhouses.
Construction and maintenance of greenhouses
Greenhouses are a necessary accessory for rational gardening; they give you a means to artificially improve the climate, and with their help we have the opportunity: to breed plants characteristic of greenhouse countries; drive out ordinary vegetable plants earlier than in open ground and add a month or two to our short summer by sowing seeds of such plants in a greenhouse that will subsequently be planted in open ground and without such an increase in time would not have reached the required degree of development, for example, some varieties onions, cabbage, artichokes, etc. With a relatively small cost for the construction and maintenance of greenhouses, they represent significant benefits compared to vegetable and hothouse greenhouses, the construction, maintenance and heating of which are not very cheap.
The overall design of the greenhouse has remained virtually unchanged, and its traditional forms are still found. Typically, a greenhouse is an elongated rectangular formwork, one edge of which is higher than the other, and the shape of the slightly inclined walls allows it to support glazed or film-covered frames. There are double or composite greenhouse designs, with a gable top and glazed walls, as well as a variety of opening methods.
Light metal and film greenhouses can be easily moved around the site and installed in the desired position on single beds. Stationary greenhouses of traditional shape are placed on a foundation made of brick or wood.
Greenhouses can be placed along the walls of partially lined greenhouses, thereby utilizing some of the heat used to heat the greenhouse.
The simplest greenhouse is a glazed or film-covered frame placed over a shallow pit. Potted plants are hardened in it.
Stages of preparing a greenhouse for the next season
The preparation of the greenhouse must be carried out in stages. There is a certain list of work that must be completed. Step-by-step preparation must be carried out in the fall. In this case, all that remains is to plant new plants in the spring.
Greenhouse cleaning
Preparing a greenhouse for winter in the fall for the next season always begins with collecting plant debris. All crops that have already finished bearing fruit must be removed along with their roots. It is recommended to dig up the roots with a pitchfork or shovel so that nothing remains in the ground. All this must be done immediately after harvesting.
If tomatoes or cucumbers were tied to trellises, all pegs should be removed and the ropes should be cut. They may contain spores of pathogenic microorganisms. Ropes or twines should be taken off site and burned. The pegs can be put aside and subsequently disinfected.
Nothing should be left in the greenhouse. All rotten fruits, dried stems, leaves, weeds, and mulch residues must be placed in bags and removed. It is worth paying attention to the junctions between the side walls and the soil, between the plastic sides separating the beds. There may also be plant debris that needs to be removed.
The importance of soil in the places where the greenhouse is located
A necessary condition regarding the place where the greenhouse is located is that it is dry. Groundwater or rainwater flowing to the bottom of the greenhouse completely destroys the warmth of the manure, the greenhouses get cold, and the plants suffer from the cold, and sometimes die completely. Therefore, it is highly advisable to choose an area for constructing a greenhouse that is somewhat elevated, dry, on sandy soil that allows water to pass through. Greenhouses can also be built on clay soil, taking known precautions against flooding with water, namely, if you form a small slope in all directions from the greenhouse and, if necessary, lay drainage at the bottom of the depression; finally, it is possible to deepen greenhouses less or not at all into the soil in damp places. In this case, the walls extending above the soil surface should consist of stronger log frames to maintain heat in the greenhouse; For the same purpose, an earthen embankment should be made around the greenhouse.
In dry places, it is more profitable to deepen the greenhouse so that its walls extend only a few centimeters above the surface of the earth; such greenhouses are always warmer and cheaper, since in this case it is enough to build walls from thick boards attached to posts buried in the ground. Greenhouse walls consisting of brickwork, used in places in Western Europe, are inconvenient; as they are destroyed by our frost.
Making a plan
First, you need to highlight the main issues that are worth studying before acquiring a greenhouse.
- It is imperative to understand why greenhouses are needed : what processes are typical for growing crops in closed ground, what the greenhouse effect is, and what role the soil in the greenhouse plays in the life of the plant. This is important in order to have an idea of the work of caring for plants in a greenhouse.
To choose a good greenhouse, you need to have an idea of the processes occurring in it Source yard.hozvo.ru
- You definitely need to know what the main parts a greenhouse consists of and how to maintain its functionality.
- It is worth studying the various designs of greenhouses in order to know how they are designed and what they consist of.
- As a result, we will try to find out whether it is possible to create a unique and efficient greenhouse from scrap materials .
Following this plan, you will be able to fully consider such an important issue for any owner as the construction of a greenhouse.
Greenhouse depth
Depending on the crop being grown, which can be early or late, and on the properties of the plants, which are more or less sensitive to heat, greenhouses are given different depths. Thus, depending on the thickness of the manure layer and its warmth, greenhouses of three different degrees are obtained:
- greenhouses 1 m deep for early forcing of vegetables in general and for beans, cucumbers, melons and watermelons in particular;
- greenhouses with an average depth of 70 cm and warmth sufficient for late cultivation of the same plants, especially for lettuce, spinach, carrots, peas, cauliflower and other cabbages;
- cold greenhouses 40 cm deep for planting cabbage, onions, leeks, lettuce, celery and other crops in open ground.
Naturally, the manure layer, as the main source of heat, even when growing the same plant, should be thicker the earlier in the calendar the greenhouse is filled, and the more it is subject to cooling as a result; and vice versa, the thinner the layer of manure, the later the greenhouse is filled, and the more solar heating can be counted on.
DIY pipe greenhouse
Here are a few more greenhouses welded by our users using the same principle.
Breadbox made by our user named drongo. It is installed on pieces of pump-compressor pipe driven into the ground, to which a 100x100 platform is welded.
Here is a greenhouse-breadbox created by FORUMHOUSE user with the nickname enycha:
This bread box is perfect for borage, although this design can also be used for large outbuildings. So, our user with the nickname man made a cover for a pool similar to a breadbox.
The shelter protects against insects, and most importantly, a microclimate is created inside it, which allows you to swim even at +20 degrees.
Economical use of greenhouse space
In greenhouses, each square meter costs several times more than in open ground, and therefore it is very important to use the greenhouse space as economically as possible.
Some plants, such as pumpkin plants, especially watermelons, require a huge amount of space, but do not quickly take it up. While the place is still free, other crops are grown near such plants, which soon reach sufficient ripeness for consumption; such as a salad. The lettuce is sown or planted twice or three times thicker than required in normal culture, and then gradually selected two-thirds in the form of leafy lettuce. Thus, as a by-product, we get fresh dill, parsley, watercress, spinach, radishes, etc. Radishes, however, fit comfortably between cauliflower and carrots, which develop slowly and require less heat. First of all, the watercress is removed, which ripens within one or two weeks and can therefore then give way to a neighboring plant. The same greenhouse can be used for several harvests of early-ripening vegetables such as radishes and spinach, which ripen in 4-6 weeks.
In greenhouses - glazed or film-covered longitudinal boxes - early vegetables (onions, lettuce, cucumbers), seedlings of early cabbage and cauliflower, tomatoes and other crops are grown. This becomes possible thanks to the use of biofuels.
Manure, various rotting garbage, sunflower husks and other plant residues are used as biofuels. Cow and pig manure is pre-mixed with peat chips or sawdust.
When overheated, biofuel releases heat, the temperature of which reaches +70° C, and heats the soil from below. Biofuel lasts 2 - 3 months. It is usually prepared in the fall.
The location for the greenhouse on the site is chosen in such a way that it is protected on the north side by some kind of cover about 2 m high, for example, a barn wall, a blank fence, a dense green hedge, and on the east side by a cover about 1.5 m high. The length of greenhouses is usually located from west to east, so that they are always exposed to the rays of the sun.
What to do with burnt excrement?
The process of active decay lasts 1–3 months .
Moreover, the temperature remains consistently high only for the first month, then gradually decreases, and after the end of the process it drops to the temperature of the surrounding soil.
However, for another 9–12 months when treated with bacteria-based products, or 12–18 months without such treatment, bacteria will convert the excrement into humus.
The next season, ready or almost ready fertilizer from the trench . If bacterial preparations were not used, then the extracted rotted manure must be left in the fresh air so that it completely rots, after which it can be used as one of the components of a fertile soil mixture.
Thinning, weeding and cleaning greenhouses in the fall
Any sowing in greenhouses is done somewhat thicker than the plants can stand later; Plants that have sprouted too densely must be thinned out to normal. Weeds also appear in greenhouses with particular force and must be destroyed immediately, otherwise they will outgrow and completely choke out the cultivated plants. Most of all, annual weeds, such as quinoa and woodlice, end up in greenhouses.
At the end of the summer crops, the greenhouses are cleared of soil and manure. Whoever does not complete this work in the fall will encounter great difficulties in removing frozen soil and manure before filling the greenhouses in the spring. The earth is piled up and covered with leaves or manure so that in the spring it can be used in a dry and thawed form. Only a certain amount of humus is left in reserve; the rest is taken out as fertilizer to the garden beds.
Gardeners believe that greenhouse humus has lost its potency and rarely use it for cabbage, preferring to import fresh fertilizer. Probably, most of the nitrogen in humus is lost through volatilization, and the heating ability is also lost, but mineral fertilizers are preserved in it intact and intact. Greenhouse humus is an excellent tool for fertilizing berry bushes and fruit trees; it is also good for vegetables in warmer soil. In general, humus is a strong and excellent fertilizer for any soil.
Greenhouse frames are removed under the canopy and damage repaired in winter. Winter is also the best time to prepare, treat and paint new frames.
Filling greenhouses with manure
A greenhouse is filled to heat the greenhouse. Only fresh horse manure mixed with more or less bedding straw or hay is suitable for this. If there is a shortage of manure, you can mix it with old straw, hay or tree leaves collected for this purpose in the fall. The leaves provide a small but rather long-lasting warmth.
All materials prepared for reserve are spread in thin layers on the surface of the earth and thoroughly compacted so that the manure does not undergo premature heating and burnout. About two weeks before stuffing the greenhouse, the manure must be spread loosely and allowed to burn evenly; Only heated manure should be used for packing, otherwise the heat in the greenhouse will develop very unevenly, and settling will also occur unevenly. Moreover, heating of manure occurs much faster and easier in a large pile than if it is distributed in small quantities throughout the greenhouse.
To set the manure on fire, proceed as follows: dump the manure into a heap and place frozen and thawed cold manure around it, and try to mix the straw manure with the non-straw manure as evenly as possible. Properly stored compacted manure usually warms up quickly if it is transferred more loosely.
After a week, the entire pile is heated and suitable for filling greenhouses. However, it sometimes happens, especially during severe frosts, that heating occurs slowly and only in places; then you can speed up the combustion process by pouring several buckets of hot water inside the cold heaps, and if the manure is very damp, then it is better to bury hot stones in it; but most of all, a new layer with warm manure contributes to heating. In warm weather, the opposite phenomenon often occurs: the manure heats up on its own prematurely, and then it is necessary to compact it so that it does not completely burn out before the time of use.
The manure is stuffed into the greenhouse in such a way that the more or less hot parts are mixed with the cold ones, and the straw manure and the non-straw manure form a uniform mass. To fill, you need to stand at the bottom of a greenhouse cleared of snow, starting work from one end, and loosely fill the greenhouse with manure to the other end, always leaving a slope in front of you, on which the manure is shaken, pressed down with a fork, but without stepping on it with your feet. Loose manure is more likely to heat up when exposed to air than densely packed manure.
After a few days, the manure becomes very hot and settles; then it is lightly trampled down, the unevenness is leveled out and a layer of humus from old greenhouses, if any, 5-10 cm thick is placed on the surface of the manure. Some gardeners do not use such a humus layer, dumping the soil directly on the hot manure; but it is considered better to use humus so that the roots of the plants do not come into direct contact with the manure. After compacting and adding humus, close the greenhouse again and allow it to recover from cooling, which will take 2-3 days.
Not all gardeners consider it necessary to put a layer of humus on the manure. Usually by then. when the roots reach the manure, the top layer has already cooled, and there may be no danger of burning the roots. Meanwhile, a layer of humus 10 cm thick will significantly delay the access of air into the thickness of the manure.
What does a greenhouse consist of?
There are a huge variety of greenhouses and greenhouses, with very different designs and made of different materials. Therefore, it is worth considering in order the options for the structural units of such a structure.
Coating
The light-transmitting coating is the main part of any greenhouse, on which the effectiveness of the device largely depends. This article has already talked about polycarbonate. Another option for hard coating is glass. It is more durable, but retains heat worse. By the way, polycarbonate is very susceptible to ultraviolet rays, so it is always covered on one side with a protective film, which is important to preserve during operation. But still, the probability of damage to the PC coating of the greenhouse is quite high: the protective layer can be pierced even by soil particles raised by the wind. Places of film damage can be found by cracks and opacities.
Polycarbonate greenhouses need more careful and careful care Source kroystroy.ru
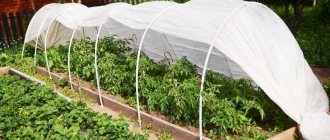
One of the cheapest and most accessible options for covering material for a greenhouse is film. Typically, a fabric with a thickness of 120 to 60 microns is used. The film can be made of polyethylene, ethylene vinyl acetate, polyvinyl chloride or polyisopropylene. They are often available in the form of non-woven fabric. Here is a brief description of the various films:
- PE has a low price . At the same time, it transmits little light and does not protect well from ultraviolet radiation and does not reflect infrared rays well. This coating does not protect against frost. The service life of polyethylene is most often 1 year.
- PVC costs a little more than polyethylene. At the same time, it is characterized by normal optics and thermal engineering. It can protect plants from light frosts, but is afraid of ultraviolet radiation, which is why it cracks and becomes cloudy. Service life - from 1 to 3 seasons.
- EVA differs in that it is quite resistant to UV , but all other parameters are similar to polyvinyl chloride.
- Despite its milky white color, PP transmits light well , and diffusely, which is why it completely eliminates the possibility of burns to plants. Provides maximum greenhouse effect due to the fact that it reflects IR rays well. Polyisopropylene allows moisture to pass through, so the beds can be watered directly under the film layer. It selectively allows gases to pass through itself, so a PP greenhouse does not require ventilation.
The film is used as a covering material for greenhouses Source yandex.ru
If suddenly a hole appears in the film greenhouse, it can be easily repaired using special agro-adhesive tape.
Soil heating system
Electric heating of soil in greenhouses is becoming increasingly popular. However, it is worth remembering that using electrical equipment without following safety rules very often leads to casualties. In addition, heating small greenhouse spaces using cable is often unprofitable.
This is what a “warm floor” system looks like for a greenhouse Source projject.ru
Another option for heating the soil inside a greenhouse is a small solar collector. This device has an area of 1 sq. m. can ensure the normal functioning of plants on an area of 3 square meters. m. You can build a solar collector yourself, using old thin-walled steel batteries as an energy receiver, and ordinary cast iron “accordions” as a heater.
Pouring soil into greenhouses
As soon as the humus layer warms up, the cover from the greenhouse is removed, leveled, the humus is pressed onto the manure and the first half of the soil is poured with a layer of about 10 cm. If there is thawed soil (which is not difficult to stock up on, covering a pile of soil in the fall), then such soil is preferred to frozen soil, which always cools the greenhouse more. Drier soil also has advantages over damp soil. Manure vapors penetrate the soil and settle in it, causing the soil to become damp, compacted and generally inconvenient for plant nutrition.
This inconvenience is eliminated by ventilating the ground. In clear weather, the frames are removed daily and the earth is turned over, causing vapors and dampness to escape. As soon as the soil turns out to be sufficiently dry and loose, pour in the second half of it, which is dealt with in the same way, until it is completely ready for sowing or planting.
Depending on the circumstances, from the start of filling the greenhouse to its complete readiness, about two weeks pass - this is with early filling; at a later stage - somewhat less. Early stuffing begins in mid-February, and late stuffing begins in mid-March.
However, you can fill the greenhouse at any time, to the extent possible and necessary. But, nevertheless, it is not advisable for those with little experience in greenhouse practice to start packing too early, so as not to struggle with many accidents and difficulties that they are not able to overcome and that will inevitably be encountered during the February packing; Success is more likely if you start the business in mid-March.
A cold greenhouse about 40 cm deep for sowing cabbage intended for planting in the garden is filled no earlier than the end of March and sowing is carried out in mid-April. In the middle zone at this time, you can sow directly in old, uncleaned greenhouses, and in the south - directly in open ground. It is clear that all these dates are only approximate. You cannot indicate the same dates for the south, middle zone and north.
To grow the best plants, such as melons, watermelons, cauliflower and beans, turf soil is used, that is, rotted turf layers removed the year before from fertile black earth meadows and processed and decomposed in heaps.
During early forcing, a quarter of leaf humus, i.e., decomposed leaves, and some river sand are mixed into the turf soil, if the turf chernozem is too clayey and does not dry out or crumble. In the absence of deciduous soil, you can add some old greenhouse loose soil.
When planting greenhouses late, such caution is not necessary. Under the influence of a sufficient amount of light and air, plants always turn out to be more fertile on heavy soil than on light soil. For ordinary vegetable plants, such as radishes, lettuce and spinach, the same soil can serve several times; but for the above-mentioned plants it is better to use fresh turf soil annually; the same for potatoes and carrots, which require light humus soil.
When old soil is removed from greenhouses, a certain amount of humus always gets into it, so it produces an abundance of foliage and few fruits; therefore, it is suitable for deciduous plants, but not for fruiting plants. If there is a lack of fresh turf soil, you can mix a certain amount of loamy or clay field soil with the old greenhouse soil and, thus, improve it for use for fruit plants.
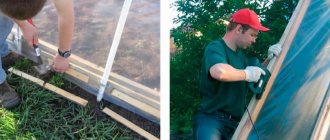
How to make arcs for a greenhouse
Arcs, the main component of the greenhouse frame, can be purchased at any hardware store. Many people do this, but not everyone is satisfied with the finished products. And it’s simple - it’s a pity to spend money on something you can do with your own hands.
The arcs for the greenhouse-breadbox can be bent yourself from a metal profile.
A member of our portal with the nickname enycha made a bending machine specifically to build a greenhouse. It took him one day to make the unit.
EnychaFORUMHOUSE Member
The machine was made for a specific task: to make a couple of such greenhouses. Accordingly, the pipe is only one size - 20x20 mm. The amount of health required for bending is inversely proportional to the bending radius. The smaller the radius, the more health required. It is necessary to bend in several passes; An attempt to bend immediately with a minimum radius leads to bends in the pipe.
The article on the forumhouse describes in detail how to make pipe benders of varying complexity with your own hands: from very simple to almost professional.
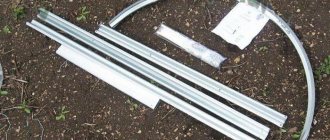
For simpler greenhouse designs, you can:
— Buy very inexpensive duralumin tubes with a diameter of 10 mm, 2 or 3 m long at a home and garden store and bend them to the desired radius.
- From a 2 meter long tube you can bend an arc into half a circle with a radius of 635 mm (for a bed 127 cm wide.
- From a tube 3 meters wide, make an arc of half a circle with a radius of 955 mm, cover a bed 1910 mm wide.
- Bend the pipe into an ellipse and get a higher and narrower arc.
— Make arcs from 10mm wire (sold in rings, diameter 3.5 m, very inexpensive).
OPrizFORUMHOUSE Member
I cut it in half with a grinder, and the arcs are ready. I pull the ropes well along the top and sides, with a film on top.
— Use metal-plastic pipes from the water supply. They bend easily, do not rust, do not rot, and are always white and clean. The downside is that metal-plastic is not elastic, and if you lean your elbows on the greenhouse, the pipe will remain crooked.
GeobuilderFORUMHOUSE Member
I bought 50 m of HDPE pipe 20 mm (600 RUR) and 18 m of fittings 12 mm (700 RUR), it turned out very cool!
— Use fiberglass reinforcement: lightweight, mobile, convenient.
MokhovichokFORUMHOUSE Member
You pull the reinforcement out of the beds, it straightens and you store it like ordinary poles.
The thickness of the soil layer in the greenhouse
Depending on the size of the roots of plants grown in greenhouses, the layer of soil becomes thicker or thinner. For small leafy vegetable plants, such as radishes, lettuce, spinach, dill, parsley and all kinds of seedlings, a layer of 9-10 cm thick is sufficient; large-growing fruit plants from the pumpkin family require a layer of soil 18-22 cm deep.
Since such a significant earthen embankment retains the heat of the greenhouse too much (i.e., heat hardly penetrates through the ground), then in order to sufficiently heat the air in the room where the plants are located, it is better to make the earthen embankment somewhat thicker only in the middle of the greenhouse, where subsequently planting plants. The thickness of the earthen layer should be reduced to 10-13 cm towards the edges of the greenhouse.
Cauliflower requires soil of even greater depth, but it is applied sequentially, in the form of hilling; The same is done with beans, which can be pre-planted on a thin layer of soil.
And further. It is advisable that the thickness of the earth layer never exceed 13 cm. If plants require a thicker layer, it is necessary to make so-called “windows”, i.e. strips of earth about 9-13 cm wide along the entire length of the greenhouses. You need to make two or three such stripes. Through these strips the air will have free access to the manure.
Distance of plants from greenhouse glass
The closer the plant is to the glass, the better, but touching the glass is very dangerous for the leaves and stems of the plants. In the cold season, they are subject to freezing, and on clear sunny days - to combustion.
When using French or German greenhouses (read more), it is always possible to slightly raise the moving boxes and seal the hole from below with earth or manure. When using a Russian-style greenhouse, one must count on the settling of manure as the plants grow. If tall plants are grown, such as cauliflower, beans and potatoes, then use greenhouses that are somewhat higher and do not fill them too full with manure.
Pumpkin plants creeping on the surface of the ground, if their stems rise too much, can be “hooked,” that is, attached to the ground with wooden hooks. Over time, the settling becomes too great for these plants, as a result of which they move more than desirable away from the light, that is, in this case, from the glass. Anticipating too much settling in greenhouses occupied by plants, you should fill them more fully and densely with manure and thus prevent harm from excessive settling.
Frame greenhouses
The easiest way to make a ground box ( Fig. 1
) with bioheating. Before installing a greenhouse, a site is prepared for it. In the fall, the selected area is covered with manure to prevent the ground from freezing. In the spring, the area on each side is expanded by 40 cm and manure is again laid out in a layer of up to 40 cm. Then a greenhouse box is placed and filled with biofuel with a layer of 50 - 60 cm. The outside of the box is insulated with manure up to the upper edge of the walls.
Rice. 1. General view and side section: 1 - corner peg bar; 2 — greenhouse frame; 3 - plant layer; 4 - manure cushion; 5 - dry leaves
The main dimensions of the box: width - 1.6 m, height of the north side 25 - 30 cm, length depends on the number of frames. Their number is determined based on the need for growing crops, but it is best to have at least six of them.
To tie the frames, round logs with a diameter of 12–14 cm or double thick boards are used. The finished crown consists of a southern and northern parubny ( Fig. 2
). The northern log is raised 12 - 15 cm higher than the southern one to create a slope towards the sun.
Parubni: 1 - southern; 2 - northern
In order to make this greenhouse, you first need to dig a trapezoidal trench with a bottom width of approximately 125 cm, a top width of 150 cm, and a depth of 80 cm. The length of the greenhouse depends on how many frames there are to cover it. Then they prepare a crown, or paruben, a box made of boards without a bottom.
Side section of a single-pitched in-depth greenhouse: 1 - southern log from a sub-frame Ø 14 cm; 2 — greenhouse frame; 3—northern parrot from a stock pot, Ø 12 cm; 4 - biofuel; 5 - nutrient soil
To support the frames on the southern parubny, choose a groove 2.5 - 3 cm deep, 6 cm wide. The size of standard greenhouse frames is 160 × 106 cm. Removable frames must be made carefully so that they fit tightly to the parubny, otherwise it is impossible to retain heat in the greenhouse. All glass joints in frames are carefully sealed with silicone, and the frames themselves are coated with an antiseptic or deep wood primer and painted with oil paint to extend their service life.
Greenhouse with reflective screen
Rotating flat screens are quite easy to use and allow for the fullest use of solar energy. Such screens create additional illumination of the greenhouse with reflected sunlight, thus increasing the temperature in the beds by about 2-3°C. The screen is painted with white water-based paint or whitened with lime. The coloring is repeated as necessary. You can stretch the foil.
Materials for making a greenhouse
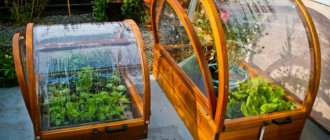
Slate may be needed to strengthen the hole, but this is not necessary. To build the walls, you can use logs, boards or bricks. To make a roof you need a greenhouse or window frame. You can make it yourself from wooden blocks and transparent film.
Advanced craftsmen can insert glass or polycarbonate into the frame. You will need wooden or window hinges to attach the roof to the sides, and putty to seal the cracks.
An optional but useful addition would be a wood preservative and paint for exterior use.
Greenhouses of Europe at the beginning of the 19th century
The greenhouse devices described earlier are Russian. Greenhouses used in France, Belgium and Holland are completely devoid of permanent walls, which are replaced by movable boxes on which the frame is placed.
French greenhouses require more manure, but less wood, than Russian ones. Parisian gardeners fill a lot of greenhouses for forcing vegetables and growing seedlings, and spread the manure directly on the surface of the ground without any depression, to the proper thickness, and place movable boxes on it in two or four frames. These boxes are made of wide boards, fastened edgewise at the corners with wooden triangles or metal corners. If the boxes are made up of four frames, then a partition or at least a cross beam is placed in the middle to prevent sagging and maintain the walls of the box in normal condition.
Typically, boxes are placed in several rows next to each other with small gaps for passage. These passages are also filled with manure (the so-called “overcoat”) to maintain warmth in the greenhouse. In the event of premature cooling of a greenhouse, it is possible to restore heat by pouring hot manure, raking the paths and clearing them of old and cooled manure.
Another convenience of such a greenhouse arrangement is that it is possible to raise boxes and frames as the plants grow, adding earth and bricks; when growing low-growing plants, the frame settles as the manure settles. Thus, the plants are constantly near the glass, which greatly contributes to their development.
In Germany and Scandinavia, another type of greenhouse was often built - both with permanent walls - like the Russians, and with movable boxes - like the French greenhouses. The distance between the walls is made 90-120 cm longer than the length of the frame. As a result, there remains a free strip between the movable drawers and the walls. This strip is not covered with a glass roof, but is simply covered with wooden panels at night, in case of cold weather. The free strip is used for propagating various seedlings for later planting in open ground; such seedlings are less pampered than those raised under glass. Boxes covered with glass frames are used for forcing or breeding various plants that require more warmth.
A greenhouse of such a device is especially convenient for growing large-growing cucumbers, melons and watermelons, which are subsequently released from under the frame; at the same time, the boxes are raised so much that the lashes can freely protrude onto the open strip, which by this time is already cleared of seedlings.
Construction of walls
The sides of the recessed greenhouse are made low - 10–25 cm. On the south side they should be 10–20 cm lower than on the north. This is necessary so that the frame laid on them has a slope from north to south. With this design, water will drain from the roof, and the plants will be better illuminated.
To make the walls, logs with a diameter of 10–16 cm are used. They are laid in one layer around the perimeter of the pit. On the southern side, the log is placed on the edge of the pit, and on the northern side - on a compacted earthen roller 10–15 cm high. Wooden posts are installed at the corners of the pit and in the middle of its long sides, to which the logs are nailed.
The walls can be made from boards 4–5 cm thick. To make the greenhouse warmer, it is better to make them double. To do this, the boards are laid in two layers - horizontally on the inside and vertically on the outside.
To prevent cold air from penetrating into the greenhouse, there should be no gaps in it. To do this, the walls are hemmed from above so that they are even and smooth, and the frame fits snugly against them. The gaps between the boards are sealed with putty. Outside, earth is added to the walls to make the inside even warmer.
Since wood rots from contact with moisture and soil, it is useful to treat all wooden elements with an antiseptic and then coat them with paint for exterior use.
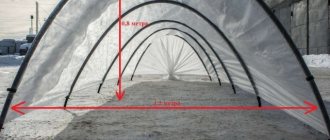
Shelters
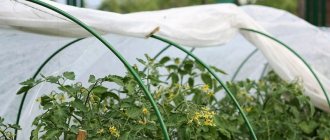
They are made in the form of separate sections, each of which represents a miniature greenhouse, open at the end sides. They are connected during installation. Assembled from sheets of glass with metal components of various designs, they are very bulky. Currently, glass has been replaced by rigid polymer materials. A tunnel-type shelter made from strips of elastic synthetic film is stretched longitudinally onto a frame made of metal arches and is additionally supported on top by arches. The ends of the film are dropped in drops. Ventilate by lifting the film covering on the leeward side.
Traditionally shaped shelters made from sheets of glass held together with clamps are set up like an awning or a house.
Film-coated wire frames form an awning shelter.
Tunnel-type shelters consist of long strips of polyethylene film stretched over metal arcs and held on top by the arcs.