Of course, the seeds of this crop are planted directly in open ground - it’s simpler, easier and more expedient. But this applies specifically to those regions that are suitable for growing such berries - Astrakhan, Volgograd, Rostov, Krasnodar regions. But to grow this crop in more northern regions - in the central zone, Siberia, the Urals, it is better to first grow seedlings at home, and then plant them in open ground (this way you can achieve the ripening of the crop).
Why in a greenhouse?
Melon crops are demanding on soil composition , humidity and air temperature. The deep root system does not tolerate close groundwater and begins to rot. Late frosts, which are not uncommon in regions with cold climates, will leave seedlings no chance of survival.
A rainy summer will not destroy the crop, but will affect the taste . The fruits will be unsweetened and watery. When growing watermelons and melons in greenhouses, the listed problems can be avoided.
Growing seedless varieties
As a result of breeding work, seedless watermelons were developed, characterized by looser and more watery pulp. However, the statement that they have no seeds at all is incorrect. There are bones, but they are very soft and can be eaten.
To grow such watermelons, they purchase seeds obtained by crossing previously pollinated species of watermelons, since the seeds of seedless varieties do not inherit the parental qualities.
Before sowing, the seeds are not soaked due to the presence of air cavities, but are sown in soil heated to +30°C.
Which greenhouse to choose?
The frame and covering material can be anything. Thus, growing melons and watermelon in a polycarbonate greenhouse is increasingly finding its supporters. They also feel comfortable under cheap film.
It is worth paying attention to only a few points.
- the greenhouse must be high. Ideally, at least two meters. Shoots of watermelons and melons, tied to trellises, rise high;
- prevent the penetration of cold air. The structure should not have gaps , cracks, or breaks in the covering material;
- exclude the development of fungal diseases (melons and melons are especially sensitive to them).
In the spring, disinfect the frame and soil in the greenhouse with Bordeaux mixture or copper sulfate solution.
You can find out more about how to build and strengthen a polycarbonate greenhouse, how to make an arched one, a lean-to (wall-mounted) one, from window frames, or choose a ready-made greenhouse, as well as how to correctly position the building on the site.
Hardening
A week before planting the seedlings in the ground, the seedlings begin to harden off. This prepares plants for changes in temperature and humidity.
First, the containers with seedlings are taken out onto the balcony, shaded from the sun's rays. For the first time, seedlings are left in new conditions for 15 minutes and the time is gradually increased.
Immediately before planting, the seedlings should stand outside for a day.
Do we need “neighbors”?
To prevent the greenhouse from standing idle waiting for the right temperature to create melons, you can sow early greens or radishes in it. Precursors will not harm watermelons and melons. Melons will develop well next to drought-resistant , light-loving tomatoes and eggplants.
Moisture-loving cucumbers and bell peppers will not be the best neighbors. Adherents of hot, dry climates, watermelons and melons suffer from diseases (powdery mildew, angular spot, downy mildew) at a humidity of sixty percent.
Lighting
Watermelons are a light-loving crop. The minimum daylight hours for seedlings is 12 hours. Even when growing on southern windows, it is recommended to install additional lighting. After the film is removed from the seedlings, the seedlings are shaded. Then they maintain the prescribed norm.
Important: by moving watermelon seedlings to the balcony, thus adjusting the lighting mode, you can get elongated seedlings.
Seedlings stretch even when there is insufficient lighting. To prevent this from happening, on cloudy days you should lower the temperature in the room where the watermelon seedlings are growing.
To ensure that the plants grow evenly, the pots are turned every day, exposing different sides of the seedlings to the sun’s rays.
How to prepare the soil?
Melon and watermelon love fertile soil with weak or neutral acidity. It should be loose and breathable. Do not allow water to stagnate . It’s good to start preparing the soil for the future harvest in the fall. Place tops, cut grass, and rotted manure in the beds.
What layer of manure should be in a greenhouse for watermelons and melons? About 30 centimeters will be enough. Important! Discard fallen leaves.
Dangerous garden pests like to spend the winter in them. In spring, you can add straw manure or humus with mineral fertilizers.
To improve the soil structure, pour a bucket of river sand onto each square meter of area and dig up the beds. To reduce soil acidity, calcium and magnesium compounds are added . They nourish plants and improve their growth.
Sulfur or ammonium sulfate will help increase the acid balance. The soil must be warmed by the time the seedlings are planted. To do this, remove a layer of soil to the depth of a shovel, put in a mixture of herbal material and humus, and pour in plenty of hot water. Place soil on top and cover with film .
Collection and storage of watermelons
Before harvesting watermelons, you need to make sure that they have reached the first stage of removable ripeness - this usually occurs 5 days before full ripeness. If you skip this point and remove the watermelon later, it will not be stored for long, and if you store an unripe watermelon, it is unlikely to ripen in storage. The state of first ripeness can be determined by the color of the pulp and seeds, characteristic of each variety of watermelon. If you remove the watermelons in time, when the flesh in them is pink, then during storage it will gradually turn red - the watermelon will ripen in storage without losing its sweetness.
Watermelons of late varieties, which have a denser and thicker peel, and the pulp has a rougher structure, last the longest. Early and mid-ripening watermelons are removed as they ripen and eaten or processed - jam is made from them, salted or pickled, and the fruits of late-ripening varieties intended for storage are cut with pruners or a sharp knife along with a peduncle 5 cm long just before frost. Do not tear the berry from the stem, as rotting often begins at the point of separation.
For storage, choose medium-sized watermelons with a thick rind, shiny and intact - there should be no dents, cracks, soft areas or scratches on it. When transporting, do not throw or place watermelons on a hard surface; do all work with gloves. When laying watermelons, make sure that they do not touch each other - this measure will help avoid infection of the fruits with rot.
Optimal conditions for storing watermelons: temperature 1-4 ºC with air humidity 75-85%, as well as good ventilation. We offer you the following storage methods:
- – collect dry moss in the forest in sunny weather, lay it in a thick layer on the bottom of a wooden box, put a watermelon on top and cover it on all sides with moss, then put other watermelons, covering each of them with moss;
- – instead of moss, you can use wood ash. Watermelons sprinkled with ashes in a box or barrel are lowered into the cellar and stored there under a tightly closed lid;
- – dip each watermelon into a clay or alabaster mash with the consistency of thick sour cream, let the coating dry and lower the fruits into the cellar;
- – instead of clay or alabaster, you can use wax or paraffin: melt them in a water bath, cover each fruit with a layer about five millimeters thick and lower the treated watermelons into the cellar;
- – wrap each watermelon in thick natural fabric, place it in a net and hang it in the cellar from the ceiling;
- – make racks in the cellar, put a thick layer of straw on their shelves and place watermelons on top so that they are shrouded in straw;
- – find a dark, cool place in the apartment where no light penetrates, place watermelons there and turn them over daily.
How and wherever you store watermelons, make it a rule to check what condition they are in at least once a week in order to notice a spoiled fruit in time and not allow it to infect other watermelons with rot. With the right variety, place and storage method, you can enjoy watermelons until spring.
What you need to know about seedlings?
Two factors influence the production of strong, healthy seedlings:
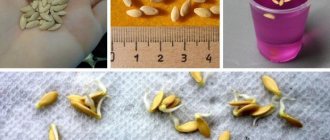
- Properly selected seeds. They must be large and have a high specific gravity. A solution of table salt will help you avoid mistakes. The seeds are dipped in liquid (a teaspoon per glass of water). Those that float are thrown away. Those that settle at the bottom are taken for sowing. Be sure to rinse off any remaining salt and dry.
- Nutritious soil. It is sold in stores, but it is easy to prepare yourself. Mix three kilograms of humus with a kilogram of turf soil. Add 200 gr. wood ash and a small spoon of potassium sulfate. Sometimes peat or river sand is mixed in . The soil should be loose, light, and well-permeable to moisture.
How to grow watermelons and melons in a greenhouse? Seedlings usually begin to grow in early April. From sowing seeds to the formation of a plant ready to move into the greenhouse, it takes 25-35 days for watermelons and 20-25 for melons. Based on this, the exact start date of work is calculated.
For quick germination, seeds are soaked in warm water for two to three hours. It wouldn’t hurt to dip them in a weak solution of potassium permanganate to protect them from diseases.
Drop one seed into peat pots for seedlings (can be replaced with plastic cups or a cut bottle) to a depth of three centimeters. Cover the top with film. The temperature is maintained at least 25ºC. When shoots appear, the film is removed . If the greenhouse is heated, the pots with future watermelons and melons are transferred there. If the temperature is low, grow on the windowsill.
A few tips will help ensure high viability of young plants.
- seedlings need a lot of light. To prevent plants from stretching, it is advisable to provide them with an extended daylight hours (at least 14 hours);
- Watering should be done carefully. If water gets on the leaves, they may rot;
- Plants are sensitive to “personal space.” The pots should not be placed close to each other;
- do not neglect mineral supplements.
The seedlings are transferred to the greenhouse at the stage of two to three true leaves. The earth should warm up to 14ºC . The night air temperature is not lower than 5ºC-8ºC, and the daytime temperature is above twenty.
In case of sudden drops in air temperature, seedlings in the greenhouse must be covered. Plants will not tolerate even short-term frosts .
The sprouts are carefully removed from the plastic container along with a lump of earth and lowered into holes spilled with warm water. Their depth is 10 cm. The seedlings are placed at a distance of 50 - 70 cm from each other in a checkerboard pattern. The top of the ground is mulched with sawdust .
You can plant two plants in one hole. In this case, the lashes are directed in directions opposite to each other. To avoid rotting of the root collar, do not bury the plant too deeply into the soil. The lump should rise 2 cm above the ground.
Watermelon care
How to grow a watermelon.
Watermelons in open ground do not require intrusive care, however, there are agrotechnical measures that should not be neglected. These include thinning seedlings, watering, weeding, loosening the soil, and pinching out the vines. In the development phase of 3-4 true leaves, thin out the seedlings, leave one or two in the hole, and cut the rest just above the surface of the soil. Although some gardeners successfully plant extra seedlings, they take root well and bear fruit.
When the ovaries appear, leave no more than 6 fruits on the bush, and under those that lie on the ground, place some kind of non-rotting material - roofing felt, a piece of plastic or foil.
Watering a watermelon.
Watermelons are watered once a week, but generously, at the rate of 3 buckets per m² of land. When the heat comes or the time of flowering, it is necessary to carry out 2 such abundant waterings per week, moistening not only the soil around the bushes, but also the aisles - the entire area of the site. When fruits form, watering is gradually reduced until it stops completely two weeks before harvesting. In total, watermelons are watered 3-4 times during the summer: when 5-7 leaves develop, during the flowering period and at the beginning of fruit formation.
A day or two after watering at the beginning of the growing season, loosen the soil in the area to a depth of 6 cm and at the same time remove weeds from it. When the watermelons close in rows, the weeds will no longer harm them, so loosening and weeding can be stopped, especially since the plant’s root system, which extends in different directions, is very easy to damage with a hoe.
Feeding watermelon.
Two weeks after planting the seedlings, they need to be fed. How to fertilize watermelons in open ground? The first time it is best to apply ammonium nitrate by dissolving 20 g of fertilizer in a bucket of water, using 2 liters of solution for each bush. You can replace saltpeter with a solution of mullein (1:10) or chicken manure (1:20), adding 30 g of superphosphate and 15 g of calcium chloride to a bucket of solution. The next feeding is applied during the budding period, and it consists of 4 g of calcium chloride, 4 g of ammonium nitrate and 6 g of superphosphate per plant. If you apply fertilizers dry, water the area before and after applying them.
How to properly care?
The work of obtaining a decent harvest is not labor-intensive , but it requires compliance with certain conditions.
- A properly formed plant will produce good fruiting.
- Watermelons and melons need to be given a lot of sun and warmth.
- Humidity should be low.
- A garter to the trellises is required.
- The yellow flowers that appear indicate the need to move on to the next stage - pollination.
- Melons growing in a greenhouse require mandatory feeding with wood ash.
- Melon crops should not touch the ground.
How to grow melons in a polycarbonate greenhouse? When growing a melon, pinch the growing point above the fifth leaf (as on cucumbers). In a week and a half to two weeks, the shoots of the lower row will appear. The weak ones must be removed immediately. On all strong shoots, stop the growing point. Important! If you want to get sweet, juicy large fruits, one berry should grow on each vine.
To do this, wait until the ovaries grow to five centimeters. Choose the largest one with the correct shape. The remaining ovaries and flowers will have to be removed , even if you like them. Otherwise, you'll end up with a lot of small, unsweetened, grassy-tasting fruits.
In watermelons, pinch off the growing point above the fifth leaf. Later, the two lower shoots are removed (the flowers on them grow late, the fruits do not have time to ripen). Subsequent lashes are tied to trellises on both sides of the main shoot. Shoots without ovaries are removed.
Lateral shoots with ovaries are stopped above the third leaf above the female flowers, above the seventh above the male flowers. For watermelons, it is optimal to leave more than five to six fruits on one plant .
A temperature of 30ºC is considered favorable for the development of melon crops. During prolonged heat, the greenhouse is ventilated by opening the windows or doors. This measure prevents the formation of condensation. Important! Melon can easily withstand any heat. Watermelons should be covered with protective material from the scorching heat. You can plant a trailing plant (such as a climbing bean).
Watermelons and melons have deep root systems that allow them to extract water underground. If overmoistened, the roots will rot and cracks will appear on the fruits. The plants themselves will report a lack of moisture. If the leaves have wilted, it is time to water. The drip irrigation system has proven itself well, preventing water from getting on the leaves.
This should be done when the plants are still short, under the second or third leaf. As they grow, the lashes are tightened.
It is important not to waste time. The male flowers will fall off within a few hours. Females are capable of pollination within three days. Melons can pollinate on their own. But for this we need living helpers - bees.
In their absence, you will have to take the pollination process into your own hands. Find male flowers. They are large and without an ovary. Pluck them and remove the petals.
Do this very carefully. Don't shake off the pollen. Apply the stamens of male flowers to the pistils of female flowers several times.
It gives the berries a sweet taste. Ash is especially important for melon. Mineral fertilizers are applied once a month. Every ten days, it is recommended to water the plants with ammonium nitrate diluted in water (15 grams per 10 liters of water). Important! As soon as the fruits begin to ripen, stop feeding.
There are several ways to solve the problem:
- Place each ripening fruit in a separate net and tie it to the trellis. This is the best method to preserve watermelons and melons.
- Place a board under the watermelon or melon. This method is good only for the lower fruits (or you will have to bend the lashes to the ground). The disadvantages include the need to regularly turn the berries to ensure uniform ripening.
- Make shelves from any material and attach them to the walls of the greenhouse. The fruits will also have to be turned over.
- Sometimes cardboard boxes are used instead of nets. They are difficult to attach to trellises, and it is difficult to monitor the development of the fruit.
The ripeness of watermelons will be indicated by shiny bark with a clear pattern , a shrunken stalk and a characteristic dull sound when hitting the berry. Ripe melons emit a unique aroma. The harvest is stored in cardboard boxes. It is advisable to place each fruit in a separate container.
Watermelon berry - description
Watermelon has thin branched stems, climbing or creeping, most often smoothed-pentagonal, reaching a length of 4 m. At a young age, the stems are covered with dense pubescence. The leaves of watermelon are petiolate, alternate, pubescent, harsh, rough on both sides, triangular-ovate, heart-shaped at the base, from 8 to 22 cm long, from 5 to 18 cm wide. Watermelon flowers that bloom in summer are female, male and hermaphroditic, with boat-shaped bracts. The fruit is a watermelon berry, a multi-seeded juicy pumpkin with a smooth surface and juicy, sweet pink or red flesh, although there are varieties with yellowish pulp and a rough rind.
How to avoid mistakes?
In some cases, melon berries do not set. This happens due to mistakes made.
- Wrong choice of seeds. It is better to buy them in specialized stores. Pay attention to the expiration date and permissibility of cultivation in a particular region;
- Violation of the conditions for growing seedlings and fruit-bearing plants. The formation of lashes, garter, pollination influence the formation of ovaries;
- Low ambient temperature. In cold, rainy summers, it is necessary to provide additional heating to the greenhouse and illuminate the plants with LED or sodium lamps.
Subject to simple planting and care conditions, melons and melons in protected soil will grow no worse than under the southern sun. Ecologically clean, nitrate-free watermelons and melons will delight gardeners with a bountiful harvest and excellent taste.
Useful video:
Feeding with folk remedies
In addition to the usual mineral and organic fertilizers, gardeners also use folk remedies.
Yeast
Prepare a solution consisting of yeast (100 grams of wet or 50 grams of dry), 5 tablespoons of sugar and 3 liters of slightly warm water. It is infused for a week, then diluted with water (1:20) and used when watering plants at the rate of one liter per root of one plant.
Ammonia
It is used when the plant is withering after using all the means to revive it - add 0.02 ml to 200 ml of water and spray the plant over the leaves, trying to cover the underside of the leaf.