Rational approach
When arranging beds in greenhouses, some important points must be taken into account:
- Paths in greenhouses should not be too narrow. Since it will be inconvenient to work with the equipment. Sometimes gardeners ignore this fact, wanting to allocate more space for plants, and thus getting additional problems. The path should be of such a size that a garden wheelbarrow can drive along it, since the beds will need to be loaded with humus, peat, and fresh soil every year. The optimal width of the tracks is 45 cm.
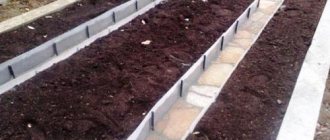
- The beds should be made stationary - metal or wooden. In this case, the bed will not spread, fertile soil will gradually form in it. After 2-3 years of correct loading of stationary beds, there is no need to dig them up. Moisture is retained during watering, which is very important in hot summer conditions.
You can lay out permanent paths that are not only decorative, but also prevent the growth of weeds. It is convenient to walk on them and move a wheelbarrow.
- The beds should be of such a size that it is convenient to work with plants. The workload of the summer resident depends on this fact. What does it mean? When working with plants, a gardener should not stretch, strain his back, or stand bent over for a long time. It is better to make the beds narrow, perhaps raised or high. There is an arrangement of beds in racks. By the way, high beds warm up better and faster in the spring!
Comfortable height of the beds varies from 15 to 40 cm, and width - from 60 to 90 cm. The last size is used for a two-way approach to the bed.
Georeferencing
The geographical location is a fundamental factor, but all the features of the site should be taken into account: relief, shadow from trees and buildings. If everything is clear with the choice of a sunny place, then with a slope you need to adhere to the rules.
Related article:
How to Improve Sandy and Clay Soil
It is possible to locate a 3 by 6 greenhouse on a sloping area, but the beds should be laid out strictly horizontally, that is, across the slope line. This is necessary so that when watering the water does not drain and is absorbed into the soil evenly. For a standard 3x6 greenhouse, it is not always possible to place beds across the slope and along the structure at the same time. In this case, there is no alternative and the selected site will have to be leveled before construction.
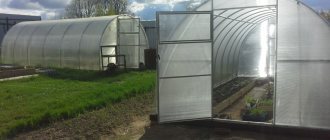
Greenhouse arrangement of beds
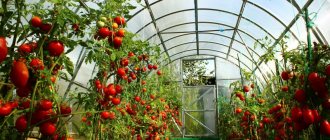
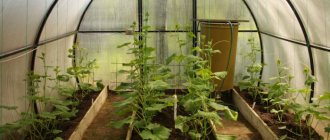
Taking into account the previous information, you can optimally calculate the location of the beds and paths for a standard 3x6m greenhouse. The most popular are two options: two rows along the walls of the greenhouse and three rows (two along the walls, one in the middle).
When arranging the beds in two rows, there is a simple calculation. If the width of the path is taken to be 60 cm, then 300 cm (the width of the greenhouse) minus 60 cm (the width of the path) and divided into two rows. One bed will be 120 cm. This is a fairly wide bed, which will not be very convenient for processing; in some cases you will even have to step on it. And if she is also tall (40 cm), then this becomes a real problem. The area of land used will be 6X2.4=14.4 m2.
Another option is possible. Make the rows 90 cm each, then the path will be 120 cm. In the center of the greenhouse, the beds are connected with a box 120 cm wide, since a two-way approach to it is possible. The usable area will be equal to: beds along the walls of the greenhouse - 0.9 m X 2 pcs X 6 m = 10.8 m2, box in the center - 1.2 m X 1.2 m = 1.44 m2. We get a total usable area of 12.24 m2.
With this arrangement of the beds, 2.16 m2 of usable area is lost. However, the size of the resulting beds and the remaining two areas are very convenient when organizing greenhouse maintenance. And there is a place to bring in various garden pots during the spring return frosts.
When the beds are arranged in three rows, the most common sizes are: two beds along the edges of the greenhouse - 60 cm each, the central one - 90 cm, two paths - 45 cm each. The usable area will be: 0.6mX2pcsX6m=7.2m2, 5mX0.9m= 4.5m2. Total - 11.7 m2.
When comparing numbers and choosing a layout, you should take into account not only the usable area, but also the location of the crops on them.
What can beds be made from?
Since redevelopment in a place such as a greenhouse occurs very rarely, a gardener can afford to build large structures. What can be used to create greenhouse beds?
Wood
You can make small greenhouse beds stronger by using thick boards. The advantages of this option are its availability, economy and durability.
If you treat the wood with a special compound, in greenhouse conditions such a fence will last for over ten years.
It is worth paying attention that the pegs that will hold the board must be located on the side of the ridge. Otherwise, the gardener runs the risk of constantly clinging to them while digging. It would be a good idea to sharpen the corners with a file.
Among the disadvantages, it is also worth noting the risk of fungus on the boards
It would be a good idea to file down the corners with a file. Among the disadvantages, it is also worth noting the risk of fungus on the boards.
Reinforced concrete
Surprisingly, fences for greenhouse beds are often made even from this material. This is one of the best options. If you use enough reinforcement, the result will be many times stronger than anything else on this list.
In addition to fences, concrete in the greenhouse is used to make paths between the rows and shelves for auxiliary devices. A greenhouse framed with reinforced concrete will always look well-groomed and detailed, even despite its compact dimensions of 3x6 m. And it’s very convenient to work like that.
You can't do without shortcomings. First of all, there is a need to round off sharp corners. Otherwise, leaning on your feet will not only be uncomfortable, but also painful. In addition, experience has shown that the concrete option has problematic drainage.
Galvanized profile
Greenhouse beds are easy to make from galvanized profiled sheets and profile pieces. In the relevant stores it is easy to find ready-to-use designs. However, if the master has the necessary tools, it will be better to make the beds on your own. Thanks to this, you can not only easily save money, but also not make a mistake with the dimensions.
The advantages of galvanized beds are that the upper corners of the sheet are curved and therefore you can rest on them. After filling with soil, the structure becomes stronger and more stable, and also stops making rattling sounds.
It was not without certain drawbacks. Sharp profile trims may remain at the corners. They must be smoothed with a file. Otherwise, there is a risk of damaging not only clothes, but also skin.
Tile
Borders are usually always included with paving slabs. From them you can make very durable beds of the desired size. To make it comfortable to lean on, the tiles at the base must be reinforced with concrete mortar. The process is not easy, but the end result is worth the effort.
If you do everything correctly, you can end up with a strong frame and smooth paths. Among the disadvantages are the high cost (one border costs at least 200 rubles), the considerable weight of the material and the troublesome installation process.
When processing at home, tiles can be cut with a metal saw or grinder.
Flat slate
As usual, when planning a greenhouse, gardeners use flat slate only as a material to create a temporary fence. This material is cheap and easy to handle. But the fact is that flat slate itself is fragile. You won’t be able to lean on it or even just place a filled watering can. For the same reason, you should not drop working tools on it. And at the same time, you can set up greenhouse beds within a day using a metal saw and a sledgehammer.
Planting plants in a greenhouse
Typically, heat-loving crops are planted in a greenhouse, especially those that cannot tolerate sudden temperature fluctuations. These include: sweet peppers, tomatoes, eggplants, cucumbers. Greens are also planted to obtain earlier shoots with a delicate taste.
How to arrange plants so that they do not interfere with each other and produce abundant harvests?
With a two-row layout, tall varieties are planted on the sides, and with a three-row layout, on the central ridge so that they do not block the sun's rays for low-growing varieties.
In this case, they are planted in two rows in the center, and in one row on the sides. In this case, it is important to take into account the slope of the greenhouse. Standard polycarbonate greenhouses are shaped like a semicircle, and the height of the plants in the outer beds will be limited by this fact.
When choosing varieties for greenhouses, one must take into account their method of pollination and ripening time. Self-pollinating hybrids with different ripening periods are suitable for shelters. This will allow you to have fresh fruits throughout the entire summer season.
Important! Too dense plantings will lead to poor ventilation of the plants, which will lead to the emergence and rapid spread of diseases and pests.
It is rational to use square-cluster or checkerboard planting methods. Leaving distances between specimens from 30 cm - for low varieties, to 80 cm - for tall bushes.
Choosing a polycarbonate greenhouse
The key to successful operation, benefits from the purchase and the possibility of self-delivery/assembly of the greenhouse will largely depend on the correct choice. Therefore, before you go to the store and purchase a greenhouse, let’s get acquainted with the basic principles for choosing this design.
First, decide for what purpose you need a greenhouse and what you are going to grow in it, in what quantity - the type of structure and its size will depend on this. If you have a small summer cottage, and you plan to cultivate only a few bushes of tomatoes and cucumbers “for yourself,” then there is no point in purchasing a huge structure - you still won’t use it fully. If you decide to start a vegetable growing business, then you will have to buy not just a large greenhouse, but also an insulated one. And this will affect both its price and the complexity of installation - it is not always possible to assemble such a structure yourself.
A good greenhouse must be durable - every gardener knows this. But I also don’t want to spend a lot of money again. Therefore, consider what climate zone you live in. If your region does not experience strong winds and snowfalls, then you should not purchase a reinforced structure, which is much more expensive than the standard one, and is also difficult to assemble due to the large number of additional parts. In a region with strong wind and snow loads, on the contrary, it makes no sense to buy a standard greenhouse - here you just need a reinforced one so that in winter it does not collapse under the weight of the snow on it. By the way, the strength of the greenhouse depends largely on the shape of the roof.
Table. Types of greenhouse roofs.
| Form | Characteristic |
| The arched roof we are used to. Allows snow to roll off the surface relatively easily (but can still sometimes linger on the roof). The frame of such a greenhouse is often assembled from solid, rather than composite, arches. | |
| Such a roof used to be constantly made for ordinary wooden greenhouses. And the greater the slope angle, the better the snow rolls in winter. However, if the slopes are too steep, the greenhouse ends up either very high or with low side walls, which makes it difficult to carry out work inside it. Arches, as a rule, consist of two joining parts. | |
| A combination of arched and gable roofs. The best option. On such a roof, shaped like an arrowhead, snow rolls off easily. Such greenhouse structures are less likely than others to be damaged due to heavy snow or wind loads in winter. Arches usually consist of several parts that are joined together. | |
| Pyramid or dome | More exotic forms of greenhouses. One resembles a ball of honeycombs, the second follows the shape of the Egyptian pyramids. Difficult to assemble with your own hands, but very durable and beautiful. |
When choosing a greenhouse, do not forget that strength and durability will be influenced by factors such as the thickness and coating of the metal profile, the density and thickness of polycarbonate sheets, the distance between the main arcs and much more.
Prices for cellular polycarbonate
Also, if possible, try to choose a greenhouse whose frame has fewer components - the more solid parts, the stronger the structure. And don’t forget about covering the frame - galvanizing metal is much better than painting. If you believe the reviews of experienced gardeners, the paint often peels off (especially in places where parts are joined) and it has to be repainted annually to avoid premature corrosion.
Source
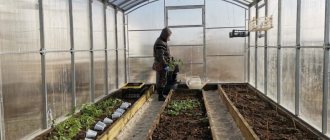
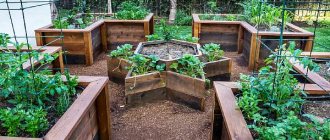
Creating beds from scratch
The most common materials for making beds in a greenhouse are metal and wood. But gardeners can use other available materials.
Modern metal beds are coated with a polymer coating for longer use. Ready-made beds can be ordered from manufacturing companies. They have stiffening ribs and are manufactured in standard and custom sizes. They have a wide range of colors.
Such beds can be made independently from sheet metal, 0.5-0.7 mm thick. The beds are assembled using self-tapping screws; it is good to provide mounting legs 40-60 cm long for deepening into the ground.
Wooden beds are a cheaper option, but require additional treatment with an antiseptic to prevent fungus, blue stains, etc.
Relative to ground level, the beds can be elevated or buried. The choice depends on the groundwater level. If the groundwater is high, then the beds are raised. And vice versa.
If the groundwater is low, then the level of the floor and beds in the greenhouse can be made 50 cm below the general ground level. Both options allow the soil in the beds to warm up faster in the spring. In the second option, it may not even freeze during the winter, and during spring frosts, low temperatures do not fall below the upper soil level.
Smart use of verticals
It is not at all necessary to place the beds exclusively in one plane. You have an excellent opportunity to organize a shelving structure in the greenhouse. It is the vertical layout of the beds that allows you to very efficiently use all the free space. However, there are also difficulties here. It is extremely important to distribute all plants and containers with soil in such a way that the lower tiers are not in the shadow of the upper ones.
Greenhouse shelving
Here are three simple rules for shelving.
- Directly under the shelving, you can make a warehouse-type niche to store the necessary equipment.
- The lower and middle tiers are ideal for adult plants. You can also place containers with fertile soil in which young bushes are planted. For example, this is a good solution when growing strawberries using the Dutch method.
- Containers with seedlings most need warmth and light. That is why they should be placed on the uppermost tiers when placing beds in racks. In accordance with growth and development, they can be gradually moved lower.
Shelving and pots for plants in the arrangement of a greenhouse
It is important! Hold yourself to a certain standard. The depth of the rack should be no more than 50 cm. Then the shelves will not shade the plants.
The vertical can also be used for terraced arrangement of beds. This is also a good option for those who want to gradually switch to shelving. In the greenhouse, on one side the beds are left traditional. The southeast or south side is more suitable for this. But a terrace can be made on the opposite side of the greenhouse.
An example of creating terraced beds
It is worth noting that such experimental designs are appropriate in cases where the combined cultivation of different crops is carried out within the same greenhouse. If one crop is grown, it is necessary to create uniform conditions throughout the entire area.
Filling beds in a greenhouse
The process of filling the beds is important for the bottom heating of the plants. At the bottom of the finished frames, a small layer of drainage (crushed stone, sand, etc.) is spilled, and fresh manure (horse or cattle), which has just begun to “burn,” is laid out on it.
During this process, a large amount of heat is generated. The layer of manure should be poured with boiling water with the addition of potassium permanganate, which will serve as an antiseptic and an additional stimulus for the process of “burning” of the manure.
Then a layer of fertile soil is poured, covered with film and left for 1-2 days to warm up. Plants are planted in such beds so that their roots do not reach the manure, otherwise they will “burn.” When they grow, the manure will burn out and turn into humus, which will serve as an excellent nutrient medium for growing plants.
Nitrogen fertilizers are not added when filling the beds in this way, because there is already enough of it in the manure. You can add potassium and phosphorus fertilizers according to the instructions to support roots, flowering and fruit set.
Taking into account all the above recommendations, a summer resident can correctly and rationally use greenhouse conditions to obtain record yields!
Step-by-step assembly of a polycarbonate greenhouse 6m by 3m
Thanks to the simple design, even a beginner does not have to involve third-party specialists for installation.
Further actions cannot be clearly called simple or complex. On the one hand, we are talking about the opportunity to purchase an almost completely assembled structure, the size of which corresponds to the parameters of the site. On the other hand, models presented in the retail chain require mandatory “finishing” depending on operating conditions.
The following recommendations will help you avoid a large number of problems:
- First, the end side is installed;
- To do this, the top part is fixed with two central elements;
- The connection is made using self-tapping screws and a screwdriver;
- The process of fixing the end arch directly to the foundation occurs with the help of clamps;
- Measure the length of the side walls and multiply it by 1/2;
- Fix all horizontal parts on the end wall;
- A two-meter crossbar is mounted in the central part of the upper arc;
- The finished arch is placed perpendicular to the base;
- Using a building level, the correct installation is checked;
- All fastenings are stretched, doors and windows are installed;
- Everything ends with the installation of polycarbonate material.
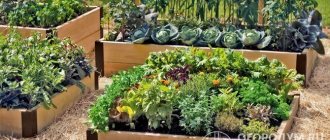
Photo of beds in a greenhouse 3 by 6
Additional Tips
And recommendations:
- do not forget about regular weed removal to help crops develop normally and maintain a well-groomed appearance of the premises;
- the width of the beds located on the sides should not be more than 100 cm, since distant specimens will be difficult to care for;
- if a bed is planned in the center, then it should be in the shape of a square to make it more convenient to maintain;
- It’s worth installing fasteners and hooks above the ceiling and placing more plants on them. So, for example, with this method of placement, ampelous flower crops, green vegetables and others develop well.
Whatever beds you choose, first of all, working in the greenhouse should be convenient!