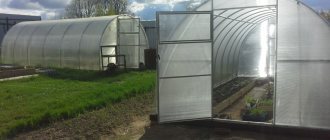
A small greenhouse on a summer cottage is an undoubted help for a gardener. And you can grow seedlings in it, and get early vegetables and herbs, and get a harvest of cucumbers and tomatoes, and even harvest remontant strawberries until December. And there are a great variety of ready-made polycarbonate structures on offer – choose to your heart’s content. But the question often arises of how to arrange the beds in a greenhouse for maximum results. Let's try to figure it out.
Gardeners use stationary greenhouses and temporary film shelters - greenhouses - to create a favorable microclimate for heat-loving plants
The most “favorite” mistakes of summer residents
According to tradition, we’ll start by analyzing other people’s mistakes in the planning and arrangement of protected ground, so as not to repeat them ourselves.
- “I want everything at once!” Becoming the happy owners of a greenhouse, summer residents try to make the most of the usable space. They plant literally every centimeter, counting on a great harvest. And in the end they remain disappointed. Firstly, every crop requires sufficient space for its leaves, shoots and roots. But where can it grow if another plant is already sitting nearby, also trying to win a piece for itself?! The result is a real jungle, where the more active inhabitants oppress the shorter ones, and the paths are hidden under a carpet of vegetation. Secondly, for high-quality pollination and growth, access to air and light is required, but this is impossible in thickets. Thirdly, diseases and pests simply adore the “jungle”, where all the conditions for their development are created. So summer residents are running around with sprayers, receiving cocktails of fungicides and insecticides instead of organic vegetables.
- "Let's marry the fox and the hen." Inexperienced gardeners try to combine a variety of crops in one greenhouse, without taking into account their needs for microclimate, lighting and soil. The most typical example is tomatoes and cucumbers. Cucumbers require warmth and humid air, and tomatoes begin to get sick from humidity, becoming covered with late blight. Even greenhouse manufacturers make combined options, separating them with a partition.
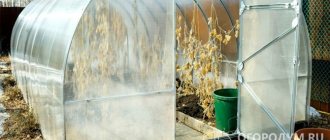
- “We plant as is.” Often, after installing a polycarbonate structure, the owners simply dig up the soil inside and plant plants, wondering later why they don’t grow and get sick. The point is the most banal physical laws: while the “tops” warm up in closed ground, the roots freeze in the ground, because the cold from outside is directly transferred inside, under the shelter. As a result, the leaves are hot, want to drink and eat, but at this time it is winter at the roots - they have trouble absorbing cold water. And somewhere on the border a conflict occurs, leading to the death of the poor plant.
- “Wider and bigger.” Another common mistake is to take up as much space as possible with beds, leaving a minimum for walkways. As a result, it is inconvenient to weed wide ridges, you can’t reach the plants, and you can’t even walk along narrow paths with a watering can, let alone with a wheelbarrow.
- “They made it out of what was there.” Some summer residents believe that the beds in the greenhouse can be fenced off with whatever is necessary, as long as the soil does not spill into the passages. In particular, the worst option is boards. Considering the constant “tropics” of protected soil, even thoroughly impregnated wood is not enough for five years. Rot and mold, moisture and fungus quickly destroy borders, then crawling onto plants.
Here is a kind of TOP 5 typical mistakes of beginners who are learning vegetable growing in protected ground for the first time. All of them lead to a natural result - disease and death of plants, low yields and dissatisfaction, complete with irritation among the owners themselves.
A new way to plant strawberries in a pipe.
Reviews:
Svetlana Eternity
writes: I couldn’t find a video about making such a bed….
Marko176 Schneider
writes: Cool video. Thank you!
Spirit cool
writes: Is it necessary to plant a new mustache every year? Or is there some way to save it in the winter? For example, should I take these pipes to the cellar for the winter?
Svetlana Eternity
writes: I couldn’t find a video about making such a bed….
Marko176 Schneider
writes: Cool video. Thank you!
Landscaping such beds is somewhat similar to pyramidal ones. You could even say that this is their subspecies. But the specificity of vertical beds is more functional. They can be used to grow pumpkins, wild strawberries, strawberries and almost anything else. The main advantage is that the fruits do not rot because they do not come into contact with the soil.
Planning: basic layouts
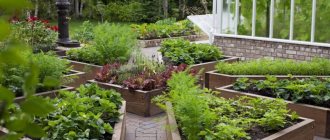
The location of the beds in the greenhouse will depend on the type of plants for which they are intended. Thus, for low-growing peppers, herbs and berries, optimal lighting is created if the rows are stretched from east to west. Then the plants will receive maximum light even when placed in several tiers (on racks, in hydroponic installations, hanging containers), making it possible to effectively use the useful area of the shelter not only in width and length, but also in height.
For tall crops, supports, such as trellises, are installed next to the plantings
But for indeterminate tomatoes and cucumbers, an extension from north to south is better suited, when the sun illuminates first one side of the “wall”, and after lunch, the other.
The dimensions of landing areas for ground placement should be correctly calculated in such a way that:
- the plants were comfortable to develop without shading each other and without competing for soil, moisture and light;
- the owners had free access to the entire area of the boxes for weeding, thinning (picking) seedlings, forming bushes and other necessary agrotechnical measures;
- There should be distances between the rows of plantings that allow you to walk without touching the shoots or breaking through the foliage.
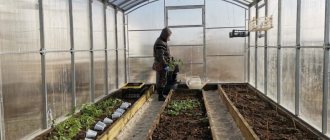
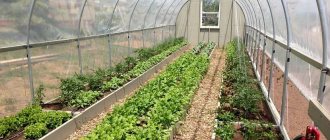
We suggest considering several options for planning beds in a standard 3x6 m greenhouse.
Two narrow beds on the edges and one wide one in the center
The outer boxes have access only from one side, which determines their dimensions, limiting the width to half a meter. The middle bed can be served from both sides at once, so it is made twice as wide. An excellent option if you plan to combine planting tall crops (in the center) and medium-growing crops (along the edges) in one greenhouse.
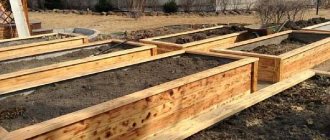
Three identical boxes
In this option, you can expand both side beds to 65-67 centimeters, but narrow the central one, otherwise it will become impossible to pass.
U-shaped box and central bed
This type of arrangement is perfect for those who have a blank back side of the greenhouse, without a door. The passage turns out to be circular. And if low-growing crops are grown in the center, they can be arranged in several tiers.
Two wide ridges on the sides and a path in the center
This method of planning is optimal for growing melons, allowing you to place deep and wide boxes and get a good harvest of early zucchini, squash, melons or watermelons (as in the photo).
Having chosen the optimal option for placing boxes in a standard polycarbonate shelter, you can begin to search for materials for the structures themselves.
Features of growing garden strawberries on vertical beds
We propose to consider the most “popular” mistakes made by summer residents, which invariably arise during the first experience of constructing and operating vertical beds.
Soil quality
If the owners of their summer cottage previously grew strawberries on ordinary beds, then when planting in various structures they often do not pay attention to the recommendations about the need to prepare a special substrate. So they use ordinary garden soil, or even the contents of flower pots. Please note that in containers on vertical beds the amount of substrate is limited , so increased requirements are placed on its looseness and nutritional value.
More sun - better harvest?
Under natural conditions, strawberries are lovers of bright sun and high areas without excessive moisture. But when there is only a small volume of soil at its disposal, the roots of the plants quickly overheat, which cannot be compensated for by any watering. Therefore, it is better to place vertical and hanging devices for the berry garden in partial shade, on the western or northwestern side.
On vertical structures and in small containers, plants require more frequent irrigation, because a small volume of soil dries out quickly
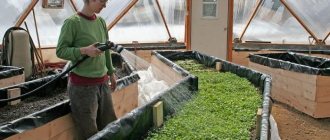
Organization of watering
For the full growth of seedlings and obtaining a bountiful harvest in hanging strawberry beds, constant moisture is needed, and ideally, watering combined with fertilizing. An irrigation system should be organized before planting the bushes. This can be either a drip tape or centralized watering in the middle of the box (barrel).
What to make beds from in a greenhouse
When making boxes with their own hands, summer residents usually use all kinds of available materials. Unfortunately, not all experiments are successful, since each type of fencing has its own advantages and disadvantages:
- Boards . As mentioned above, wood is not very practical for greenhouse conditions. The same as plywood, chipboard, OSB and other wood materials. Natural porosity, fibrousness, low resistance to moisture and rotting will not allow board borders to last long enough. Wood-polymer composite is considered the most suitable.
- Slate . Wavy or smooth slate sheets are the most economical and durable option for boxes. They don’t rot, they keep their shape, they don’t allow cold and moisture to pass through, they don’t need impregnation, painting or maintenance - what else does a summer resident need?! You can buy old slate for pennies, and often you can get it for nothing by asking neighbors who are replacing their roofs.
- Metal . Until recently, galvanized and stainless steel sheets were not so expensive, and they could actually be used to fence off garden beds. With the rise in prices for ferrous and non-ferrous metals, it becomes too expensive to make boxes out of them. And the heat in such structures is difficult to regulate; plant roots are at risk of overheating or freezing.
- Brick, cement, blocks . Capital beds are expensive, but if you plan to use the shelter professionally and year-round, then it is completely justified. The only pity is that the thickness of the enclosing sides will “steal” the invaluable area of closed ground.
- Plastic . The panels and siding are too thin to adequately support the weight of the soil in the box, and when exposed to the sun they also become brittle. The only decent option is plastic window sills.
Savvy summer residents use various building materials and recyclable materials to build boxes
Issues of choosing a material, as a rule, are decided depending on what is easier (cheaper) to obtain. However, it is important for gardeners to make the beds not only beautiful and comfortable, but also fertile.
Classification of warm beds according to the type of filling with biomaterial
- Wood filler. We dig a trench about 40 cm deep, place a layer of sawdust logs, pieces of stumps, and wood chips in it. Next, fill it with boiling water only. This is done in order to speed up the rotting process. After boiling water, add dry compost on top. Fresh is not recommended as it can burn the rhizome.
- Straw or leaves. A trench is dug to a depth equal to the bayonet of a shovel. We place finely chopped straw, dry leaves, plant debris, food waste, for example, potato peelings there. We compact it tightly, pour boiling water over it and cover it with dark film material. Leave for a week for maximum heating. Then add a 30 cm layer of enriched soil.
You can also now find in specialized stores compositions that promote the activation of decay. If you use them, you only need to add the finished preparation on top of the first layer.
Preparing beds for greenhouse planting
As you know, the main purpose of installing polycarbonate shelters is to obtain early vegetables and herbs and extend the harvest period. This is especially true for the northern regions, where warm days begin only in June and can end as early as August. Early greens and greenhouse vegetables are much more expensive than seasonal ones. In order for the greenhouse to “work” as long as possible and provide a decent result, you need to create maximum comfort for the plants:
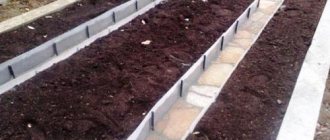
- Separate the boxes with nutrient soil from the surrounding soil. For what? Everything is easily explained by the laws of physics. No matter how well the greenhouse was heated, no one canceled the heat exchange. Imagine that outside it is already (or still) frosty, 10 degrees, and inside it is full summer, created by heaters. If the soil in the greenhouse comes into contact with the frozen ground outside, then heat is lost and plant roots suffer from the cold. The result is that the tops are in the heat, and the roots are in the cold. From such dissonance, plants get sick and die.
- Create “warm” beds. In industrial greenhouses, the soil is poured onto a water or film heated floor, but in a summer cottage such options are unprofitable. Experienced gardeners use alternative “biofuels”. On top of the drainage, approximately 2/3 of the volume of the box is laid out with a layer of branches, large weed stems, leaves, straw and fresh manure (preferably horse manure). The top is filled with the prepared soil mixture and thoroughly spilled with hot water or solutions of mineral fertilizers. After this, the bed is covered with film, “launching” the process of natural heating. Gradually overheating, organic matter releases heat that warms the roots and additionally enriches the soil with nutrients.
- Protect plantings from pests and rodents. If moles, mole crickets and mice are often found on the territory of a dacha village, then do not be lazy and place a fine-mesh metal mesh under the beds. It will protect the plants from pests that find satisfying food and settle down for the winter in warm boxes.
When filling high beds in multiple layers, a layer of branches (1) is placed on the bottom, then fresh manure and vegetable compost (2), and a fertile soil mixture is placed on top (3)
For full-fledged warm beds, the height of the box will be at least a meter, where 30 cm is large branches with unrotted manure, 30 cm is small organic matter with leaves and wood chips, and 40 cm is a mixture of earth with humus, peat, sand for plant roots.
Of course, the prefabricated structure does not have to be mounted entirely on the surface. Taking into account the groundwater level, you can deepen the boxes, providing drainage, or “drown” the passages, creating a kind of heat collector. There are a lot of options, but they need to be chosen taking into account the characteristics of a particular site and the climatic conditions of the region.
Brief reminder for beginners
When planning vertical planting of strawberries in a greenhouse or open ground, you should remember that:
- Each bush requires at least 2 liters of nutritious loose substrate enriched with macro- and microelements.
- When cultivated in container culture, the “service life” of plants does not exceed 1-2 years. As a rule, after fruiting is completed, the bushes are removed, the depleted soil is replaced with fertile soil, and new young rosettes are planted.
- The key to success is constant soil moisture. It is achieved by proper watering and selection of moisture-intensive substrate.
- The distance between the bushes should be at least 15 cm, otherwise you should not expect a full harvest.
- Be sure to protect structures from frost and, if possible, bring them indoors for the winter - a small volume of soil easily freezes completely and the plants die.
Drip irrigation system
The arrangement of a greenhouse inside without a drip irrigation system can be called unfinished. This irrigation principle moistens the soil directly next to the root of the plant, without wetting the paths and aisles. The peculiarity of the method is that wetting is carried out constantly and evenly, which significantly reduces water consumption and has a beneficial effect on plant growth.
Water distribution is carried out through a supply line connected to a volumetric tank or the main branch of the water supply system. At the design stage, you need to decide on the places where the plants will grow, since the supply of liquid must be organized directly under each root.
Drip irrigation system for a greenhouse Source stopdacha.ru
It can be presented in one of the following ways:
- Installing or assembling drip tape is one of the simplest options. It operates on the principle of gravity flow or connection to a main line with a pressure of no more than 1.5 Bar.
- Automated drip irrigation system with connection to a water supply branch. A magnetic valve with an autonomous controller responsible for the irrigation intensity is embedded in the pipe.
- The main line is made of metal or plastic pipes, and sometimes a watering hose. The best option would be HDPE or PVC, as they have a reasonable price, are durable and do not form deposits on the internal walls. A watering hose may be accidentally damaged by a garden tool; rust will form on the metal, which will eventually clog the drip nozzles.
Interesting! The simplest, oldest and no less effective method of drip irrigation is a bottle of water buried in the soil and turned upside down. A plug that is not screwed all the way allows water to drain, thereby irrigating the area near the plant.
Key rules for arrangement
Effective cultivation of fruit crops requires knowledge of how to arrange the inside of a greenhouse. The main goal at this stage is to create the most comfortable conditions for the growth of the plants that you plan to plant. First of all you will need:
- Create beds and place shelving.
- Organize the maintenance of optimal temperature conditions.
- Solve the problem of lighting that is beneficial for plants.
- Set aside a small space for a quarantine area.
- Create (apply) fertile soil.
- Decide on the surface and lay out the paths.
- Consider a design for shading the southern part.
- If necessary, install a drip irrigation system.
Dividing the internal space of a greenhouse Source vogorode.com
Important! Let us remind you that each of the listed points is selected taking into account the characteristics of the crops that you plan to grow. For example, growing vegetables requires organizing beds. For seedlings or plants growing in pots, shelving is needed.