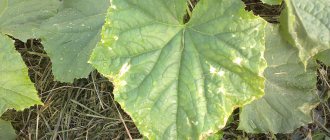
Most home gardens or summer cottages have a greenhouse for growing early greens, flowers or nightshade crops. We will figure out how best to arrange the beds, whether a partition is needed to separate the plants and a path in the greenhouse, what to make them from so that it is beautiful and comfortable inside. Read to the end, and you will know how to mark paths and where to install partitions, what materials can be used for this, and which ones should not be considered.
Wood industry waste on paths Source thelastbestplates.com
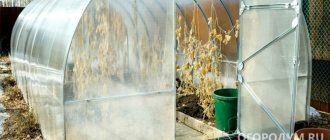
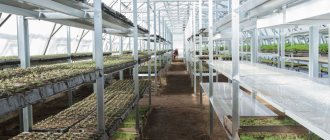
What is the best way to place beds in a greenhouse?
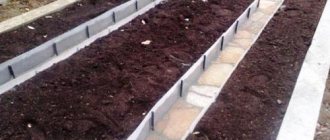
In order to maximize the use of protected soil, the ridges are located depending on the width of the structure. Therefore, it is measured before making paths in the greenhouse. If the structure is narrow, then it is rational to plan ridges on the sides with a path between them. If the width is sufficient, 2 paths and 3 beds should be made, while the central one should be 1.5-2 times wider, since it can be served from both sides.
It should be taken into account that the paths in the greenhouse should not be too narrow so that they:
- Buckets, watering cans and other equipment could be placed freely;
- people moved comfortably;
- care and harvesting were carried out without difficulty.
The optimal width for the passage between the ridges is considered to be 45-50 cm. Before you make a path with your own hands, you should decide on its length. For example, you can make paths along the entire length of the greenhouse or not reach the end of 50 cm - this will create space for several more plants.
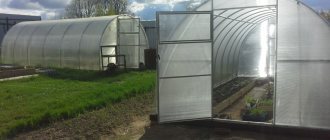
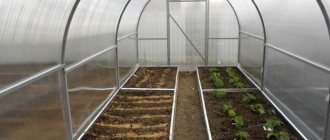
Maximum use of greenhouse area Source homeli.ru
Terrace board
For homeowners who prefer wood decking, we recommend considering decking. A natural material containing polymer additives that prevent rotting in conditions of high humidity and dampness.
- No special skills are required for laying this covering, since all planks are equipped with installation elements (clamps, strips, beams).
- It is enough to simply cut them according to the required dimensions and fold them using a technology similar to a construction set.
The surface of decking boards is treated in layers with specialized oils, which provide protection from moisture and abrasion. It does not slip, is resistant to various influences, and such boards are quite long-lasting in use.
Materials for making paths
In addition to the practical benefits, the aesthetic component also depends on how to make a greenhouse inside - the inside of the structure becomes neat, well-groomed and takes on a finished look. Before you make a path in a greenhouse with your own hands, you need to decide on the materials. They can be bulk or monolithic, organic or synthetic.
Crushed stone or gravel
These materials are perhaps the most popular due to the following properties:
- accessibility;
- cost;
- ease of care;
- functionality;
- strength;
- good density of the path;
- ease of installation.
In addition, bulk materials allow moisture to pass through well and do not require drainage, and if they are displaced they are easy to correct.
The shade of gravel or crushed stone can be any Source vosaduly.ru
To prevent grass from sprouting, before making paths in the greenhouse from gravel or crushed stone, you should carry out preparatory work:
- remove fertile soil in place of paths in the greenhouse;
- make a sand cushion, water it and compact it;
- lay geotextiles so that the gravel does not mix with the soil and weeds do not grow;
- install sides for beds;
- pour crushed stone or gravel in a layer of 3 cm.
With this option, the soil that gets on the gravel can be easily washed off, the water will pass through the textile into the ground.
Rubber track
This coating is available in the form of various materials:
- Tiles.
- Rubber crumbs.
- Roll covering.
The undeniable advantages are the following qualities:
- anti-slip effect in any conditions;
- moisture resistance;
- frost resistance;
- service life is over 50 years without loss of color and quality;
- resistance to mechanical damage;
- ease of installation;
- weeds will not grow through thick rubber;
- large selection of colors.
The only drawback is that it heats up quickly in the sun, so it is better to choose light shades for the greenhouse.
Laying roll material does not require special skills Source fermer.blog
If rubber by the meter can be laid directly on the track, then this cannot be said about tiles and crumbs. In the first case you need:
- remove soil and compact the soil;
- pour a layer of fine crushed stone;
- fill it with cement mortar;
- After drying, lay the tiles.
In the second case, before you build the inside of the greenhouse with your own hands, you should first make a liquid mixture of crumb rubber and polyurethane glue. Then pour over the existing concrete base or in 2 steps onto compacted soil. If there are no special skills, then it is better to involve specialists.
Wood
Usually on the site there is always something to make a floor in a greenhouse from - these are various remains of wood (boards, logs, beams). If you make cuts or saw boards and treat them with fungicides and impregnations against rotting, then the paths in the greenhouse can be paved with them. But the durability of such a coating does not exceed 6-8 years. The main advantages are:
- environmental friendliness;
- aesthetics;
- availability.
In addition, the wooden path does not slip and is pleasant to walk on barefoot.
Wooden cuts in combination with board sides look organic Source 7dach.ru
To make the tree last longer, the lower part is treated with bitumen; the surface must be smooth, without roughness. Small elements are laid on a gravel-sand cushion, boards or transverse dies - on bars, under which the cushion is also placed.
In this case, the bars are completely coated with mastic, and between the elements I leave gaps for water drainage. The timber cuts can be laid out offset, simulating a pavement. It is advisable to lay geotextiles against weeds, and for drainage, the height of the cushion should be 10 cm. The boards can be painted to match the sides.
Tile
There are many options here. The material can be:
- ceramic;
- polymer-sand;
- rubber.
And also paving slabs and paving stones. Before making paths inside the greenhouse, you should inspect the remaining materials after constructing a house, bathhouse or landscaping. Often, after breaking up sidewalks, there remains unused material on the site, which is good to use for its intended purpose and not have to worry about what to make paths from in a polycarbonate greenhouse.
Paving slabs on a sand cushion Source blogspot.com
See also: Catalog of companies that specialize in greenhouses and heating systems
To prevent the elements from sagging or sagging, it is important to properly perform the underlying layer. For this:
- remove the top layer of soil;
- install the sides of the beds;
- put geotextiles or roofing felt;
- pour a layer of sand, moisten, compact;
- then – a layer of gravel – level and compact.
After this, begin laying the tiles using a mallet. Flat or facing bricks are laid in a similar way, only in this case you need to take into account its height and remove the soil to the appropriate depth.
Another thing you can use to make paths in a greenhouse is from fragments of tiles or flagstone, sinking them into cement mortar, covering them with a thick layer of pine needles, dry leaves or bark, marble or granite chips. Elite materials are natural stone, garden parquet and decking boards.
Path and fencing for beds made of cement bonded particle boards Source stblizko.ru
Stages of installation of concrete paths
Concrete is one of the most durable and strong materials, although it is not particularly beautiful. To prevent water from accumulating on it, the level should be higher than the soil level. If fences are provided for the beds, then drains should be provided along the edges or a path should be made with a slight slope in one direction.
A natural stone
The most common types:
- Chipped.
- Tiled.
The stones have a flat shape, which allows you to lay out smooth and beautiful sidewalks both in the garden and between the beds in the greenhouse. It especially gives a presentable appearance to glass greenhouses or polycarbonate structures. This coating has a lot of advantages, the only disadvantage is the rather high price.
Most Popular:
- Chip paving stones. It is a mixed mass of fragments (granite, shungite). The shape is predominantly in the form of a rectangle with sharp edges - this improves grip and looks like a noble broken stone.
- Sawn. The result of sawing large boulders and then grinding them down. As a result, products are produced that are similar in shape to tiles, with a smooth and even surface.
- Flagstone. Flat stone fractions with an indeterminate shape. It looks beautiful when the covering elements are laid out in the form of a mosaic. Creating comfortable paths of any shape, including a curved smooth line.
- Solid cobblestones. Large stones (boulders can be used), mostly round in shape, but due to their size are optimally suitable for paving passages. If you lay out the covering elements, alternately choosing contrasting colors, the path will look not just beautiful, but also quite unusual, with patterns or color transitions.
Advice! If your chosen option is expensive natural stone, then think in advance about how to design the contours of the sidewalk.
Video description
A comparison of two and three row placement of beds in a polycarbonate greenhouse and the simplest paths are shown in the video:
Preparing the base is the same as for tiles. Then the formwork is installed, a concrete solution is poured, consisting of:
- 1 part cement;
- 3 parts sand;
- 5 parts crushed stone;
- ½ part water.
For strength, you can make reinforcement with a rod. So that after pouring the concrete does not crack. It is watered several times and covered with burlap. If you are interested in the question of how to make the inside of a greenhouse beautiful, then it is better and easier to make paths from DSP, and besides, it is simpler.
But, if there are neither materials nor time to purchase them, then the paths are simply covered with roofing felt or covered with sand. Enough for a couple of seasons.
The simplest installation method
First, weeds are carefully removed from the surface and the roots are uprooted. On a cleared and leveled area, a base is laid that ensures tolerable movement and inhibits the growth of nettles, grass, wheatgrass and other harmful types of vegetation. Suitable remnants of recycled materials available in almost every household include: thick cardboard, thick plastic film, newspapers, and magazines. Geotextiles in this regard are the most preferable option, as they fully possess the required properties.
Wide passages when arranging narrow beds (according to Mitlider) are usually covered with a mulch layer of mown grass, pine needles, and bark
The base is additionally secured with a lattice of slats, mesh, or weighted, sprinkled with sand, crushed stone, gravel, expanded clay, river pebbles, lumber (sawdust, chips, shavings). In this way, the laid substrate is fixed in a designated place so that germinating herbs and their rhizomes, wind or walking movements do not move it. At this simplest, relatively cheap and quick stage, the arrangement work can be considered complete. But you need to understand that the embankment paths are quite soft and unsteady. Small pebbles will get into your shoes when walking and scatter throughout the area; the sand will have to be leveled and renewed frequently, just like a rotten, torn base. It will last no more than one or two seasons.
Video description
You can watch how to make unusual and simple paths for a greenhouse and equip high beds in the following video:
Glass crushed stone
Perhaps the most spectacular paths are made of glass; it goes well with plants, is durable, non-toxic and can be purchased in any color scheme. To arrange a passage in the greenhouse you should:
- first remove 10 cm of soil, add a small layer of sand, moisten and compact;
- then lay geotextiles;
- pour fused glass.
If the material becomes dirty during the season, it can be collected, washed with a stream of water, dried and stored in bags until next spring.
Lawn grates
A fairly widespread method. The grid is evenly positioned, soil is poured into each cell and sown with lawn grass seeds. This option strengthens the surface of the lawn on which you can walk without damaging vegetables, berries and other crops.
Lawn grates can be laid out inside the greenhouse, filling the cells not with grass, but with bulk material, such as sand. The result is a hard coating that perfectly absorbs excess moisture.
Interior arrangement
In addition to designing the paths, you need to know how to make partitions in the greenhouse, borders for beds, racks, shelves and whether they are needed at all. If needed, then in what quantity.
Partitions for beds
Before you make a partition in the greenhouse, you should decide what function it will perform. If you divide a ridge for different types of plants, then you will need some materials, if you partition the structure completely, dividing it into 2 parts, then you will need others.
Ridge fencing and partitions made of the same material - boards Source pinimg.com
In the first case, you can use the same material as for the sides of the beds, for example:
- boards;
- sheet slate;
- galvanized profile;
- sidewalk thin curb.
Ready-made beds are also purchased. If the plants are supposed to be planted on high ridges, then it is best to fence them with flat slate. If desired, it can be painted. The need for the construction of high ridges is dictated by the shallow occurrence of groundwater. In such areas, it is advisable to raise the soil for the root system of plants to a certain height so that there is no waterlogging and lack of oxygen. In addition, crops become more convenient to care for. The ridges are prepared as follows:
- 1st layer (drainage) – broken bricks, gravel, short branches, chopped corn stalks, tomato tops (for cucumbers);
- 2nd layer – garden soil (for nightshades), manure (for cucumbers);
- 3rd layer – humus.
In this case, you need to leave room for mulch. Depending on the height of the fence and partitions, the thickness of the layers is also selected.
High ridges in a greenhouse on a high foundation Source teplicno.ru
Coverage selection criteria
Wear-resistant to high atmospheric and mechanical loads, the opaque coating must be resistant to ultraviolet radiation, damage by mold fungi, and destruction by moisture. It is important that it be “breathable”, moisture- and air-permeable, as environmentally friendly as possible, and in no way come into contact with plants or soil during its entire service life. What is needed is a material that has low thermal conductivity , is not afraid of strong drops in temperature , has anti-slip properties , and is easily cleaned of moss , dirt , and minor surface growth .
To cover the paths between the beds from weeds, various building materials are used that require compliance with laying technologies
Each type of coating has its own advantages and disadvantages. In factory products intended for use in outdoor conditions, almost all of the specified options are met.
Video description
An interesting way of opening and closing a window in a greenhouse is shown in this video:
Lighting
The importance of light for all plants is difficult to overestimate. Sometimes, especially at the beginning of the growing season, they need an artificial increase in daylight hours in order to quickly reach full strength. At the end of summer - to extend the period of fruiting and fruit filling.
For this purpose, you can use LED lamps, which consume very little electricity, or ordinary incandescent lamps - they also heat the air, which is especially important in the spring and autumn.
Heating
The simplest and most effective remedy is to install infrared heaters in the greenhouse. They first heat the soil, which then heats the air. You can also use fan heaters and gas heaters.
Fake diamond
This coating is similar to paving slabs. First of all, clinker decorative bricks are used as artificial stone.
- For installation, you should also prepare the soil and pour the base in the form of sand.
- In terms of cost, yes, it turns out to be expensive, but beautiful and elegant. With a long service life.
Such a coating can effectively withstand all the negative factors that are present in the microclimate of the greenhouse structure.
Durable options
It is more rational to use lightweight bedding and agrofibre as a shock-absorbing and drainage layer for more durable and reliable materials. The compacting layer must be at least 5 cm. A good hard coating is laid on top. The passages between plantings are made using flat stones, bricks, tree cuts (various types of wood) or industrial products - paving, rubber or plastic tiles.
Capital construction in a vegetable garden is only appropriate for permanent placement of high beds planned for many years
You can cast concrete blanks yourself using molds of various configurations. Making homemade blocks will allow you to save a lot of money, while they also effectively fulfill their role. Whatever category of covering for organizing interbed space is chosen, you need to inquire in advance about its characteristics and application features.