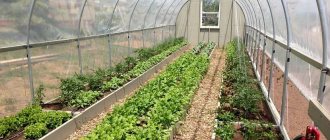
Polycarbonate greenhouses can be found in almost every garden plot. They are convenient and practical, allowing you to create a microclimate favorable for plants. When installing a greenhouse, it is important to properly plan and arrange the beds in it to provide the plants with light and moisture and create optimal growing conditions.
How to make beds in a polycarbonate greenhouse
Features of placing beds in a greenhouse
Setting up beds in a greenhouse is an important step not only on the path to growing a good crop, but also to enjoying the process itself.
The beds in a greenhouse made of polycarbonate of standard sizes are made low, 20-25 cm high. Most often they are placed along the walls, and a path is made in the center.
To make it easy to reach each plant, the passage should not be narrow. For convenient movement and care of plants, it is enough to leave 80-90 centimeters.
I don’t really want to spend the whole summer bending over until my back hurts. To avoid unpleasant sensations, experienced gardeners began to raise the beds higher and higher.
To make comfortable beds in a greenhouse with your own hands, you will have to work hard once, so that you can then take care of the plantings with ease and pleasure.
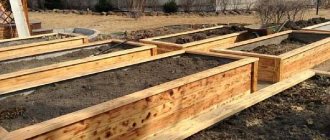
If you make high beds up to 60 centimeters high and fill them with nutritious soil, you won’t have to bend over much to loosen or tie down plants.
Caring for plants in high beds is much easier than in regular beds.
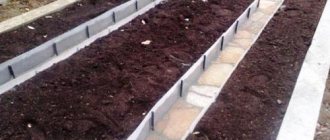
To build high beds, boxes are installed, agrofibre is laid at the bottom, drainage is made, then soil is poured, 40-45 centimeters high.
Such beds will be especially useful for regions where summers are not warm enough. Plants planted in high boxes will suffer less from the cold than those in beds located at ground level.
Nets with filling (pergons)
Stones can not only be held together with mortar, but also poured in random order into specially prepared grids. Pergons are called bulk fences and can be filled with pebbles, broken glass, and colored glass. Professionals make real works of art out of this type of fencing, filling the mesh with materials of different sizes and colors, laying out patterns from them. Any plant in such a noble frame will sparkle like a diamond.
- plus: no maintenance required. Durability;
- minus: cash investment.
Mesh with filling
How to arrange beds in a greenhouse
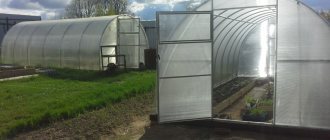
If you are planning to install a polycarbonate structure, it is recommended to place it from east to west. The wall with the door is placed from the north, and the blank end wall should be turned to the south.
You can distribute beds in a greenhouse of any size at your own discretion; there are no strict rules here, but there are established rules for organizing space:
- The width of the passages is 45-50 cm, if you plan to use a wheelbarrow, then 90 centimeters.
- The width of the ridges is no more than 1 meter.
- It is necessary to leave free space near the entrance, so the central bed should be shorter.
When planning the beds, it is necessary to take into account that over time the tops will grow and cover part of the path, so three most popular options have been developed.
- Two lanes. The ridges are located along the walls, with a wide passage in the center.
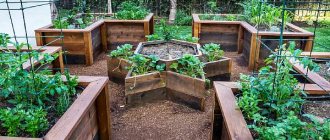
- U-shaped option with maximum filling of the area.
- Another greenhouse option is three stripes. Two on the sides and one in the center.
For the normal development of seedlings, the height of the beds is important, which depends on the type of soil.
- Low - 100-150 mm, suitable for fertile soils with low groundwater.
- Medium - 250-300 mm are suitable for crops with roots that are located closer to the surface. Suitable for soils of low fertility, so they are filled with nutritious soil.
- High - up to 60 cm. Used on infertile lands or wetlands. They are filled with fertile soil and plants with long roots are planted.
To grow seedlings faster, install heated boxes up to 80 cm high.
Border tape and other plastic products
Border tape is a fence in the form of a green or brown ribbon with a wavy or smooth surface. Can be purchased at any flower shop. Tape, like other types of decorative plastic fencing, has a number of advantages.
Pros:
- Does not rot, does not become moldy, does not rust.
- Sold at an affordable price.
- Easy to install.
- Elastic and comfortable. Can be cut and given any shape.
- Resistant to ultraviolet radiation and low winter temperatures.
Another interesting option is installing purchased decorative fences. They come in completely different shapes and colors. For example, in the form of tulips with green grass or imitating a picket fence. It has the same advantages, but it is better to remove it for the winter.
Plastic border for garden beds
In addition, the “Labyrinth” border is popular - a narrow plastic fence stylized as a stone. And the plastic panel “Garden Board” up to 3 meters long and up to 15 cm high, durable and easy to install.
Planning the placement of beds in a greenhouse
The placement of beds in a greenhouse largely depends on the size and type of structure. For example, in a greenhouse 3 meters wide, it is best to arrange beds in the shape of a rectangle. To make it easy to care for plantings, the beds do not need to be made wide.
If you plan to plant several types of plants, then plants with the same needs for growing conditions should be planted on one side. It is also worth considering their need for watering, resistance to pests and diseases.
It is not recommended to make beds in a greenhouse for tomatoes and cucumbers at the same time. They have completely different requirements.
For example, cucumbers love the greenhouse effect and a lot of moisture, and tomatoes love ventilation and moderate watering. It is best to grow one crop in a greenhouse or with a convenient neighbor.
There are three most convenient types of bed layout:
- Wide seating along the walls, and a passage between them.
- One wide ridge in the center and two narrow ones on the sides, which are separated by two paths. With this scheme, the planting in the middle can be made wider, since plants can be cared for from both sides.
- Two aisles between three narrow landings.
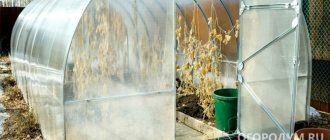
Be sure to leave space at the entrance so you can place a barrel of water or buckets for convenience.
Brick patterns
A classic of the genre - flower beds fenced with bricks on the edge. The bricks can simply be laid around the bed, half dug into the ground. Some will have two or three rows, while others will have elegant brickwork.
- plus: durability;
- minus: old brick looks unaesthetic. You may have to spend money on a new one.
Brick beds in a greenhouse
Placing beds according to cardinal directions
Lighting of plants is of great importance for a good harvest. Seedlings that receive more sunlight will produce a bountiful and “sweet” harvest.
There are two main directions:
- North South.
- West East.
North-south is more suitable for tall crops. The sun's rays will pass more evenly between the rows of seedlings. In this situation, tall plants are planted on the north side along the wall.
For low crops, the second option is best suited. It can also be used for mixed plantings.
It is not always possible to position the beds correctly so that they receive more light. In this case, you have to turn on additional lighting.
All gardeners know that the greenhouse where more light pours into the garden bed will produce more crops. When building a greenhouse structure, it is necessary to provide additional lighting.
Tires - there is no limit to imagination
Tires are most often used to frame flower beds. From them you can create any multi-tiered structure and even a flower bed in the form of a tea cup and teapot. If you cut the tires in half and dig them into the ground, you will get a wavy fence that children love to jump on.
- plus: Easy installation. Space for creativity. The highlight of the site.
Tire beds
Organization of space
When installing a structure for growing garden crops, you must remember that a greenhouse is a closed space, the correct formation of which will facilitate hard work and increase the yield of all crops.
The first thing you need to pay attention to is filling the beds with a nutritious earthen mixture.
Even after the delivery of good fertile land, the soil will need to be fertilized with rotted manure, dolomite flour, ash, bone meal and, of course, peat. Peat for greenhouse soil is necessary to ensure that the soil is porous and retains moisture well.
Having dealt with the soil, you can begin to further organize the space. Since greenhouse structures come in different sizes, they must be arranged differently inside.
If the size of the greenhouse allows, then in addition to the beds below, shelving is placed at a certain height or pots are hung in which seedlings, berries or herbs are grown.
Before planting the plants in place, many grow seedlings in a greenhouse. In this case, it is necessary to equip racks. The main advantage of this option is convenient plant care and space saving.
To save space, it is necessary to make a multi-tiered design, where the shelves can taper from bottom to top or be of the same width.
If you plan to grow several crops that require different conditions, then the space can be divided by a partition. It is recommended to use a curtain made of polyethylene film or polycarbonate sheets as a partition.
To ensure that caring for plants in a greenhouse does not take up much time, a drip irrigation system is installed in the greenhouse. The placement of the irrigation system must be carried out before the construction of the walls and roof of the structure.
When allocating space, it is necessary to provide for the installation of lamps for additional lighting and heating devices for heating during the cold period.
If the greenhouse is large, then you can fence off a place for storing equipment and changing clothes.
To maintain optimal conditions in the greenhouse, it is advisable to consider a ventilation system. You can install a special fan, or better yet, make a device that will open and close the window in the greenhouse.
Materials and heights of curbs - advantages and disadvantages
Any material can be used to zone the territory on the site. When choosing, you should take into account its features and characteristics. Borders for garden beds must be strong and reliable, able to withstand the pressure of heavy, wet soil. The specifics of the soil and the effect of chemicals on the part of the fence buried in the ground should be taken into account. You can install any garden border with your own hands; some types can be made independently from scrap materials. The size of the fence depends on the area, configuration of the flower bed or bed.
Plastic
The raw material for making borders is a non-toxic polymer. The material does not release toxic substances into the soil and does not deform at low or high temperatures. The following types of plastic fencing are suitable for any climatic conditions:
- Border tape. The flexible polymer can be 0.1-0.5 meters wide. Suitable for both forming beds and fencing shrubs. Mobile, lightweight product is easy to install. It is enough to dig a shallow trench around the lawn, stretch the tape, and secure it with stakes. Disadvantages: fragility, high probability of deformation due to mechanical damage.
- Net. Used for zoning areas, fencing flower beds and low beds. Often used as an additional barrier. Cons – does not retain moisture in the watering area, shaky, unstable structure.
- Plastic panels. Excellent moisture retention and soil pressure retention. The width of each polycarbonate piece does not exceed 15 cm; if desired, you can connect them and make a high fence. The simple design is assembled using corner fasteners and grooves.
- Garden designer. The universal set for garden beds includes several plastic parts that are connected thanks to special grooves. Can be used for flower beds, beds of any irregular shape. Plastic board. Similar to panels, but different in composition and appearance. Boards are made from wood waste and polymers. The product has the texture of natural material. The finished box is fixed in the ground thanks to hinges and stakes.
Metal
Flat curbs are made of steel, corrugated board, galvanized, coated with polymers, which significantly increases the resistance of the material to the negative effects of moisture. Decorative structures can be purchased at the store or you can make your own metal box from roofing iron and corners.
Some of the most durable types of borders expressively define the boundaries of paths and harmonize with all surfaces of garden paths. Metal fences can take the form of ribbons, rods, blocks made of corrugated sheets, and can follow any winding shape of a flower bed.
Decorative fencing has several significant drawbacks - it quickly heats up in the sun, which is detrimental to plants in contact with it. You can reduce the temperature by lining the inside of the fence with cardboard. The high cost of the material also reduces the demand for this type of border.
Brick
The brick border looks reliable and solid. Facing bricks can withstand temperature changes, street conditions, and constant contact with the soil. Simple material for marking boundaries allows you to adjust the height of the structure and fits perfectly into any design of the local area.
Any owner of a summer cottage can make a border out of brick or foam block on his own. The work does not require special construction skills. Fast and easy execution is supported by an affordable price. Thanks to the universal shape of the red bars, you can design borders of any shape - in the form of a ladder, in rows on an edge. Negative aspects include the need to fill the foundation and lengthy phased installation.
Concrete strip fencing
Durable concrete mortar curbs have the longest service life. The permanent structure is installed on previously prepared soil. You will also need to make formwork and prepare a solution of cement, water, sand. The form for pouring can be made from wooden boards or plywood, taking into account the width of the future fence - it should be at least 15 cm.
Practical concrete curbs do not change the acidity of the soil. Such a fence can be stretched across the entire site, beds and flower beds can be decorated in the same style, and pedestrian paths can be identified. You can diversify the gray unsightly material with the help of mosaics. The top edge of the border is decorated with glass fragments, colored stones, shells, and the bottoms of glass drink containers.
The disadvantage of strip concrete fencing is its heavy weight and inability to be dismantled. Such a board cannot be installed on loose soil. From an aesthetic point of view, it is suitable for beds with massive, tall crops. Delicate strawberries and primroses will look ridiculous against the background of a concrete fence.
Natural or artificial stone
Stone fences have the most attractive appearance. Decorative, artificial stone is not inferior in strength to concrete and brick. The variety of materials allows you to create real design masterpieces, making simple, elevated structures.
Garden beds with a stone fence are a bright picturesque element. The surface of the parts can be smooth, chipped, fired, polished, aged, etc. Regardless of the design, the natural material does not lose its attractiveness and looks beautiful at any time of the year. You can combat inevitable contamination with the help of special impregnations.
Artificial stone imitates the look and texture of natural material, but is cheaper. Durable borders can be given any shape. The only difficulty is the need for minimal masonry skills, alternating uneven edges to obtain a durable fence.
Wattle
Once upon a time, an unchanging attribute of a rural yard was very popular. The wattle fence was present at every site. Modern summer residents use a semblance of tyn to create original beds and flower beds in an ethnic, eco style. Wicker structures will give the site a natural look without any financial investment.
Frame borders made of flexible branches have mainly decorative value and go well with other materials on the site. These can be hanging or ground beds. Fences can be dug into the ground or installed without fixation and moved in any direction. To stretch the vine between the posts, several methods are used: horizontal, vertical, checkerboard, oblique.
Tree
A classic option for framing beds. You can use wood of any size and finishing method. The materials used are clapboards, slabs, scraps of boards, solid barrels, and logs. With cheap, affordable material you can easily cover a flower bed in any area; it has a natural, aesthetic appearance. The box can be left without a bottom or the bottom of the frame can be covered from rodents with a metal mesh.
But not every wood is suitable for growing vegetables. Some rocks can emit resins that negatively affect the soil composition. Also, wooden borders must be periodically treated with an anti-rotting solution.
Pergones
Steel boxes with crushed filler look modern and neat. Lattice tall boxes are filled with crushed stone, pebbles, and stone treated with glass. Functional, practical, aesthetic borders fill the area with harmony and tranquility, emphasizing the closeness with nature.
The beds can be made from solid structures or individual blocks can be installed at a distance. These can be low, high, multi-tiered sides. A fence and paved paths will perfectly complement original products of the same type. The cost of pergons is influenced by the filler, type of fastening, profile, and the need for a foundation. In any case, it won't be cheap.
Arrangement of beds depending on their type
Making beds in a greenhouse with your own hands is not difficult if you choose a convenient option and a new way of growing vegetables and berries.
Many gardeners have already used Mittleider beds, high heated beds, warm and vertical beds.
Beds according to Mittleider
An interesting method of growing seedlings according to Mitlider involves saving space in the building.
American vegetable grower J. Mittleider has developed an optimal way of planting plants, where each sprout receives a lot of light and is well ventilated.
According to Mittleider, beds in a greenhouse should be made in this way.
- Orient the plantings in the north-south direction.
- Level the soil horizontally.
- The width of the beds in the greenhouse is no more than 45-50 cm.
- The seedlings are placed in 2 rows along the long walls, leaving the center of the greenhouse free (the distance between the seedlings is 30-40 cm).
- A side about 10 cm high is made along the edge of the bed (as a rule, soil is poured or formwork is installed).
- The height of the ground does not exceed the height of the passage.
- A passage 90 centimeters wide is made between the ridges.
For sowing, you can use boxes made of boards, which are filled with nutritious soil. Ridges made from wooden boxes have their advantages. If necessary, the old soil can be pulled out and new soil freed from pests and diseases can be added.
Raised beds in a greenhouse
The main reason for arranging high beds, up to 60 cm in height, is the convenience of caring for seedlings and the ability to plant plants earlier than other gardeners.
The tall structure raises the soil above the frozen ground, so you can start planting a little earlier than usual. And all because high ridges become warmer.
The warmth of the soil is given not only by the height, but also by what the boxes are filled with:
- The first layer is geotextile or something similar;
- Then sand, mown grass, wood chips, branches, peat, manure;
- Next is ordinary land;
- Pour boiling water generously and cover with film.
In such a bed, organic matter will begin to slowly decompose, filling the contents with warmth.
Warm beds
Warm beds come in several types: electric, biological, water. Having occupied the greenhouse with such beds, plants can be planted on them as early as March.
The most accessible option is considered to be the biological one, when a layer of sand is laid out at the bottom of the bed, then drainage and all organic residues in the form of grass, branches, leaves, and compost. The biological bed will last at least five years.
To make a warm electric or water structure, special preparation of the place in the greenhouse is necessary. First you need to dig a trench, then make sides. If you decide to build an electric bed, then you should put an electric cable or tape on the bottom. Next, you should install a thermostat to maintain the desired soil temperature.
There is a similar way to create a warm structure when metal pipes are placed at the bottom of the bed. Arranging a water option for heating the soil will require installing a stove to heat the water and a pump to circulate it through the pipes.
The principle of making all types of beds is the same. The first step is to draw the layout and dimensions of the beds. The diagram and calculations will help you place the plantings conveniently and compactly.
Wooden fencing
One of the most common options, such as slats, boards and beams, is found in almost every dacha. You can also use clapboard, slab, picket fence, cut or uncut board.
Tip: If you are fencing a piece of land with a board, then you need to make several supports around the perimeter and firmly bury them in the ground.
Board beds
For areas decorated in a rustic style, hemp or wattle from willow branches are perfect. Or small logs dug vertically into the ground.
- plus: the tree looks elegant and natural. You can show your imagination and build something special, for example, a multi-tiered flower bed;
- minus: under the influence of moisture, the wood can become covered with fungus or rot. Such borders need to be constantly looked after, treated with an antiseptic, and repainted.
Tip: To increase the service life of slats or logs, you need to dip the lower part in bitumen mastic or wrap it tightly with roofing felt.
Placing beds in a greenhouse
Most often, 2 or 3 beds are arranged in a greenhouse. If the width of the structure is 3 meters, then 2 passes can be made, the width of each passage is 0.55 meters. Plantings are 0.6 meters along the walls, and 70 centimeters in the center. With this arrangement, each plant will receive its own portion of care.
If the structure has a door at the ends, then it is best to plant tomatoes in the middle. They love ventilation and are not afraid of drafts. Near them you can sow a row of parsley, cilantro, and radishes. The whitefly won't even get close to your seedlings because it can't stand the smell of cilantro.
It is better to leave the eastern or northern bed for cucumbers. You can protect from drafts with a film curtain. The western and southern sides must be left for eggplants and peppers. To reduce humidity, the base of the plants should be mulched with humus or compost.
In early spring, the greenhouse should be sowed with mustard. Then leave it as mulch. Tomatoes will be protected from late blight.
The placement of beds in a greenhouse is almost the same everywhere. But you can consider new products tested by gardeners.
Arrangement of beds in a 3 by 4 m greenhouse
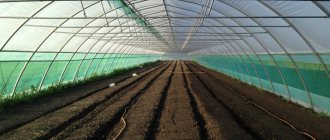
Rational distribution of beds in a 3x4 greenhouse will also help to grow as many vegetables as possible. In a small greenhouse, it is most rational to distribute plantings along the entire length of the room in 2 rows.
Planting pattern in a 3x4 structure: the beds are located along the walls 1 meter wide, with a passage made in the center. In the beds, plants are planted in 2 rows or in a checkerboard pattern.
If the seedlings are positioned correctly, then 50 bushes can be placed, with a distance between bushes of 400 mm. Then 15 bushes can fit in one line. In a small space, you can make three rows by reducing the width of the tracks.
The technique of planting seedlings in three beds allows for a checkerboard-type planting method.
Calculation: It is recommended to compact the distance between seedlings to 300 mm, then up to 25 bushes can be placed in one line.
If the time has come to plant seedlings, then you need to choose a method based on the cardinal directions. It is better to plant low crops from north to south so that the sprouts receive more light.
High crops from the west to the eastern edge. With such a planting, the sun's rays will penetrate into the aisle, feeding the lower row of foliage.
When planting vertical beds, you need to ensure that the sun’s rays illuminate even the bottom row of the structure.
How to make beds in a 3x6 greenhouse
Often the beds are arranged in 2 rows. Many plants in such structures are planted in a checkerboard pattern.
Plantings in a 3x6 greenhouse can also be distributed in 3 rows. Two are along the side walls, and the third is in the center of the space. The distance between them is 50 cm. In the center, the width of the bed is approximately 1 meter, and the side beds are 45-50 cm. Tall plants are planted in the middle, and low-growing ones on the sides.
For greenhouses in which tomatoes are grown, several layouts of tomato plantings have been thought out.
The most correct beds in a greenhouse for tomatoes are those distributed according to ripeness:
- Mid-early and mid-season varieties should be planted in the middle of the ridge.
- Early ripening tomatoes should be placed on the sides.
This distribution of tomato varieties will allow you to always have fresh, juicy tomatoes on the table.
Tomato plants can also be distributed according to the growth of the bushes. Tall ones should be planted closer to the wall along the east-west line. Low-growing tomatoes should be planted so that they are not in the shadow of tall tomatoes.
It is best to distribute the beds in a 3 by 6 greenhouse by making three rows of the same width. To plant as many plants as possible, the paths should not be too wide.
Sufficient dimensions: two paths of 0.4 meters each, three beds of 0.7 meters each. By narrowing the paths, the three ridges will be quite wide and comfortable.
What can you plant?
What to plant in a high bed depends on the air temperature and other factors. As a rule, there are no special restrictions. You can plant:
- cucumbers;
- carrot;
- strawberries;
- greenery;
- other vegetable and fruit crops.
The limitation concerns only temperature. In high beds it is higher, as is the amount of sun. For strawberries and cucumbers, this is critical. You need to select the right plant varieties.
What to make beds from in a greenhouse
Fencing for garden beds is made from various materials that can be found on the farm. Most often they are made from flat slate, wood, DSP, plastic, brick, galvanized steel with a polymer coating, and polycarbonate sheets.
Wooden fencing for garden beds
Good boxes are made from wood treated with special preparations that protect against rotting.
The height of the wood product depends on the crops that are planned for planting. The deeper their roots lie, the higher the sides become.
Options for wooden boxes:
- Low. The frame rises 10-15 centimeters. The products retain heat for a long time and are suitable for greenhouse structures without proximity to groundwater.
- Medium - the frame is raised by 20-40 cm. Suitable for cucumbers, zucchini and all crops with weak roots.
- Tall - from 40 to 70 cm, suitable for wetlands. The beds heat up quickly, but require intensive watering.
Slate beds
Slate is resistant to rain and snow, so it is often used to construct barriers in greenhouses. This material is convenient to work with. It is enough to cut it into pieces of the required size and the fence can be installed.
Such a bed will last 10 years, then the slate may have to be replaced.
Metal boxes
Metal boxes can be purchased and installed in the greenhouse. The structure already has a protective coating, so there is no need to be afraid of corrosion. Such boxes will last at least 30 years.
The convenience of such products is that they can be moved to any place.
Ceramics, plastic, polycarbonate
What else can you make a bed from? Ceramics, plastic, polycarbonate are also very reliable and durable materials. Thanks to fences made of these materials, the soil inside will not crumble, and the communications inside will be protected from damage.
These materials are also good because when planting seedlings, you can stretch a transparent film over the fences, making a greenhouse. Rodents will not approach your plantings if the fences are deepened. The figure shows planting patterns.
Stone fences
For those who prefer environmentally friendly raw materials, fences made of stone, for example, made of cobblestones of approximately the same size, are perfect. They are used to build a fence, fastening the stones with mortar. It turns out beautiful and noble.
- plus: durability. No need to paint;
- minus: painstaking work. A heavy fence can sag under its own weight, this needs to be monitored.
Stone beds
Choosing an installation location
The choice of the location where the boxes are planned to be installed must be approached no less thoroughly than their design. To get a rich harvest, it is important to focus on the needs of the plants.
It is best to place high beds on flat, illuminated areas of the garden, with the long side facing south. This will allow the warm rays of the sun to evenly illuminate the plantings. You should take into account the presence of bushes and trees growing nearby, especially tall ones, as well as buildings and fences, the shadow of which can block the access to the necessary light and heat. Light shading is allowed in the morning and afternoon, which is most important for hot regions with scorching daytime sun.
In areas with a difference in height, the space allocated for the boxes is pre-leveled