How to make beds in a polycarbonate greenhouse? This is one of the most asked questions today. Fencing made from this material has many advantages. After all, with the help of polycarbonate fences you can achieve not only an aesthetic effect, but also functionality.
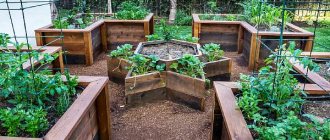
This is what an assembled polycarbonate bed looks like
Return to contents
Features of placing beds inside the greenhouse
There are no standard recommendations for the location of beds inside a greenhouse, since such structures have different sizes and shapes. When planning a greenhouse, there are a few basic rules to consider.
From the point of view of experienced gardeners, the most reasonable thing is to place the greenhouse and beds in it from north to south. However, for short plants, an orientation from west to east is also acceptable.
If the terrain forces the structure to be placed on a slope, then the beds must be formed perpendicular to the slope of the ground. This technique makes it possible to improve the illumination of plants.
When planning the size and arrangement of beds, it is important to take care of the rational use of every centimeter of usable area. At the same time, we should not forget about the ease of movement inside the structure when caring for cultivated plants.
Organization of space
When installing a structure for growing garden crops, you must remember that a greenhouse is a closed space, the correct formation of which will facilitate hard work and increase the yield of all crops.
The first thing you need to pay attention to is filling the beds with a nutritious earthen mixture.
Even after the delivery of good fertile land, the soil will need to be fertilized with rotted manure, dolomite flour, ash, bone meal and, of course, peat. Peat for greenhouse soil is necessary to ensure that the soil is porous and retains moisture well.
Having dealt with the soil, you can begin to further organize the space. Since greenhouse structures come in different sizes, they must be arranged differently inside.
If the size of the greenhouse allows, then in addition to the beds below, shelving is placed at a certain height or pots are hung in which seedlings, berries or herbs are grown.
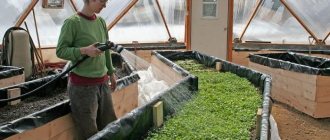
Before planting the plants in place, many grow seedlings in a greenhouse. In this case, it is necessary to equip racks. The main advantage of this option is convenient plant care and space saving.
To save space, it is necessary to make a multi-tiered design, where the shelves can taper from bottom to top or be of the same width.
If you plan to grow several crops that require different conditions, then the space can be divided by a partition. It is recommended to use a curtain made of polyethylene film or polycarbonate sheets as a partition.
To ensure that caring for plants in a greenhouse does not take up much time, a drip irrigation system is installed in the greenhouse. The placement of the irrigation system must be carried out before the construction of the walls and roof of the structure.
When allocating space, it is necessary to provide for the installation of lamps for additional lighting and heating devices for heating during the cold period.
If the greenhouse is large, then you can fence off a place for storing equipment and changing clothes.
To maintain optimal conditions in the greenhouse, it is advisable to consider a ventilation system. You can install a special fan, or better yet, make a device that will open and close the window in the greenhouse.
Common sizes of greenhouse beds
The size of the beds inside the greenhouse is directly affected by its size, purpose and the type of farming chosen by the gardener. A competent approach requires the presence of sufficiently wide passages between the beds. This is necessary not only for the convenience of the gardener, but also for ventilation of the plants.
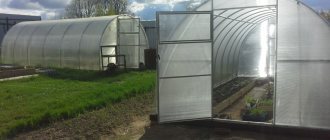
Ready-made greenhouses have standard sizes. The most popular ready-made options today are arched greenhouses measuring 3 by 4 or 3 by 6. Such a structure is enough to provide fresh greenhouse vegetables to a family of 3 or 4 people.
There are several ways to place beds in a 3 by 6 greenhouse:
- a large U-shaped bed along the perimeter of the structure and a small narrow one in the middle;
- wide ridges along long walls with one technological passage;
- three beds about 70 cm wide and furrows 40 cm wide.
It is important to remember that the row spacing directly depends on the dimensions of the structure. The longer the structure, the wider the technological passages should be to ensure normal ventilation of the plants.
The width of the beds in a greenhouse is to a large extent determined by the purpose of the structure. To grow cucumbers, you should make wider beds than for tomatoes. But sweet peppers feel comfortable on a ridge of any width.
Sides made of wood, foam or polycarbonate
When thinking about what is best to build the walls of a high bed with your own hands, many people prefer ordinary boards.
However, you should remember: if ants spread throughout a greenhouse with wooden formwork, it will be very difficult to drive them out, because the abundance of cracks creates ideal conditions for their existence.
Among other things, the wood must be treated to prevent rotting. If this is not done, the walls will crumble into dust in just 2-3 years. For this purpose, a variety of antiseptics are usually used, which significantly extend the life of the boards.
Traditional methods of protection include drying oil heated to a boil. The board is treated with it twice on all sides.
It’s quite simple to build sides for a garden bed from boards:
- decide on the sizes;
- Drive in bars pointed at the bottom (50 by 50 mm) into the corners of the bed;
- Attach the boards to them using self-tapping screws.
Keep gaps to a minimum. By the way, the optimal height for such beds is 60-80 centimeters. Many people make formwork from polycarbonate or extruded foam. Both options have a number of advantages:
- good thermal insulation;
- ease of processing (all you need is a knife);
- convenient sizes.
True, polycarbonate is very flexible, so it needs quite a lot of additional spacers (for example, from reinforcing bars).
In the case of polystyrene foam, we recommend taking sheets with a thickness of at least 40 millimeters. They are placed in a frame consisting of:
- 4 bars driven into the ground;
- 16 planks (four on each side of the bed).
How to make beds in a greenhouse correctly
Owners of a new, newly installed greenhouse are especially interested in how to properly make beds in a greenhouse. It is not difficult to cope with the task by adhering to a simple algorithm of actions.
- Along the perimeter of the structure, it is necessary to remove the turf to a depth of about 20 cm. After this, the roots of the weeds should be carefully selected.
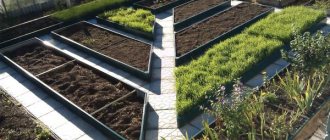
- The area inside the greenhouse is marked using a cord and pegs, planning the placement of ridges and convenient passages between them.
- The areas where the beds are planned to be placed need to be dug up and humus, high peat or complex fertilizers applied.
- According to the markings, it is necessary to mount the sides of future beds and, if necessary, add additional nutrient soil.
- An alternative to soil will be the remains of various plants if you plan to arrange warm beds. The height of the beds, regardless of their type, must be at least 20 cm.
- Technological passages are leveled and the earth is compacted. Furrows are often mulched or covered with dense material to prevent the growth of grass and weeds.
- If necessary, a drip irrigation system is installed in the beds, then the soil is protected from drying out with mulch.
If desired, it is not difficult to convert the beds in an existing greenhouse. To do this, it is necessary to dig up the soil, cut furrows, and compact the surface of the soil in them properly. If necessary, add additional nutritious soil or high-moor peat that has a neutral acidity to the beds.
Frame installation and sheet fastening
As soon as the materials for work are prepared, you can get down to business. First, the area is prepared. The ground must be carefully leveled and compacted. After this, metal poles for the frame are installed every 50 cm.
Grooves are dug under them, which will subsequently need to be half filled with sand and crushed stone, the pillars themselves must be installed directly, and then the so-called “cushion” must be compacted and crushed stone must be added to the top.
It is not advisable to use cement. Once the vertical posts are installed, it will be necessary to secure the horizontal frame elements between them. To do this, it is important to use self-tapping screws and metal corners. If the final version of the frame structure seems shaky, it is necessary to further deepen it into the ground another 5-10 cm with a hammer, and compact the areas near the pegs well.
The process of attaching polycarbonate sheets to the metal frame of the garden bed
Once the metal frame of the polycarbonate fence is ready, you can begin cutting the polycarbonate sheets.
A jigsaw or hacksaw is used for this. It is advisable to first make a drawing, and then cut out sheets of the required sizes. Particular attention should be paid to the height of the sheets. It is extremely important that it be the same. Otherwise, the polycarbonate fence will not look neat. First, markings are applied to the sheets, and only then the material is cut using them. Next, you should sand the edges of the polycarbonate in those places where the material was cut. This will make it possible to obtain safe sheets that will not subsequently injure fragile plants. After this, you can begin installing the sheets to the metal frame. It is strictly not recommended to lay sheets overlapping, as this can significantly reduce the quality and rigidity of the structure. It is best to leave gaps of about 2-3 mm between them. The sheets should be secured to the posts using metal corners on the inner surface of the future fence. The sheets are additionally fixed to the horizontal crossbars using screws or self-tapping screws.
Be sure to use a building level when performing work. This allows you to identify and correct existing distortions in a timely manner. After all, it will be quite difficult to change the design later. It will be necessary to completely dismantle the entire fence.
Return to contents
What can beds be made from in a greenhouse?
The easiest way is to make ordinary beds in a greenhouse without additional fencing. However, their height will be small, and the edges will spread out when watering and cultivating the soil. This option is acceptable for the construction of a small area.
A more practical and aesthetic way to design greenhouse beds is a special frame. It will allow you to make the beds higher and keep the fertile soil from falling into the technological passages.
There are several options. You can clearly study the most common ones in the photo of arrangement of beds in a greenhouse.
Plank frame
The most affordable material for fencing greenhouse beds is wood. It is not difficult to make a box from it or make strong sides, securing them with timber supports. Any gardener with a minimum set of tools can handle the job.
The disadvantages of this option include:
- the need for additional surface treatment of the boards to make them smooth;
- the use of protective compounds against mold, rot and fungus;
- instability of wood to moisture.
Impregnating it with special protective compounds against rot and fungus will help extend the service life of a wooden frame. It is recommended to treat the surface of the boards to avoid splinters when working with soil and caring for greenhouse crops.
Slate frame
Gardeners often use remnants of old slate to create greenhouse beds. It will need to be buried approximately 20 cm into the ground, leaving a side up to 25-30 cm high on the surface.
The advantages of this material include the ease of working with slate and the availability of the material. The list of obvious shortcomings includes the fragility of slate and the presence of sharp chips, which can easily cause injury. Such a fence does not look very aesthetically pleasing, but it lasts quite a long time in the absence of serious mechanical impact.
In addition to slate, remnants of PVC panels, galvanized iron, and curb stone can be used.
You should know that in the autumn, when disinfecting a greenhouse, such fences must be washed with warm soapy water. This will help get rid of harmful insect larvae, fungal spores and bacteria.
Advantages
High beds always warm up faster, because they are not in direct contact with the freezing ground. This means that plants can be planted faster, which will naturally ensure an earlier harvest.
Such raised beds are often made in the form of a multi-layer cake:
- build sides;
- geofabric or thermal insulation is placed on the bottom;
- pour sand;
- a mixture of peat, leaves, tops and manure;
- pour boiling water over everything and cover with cellophane;
- Fertile soil is placed at the very top.
Such a bed, thanks to the slow decomposition of organic matter, will produce heat on its own.
Warm beds
For some time now, warm beds in a greenhouse have been in demand among gardeners, as they help to obtain an early harvest of greenhouse vegetables. Creating beds with a cushion of manure in a greenhouse should be done in the fall.
Making such a bed is not difficult. You will need to dig a small trench, having previously moved fertile soil from the ridge. Manure, mixed humus, and the remains of various plants are laid as the bottom layer. This base is covered with nutritious soil.
With the seedling method of growing greenhouse vegetables, this method allows you to get the first harvest 15-20 days earlier than using conventional beds. However, after 3-4 years, the lower “cushion” on the warm bed will need to be re-equipped.
The decision about which beds to arrange in a greenhouse is purely individual. When choosing an option, you need to focus on the method of growing plants and their varieties. When planning the size and height of greenhouse beds, it is important to take care of the ease of caring for greenhouse plants.
Tools and materials
First you need to decide which beds need to be fenced with material. Experts advise that in large greenhouses, all plants should be separated from each other using polycarbonate sheets. Next, you should calculate the approximate amount of material. Remember that it is better to buy polycarbonate with a little extra than to run to the store again. To work, you must prepare the following materials and tools:
- The sheets themselves are high-quality polycarbonate.
- A jigsaw that can be used to cut material without deformation.
If the sheets are thin enough, then instead of a jigsaw it is permissible to use a fine-toothed hacksaw. But in the case of thick material, the best option would still be a jigsaw, since a hacksaw will cause cracks on the surface. The process of cutting a polycarbonate sheet into sections for a bed - Drill with different drills and screwdriver.
- Set of screws.
- Tape measure and pencil for marking.
- Building level.
- Small spatula.
- Hammer.
- Sand and crushed stone.
- Aluminum auxiliary blank for the construction of a fence frame.
- Metal corners and screws.
Return to contents
Photo of beds in a greenhouse
What rules should you follow when planning a country greenhouse?
The layout of the beds must be done correctly. If you make them wide, the harvest may suffer. To reach the plant, you will have to step on the bed.
Arranging beds in a 3x6 polycarbonate greenhouse
And this will entail undesirable consequences: you can damage the root system or compact the soil. When roots develop slowly due to mechanical damage or reduced permeability of the soil, the plant will produce less fruit. It all depends on which method you prefer. Make the width of the beds no more than 90–95 cm if you plan to grow plants on racks. When planted directly in open ground, the maximum width can reach 1.2 m.
The size of the passage must be wide enough so that you can move freely in it:
- 90 cm. When it is necessary to transport a wheelbarrow along the central aisle, then it is better to make it spacious. In this case, you will not damage your plantings when moving. This space will be needed when plants are planned to be grown in pots or tubs.
- 50 cm. This is a suitable width if the summer resident intends to use the passage exclusively for walking.
Layout and location of beds in a greenhouse measuring 3x8 meters
Increasing the area for the growing area
A rectangular layout of the site with your own hands allows you to distribute space with maximum benefit. Often, summer residents create more beds with the maximum possible width by reducing the size of the passage.
For example, they often make 3 beds, where the width is 1.2 m, and 2 passes of 30 cm each.
Experienced gardeners have their own trick on how to avoid stepping on crops. Concrete blocks are placed on the beds and in the aisle, and wooden boards are placed on top of them. Thanks to this design, you can reach any plant.
Layout of beds in a greenhouse with a geodome
The layout of a geodesic greenhouse has a number of significant differences:
- the main bed is the largest in width and is located along the walls of the structure.
The optimal width is 1-1.2 m; Scheme of a greenhouse with a geodome - a passage is made from the main bed into the middle, its width should be 1.5 m;
- high wooden sides are installed on the sides, and you can sit down on them to relax while working;
- when there is a lot of usable area left after the construction of the bed, then an additional bed with a width of 1 m is made;
- after the second bed, a narrow passage is arranged;
- the center of the structure may be a circular tank or a raised bed. The container is filled with water, which warms the air at night. It can also be used for watering.
The geodome is usually made of polycarbonate. The material is not as transparent as glass, but it is durable and has the ability to retain heat. A solar battery on the surface of the polycarbonate allows you to maintain the desired temperature inside. It is located at the top of the dome.
Mitlider greenhouse layout
An interesting solution for planning is the arrangement of beds proposed by the Canadian doctor Mittleider. He carried out the experiment for 50 years. As a result, the Canadian scientist made conclusions regarding the optimal sizes:
- the bed should be 45 cm;
- the passage should be left at least 90 cm.
This planting allows you to provide the most comfortable conditions for plantings. Plants are well ventilated. Each of them receives a sufficient amount of sunlight. Such conditions are most favorable for the development and growth of plants.
To set up such a greenhouse, you will need to get a compass. The location of the beds should be in the north-south direction. Make sure the soil surface is horizontal. The high yield is due to the use of balanced fertilizers.
Timely watering is considered an important factor. And loosening the soil is not required. The doctor gives recommendations for creating beds on any terrain. If the soil is poor for cultivation, then large boxes with a width of 1.2 m - 1.5 m and a height of 40 cm should be installed inside the greenhouse.
Prepared soil is poured into the boxes. These ridges are perfectly warmed by the sun's rays, and pests do not infest the plantings. However, plants require increased watering. If you agree with the doctor’s opinion, build your own Mitlider greenhouse from polycarbonate.
Features of a warm bed
Many gardeners are accustomed to surprising others with their achievements. Their harvest of zucchini the size of a good wild boar cannot go unnoticed. Other vegetables also grow better than others. The secret is quite simple. Summer residents plant their crops in compost or warm beds.
Diagram of the device with the dimensions of the warm bed
Productivity increases, and the soil does not need to be plowed. During the decay of organic matter, heat is released, which warms the soil well. Carbon dioxide accumulates above the compost layer, which is involved in the process of photosynthesis. This promotes rapid plant growth. The temperature inside warm beds is higher than the surrounding soil. This allows you to plant early seedlings. The period of growth and fruiting of plants increases. The warm bed is arranged as follows:
- Create a mound of earth with a height of 20 cm. Install board borders along the edges of the bed. If a summer resident is going to grow greens or early-ripening vegetables, starting in early spring, then the height rises to 80 cm. This height ensures optimal heating of the soil, and to prevent the soil from drying out, there should be water in a container nearby.
- Horse manure will help in creating a warm bed. It is important to prepare it in advance.
The process of installing a warm bedIt is best suited for garden beds: it generates a lot of heat. For several days it maintains a temperature of 70 degrees, in the next 20 days - 30 degrees. You can speed up the decomposition process by adding a mixture of one part straw and three parts sawdust. Form the beds after the manure begins to rot; the inside of the pile is heated to 45 degrees. If horse manure is not available, it can be replaced with pork or sheep.
- The first layer is 15 cm thick sawdust. Rotted manure is evenly distributed on top. Its layer should be about 30 cm. Carefully compact the future bed. Pour boiling water over it. You need to wait two days to let the manure brew. Do-it-yourself soil mixture or fertile soil is poured on top. It is easy to prepare the soil mixture yourself: mix equal parts of turf soil, peat, sawdust and humus.
If there is no manure, then a thermal cushion is made in the following way:
- Wooden chips or finely chopped wood are placed underneath;
- on top - pulled out weeds without seeds with food waste;
- the third layer consists of fallen leaves (you can add waste paper, rags or sawdust here);
- pour urea over the resulting layered “pie” (you can use diluted bird droppings instead);
- to speed up the decomposition process, add appropriate preparations;
- compact the pillow and cover it with black film to warm it up;
- after 7 days, pour 30 cm of soil on top and start planting seedlings.
Alternative methods of fencing for garden beds
Polycarbonate sheets are the same popular building materials for greenhouses as boards are for fencing garden beds. In addition to wood, alternative options can be used:
- Aluminum sides. Finished products coated with polymers are durable. They are not afraid of humidity or heat. It is convenient to select their sizes. Knowing the dimensions of the polycarbonate greenhouse (3x6 \m) and the number of beds, it is not difficult to calculate how many sides you need. Galvanized beds are perfectly level.
- Sides made of slate and metal profiles. Such materials guarantee high-strength fencing. However, you can easily get injured by carelessly cut edges.
- Sides made from tires. To make elements for the fence, each tire is cut into 2 halves. The layout of the garden acquires originality thanks to the shaped beds. The dark color attracts the sun's rays, and the tire gives off heat to the soil. However, if there is a shortage of space, this option is not suitable: these sides take up a lot of space.
- Bottle sides. Beds with a height of 20 cm can be fenced using glass bottles filled with water. Each element of the fence should be dug into the ground. The dark glass of champagne bottles attracts sunlight.
- Sides made of concrete or brick.
To make concrete sides, formwork is installed into which the solution is poured. The soil needs to harden after the concrete has completely hardened. Brickwork will take time. However, such a durable fence can be raised to any height. The process of constructing a concrete bed
Build a greenhouse and properly plan the land. Then each bed will delight you with its rich harvest. Make the conditions in the greenhouse favorable for plant growth. Arrange warm beds. And harvest several crops per season.