- Updated: September 3, 2020
Working in the garden becomes a real chore for many. Every season you have to do some preparation - remove plant debris and weeds, loosen the soil, mark out the beds. At the same time, the work is not always justified: low quality of the harvest and pests can ruin everything. Some gardeners get rid of such problems once and for all by using smart bed technology. Next, we will look at the features of the approach to growing plants in a summer cottage and determine a list of necessary actions.
Features of smart beds
The technology of smart or lazy beds involves the formation of a special layout on the site, periodic rotation of planted plants, and the use of materials that protect the soil from excess moisture and weeds. The integrated approach is based on two well-known methods:
- Permaculture is the creation of an ecosystem on a site that emphasizes the absence of chemicals and the natural interaction of plants.
- Mittleider beds - growing vegetables and berries on narrow beds maintaining a certain distance between them.
Some gardeners call smart garden beds an activity for the lazy. This is justified by the absence of the need to dig up the site in the off-season and the minimum amount of fertilizer. In practice, the proposed approach makes it possible to save a lot of time, while getting a good harvest and increasing soil fertility without hassle. Even older garden owners can cope with most of the tasks.
Location
When planning the location of smart beds, you must remember that most plants need good lighting; in the shade, the number of fruits set is reduced. Areas that are shaded during the day should be designated as ornamental crops or a recreation area. In addition, it is necessary to take into account the degree of moisture-loving plants; The more watering is needed, the closer the bed is located to the source of water.
In order for the entire area of planted plants to bear fruit, the beds are located strictly from north to south.
Creating smart beds
Of course, the approach to organizing a summer cottage cannot be called as simple as possible. You will have to work hard during the initial arrangement of the territory, because you need to properly organize the ridges and protect them from weeds. You won’t be able to do it without investing money - you need to buy fencing materials and a covering film that will help achieve the moisture level the plants need.
In general terms, the list of work on creating a smart garden looks like this:
- Cleaning the area of plant residues from last season and weeds, lightly loosening the soil.
- Marking, during which the locations for future beds and the passages between them will be determined.
- Preparing boxes or trenches that will be filled with soil and plants.
Depending on the size of the garden, preparation may take from 2-3 days to a week. It is worth remembering that properly created conditions will help save time and effort in the future. You can verify the effectiveness of smart beds already during the first harvest. If you are not satisfied with the result, you can return the site to the condition it was before the start of work in just a couple of days.
Optimal time for work
It is better to start transforming your dacha in the spring, after all the snow has melted and the sun has dried the top layer of soil. The moisture will go quite deep, so you won’t have to dig into the dirt. For many regions of the country, the optimal time is mid-April. The time before the snow finally melts can be spent usefully by pruning and cultivating fruit trees and berry bushes, including strawberries.
If the plans include a complete change of the site associated with construction or other serious work, then the arrangement of smart beds can be postponed until the fall. In this case, before planting begins, the soil in the prepared boxes or trenches will have settled sufficiently and been well saturated with moisture.
Site preparation
The arrangement of plants is the key to obtaining a high yield and comfortable care of the territory. The main emphasis is on natural light, because almost no plant can germinate properly without light. The rule of orientation according to the cardinal directions will help here - the ridges should be placed strictly in the north-south direction.
It is worth considering that the boxes or trenches in which the seedlings will be placed are rectangular in shape. Accordingly, it would not hurt the owners of non-standard plots to obtain a site plan. You can find it in the documents for the dacha and use it as a guide for the distribution of beds, recreation areas and equipment.
Advantages and disadvantages
The raised layer of smart beds allows you to isolate them from the soil layer. Each site owner can make simple box-shaped structures with his own hands, using available materials.
Among the main advantages of warm (smart) garden beds it is worth highlighting:
- Possibility of independent choice of shape, shade, coating and general design of structures. If you wish, you can create amazing compositions that will transform your garden.
- With the correct organization of sowing technology, you can achieve 2 harvests in one season.
- If the bed is properly maintained, the soil will be maximally saturated with mineral elements.
- The raised design makes it easy to care for vegetables.
- Reducing time for caring for the garden.
The disadvantages of smart beds are:
- Inappropriate and even unprofitable use in regions with arid climates.
- The need for systematic fertilizing. Raised soil requires frequent fertilization of the soil, which will make it possible to obtain a hefty harvest.
- Increased risk of developing unfavorable microclimatic conditions at the bacterial level compared to ordinary soil.
- It is impossible to grow spinach, lettuce, and beets in raised beds. The listed plants die in such conditions. This is explained by the discomfort that cold-resistant crops experience in well-warmed soil.
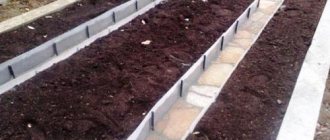
Paths between raised beds can be tiled
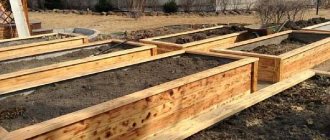
Beds in boxes
Arranging plants in special boxes is considered the optimal solution due to the effective distribution of space. In addition, when placing such structures in the future, it will be more convenient to fill the space between the beds. To create a box, you can use wooden boards. An alternative is slate, mounted on a sheathing made of the same wood. Recommended dimensions:
- width – 0.5-1 m;
- wall height - if the climate is humid, up to 0.5 m, in other cases 0.1-0.2 m;
- length – unlimited;
- the distance between the beds is up to 1 m.
A convenient solution is old shipping pallets. You can buy them in large warehouses or from transport companies. The advantage lies in minimal actions - the pallets are cut in half and dug into the ground to a shallow depth. You can connect the resulting sides with nails or thick wire.
To preserve the wood in a smart bed for a long time, it is recommended to cover the inside walls with moisture-resistant material. Thick film, linoleum, tarpaulin or roofing felt will do. It is important to leave the bottom empty, otherwise the filling of the box will not interact with the soil underneath. Also, by covering the bottom, you can disrupt the exchange of moisture - water from irrigation and rain will accumulate in the structure.
Proper filling of boxes
A smart garden bed in a box consists of several layers, the task of which is to properly remove excess moisture and saturate the soil with useful substances. You can prepare everything you need with your own hands, using pre-stored manure and waste from cleaning your dacha. Let's take a closer look at the composition of each layer:
- Drainage - for regions with moderate humidity, it is better to use organic matter as a filler. Optimally - dry branches, corn or sunflower stalks. Some gardeners recommend using the remains of weeds, but if it contains seeds, it will take a long time to get rid of the pest.
- Nutritious - consists of manure mixed with plant waste. Anything left over from cleaning the dacha will do, with the exception of weeds. The best solution is dry leaves. An alternative is tree bark or sawdust, but they must be soaked in a urea solution to protect the nitrogen in the soil.
- Ground is the layer on which plants will be planted. The soil can be taken from the areas between the rows. Experienced summer residents advise mixing it with store-bought chernozem (if it is not saturated with chemicals). You can also add organic components that increase nutritional properties.
This design is suitable not only for boxes, but also for trenches, the features of which we will consider further. It is recommended to distribute all layers evenly, taking into account the height of the sides of the box. If the walls turn out to be too low, then you can first go a little deeper into the bottom of the bed.
Basics of a decorative vegetable garden
As already noted, a modern person needs a dacha not only to grow vegetables and fruits. Most people use their vegetable gardens as a place for the whole family to relax. Let's figure out how to decorate your garden plot without spending a lot of space, effort and time.
Structures such as gazebos, fences, and southern walls can be used to create garden beds. If the fence is made of mesh, then it itself will be an excellent trellis for tall climbing crops. You just need to dig a trench nearby and fill it with organic matter. This bed is ideal for growing cucumbers and beans. The advantages are obvious - you don’t need to build a trellis, and it doesn’t take up space, and flowering plants, with skillful care, are also a wonderful decoration.
In the same way, you can surround a gazebo with a trench. In this bed you can plant various types of decorative pumpkins and beans that bloom in red, white, and even purple flowers (hyacinth beans). A gazebo decorated in this way will become the highlight of your dacha and a favorite place for family gatherings. It should be noted that it is not recommended to plant a gazebo with cucumbers; sometimes they get sick and lose their decorative properties.
The southern and eastern walls of various country houses are able to warm up well during the day and give reflected light and heat to plants, which helps accelerate the growth and development of heat-loving crops. Such walls can provide an excellent support for cherry tomatoes, and underneath you can plant attractive cabbage varieties such as kohlrabi and broccoli.
In order to give your garden plot a well-groomed appearance, all free spaces between the “smart” beds need to be mowed regularly - this will turn the weeds into a mixed-grass lawn.
Beds in trenches
You can save a little on materials by spending a few days working with a shovel and crowbar if you place the plants in trenches instead of boxes. It’s worth noting right away: this approach will not work if the groundwater at the dacha is located quite high. In fact, such smart beds perform the same functions as the options in boxes. The key difference is that the plants will be placed flush with the ground rather than on a small ledge.
Features of creation
If there are no problems with groundwater, and a plan for placing the beds has already been drawn up, then you can proceed to physical labor. Before making trenches, you need to understand the dimensions. You can use the same ones as in the case of boxes: width up to 1 meter, depth - 0.2-0.5 m. To prevent the soil on which paths between the beds will be made from sliding, it is recommended to protect against the spread of moisture.
It is not necessary to hammer the walls of the trench with wooden boards - this is a long and not the cheapest process. The optimal solution is to use thick film, linoleum or tarpaulin. It is not necessary to secure the materials too seriously on the walls; they will be held in place by the soil. It is necessary to fill a smart bed in the same way as in the case of a box.
Irrigation system
A significant part of gardening work is watering the plants. If you use lazy beds, you will have to water much less often. But even in this case, it is better to route the pipes around the area correctly. You already have a plan for the location of the beds in your garden. Now add flower beds, bushes and trees. Get a plan for the placement of plants that need to be watered. Now you should think about how to lay water pipes in the garden so that any “irrigation object” is no more than 2-3 meters away. If you do this, then you will have to pull a small hose to each bed, which is much simpler.
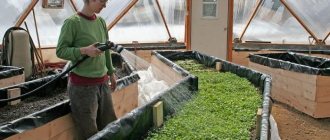
Homemade drip irrigation system made of polymer pipes, water source - barrel
It’s even better if a hose for drip irrigation is installed in the smart garden bed. This will reduce water consumption and increase yield. Yes, at the same time. A drip irrigation hose is a polyethylene tube with small holes through which water drips drop by drop. When planting, plants are planted next to the holes. As a result, water is supplied to the root, the plant receives a sufficient amount of moisture, and the spaces between plants remain only slightly moist (due to the redistribution of moisture in the soil).
When using drip irrigation, you will have very little work. You open the tap, wait a certain period of time, close the tap. All. Hoses for drip irrigation are available for connection to a water supply (sold by the meter), and are available in the form of kits with a small pump that will pump water from the container. The price range for hoses for drip irrigation is significant - prices differ significantly. No matter how limited your finances are, don't buy the cheapest hoses - they won't last more than one season. It’s better to pay a little more for a quality product and use it for several years. When choosing kits for drip irrigation, you must also consider the area to be irrigated. But, most likely, it will suit you, since lazy beds are rarely large. Read more about drip irrigation kits and manufacturers here.
Weed protection and moisture conservation in a smart garden
Partial savings on watering a smart garden will be possible, as in the case of the classic version, due to rain and dew. However, the beds cannot do without artificial watering. The procedure must be carried out as standard - in accordance with the recommendations for the selected plants.
Experienced gardeners have long borrowed from agricultural enterprises an affordable way to maintain moisture levels for a long time, combined with weed control. We are talking about mulching an area - surface covering the soil with organic materials crushed to a certain consistency.
You can use store-bought or home-made mixtures as mulch on your site. Each option for a summer residence has its own advantages and disadvantages. Let's look at the most notable ones:
- Straw is the most accessible material that you can prepare yourself or buy relatively inexpensively from farmers. The main disadvantage is rapid rotting, which is why the layer of such mulch will have to be renewed once or twice a month.
- Sawdust - you can also prepare it yourself in advance or buy it. It is strongly not recommended to use fresh ones, because they will seriously acidify the soil, absorbing a lot of nitrogen. Optimal for a summer residence is sawdust, dried for several years. This option will go well with wooden boxes.
- Coniferous branches with needles - getting the required amount is problematic in some regions. However, this option will ideally protect plants. The needles rot quite slowly, so you can change them a couple of times a season, and they will also help decorate smart beds.
- Ready-made wood mulch is a good solution for those who have a good budget. Sold in bags at many garden centers or large farms. In fact, it is properly dried sawdust without unnecessary debris, packaged for hassle-free placement.
Mulching has a good alternative - agrofibre. The material is made of dense polyethylene film with fine perforations. In production, substances are used that practically do not harm the soil and plants. Agrofibre for gardening is cheaper than ready-made mulch, without being inferior in efficiency. It is recommended to buy black film. Before you make a shelter for smart beds, you need to make holes in the places where plant stems grow. This is especially true for tomatoes, cucumbers, carrots, and potatoes.
Some tricks
The technology is called smart gardening for a reason. You can test different approaches, new products, and the experience of “colleagues.” There are several tricks that come with use. We have already talked about one - about covering material. It really makes maintenance a lot easier and there is no need for mulch. There are other interesting ideas:
- After crops that are “heavy” for the soil, sow oats, peas, mustard, and rapeseed. After a couple of weeks, juicy greenery grows. It can be left “under the snow” and dug up in the spring. Or dig it up just before the snow, along with the greens. The goal here is twofold - the young greenery rots, enriching the earth. This time. And two - weeds do not grow, since the shoots are friendly. This harvest makes my heart happy
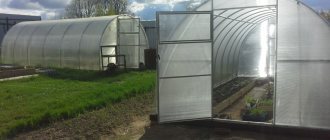
- Use white covering material to extend the summer season and get an early harvest. Arcs are made from steel rod with a diameter of 8-10 mm. Drawstrings 2 cm wide or more are sewn into medium or high density spunbond. Arcs are inserted into them, spunbond is assembled on the wire so that the ends of the wire are free. The portable mini-greenhouse is ready. Stick arcs in at both ends of the bed. To protect the plants from frost, straighten the spunbond; you can open it for the day by collecting all the material on one side. The same design will also save you from overheating in the summer heat.
- Place a large metal barrel in the corner of the site. Place weeds and other plant waste in it. To fill with water. The greens will quickly rot and this slurry can be used for feeding. You just need to cover the barrel - the contents don't smell the best.
Filling spaces between beds
In accordance with the recommendations, the distance between the formed beds can reach 1 meter. There are no special recommendations for filling such places, but it is advised not to bother with weeding. You can lay out paths in a smart garden yourself, using artificial lawn, paving slabs, or constructing wooden flooring. Such options will help not only eliminate weeds outside the beds, but also decorate the area. The general list of work makes it possible to make sure that designing smart beds is not an activity for the lazy, as adherents of classic garden growing often claim.
Check out our new blog material on the topic “Vegetable garden on the windowsill.” In this article, we explained how a vegetable garden on a windowsill is useful and what are the features of its arrangement.
Did the article help? Rate it
5 / 5 ( 1 voice )
How to arrange row spacing
It is impossible to create smart beds with your own hands without paying due attention to the correct organization of row spacing. To do this, the space between the beds is needed:
- cover with cardboard;
- cover the cardboard with a layer of sawdust;
- Cover the sawdust with a layer of sand.
- Weeds will not be able to break through these layers, and the gardener will not have to waste time and effort fighting them.
Recommended by topic
Soil and fertility April 19, 2021
What to do in the garden in spring
Read more
Soil and fertility January 31, 2021
How to choose and where to buy quality seeds
Read more
Soil and fertility January 22, 2021
Several features of watering vegetables
Read more