Have you ever had a neighbor on a dacha or garden plot who started planting seedlings back in March, and no cold or other problems prevented him from achieving a good harvest with large fruits? If he was or even is now, it means that he is a very experienced summer resident who knows exactly how to make warm beds in a greenhouse with his own hands, because it is with their help that he achieves such results. There is nothing too complicated about this, the instructions and recommendations below will help you.
Do-it-yourself warm beds in a greenhouse
Warm beds and their advantages
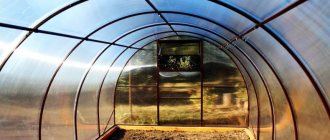
Let's start with the basics. A warm bed differs from an ordinary one in that in a certain way an increased temperature is created in it, which is optimal for the growth of crops, even in the presence of frosts or real colds “outside” the greenhouse. Thanks to this design, gardeners have the opportunity to start the summer season in March-April, despite the remaining snow, unheated ground, temperatures below zero and unpredictable weather.
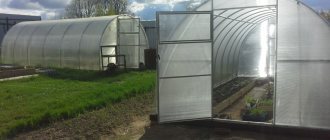
High warm beds
The most popular options for warm beds are those that use “biological fuel” in the form of compost or manure to heat plants and their root systems. But this will be discussed in more detail below, and now let’s look at what the advantages of warm beds in a greenhouse are, and whether they justify the investment of time and effort.
- The opportunity to start planting seedlings in the greenhouse earlier and achieve a large and high-quality harvest.
- Protection of crops and especially their root systems from freezing during sudden frosts.
- Good harvests with large fruits even on relatively poor and infertile soil.
- Improving the process of photosynthesis - when using “biological fuel”, carbon dioxide is released, which immediately goes to the leaves of seedlings and bushes.
Good potato harvest from a warm bed
- Reducing the need for fertilizers and fertilizing - the very composition of the warm bed contains a large amount of nutrients and minerals.
- Weed control - their seeds in a warm bed begin the process of rotting, without having time to turn into a hindrance for your tomatoes or cucumbers.
- A slight reduction in the need for watering due to wetter soil and minimizing the process of water evaporation.
- A warm bed allows you to use various waste from gardening and animal husbandry, which previously had to be burned or disposed of in some other way.
Proper organization of internal space is the key to high productivity
Among the disadvantages of warm beds, one can highlight only the need to start work in early spring or even autumn and the fact that the rotting process may be accompanied by far from pleasant odors.
Option #1 – heat the bed with an electric cable
What is the advantage of heating the bed this way over compost? It is simple and possible to constantly control the soil temperature with an accuracy of one degree, which is simply necessary when growing particularly capricious plants.
Place the cable itself on geotextiles - it allows water to pass through, but holds the soil, and therefore the weeds immediately die out, and the ground quickly becomes soft and loose - which is good, of course. Lay the cable deep enough, mice don’t dig like that, and moles don’t gnaw things like that - 40 cm. The standard laying step is 15 cm.
It is best to take Green Agro to create warm greenhouse beds - such wires are used today wherever possible: for heating roofs, floors and even in plumbing systems. And you need to configure the entire system like this: as soon as the heating of the cable reaches 25°C, the power should be turned off. On average, back in March, electricity consumption will be about 20 kW per greenhouse, but in April it will drop to 9 kW, which is not at all expensive. Such warm beds in the spring produce as many as three harvests of radishes alone!
Most of the electricity, of course, will be consumed in the first days - the soil will defrost and thaw, but with each passing day significantly less heat will be needed. For accuracy, additionally purchase a thermostat - it will help to constantly maintain the temperature that is needed. In addition, it will take into account the sunshine of the day and the weather outside the greenhouse, determining the frequency of turning on the heating.
Types of warm beds
Based on the principle of heating the soil and the root system of plants, warm beds are divided into three types.
- “Biological” warm beds . As a source of elevated temperature, they use the process of decay of various vegetation residues and animal waste. There are many subtypes of warm beds using “biofuel”, differing in their design and filling.
Types of warm beds with compost
Laying cables for arranging an electric heated bed
Making a warm bed using a heating cable
Prices for heating cables
heating cable
Construction of warm beds with subsoil pipes
Important! Regardless of the principle of operation, for any warm bed it would not be superfluous to install thermal insulation from below (and in some cases from above). This will prevent heat from rotting cables or pipes from being wasted in the frozen ground.
This article will focus on warm beds using “biofuel”, as they are the most common at the moment. They are easier and cheaper to install compared to other options.
Warm organic beds
According to their design, warm beds operating on rotting are divided into four subtypes.
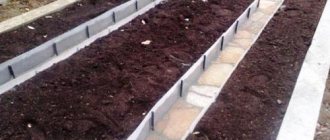
- Recessed - under them, the turf is removed from the soil of the greenhouse, a sufficiently deep trench is dug and filled with several layers of organic material so that the upper boundary is at ground level or slightly higher.
Trench with organic matter, high and raised beds
The main options for warm beds working on rotting
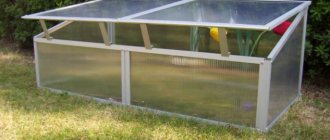
The best option would be a raised warm bed - it is the easiest to arrange, it does not require digging a trench, and it will lose less heat due to contact with frozen spring soil. In addition, due to the relatively small volume, the warm bed in the box warms up much faster.
Beds in a greenhouse 3 by 6
The beds in a greenhouse 3 by 6 meters have their own design nuances. It is necessary to rationally use the entire area of the greenhouse, and be sure to provide free access to every bush, plant, and branch. In addition, the conditions for the plants themselves must be the best - so that there is enough light and nutrition.
Types of insulated systems
All of them are divided into two types. Seedlings are grown on temporary ones. After transplanting it, the vacated space is used as a regular garden bed. Permanent structures are in use for 4-6 years. There are three types of them, differing in the depth of biofuel incorporation.
- Tall. All decomposing layers are on the surface of the earth. It is necessary to arrange sides with a height of 0.5-0.8 m.
- Trench. The biomaterial is laid to a depth of 0.4-0.5 m. Above the ground level there are low sides, no higher than 0.2-0.3 m.
- Combined. Used in areas with high groundwater levels. The type of arrangement is similar to that of trenches, but the laying depth is less. Therefore, the sides of the structure are higher.
Instagram ogorody_dacha
Instagram viktoriakublashvili
- Landscape
What to plant along the fence at the dacha: a selection of trees, flowers and shrubs
In-ground beds with compost - step-by-step instructions
This type of warm bed with compost filler has the simplest design and requires a minimum of materials, but it takes a lot of time and effort to set up. Here are step-by-step instructions for creating it.
Ready-made warm beds in a trench with a path between them made of boards
Step 1. Using pegs and a rope stretched between them, mark the places for future warm beds. For an ordinary country greenhouse, this can be either 2-3 rows with a width of 60 to 120 cm with paths between them, or a U-shaped bed.
An example of marking warm beds in a greenhouse with a width of 2.4 and 3 meters
Step 2: Remove the turf with a shovel. Do not throw it away or mix it with the rest of the soil - it will be needed to form a warm bed.
Advice! If the arrangement of warm beds occurs at the same time as the construction of the greenhouse itself, start digging a trench before completing the frame of the structure.
Step 3. Dig a trench 50-70 cm deep or two shovels deep.
Digging a trench
Step 4. Level the side walls of the trench.
Step 5. Determine the type of soil. If the soil is heavy and contains a lot of clay, deepen the trench by 50 mm and fill it with sand to the same thickness - it will act as drainage and absorb excess water faster. Otherwise, when the soil absorbs water quickly, cover the bottom of the trench with cotton cloth, which will prevent excessive leaching of nutrients from the bed along with moisture.
Step 6. Place a row of empty plastic bottles with tightly screwed caps on the bottom of the trench - this is necessary to insulate the bed with compost and protect it from freezing in cold weather. As additional measures, you can line the walls of the trench with boards or several layers of plastic film.
Thermal insulation with plastic bottles
Arrangement of a warm bed
Arranging a warm bed
Step 7. Prepare covering material and mulch.
Step 8. Proceed to fill the prepared trench with the necessary rotting material. What needs to be laid and in what order is described below in one of the following sections of the article.
Filling a warm bed trench
What to put first in a warm bed, and what to put next?
- Greenhouse beds are a great temptation for rodents and moles, who are always in a hurry to feast on the young and succulent shoots of newly planted plants. To prevent this from happening, we suggest laying thick PVC film on the bottom of the bed. It can be found in greenhouse or swimming pool stores. Next, it is worth laying a fine mesh on the surface so that rodents cannot penetrate into the layers of wood, tops and above;
- Now comes the important part of the bed - its fillers. Subsequently, water each layer generously to start the reaction. In the meantime, the first layer of organic masonry. It should be the most capacious in terms of heat transfer; before laying it, you need to make sure that this filler will not freeze. This feature applies to the northern regions. Therefore, in this case, you should take care of thermal insulation. A layer of plastic bottles would be suitable as a base for preserving heat. Fill them with air and screw the lids on them. This creates a space between the first fertile layer and the cold soil;
- Regions with a temperate climate can simply replace the bottle layer with a sand cushion. Next, a loose layer of wood is laid on the plastic/sand. This layer will be heating; in the future it must be maintained at constant humidity, because it is from this that the processes of decomposition of the biomaterial will be launched and heating will come from it. Small logs, driftwood, sawn trees, corn stalks or sunflower trunks can be used as wood filler. The wood should be approximately the same size so that the decomposition process occurs evenly. The layer height is 30-50 cm. The volume of wood filler will determine how long the warm bed will function. 30 cm is enough for about 5-8 fruiting seasons;
- The next layer consists of small sawdust, paper or cardboard. It will serve as a kind of guide to the next filling (10-20 cm);
- Branches of shrubs and trees are laid on top of the waste paper as laying material. The cut material must be free of rot and painful damage, so that infection does not develop inside the bed (20-25 cm);
- After this, recently fallen leaves are laid out. The layer should be approximately 25-30 cm;
- Animal waste, barnyard, and chicken droppings are laid out on top of the fallen leaves;
- The last and final warm bed will be a layer of turf soil. The bed is leveled and covered with film for 10 days. After this time, in the spring, ready-made seedlings can be planted into it. If you want to make a bed in the fall, complete it and cover the soil with mulch film. Leave it like this until the season opens.
Warm bed in a box - step-by-step instructions
A wooden or slate box with compost stands out from a warm bed buried in a trench because it requires less time and effort to arrange - there is no need to dig a long and deep hole, it is enough to put together a simple structure from boards. In addition, it is more convenient to work with raised warm beds - there is no need to bend over too much to care for crops and when harvesting.
One example of a box for a warm bed. 1. Boards for the box 2. Vole netting 3. Wood scraps or shredded branches 4. Newspapers and cardboard 5. Wood shavings and sawdust 6. Fresh garden waste 7. Autumn leaves from the compost pile 8. Compost with soil
The standard height of the box is approximately equal to the depth of the trench from the previous section of the article - from 40 to 70 cm. For small arched greenhouses, this gives rise to two problems. First, the beds cannot be placed close to the wall; the useful area of the already small structure in terms of length/width is lost. The second is that the bushes of some agricultural crops can grow too tall and begin to rest against the skin of the greenhouse, which is undesirable. The solution to these problems is a combined warm bed - its lower half is located in a trench of appropriate depth, and the upper half is located in a box above ground level.
Combined warm bed with metal walls
Frame for a high warm bed made of corrugated iron sheet
Apart from the presence of a pit, the design of raised and combined warm beds has no major differences; boxes for them can be assembled according to the same instructions, only adjusted for the height of the product. One such step-by-step method is given below.
Step 1. Using a tape measure, pegs and rope, measure the locations for the boxes inside the greenhouse. The width of warm beds located near the wall should not exceed 60-80 cm, otherwise it will be inconvenient to work with them. In addition, if the boxes are too wide with access to them only from one side, there is a high risk of damaging one of the plants through negligence. In total, in an ordinary country greenhouse you can place 2-3 rows of boxes with paths between them. Another option is the U-shape, when a warm bed is also located on the wall opposite the entrance to the greenhouse. In this case, you get an additional 1 m2 to 3 m2 for growing plants.
Plan for dividing the greenhouse into two and three beds
U-shaped warm bed with a vertical branch in the middle and already prepared pots with seedlings
Step 2. Remove a thin layer of sod from the area where the boxes will be located.
Removing the top layer of soil
Step 3. If you plan to create a combined warm bed, dig a trench. You can find out more about this in the previous section of the article.
Step 4. Prepare the boards. Choose rot-resistant wood; larch is the best option. If it is not there, others will do, but first treat them with an antiseptic two or three times. Choose thick boards, at least 20 mm.
Edged boards made of Siberian larch
Step 5. Cut out the boards or prepare separately vertical posts that will act as a kind of frame. Their height should be 5-15 cm greater than that of the box.
Step 6. Cut the boards using an electric jigsaw or saw to the length and width of the boxes.
Step 7. Gather together the boards of the long wall of the box, attach the posts and connect them using nails or self-tapping screws. Repeat the operation for the opposite wall.
Assembling a wooden box
Step 8. Using the same screws or nails, attach the boards of the short wall to the ends of the boards of the long one. Repeat the operation on the other side. Check the quality of the box by measuring the lengths of the diagonals - deviations should be insignificant.
For better connections, you can make cuts in the corners of the boards
Step 9. Cover the inner surface of the box with plastic film. This is necessary to ensure that moisture does not leave the bed too quickly upon contact with hygroscopic wood. Fasten the film to the staples using a furniture stapler or clamp with strips nailed on top of the boards of the box.
Scheme of a warm bed in a box
Step 10. Install the box on the prepared place, the protruding parts of the racks should be dug into the ground.
The box is installed in place
Step 11. Connect the opposite boards of the long wall of the box at the top with a cross member to protect it from spreading under soil pressure.
The walls of the box are connected by crossbars
Step 12. Begin filling the box with the necessary material for the warm bed.
Preparing a warm bed
Instead of boards, slate can be used as a material for the box (as a more durable alternative). In this case, it is necessary to make a sufficiently strong frame from timber or profiled pipe. Please note that the final structure will be heavy, so create it either directly in the greenhouse or close to it so that moving the box does not cause big problems.
Creating permanent boxes for warm beds from stone, tile and brick will not only make them stronger and more durable, but will also decorate your greenhouse, especially together with a paved path
How to build it yourself
Arranging warm beds, depending on the method of heating the soil, can be more or less expensive and costly, but in most cases it is quite amenable to independent use. So the answer to the question of whether it is possible to make a warm bed with your own hands depends only on the minimal skills of the vegetable grower in working with tools. If they are available, all he has to do is find out how to make an effectively functioning warm bed.
Did you know? The prototype of today's warm beds appeared in ancient Rome, where local gardeners laid horse manure on the surface of the soil, which, when decomposed, warmed the surface of the earth in cold times.
Selection of materials
The variety of types of warm beds also implies a rich variety of materials used for their construction. Often, these materials can be found in your farmstead, especially when it comes to constructing a box that limits the space of the garden bed.
To do this, you can use easily accessible ones from:
- polycarbonate;
- wooden boards or panels;
- metal sheets;
- plastic;
- slate;
- plastic bottles.
Most often, the sides of a warm bed are built from:
- wood treated with an antiseptic;
- brick, which is a long-term option, but at the same time quite labor-intensive;
- slate, which is a cheap and practical material, which, however, releases toxic elements into the soil when chipped and therefore requires the use of exclusively solid sheets.
As for heating electric cables and water pipes, their capacities and diameters depend on the specific requirements in each individual case, which will be discussed below.
Find out how to heat the soil in a greenhouse.
Calculation of dimensions and depth
It is impossible to correctly build and equip a heated area of soil without a pre-prepared diagram and drawing, the calculation of dimensions on which is clearly tied to the configuration and area of the greenhouse. Moreover, all 3 main types of beds imply one general principle for calculating sizes. First of all, when developing the layout of a future greenhouse, you should determine the places where the heated beds will be located. The area of the proposed greenhouse will determine the length and width of the heated plots of land.
As a rule, they are placed along the long sides of the greenhouse, and a passage is left in the middle of it. But options for their placement in a U-shape or in 3 rows are possible if the greenhouse area is sufficient. Additional calculations are necessary if the soil is supposed to be heated using electricity or hot water. Here you will need to calculate the length of heating cables or water pipes and list all additional materials.
When making calculations, you should also take into account that:
- the depth of the trench for the future bed is usually no less than 0.4 m and no more than 0.7 m;
- the height of the bed can vary from 0.3 m to 0.4 m, which creates the most favorable conditions for weeding and watering work;
- the bed width can be from 0.45 m to a maximum of 1.2, since a large width prevents the care of vegetables and their lighting from the outside;
- interbed passage is limited to a minimum of 0.6 m;
- the bottom of the trench is insulated using heat-insulating material in the form of polystyrene foam, polystyrene foam or empty plastic bottles with screwed-on caps, so there are several equivalent answers to the question of how to insulate the bottom;
- a sand layer up to 0.05 m high is poured on top;
- a fine metal mesh is laid on top to prevent rodents from penetrating into the warm soil;
- either an electric heating cable, or water pipes, or organic matter is laid on the mesh;
- then another airy sand cushion is created on top;
- the structure is crowned with a layer of fertile soil, which should not be made too thick (the optimal height is 0.3–0.4 m), since otherwise it will not be able to fully warm up.
We recommend that you find out how and with what to heat a greenhouse in winter.
Step-by-step instructions for DIY construction
Different options for warming the soil in greenhouses imply different options for creating a heating effect.
Electric warm beds
The ground in greenhouses is heated with heating cables of either resistive or self-regulating type. In the first option, no regulation occurs in the heating process, but in the second, the required temperature regime is maintained in the soil using a thermostat set to the required temperature. But in both cases, they usually proceed from the requirement that for each square. m the power was between 75 and 100 W, which, however, should not exceed 10 W per meter of cable length.
Warm bed-hill - step-by-step instructions
Arranging a warm bed-hill is suitable for those who just want to try this agricultural technique and experiment with it, but do not want to spend too much time assembling the box and digging a deep trench.
Section of a hilly ridge (example with location on the site)
Step 1. Mark the areas in the greenhouse for the future bed.
Step 2: Remove the turf in these areas.
Step 3. Dig a shallow trench with one bayonet of a shovel.
Step 4. Lay layers of biological material for a warm bed so that there is 15-20 cm from the edges of the trench to it.
Step 5. Fill these gaps with fertile soil, also pour all the biological material on top.
Ready bed-hill
It should be understood that the width of the final warm bed will be from 80 to 120 cm, therefore it is not advisable to arrange it against the wall of the greenhouse.
Video - Warm bed in a greenhouse
Filling the compost bed
The main feature of a warm bed is the organic filling, which, when decomposed, provides not only warmth, but also useful substances necessary for rapid growth and a bountiful harvest.
The process of filling a compost bed
Filling the beds may vary depending on the capabilities and organic materials available on hand, but the basic principles are the same for any type of warm beds:
- The lowest layer is drainage from large debris in the form of tree branches, various unnecessary boards, stumps, and thick tops. Sand is often poured at the very bottom, cardboard, newspapers, magazines, books, rags, and metal debris are placed.
- The second layer is less coarse organic matter, consisting of sawdust, chips, weeds, peelings, peels, etc.
- The third layer is tops, leaves, grass, compost, rotted manure (if any). Often chalk, lime, and ash are added to the same layer, depending on the acidity of the soil.
- Fertile garden soil is poured on top of the bed. You can make the following mixture: sand, peat, humus, garden soil, some sawdust and mineral fertilizers (the latter is not necessary).
Detailed diagram of a compost bed
- Each layer needs to be thoroughly watered with warm water so that the bed settles and rots faster.
Return to contents
Preparing and laying raw materials for a warm bed
Now let's look at the most important thing - what and how to put in a pre-prepared box or trench to get a warm bed. In cross section, it is a “pie” of several layers of various organic matter, which, when rotting, release heat and form nutrients for plants.
Layers of warm beds
The lowest layer is the thermal insulation necessary to protect the bed from freezing from below. It is created from empty plastic bottles, always with tightly screwed caps. Don't forget to lay a fine wire mesh under or on top of this layer to protect the warm bed from mice and other rodents.
The mesh is necessary to protect against mice and other rodents
Wire mesh prices
wire mesh
Next begins the first layer of organic matter - large branches, wood chips, wooden logs, corn leaves, sunflower stalks and other relatively large objects of plant origin that are susceptible to rotting. In addition to generating heat and nutrients, this layer will play the role of a kind of drainage - excess moisture will easily go down through the cracks and gaps between large organic matter. Its thickness should be from 50 to 70% of the entire warm bed.
Formation of a trench warm bed. Fill the trench with branches and large organic matter
Important! When choosing plant waste for a warm bed, make sure that there are no traces of diseases on it, otherwise the latter may subsequently spread to the crops you grow.
Having filled in the large organic matter, pour it with a sufficient amount of water and sprinkle it with microbiological fertilizer “Siyanie-3” (also known as “BakSib F”) or its analogues. It contains many bacteria that trigger and support decay and the transformation of organic matter into compost. Subsequently, treat each new layer for a warm bed with microbiological fertilizer and water it with water.
"Shine-3"
Next will be a relatively thin layer of shredded cardboard, newspapers and waste paper. Additionally, you can add chalk and ash to it. Repeat the operation with watering and microbiological fertilizer “Shine-3”.
Prices for fertilizers "Shine"
fertilizer shine
The new layer of the warm bed contains medium-sized organic matter - potato and other peelings, tops, thin branches without seeds and plant stems. You can add sawdust, but first pour boiling water over them to kill any weed seeds that accidentally fall into them.
Potato peelings are also useful when arranging warm beds in a greenhouse
Next, place a layer of fallen leaves, mown grass, small sawdust and plant debris. Large organic matter is also added, only pre-crushed. This layer of warm beds needs especially a lot of water and microbiological fertilizer. It would not be a bad idea to cover it on top with rotted manure or ready-made compost - the decay reaction will begin much faster and will be more effective.
One of the options for a warm bed of great depth, capable of generating heat for a very long time
The last layer should occupy approximately 20-25% of the entire depth or height of the warm bed. This is fertile soil. It is advisable to purchase it separately to get as many nutrients as possible. If the land of your dacha or personal plot is rich enough, add the previously removed turf to the purchased land. For the winter, cover the top of the finished warm bed with leaves, straw or transparent plastic film with cross-shaped slits for plant stems.
The beginning of filling the warm bed with fertile soil. You can see the intermediate layer of fine organic matter
You can increase the efficiency of a warm bed and its nutrient content by preparing a special mixture for the last layer. Its composition is given in the table below.
Table. Composition of soil mixture for a warm bed.
| Ingredient name, photo | Quantity used |
| Garden soil, black soil or peat | Six standard buckets, approximately 60 to 72 l |
| river sand | One standard bucket, approximately 10 to 12 liters |
| Fine sawdust, pre-scalded | One standard bucket, approximately 10 to 12 liters |
| Wood ash | 3 tbsp. spoons |
| Superphosphate | 1 tbsp. spoon |
| Boric acid | 1.5 teaspoons |
| Potassium sulfate | 1 teaspoon |
| Urea (urea) | 1 teaspoon |
| Zinc sulfate | 1 teaspoon |
Recommendation! The filler of a warm bed can be used either until its nutrients are completely depleted and the release of heat during decay ceases, or with an annual change of organic matter. In the latter case, the compost formed as a result of decomposition processes is used to form a fertile layer on ordinary beds in a greenhouse or on open ground.
Advice from experienced summer residents on creating smart beds with their own hands: video and technology
Tips from experienced summer residents on creating warm beds in the spring:
A high warm bed can easily be converted into a greenhouse
- The soil in high beds needs frequent watering. Abundant moisture promotes the decomposition of the lower layer of fertilizers, which provides the plantings with additional heat;
- if wood is used as a building material, before making a warm bed for cucumbers, you must first treat all structural elements with an antiseptic. Lumber needs protection from rotting. Hot drying oil, which is used to process wooden blanks, will help achieve an excellent result.
Technology for creating a smart vegetable garden by Igor Lyadov: how to make beds for cucumbers
Igor Lyadov is a Russian agronomist who practices the method of traditional natural farming. This technique eliminates the use of chemical fertilizers that pollute water and soil. The technology involves treating the soil in a gentle way, returning nutrients back to the ground after the plants are grown, and protecting the contents from temperature changes.
Building a warm bed for cucumbers in the spring allows you to avoid stagnant water, dirt and disorder on the site. In essence, a vegetable container is created on the territory with fences made of timber, logs, boards, stone, slate or brick.
How to make a warm bed for cucumbers in the spring from logs using Igor Lyadov’s technology:
- A flat site is being prepared for construction.
- The logs are laid on the ground and fixed. In some cases, they can even be buried a little into the soil for reliability. The optimal width of the structure is 0.8-1.2 m. Moreover, the hotter the climate of the region, the wider the bed should be made. The length of the structure can be arbitrary.
- You can use screws or nails to secure the logs together.
- To stop the growth of perennial weeds, a layer of cardboard is placed on the bottom. This measure effectively blocks the development of pests such as wireworms and beetles.
- A small layer of sand is poured on top of the cardboard.
- Next, organic fertilizers and plant residues are added.
- To protect the bed structure from overheating and insects, the logs should be whitened or painted. For these purposes, it is better to use a water-based paint composition intended for facade work.
According to Igor Lyadov, a stable and high yield of cucumbers can only be obtained with the help of organic fertilizers
Fertilizer layers should be soaked in an infusion of herbs or manure. A layer of earth 8-10 cm thick is poured on top of all this.
Technology for making warm beds in a greenhouse with your own hands
Narrow beds, which are created based on Igor Lyadov’s technology, make it possible to increase the growing season of plants, resulting in a rich harvest regardless of the conditions of the summer cottage.
How to make warm beds in a greenhouse using Igor Lyadov’s technology:
A covered, warm bed of this type is ideal for early growing of strawberries, wild strawberries, herbs and vegetables. To ensure that the plants receive a sufficient amount of oxygen, the farmer recommends planting them in a checkerboard pattern. Eggplants, cabbage and other varieties of large crops are planted in two rows in the garden bed, while smaller plants such as onions or radishes are planted in four rows.
High warm beds in greenhouses are very effective for growing heat-loving vegetable crops
The author's method of growing vegetables in warm beds also includes recipes for infusions that you can prepare yourself. They contain lactic acid bacteria and yeast fungi. These infusions are used as a natural alternative to chemical additives. The function of leaven is performed by mash. To do this, take 3 liters of water from the well, to which add a packet of dry yeast and 5 tbsp. l. Sahara. After 2-3 days, the resulting mixture will ferment.
Features of recharging warm beds and the amazing vegetable garden of Igor Lyadov
All infusion recipes are designed for a container with a volume of 200 liters. Let the mixture sit for at least a week. Before use, the herbal composition must be diluted twice, and the infusion of manure or droppings must be diluted even more.
First recipe:
- sifted ash (shovel);
- bird droppings or manure (half a bucket);
- fallen leaves or rotted straw bedding (bucket);
- humus, turf soil or rotted compost (shovel);
- clean sand (shovel);
- whey or fermented milk product (1 l);
- mash (3 l).
With the help of organic fertilizers, you can not only improve the quality of vegetable crops, but also enrich the soil with useful minerals
The second recipe involves filling the container 2/3 of the volume with mowed grass or weeds. To this is added a couple of shovels of ash, which must be sifted. After this, the mixture is filled with water, and the container itself is covered with film. It will take several weeks for the product to reach full readiness. Before processing the beds, the composition is diluted in a ratio of 1:10.
According to the third recipe, the container needs to be filled with manure or droppings to 1/3 of the volume. The remainder is filled with clean water. The resulting mixture is infused for two weeks (no more). The infusion prepared with manure should be diluted 1:10 before use. The composition of bird droppings is diluted in a ratio of 1:20.
Vegetables grown in warm beds are in many ways superior to the results of traditional agricultural technology. The designs are less labor-intensive in terms of processing, allow you to restore soil fertility and increase the yield of vegetable crops. At the same time, the purity of nature is preserved and human health is preserved, since chemical fertilizers are not used to feed plants. It is for this reason that many summer residents use the technology of warm beds on their plots.
Using the methods of Lyadov, Mitlayder and the principles of natural farming, you can get a generous harvest several times a year
Recommendations for using a warm bed
It should be understood that the properties of a warm bed, if it uses “biological” fuel, are not static and change over time. This applies to the release of heat and the amount of nitrates, nutrients, and minerals. On average, a normal warm bed with compost can last four years, and it is best to plant different crops in each of them.
Basil, which was sown in a regular bed (left) and in a warm one (right)
The first 12 months for this design are characterized by the release of a large amount of heat, as well as an increased content of nitrogenous substances. Given these conditions, plant heat-loving plants that require large amounts of minerals and nutrients.
Such crops include:
Important! It is not recommended to plant root vegetables and greens in the first year - they tend to accumulate excessive amounts of nitrates in the fruits, which is harmful to those who consume them.
Arranging a warm bed creates favorable conditions for growing plants
In the second year, the average temperature in the soil of the warm bed will decrease, but there will still be quite a lot of nutrients and nitrates. The list of plants recommended for planting will remain the same, with the exception of watermelons, pumpkins and melons. The content of nitrogenous substances is still too high, so it is undesirable to grow agricultural crops prone to their accumulation in warm beds this year.
By the third year of using a warm bed with “biological” fuel, it will cool down even more, but the heat and nutrients created will be enough for tomatoes, beans, cabbage and peppers. The nitrate content will become acceptable and you can begin to grow root vegetables and various greens.
Beds in a greenhouse
The last year of using compost beds is characterized by the depletion of nutrients and the gradual cessation of reactions with the release of heat. It is recommended to plant greens, peas, beans and other unpretentious crops. In some cases, plants will need fertilizing.
At the end of the four-year cycle outlined above, the warm bed must be created anew, clearing the remnants of old organic matter and filling in new ones. A good solution would be to create such beds at intervals of one or two years in order to grow different types of vegetables and herbs in the same season.
Cleaning a warm bed in a greenhouse after the fourth year of use
Prepare warm beds in the greenhouse in advance - in the fall, after harvesting the previous harvest. In this case, during the period from November to March or April, decay will begin and develop in organic matter, and the heat created during decomposition will be enough to create optimal conditions for seedlings planted in early spring. If everything was done correctly, then at the end of the season you will receive a rich, healthy and high-quality harvest!
Why do we need warm beds in a greenhouse?
The principle of operation of a warm bed is quite simple. If there is a lack of solar energy in the spring, soil heating occurs very slowly. Sufficient temperature for planting plants is reached no earlier than the end of April-beginning of May.
If you warm the soil artificially, you can create favorable conditions for planting as early as March.
At the same time, the roots of the plants immediately find themselves in comfortable conditions, quickly take root and begin to develop. Some of the heat enters the air and also helps to warm it up.
Where and when is it better to make beds?
It is better to install warm structures in open areas of land that receive a large amount of sunlight. It is advisable that the surface of the ridges be illuminated for at least 5-6 hours a day. They should be placed from the east to the west.
Warm beds are best made in early spring, when the soil warms up to a temperature of about +10 degrees. We must wait until the soil thaws and dries completely. This bed is good for planting seeds, seedlings and early crops. When used correctly, warm buildings allow harvesting twice a year.
You can make ridges at the end of summer or early autumn. At this time, a lot of plant waste accumulates in the garden plot. During the winter period, the covered organic raw materials will completely rot, and the bed will be ready for use.