02/23/2015 Category: Do it yourself Author: Natalya Ivantsova
As the new summer season approaches, gardeners are once again beginning to think about what to use for seedling pots or how to make them with their own hands. There really are a lot of options for containers for temporarily growing a small plant, all you have to do is choose.
- How to make cups from scrap materials.
From paper (newspaper)
- From film
Benefits of seedling cups
Many gardeners grow seedlings in a common box, and when planting plants in open ground, take great care to untangle the intertwined roots. Even with maximum care, the chance that the plant will not be injured is not very high.
The boxes themselves, no matter how compact they are, are needed only one and a half to two months a year. The rest of the time they will only collect dust and take up space.
Another thing is seedling cups. The plants can be easily removed or, if you use cardboard or peat cups, not even removed, simply sticking the cups into the ground. They are either made from quickly decomposing materials, or after use they can be nested one inside the other and hidden away, to be taken out again next spring.
Shoe boxes
Cardboard boxes can be used as seedling boxes. To prevent them from bending when carried, it is advisable to place a piece of plywood on the bottom. It’s even better to put the box on a pallet, then you don’t have to worry about it falling apart under the weight of the soil. The insides of the box are lined with film to protect the cardboard from getting wet. After this, fill the container with soil and plant the seeds.
A serious drawback of such containers is the lack of drainage holes. Experienced gardeners are able to determine by eye the required volume of water for irrigation, but beginners do not always succeed. If there is excess moisture, the soil will turn sour and the roots will begin to rot.
Pros and cons of cups
Individual cups for seedlings, homemade and purchased, have their own advantages and disadvantages. In plastic ones, the roots can begin to rot, in iron ones they can overheat, in cardboard ones they can become damp and the bottom will fall off... but if you snag one, the whole battery of seedlings will fly to the floor.
So to plant or not to plant seedlings in cups?
| pros | Minuses |
| Easy and safe to replant Eco-friendly (cardboard or peat) Saving Variety of sizes and shapes | Short-lived Take up a lot of space fragile Unstable |
As a result, there are approximately equal numbers of pros and cons, and for whom the advantages outweigh the disadvantages, read on.
What to prepare for work
To create cups for seedlings with your own hands, we will need very simple materials and tools:
- The shape around which we will wrap the cup. This could be a can of stewed meat, a wooden or metal block of suitable diameter, or a glass glass from a set of dishes. It is very convenient to prepare a plastic bottle: you need to cut it to the height of the future cup, and punch two holes in the bottom through which to pass a rope loop. By hooking this loop, you can effortlessly remove the mold from the finished product.
- Stapler or tape for securing seams and bottoms.
- Scissors.
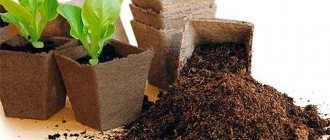
Peat cups for seedlings
Any gardening store is full of containers for seedlings for every taste and budget. But plastic seedling pots are not much different from pierced yogurt jars (except that they don't come with yogurt!). Another thing is peat cups.
Such pots are made from dry pressed peat - dense and nutritious (for plants) marsh humus - with the addition of cellulose for strength. The result is dirty brown, loose and thin cardboard.
Peat cups differ from any other containers for seedlings in that it is not necessary to pull the plants out of them - at most, if there are concerns or the planted zucchini or strawberries are not growing well, you will need to break off the bottom of the cup and give free rein to the roots.
Peat cups are ideal for seedlings of vegetables with fragile root systems, such as zucchini and pumpkin.
Those plants that do not like acidic soil will grow worse in them, so when buying peat pots you need to pay attention not only to the thickness of the walls (no more than 1.5 mm), but also to the composition: some manufacturers lime the material for the pots to neutralize excess acidity.
The ideal peat cups are those containing about 70% peat
Also, a disadvantage will be that when replanting it will become an advantage - peat glasses allow water to pass through. They will quickly become damp and dry just as quickly, so you need to water the seedlings in peat pots less, but more often, and protect the pots from hypothermia - they also do not hold the temperature.
Another disadvantage may be the dishonesty of the manufacturer: in appearance, peat pots differ little from those made from recycled cardboard, as on egg packaging, and the buyer may be sold paper ones under the guise of peat ones. Such cups will be no better than the same packaging - but much more expensive, especially if the plan was to grow a lot of seedlings.
There is only one way to avoid this scourge - to make seedling containers yourself, from proven materials at hand.
Some practical tips for preparing paper pots
To prevent the cup from unfolding, you can choose from two options:
- at the stage when the newspaper is wound on the base, tie it with thread;
- Before you start wrapping the paper around the base, fold the newspaper strip with an edge from the top edge, and when the cup is ready, slightly unfold the edge on one side and overlap it on the other side.
Paper cups are not stable enough, so you need to choose a suitable container (2/3 higher than the height of the cups) and place them tightly next to each other. You can tie them together with a rope after the soil has been poured. It is important not to overwater the seedlings in paper pots, otherwise they will quickly get wet and fall apart.
When transplanting seedlings, the seedlings can be quite easily removed from the cup, or they can be planted with it - over the course of the season, the paper will have time to decompose in the ground.
Newspaper cups made using papier-mâché - video
DIY seedling cups
No matter how large the selection of store-bought containers is, there is nothing more pleasant for the soul and wallet than making cups for seedlings with your own hands. And at the same time for nature, which is suffocating in piles of discarded plastic, foil paper and other garbage that could be recycled a hundred times and used for a good cause.
From plastic or metal jars
In this case, any container that has a bottom and walls is suitable.
It is still advisable to choose packaging that previously contained food products - there is less chance that the plastic or metal from which it is made will be toxic to the soil
Best suited:
- tin cans (durable and reusable, but not much better in convenience than boxes);
- drink cans (much better);
- jars of yogurt (they do not need to be separated from each other for greater stability, although the yogurt itself will have to be transferred to another container);
- mayonnaise jars (for large seedlings or planting several for further thinning).
Boxes of cakes (fragile, but in those with partitions it is very convenient to sow several sprouts)
Making containers for seedlings out of them is as easy as shelling pears: you need to make several holes in the bottom with an awl or a heated screwdriver, fill them with substrate or garden soil and plant the seeds or plant seedlings in jars.
In order not to damage the plants later, when planting in open ground, the jars will have to be broken or cut with scissors; or make a round hole in advance and cover it with a piece of cardboard, and when removing the sprout, simply press on this hole, pushing the clod of earth along with the roots out.
The latter is not recommended for pumpkin and squash sprouts - their indecently fragile root system requires extremely gentle handling.
From citrus peels
A method for aesthetes and lovers of fresh orange juice. From one large orange, grapefruit or pomelo (lemons and limes are small and difficult to separate from the peel, but if you want something more sophisticated...) you will get two seedling pots.
Seedlings in citrus peel
A hole is made in the peel and filled with earth, peat or coconut substrate. One pot will fit 1, maximum 2 plants, but later they can be planted in the ground without removing the sprouts.
This method is environmentally friendly and looks beautiful, but it is quite expensive - a good garden of oranges will require at least a box - and the peel is not a very durable material.
You can always plant one or two sprouts for Instagram, and place the rest of the seedlings in more budget-friendly containers.
From eggshell
Another aesthetic and environmentally friendly method is suitable for quickly germinating seeds.
Seedlings in eggshells
The main thing is to break off only the top of eggs whose shells will be used, so that most of the shell remains intact. In the bottom of the shell you need to make a hole with a gypsy needle or a thin awl to allow air to flow in, fill the shell with soil and insert 1-2 seeds.
The egg carton can be saved and used as a stand and - if you need a greenhouse effect - then keep it closed for a couple of days. Later, there is no need to remove the sprouts from the shell - just crush it or even stick it into the ground just like that, the roots of a stronger plant will break the dried and thinned shell on their own.
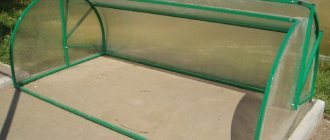
Film pots
Not as eco-friendly as shells or orange peels, but a hygienic and easy way. Its main advantage is that the film pot can take almost any shape, so they can be carefully placed in any box that fits the width of the window sill, and the size can be adjusted to suit the needs of a particular sprout.
The manufacturing method will depend on what kind of film you get into your hands.
- Garden sleeve: sold in rolls of twenty meters in large gardening stores and construction stores. Unwind the sleeve to the desired length, bend the bottom, fill it with soil and place it in a box. These pots are stronger than simple plastic ones and can be used for several seasons in a row.
- Plastic film: wrap the base (a jar or glass, depending on the size you need) with polyethylene, secure the shape with a stapler, and remove it from the base. The glass is ready.
- Plastic film “with smoke”: roll the film into a “tube” and seal the edges with an iron through the paper.
- Packages of cereals, cereals or kefir and milk: wash and use as is.
Making film cups To adjust the size of the “pot” as the seedling bush grows, you can bend the side of the bag in advance and secure it with tape. If necessary, release the edge, adding more soil. Or release it when the time comes to replant the plant in the ground: then it can be easily and gently shaken into the planting hole without disturbing the roots again.
From filter bags for coffee machines
The principle is the same as with pots made from cereal bags: fill the bags about halfway with soil for seedlings, put them in a box and sow the seeds.
Paper filters for coffee makers
The bags are made of breathable material, the leftover coffee grounds are sour, but a good fertilizer (in the West, eco-farmers make mulch and compost from the leftover coffee grounds, which you can ask your barista friend in a coffee shop).
The paper will partially dissolve from the water by the time the seedlings need to be planted in the ground; It is non-toxic, so it is not necessary to extract the sprouts from it.
Foil containers and tetrapacks
Another old-fashioned method, one of the most popular.
You need to cut off the top of milk, kefir or juice packages and thoroughly wash the inside so that there are no lactic acid bacteria or dye residues left. Fill with soil and plants.
When “evicting” seedlings, the Tetra Pak seedling pot can be cut, or you can leave it as is: they are strong enough to survive several planting seasons.
Tomato seedlings in plastic bags
Tetra Pak seedling pots are waterproof and very durable. In addition, there is some variability in shape - you can cut off not the top, but the side of the future pot, and get a seedling tray, or cut two from one bag - low and wide.
Egg trays
In egg containers it is convenient to germinate those seeds that do not like picking: the seedling, when it has thoroughly entwined its roots around the earthen ball, will be easy to remove with a fork without consequences for the root system.
Or, if the container is made of papier-mâché or cardboard, don’t dive at all - just cut or tear off the cells one by one and carefully place them in the ground, fortunately, by then the box will become limp from regular watering.
Seedlings in an egg box
Egg containers are also suitable for growing greens on the windowsill, especially onions and not too lush parsley and dill bushes.
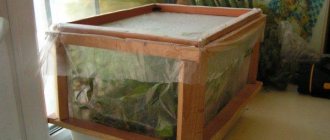
Containers for seedlings from a plastic bottle
Years ago, the Crazy Hands program taught us that a plastic bottle is a universal material for home creativity. Likewise, when growing seedlings, a plastic bottle has at least a couple of uses.
Mini-greenhouse: cut the bottle in half, place soil and seeds in the lower part, put the halves back together. Open for watering as needed. Lift the sprouts using a fork.
Mini greenhouse from a bottle
Pot with automatic watering: for those whose mother is an engineer. Cut the bottle in half, pour 2 fingers of water into the lower half. At the top one, close the neck with a lid, and use an awl to make a couple of holes in the lid. Thread a thick woolen cord into one of them (you can twist a couple of woolen threads together) about 10 cm long, tying a knot at the upper end so that the thread does not fall through.
Fill half a bottle with soil and seeds or plant a picked sprout and place everything in half a bottle of water. Such a pot will not require frequent watering - water will flow through the cord due to the capillary effect - and to make a mini-greenhouse, you just need to cover the structure with half of another bottle.
Toilet paper rolls
Another universal material for home crafts, life hacks and creativity. It’s not for nothing that parents of first-graders and gardeners sometimes even buy these bushings through Avito and advertisements on social networks.
Those from paper towels will also work if you cut them into two pieces. It is better not to use washable bushings: they will become limp much earlier than regular ones.
A pot made from a toilet paper roll is made like this:
- 2 cuts are made at the “lower” end of the cylinder so that 4 identical “blades” are made, approximately one third of the total length of the sleeve;
- the “blades” fold over each other like the lid of a cardboard box;
- Soil and seeds are placed in the resulting cardboard cup.
Cups for seedlings from a sleeve
In open ground, such seedlings can be buried along with a glass - the cardboard will sooner or later decompose in the ground. If there are concerns about the roots of the plant, the bushings can be torn off; but most often such containers are used for tubers or tulip bulbs or gladioli, which a layer of cardboard, even glued, will not stop.
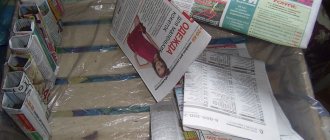
Using the same principle, cups for seedlings are made from newspaper: a newspaper folded in half is rolled into a tube, and the lower part of the tube is folded or crumpled so as to form a dense bottom. Do-it-yourself seedling cups made from newspaper decompose very quickly, and the amount of lead in the paint will not be critical for the quality of plants and soil - a completely environmentally friendly option.
Cups for seedlings made from newspaper
Step-by-step instructions for preparing pots
First of all, newspapers should be folded (or cut) into strips of the required width, depending on the height of the future pot-cup. To do this, bend the sheet in half twice. The number of paper layers in a cup depends on the quality of the paper - thin newspaper must be wrapped several times.
For paper cups, it is better not to use colored newspapers or glossy magazines, as they release dye when wet.
In addition, you will need a base to give the cup its shape. For these purposes, you can use a glass glass or a tin can, but it is better to avoid a plastic bottle - it is springy, and it will be inconvenient to wind the paper.
Next do as follows:
- Screw a strip of paper onto the base, not very tightly so that you can remove it. Leave an indent at the bottom on one edge.
- Press the remaining edge of the newspaper to form the bottom of the pot.
- Remove the workpiece from the base. The glass is ready!
Ice containers
Small but durable ice trays are suitable for germinating seeds before picking and their stratification (hardening). Not only plastic ones are suitable, but also silicone ones - it will be easier to pick up sprouts from them by simply pressing on the bottom and pushing out the plant along with the earthen lump.
Seating pots from ice containers are made simply: a hole is made in the bottom of each cell (if the plastic is strong, use a drill or a strong neighbor), and the container is placed in a tray to drain the water. The cells are filled with soil and seeds.
Such containers are suitable for plants with small roots that do not grow too quickly - others will quickly become cramped.
How to quickly cut cups from a plastic sleeve
To quickly and accurately make a large number of polyethylene seedling pots, you will need, in addition to a special garden sleeve (12 cm or wider, narrow ones will be inconvenient to tuck), a board or any plate of a suitable size.
You need to wrap the garden sleeve around the board - one turn, one glass - and then simply run a knife along it, cutting all the glasses at once in one movement. The bottoms can be sealed with an iron or simply carefully tucked in, leaving a hole for drainage, and when planting in the ground, unscrew and carefully shake out the earthen lump into the planting hole.
If the density of the resulting seedling pots is in doubt, you can compact the bottoms by inserting cups into one another. It is better to take the height of the container with a reserve so that you can fill it with soil as needed.
It may not work out the first time or it may turn out unstable, but habit will take its toll, and soon you will be calmly churning out dozens of cups.
How it used to be: paper honeycombs
Just a few years ago, seedlings were grown en masse in paper honeycombs, an invention of a team of Finnish scientists.
The idea was as follows: the seeds were sown in paper cells pre-filled with a nutrient soil mixture, and when the time came, the seedlings were planted in the ground along with these cells. Thanks to this cunning technique, the root system was not damaged, the seedlings continued to grow quietly, without getting sick and, most importantly, without wasting time on establishment. Finnish paper honeycombs were of a standard size - 60x40 cm, but the number of cells in them could be different: 48 cells measuring 8x8 cm, 130 or 238 cells measuring 5x5 cm - the choice of one of the options depended on what crops were going to be grown in them. Over time, their use became impractical, and finding paper honeycombs on sale today is very difficult. At least I didn't succeed. But new, more durable and easy-to-use containers for growing seedlings have appeared, which we will talk about in more detail now.