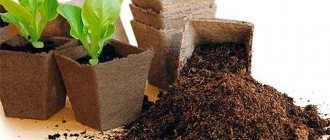
Spring is a troublesome time for gardening lovers, because it means, first of all, working with seeds. The modern assortment of various seedling containers and pots is truly huge, but still most gardeners, in order to save money, prefer to use improvised means. Do-it-yourself cups for seedlings are made in a variety of ways, and you will learn about the simplest and most accessible ones from this article.
DIY cups for seedlings
We use plastic and metal jars
Jars for canned food, coffee or tea are, so to speak, classics. In the bottom of each container you need to drill a couple of drainage holes (preferably from the inside), and to make it easier to remove young plants, you can additionally make cuts on the walls. If the cups will be used for several seasons, instead of making cuts, it is better to place a strip of polyethylene or thick paper on the bottom - this way you can remove the earthen lump without damaging the root system (you just need to pull this strip). Cut-off beer cans, toilet paper, PET bottles and much more can be used in the same way, but more on that later.
Tin jars are suitable for growing seedlings
Old jars for planting plants
Baby food and yoghurt cups can be excellent seedling containers. But the bottom of such jars needs to be cut off and a cardboard or tin circle of the appropriate size placed in its place.
Pepper seedlings in plastic cups
When you need to transplant seedlings, you just need to press on the bottom with a stick.
Note! Disposable plastic cups are not the best option for seedlings, due to the risk of slowing plant growth.
Seedlings in plastic cups
Prices for plastic glasses wholesale
plastic glasses wholesale
Seedlings in egg cells
It is convenient to grow seedlings in egg trays. I especially recommend biodegradable boxes. They are made from recycled materials, decompose quickly and can be recycled. Try not to buy plastic or foamed polystyrene egg packaging.
Using egg trays is easy, you don’t even need any special preparation. We make drainage holes at the bottom of each cell, fill it with soil and sow the seeds.
Minuses:
- For cardboard packaging, you will need a tray to prevent water from leaking when watering. Many summer residents use a plastic bag.
- Well, the seedlings will not live long in such a container - they will definitely need to be planted into larger cups.
Pros:
- At the same time, a cardboard box is also suitable for capricious crops with a delicate root system, which are not recommended to be picked. Simply cut off the cell with the seedling (by then the packaging will already be soaked from water) and transplant it into a larger container.
- In addition, the cardboard box does not create obstacles for plant roots - they easily overcome this barrier and are not damaged.
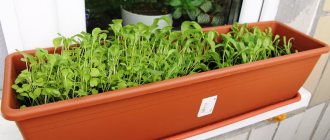
- Well, egg trays are convenient for growing vitamins on the windowsill. Plant onions there and sow greens.
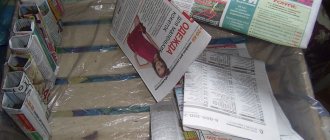
Cups from old newspapers
A small stack of newspapers is quite useful for making disposable cups. Typically, such containers are more convenient than the options described above, because when replanting the plants do not need to be shaken out - instead, you need to tear the cup. As a result, the root system will not be damaged.
How to make seedling pots from newspaper
To make these cups we need a mold. A small bottle or tin can will do. The algorithm of actions should be as follows.
Step 1 . First, take a sheet of newspaper and fold it in half.
Fold a sheet of newspaper in half
Step 2 . Next, we wrap the mold with newspaper, leaving an allowance to create a flap bottom.
Wrap the jar, leaving an allowance for the bottom valve
Step 3. Fold the edges of the resulting container and its bottom.
Fold the bottom and edge of the cup
Step 4. Fill the cup with soil mixture.
Pour soil into the resulting cup
Note! If you are not sure that the cup is strong enough, you can tie it with thread or an elastic band.
Growing seedlings in milk bags
If you buy milk or kefir in bags, you don’t need to think about the issue of seedling containers at all. After all, a milk carton is a ready-made pot. Exactly the same as described above. Only even better. Because it is opaque, it is black from the inside, which means it will not allow light that is completely unnecessary for them to pass through to the roots.
Your job comes down to washing and storing used packaging until spring, and at the beginning of seedling season, making several drainage holes in the bottom of each bag. It couldn't be simpler, could it?
Seedling cups made from toilet paper
The next manufacturing option is based on the papier-mâché principle. Here we need a spray bottle, glass glasses and toilet paper itself. The technology is extremely simple: we wrap the glasses with toilet paper, moisten them generously with a spray bottle, and then firmly press the paper against the walls. We dry the workpiece for 24 hours, and then remove it with careful circular movements.
Procurement of materials
Wrap the form in paper
Wet the paper
Dry cups
Paper cups with seedlings
Note! Such cups are good because they can simply be torn apart to transplant seedlings into the soil, as mentioned above. Or, as an option, the plants can be planted together with the container (it will subsequently collapse naturally).
We use Tetra-Pak boxes as containers for seedlings
Another simplest option for seedling pots is the lower parts of Tetra-Pak or Pure-Pak boxes. Several slits for drainage in the bottom of the box - that’s all the manufacturing work.
Compared to paper cups, such containers will last longer due to the metal or film inner coating. So they grow tomatoes, eggplants, and strawberries in juice boxes.
And the cut off tops of these boxes can be recycled in a special container. If there are any in your city.
An original version of making newspaper cups
Here you will need the same newspapers, as well as cuttings of a building profile. If necessary, the latter can be easily found among construction waste, so you don’t have to buy anything. In our example, two sections of profiles are used, each approximately 20 cm long. The width may vary depending on the specific crop (peppers, for example, need wider cups).
Step 1. First, take a newspaper and cut it lengthwise and crosswise.
First you need to cut the newspaper
Step 2. In one hand we take a piece of the profile, in the second - a newspaper bent in half (i.e. two layers). We wrap the form with newspaper as shown in the image below.
Profile wrapped in newspaper
Step 3. Where the bottom of the cup will be, bend the corners one by one.
Forming the bottom of the cup
Step 4. We do not remove the profile yet - it is much more convenient to fill the cup with soil mixture.
Filling a cup with soil
Step 5. When the cup is filled, carefully pull out a piece of the profile.
The profile is stretched
The profile is elongated
Step 6. Place the filled cups in a box pre-lined with polyethylene.
Cups are placed in a drawer
The result should be something like this.
Box with cups for seedlings
Cups for seedlings from a sleeve: quick and easy
It is convenient to make pots for seedlings from ready-made polyethylene sleeves. The polyethylene sleeve is a long pipe, tightly sealed on both sides in the factory. Usually the sleeve is sold in spools (coils). The length of such a bay can be from 1 m to 500-1000 m. From one bay of 500 m you can make 5000 cups!
How to quickly cut cups from a plastic sleeve
For seedling cups, a sleeve with a width of 12 cm or more is suitable. You should not take a sleeve with a smaller width - it will not be suitable for seedling pots, it is inconvenient to fill it with soil, and the seedlings will be cramped there.
Measuring and cutting an equal number of cups is long and tedious. It is better to use a special template. The template can be any metal plate or wooden plank of the required width.
- Simply wrap the seedling sleeve around this template. With each turn you get a new cup.
- Having wound the required amount, cut off the sleeve and cut it with a blade along the folds of the plate (board)
The cups in this way turn out absolutely identical and even.
To sow seeds for seedlings, such a pot is simply filled with earth, but not to the brim. You need to leave a little free space on top so that the free edges can be tucked inward, as if making the bottom of a pot, and turn it over. This creates a full-fledged container that does not crumble. In addition, there remains an open hole at the bottom for drainage - excess moisture will drain out through it.
| You can order polyethylene hoses* at affordable prices on ⇒ website https://olgapak.ru/products/hoses/ *Sleeves with a width of 25 to 100 cm are sold in kilograms. The length of one kg of sleeve is from 20 to 80 m, depending on the width. |
Photo: polyethylene sleeve for seedlings
Pros and cons of sleeve cups
1. They are cheaper than other seedling containers
Sleeve pots will cost several times less than other plastic seedling containers. According to gardeners' calculations, the cost of one glass is 5-10 kopecks. In addition, it can be used repeatedly
2. Save space and allow you to grow a large number of seedlings
Sleeve cups take any shape (circle, square, triangle) and fit in any drawer without leaving any gaps. This container is especially convenient for those who grow a lot of seedlings. It’s easy to put them tightly together in boxes, keep them on the balcony, and take them out to the dacha in the spring.
3. Light in weight and easy to transport
Sleeve pots are lightweight, stand firmly in boxes and do not fall over when transporting seedlings to the dacha. In such cups you can easily transport seedlings without a car if you get to the dacha by bus or train.
4. From the sleeve you can cut pots of different heights for plants with different root heights
For example, for a miniature petunia, a pot 10 cm high will be enough. For tomatoes, cut 2 times longer so that the container volume is approx. 1 l.
5. Convenient for replanting - the roots are not damaged
When growing seedlings in soft plastic cups, it is convenient to transfer them, i.e. replant together with a clod of earth. This way the root system remains intact and is not damaged even in the most capricious crops - peppers and cucumbers, fragile flowers.
6. Strong and durable
The film takes up little space during storage, and can be used repeatedly for several seasons. The thickness of the film from which the sleeve is made is from 40 to 120 microns. The thicker the film, the stronger it is. For growing, for example, delicate flower seedlings, the thinnest film is suitable. For seedlings, choose a thicker film. For seedlings of different crops and for cups of different sizes, stop at the universal average thickness - 80-100 microns
Experienced gardeners have noticed the following shortcomings:
- Softness of the walls of the finished container. However, this is a drawback only at first glance. Subsequently, as the seedlings grow and develop, the root system of the plants will compact the soil and, as it were, cement the pot - it will stand steadily and not crumble.
- It takes a little longer to fill the cup with film. This is also easy to deal with. Once you fill a couple dozen film pots with soil, things will go faster
Photo: growing seedlings in cups from a sleeve
Paper cups - an improved option
Another option for making containers from old newspapers is to use the original device. For the convenience of visitors, the step-by-step guide is presented in table form.
Table. Master class on creating paper cups.
| Steps, photo | Description of actions |
| Step 1 | To work, we will need such a rectangular device - a kind of tin sleeve placed on a small wooden block. |
| Step 2 | We will use this device when making seedling cups from newspapers. The sleeve can be made from a tin can. Such containers are tinned with food-grade tin, and therefore it will be enough to overlap the tin and heat the joint with a soldering iron. We will use the electrical tape on the sleeve as a guide when winding the newspaper so that the finished cups have the same height. |
| Step 3 | We can cover one end of the block with a piece of leather soaked in oil. Thanks to this, the soil will not stick. |
| Step 4 | First, fill the sleeve with soil mixture as shown in the picture. |
| Step 5 | We wrap the sleeve with a strip of newspaper, focusing on the electrical tape. |
| Step 6 | To form the bottom of the container, bend the edges of one side. |
| Step 7 | Carefully pull the sleeve onto the block, holding the soil with the end with the leather patch. |
| Step 8 | We place the filled cups in a wooden box, previously covered with polyethylene. |
Note! As for the dimensions of the container, they will largely depend on the dimensions of the box itself. Although on average it is from 2x2 to 4x4 cm.
Benefits of seedling cups
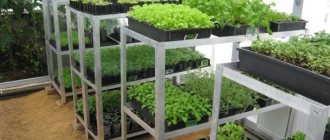
Many gardeners grow seedlings in a common box, and when planting plants in open ground, take great care to untangle the intertwined roots. Even with maximum care, the chance that the plant will not be injured is not very high.
The boxes themselves, no matter how compact they are, are needed only one and a half to two months a year. The rest of the time they will only collect dust and take up space.
Another thing is seedling cups. The plants can be easily removed or, if you use cardboard or peat cups, not even removed, simply sticking the cups into the ground. They are either made from quickly decomposing materials, or after use they can be nested one inside the other and hidden away, to be taken out again next spring.
We use toilet paper rolls
The advantages of this method are the same as those described above - the bushings are an environmentally friendly material, they do not contain foreign impurities, so seedlings can be planted in the ground without removing them from the cups (the latter will rot in the ground without a trace). If the cups will be used for large plants, we can use whole bushings; in other cases, they (the bushings) can be cut in half. The manufacturing process itself is not complicated.
Table. Master class on making cups from toilet paper rolls.
| Steps, photo | Description of actions |
| Step 1 | So, first we prepare everything necessary - these are the bushings and scissors themselves. |
| Step 2 | We take the first sleeve, crush it and cut it into two halves. |
| Step 3 | On one half we make four cuts (about 1/3 of the height). |
| Step 4 | We bend the “blades” that were formed as a result of this and form the bottom of the future cup. Simply put, we make the same bottom as in ordinary cardboard boxes. |
| Step 5 | The bottom is almost ready. |
| Step 6 | The result should look something like this. |
| Step 7 | That's it, the seedling cups are ready for further use. All that remains is to fill them with soil mixture and sow something you need! |
Video - Making cups for seedlings
What to prepare for work
To create cups for seedlings with your own hands, we will need very simple materials and tools:
- The shape around which we will wrap the cup. This could be a can of stewed meat, a wooden or metal block of suitable diameter, or a glass glass from a set of dishes. It is very convenient to prepare a plastic bottle: you need to cut it to the height of the future cup, and punch two holes in the bottom through which to pass a rope loop. By hooking this loop, you can effortlessly remove the mold from the finished product.
- Stapler or tape for securing seams and bottoms.
- Scissors.
A blank for a cup can be made from a plastic bottle
Film cups
To create such cups, it is recommended to use PET film for greenhouses. We also need a simple stapler and a base that has the required shape. First, we cut the film into strips, wrap it around the base, and then fix it with staples. The result will be a nice square cup. Although there is a simpler option - make small tubes from film with curved upper edges (required for rigidity). We place these tubes on a pallet or in a box and fill them with soil mixture.
Production of film cups
Note! The film must be dense, otherwise it will easily lose its shape!
You can also use bags from fermented milk products. To begin, we fold these bags, fill them with soil, sow the seeds and turn the edges back. In the future, as the seedlings grow, the soil will have to be added little by little. The disadvantage of this method is the instability of packets. To achieve greater rigidity, it is advisable to strengthen the edges with cardboard strips.
Containers for seedlings made from bags
DIY cups for seedlings made from film
As a supporter of minimizing the use of plastic in our lives, I am, of course, against film.
- Therefore, I advise you not to buy new film for seedling containers, but to use plastic bags , which have been accumulating for years and littering our homes.
- Milk and kefir bags are also perfect . You don't even need to sew anything here. And if you turn them “inside out”, they will all turn out to be the same color - black or gray, which is aesthetically more pleasing than the differently designed “covers”. I have quite a lot of these bags, but I don’t grow that many seedlings, so I recycle them.
For the rest, you can use the useful master class from Antonov Garden subscriber - Tatyana Krapivina . In her video, she tells and shows how to make cups from film with your own hands. You can read more in the article
Making cups from plastic bottles
Any plastic bottle will do here (in our example, a 1.5-liter bottle). The algorithm of actions is given below.
Table. Master class on making seedling cups from plastic bottles.
| Steps, photo | Description of actions |
Step 1 | First, cut off the neck and bottom of the bottle as shown in the image. |
Step 2 | The cut may be uneven - this does not play a special role. |
Step 3 | We flatten the cut bottle (you can use a glass jar, as in the photo), forming the first couple of edges of the cup. Due to the features and properties of the plastic, the ribs will definitely be straight and parallel. |
Step 4 | It should look something like this. |
Step 5 | Next, we press the resulting workpiece with our hand (the hand does not have to be six-fingered, as in the picture) and cut along the lines of transition of the container into the neck and bottom to get smooth edges. |
| Step 6 | The edges turned out really smooth. |
| Step 7 | We bend the workpiece as shown in the photo and make a couple more ribs. |
Step 8 | We still use a glass jar for this. |
Step 9 | As a result, we got a square container without a bottom. We measure the side of one square and divide the resulting figure by 2. Example: 7:2 = 3.5 cm. |
Step 10 | We cut each of the edges by 3.5 cm. |
Step 11 | The result should be the following. |
| Step 12 | We bend the cuts and form the bottom, like, again, a cardboard box. |
Step 13 | We align the edges so that the finished cup is more stable. |
Step 14 | The glass is ready. We do not make drainage holes. |
Step 15 | At the end, we wrap the container with “foil” - a label from the same bottle. If you are concerned that water will leak out a lot after watering, you can seal the bottom with tape, although this is not necessary. |
How to sow seeds in such cups correctly? Nothing could be easier! As an example, consider the cups described above, made from plastic bottles.
A glass for seedlings from a regular plastic bottle
Step 1. So, take a ready-made glass and fill it with soil mixture - store-bought or home-made.
Soil mixture is poured
Step 2. Fill the container completely or only 2/3. We place a couple of seeds of eggplants, peppers or any other crop on the soil.
Sown seeds
Step 3. Then lightly sprinkle the seeds with soil mixture and water thoroughly.
Watering
Step 4. Cover the cups and place them in a warm place, waiting for the shoots to appear. As you can see, even from such a seemingly useless thing - a plastic bottle - you can make excellent seedling cups.
Sowing and growing flower seedlings
The ideal soil for sowing should be light and loose, have a porous structure and sufficient aeration, and also match the crop intended to be grown in this soil. Read this article for more details.
DIY cups for seedlings from newspaper
The concept of “upcycling” is very popular in Europe. This is when we make new ones out of old unnecessary things. As a result, we rid apartments and landfills of unnecessary clutter, save natural resources and obtain an environmentally friendly product with new properties.
For example, cups for seedlings made from newspaper. If you think this is an “old-fashioned” way, which is used exclusively “out of poverty,” then I do not agree. As confirmation, I cite a master class from a German amateur gardener. He made cups from newspaper for tomato seedlings. And I printed the markings for the varieties on my own 3-D printer!
Well, our Russian gardeners have not yet acquired modern printing devices, but there are plenty of newspapers in every home.
How to make cups for seedlings from newspaper: master class
In order to make newspaper seedling containers, we will need:
- Old newspapers
- Glass jar with lid
- Sharp knife or scissors
- Making newspaper blanks
Thin large-format newspapers of 2-4 sheets are suitable. The required thickness of the cup is formed when it is rolled up.
- Fold the newspaper in half lengthwise and cut along the fold.
- We make a 2-3 cm fold along the cut edge and turn it over - we will need it later when we form the cup. This is the future top of the cup.
- We repeat and make as many blanks in this way as there are containers needed.
- Forming cups
For molding, you will need a glass jar of the size we want to get the cups for the seedlings. Convenient to work with a volume of approx. 250-500 g.
- Place the jar with the lid down, i.e. We will form the bottom along the lid - this will make it easier to remove the jar from the newspaper shirt.
- Wrap the jar tightly in newspaper, turn it over and fold the edges at the bottom. No glue is needed - everything will stick tightly and take on smoother shapes when wet.
- Now we remove the jar from the newspaper container, holding it by the edges and bottom so that the cup does not crumble.
- Fold the edges over the top of the cup. This will make it more stable.
- We sow seeds or plant seedlings in them
- Now let's start sowing. We fill the containers with soil, almost reaching the edge.
- We make a hole in the center and plant seedlings or seeds in them. Compact and water.
- To care for seedlings in newspaper cups, you will need an additional deep container (box). There the cups will stand tightly and not fall.
Gradually, when watering, the newspaper will get wet, the cups will become softer, but will not crumble for the time being. Then, when planted in a permanent place, the newspaper will turn into useful fertilizer.
In this case, there is no need to be afraid of the toxicity of printing ink. Its concentration on newspaper sheets is not so high, and it will do much more harm when it decomposes among garbage residues at landfills.
If you don’t need newspaper cups, don’t throw the newspaper in the trash, but recycle it!
You can watch the master class visually in this video:
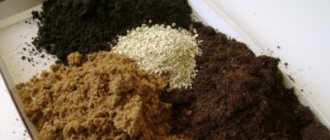
An alternative option is to make nutritional cubes
To make such cubes we prepare:
- 1 turf soil;
- 5 - humus.
There is another option:
- 1 part humus;
- 3 - peat.
How to make peat cubes
Mix the prepared ingredients, and add ammonium nitrate (15 g per 1 kg), potassium sulfate, superphosphate (50 g per 1 kg) to the resulting mixture. In addition, add water - such an amount that the finished mixture has a creamy consistency. We place all this in a tray in a layer 80-100 mm thick, and then cut it into cubes of the required sizes. You can move the cubes a little away from each other to make it easier to work with. At the end we sow the seeds.
Prices for humus
humus
Video - How to make seedling cubes yourself
As a result, we note that regardless of what kind of cups you use, they must be rigid, spacious enough, with low thermal conductivity and opaque walls. In addition, you should take care of drainage - it will protect the plants from excess moisture. If all these requirements are taken into account, the seedlings will grow healthy and strong, and adult plants will definitely delight you with a rich harvest or abundant flowering!
Ice containers
Small but durable ice trays are suitable for germinating seeds before picking and their stratification (hardening). Not only plastic ones are suitable, but also silicone ones - it will be easier to pick up sprouts from them by simply pressing on the bottom and pushing out the plant along with the earthen lump.
Seating pots from ice containers are made simply: a hole is made in the bottom of each cell (if the plastic is strong, use a drill or a strong neighbor), and the container is placed in a tray to drain the water. The cells are filled with soil and seeds.
Such containers are suitable for plants with small roots that do not grow too quickly - others will quickly become cramped.
How to quickly cut cups from a plastic sleeve
To quickly and accurately make a large number of polyethylene seedling pots, you will need, in addition to a special garden sleeve (12 cm or wider, narrow ones will be inconvenient to tuck), a board or any plate of a suitable size.
You need to wrap the garden sleeve around the board - one turn, one glass - and then simply run a knife along it, cutting all the glasses at once in one movement. The bottoms can be sealed with an iron or simply carefully tucked in, leaving a hole for drainage, and when planting in the ground, unscrew and carefully shake out the earthen lump into the planting hole.
If the density of the resulting seedling pots is in doubt, you can compact the bottoms by inserting cups into one another. It is better to take the height of the container with a reserve so that you can fill it with soil as needed.
It may not work out the first time or it may turn out unstable, but habit will take its toll, and soon you will be calmly churning out dozens of cups.