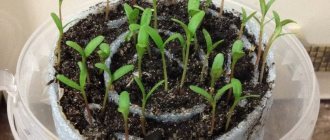
It is known that seeds germinate better when they are in one pile, rather than individually. A strange fact has already been noticed by many gardeners based on reviews. Almost all of the “babies” germinate, but those planted separately do not always.
Seedlings in diapers
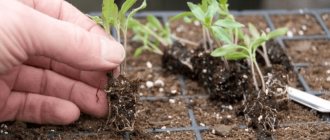
Having planted the seeds of tomatoes or peppers in one place, after a while the problem arises of how to separate them from each other without damaging the roots. Such a labor-intensive process does not always end with a positive result - some of the plants die.
Gardeners Galina Kizima and Yulia Minaeva came up with a new technology for planting seeds. The method saves space on the windowsill, the germination of tomatoes and peppers is almost 100%. To do this, the seeds germinate in a wrapped state and do not require frequent picking and replanting. The method was called growing seedlings in diapers.
How to properly plant tomatoes in a “snail”
Sowing vegetable crops in a “snail” involves 2 methods.
- seeds are germinated without using soil on toilet paper;
- sowing is carried out on a layer of soil 1-1.5 cm thick.
In any case, the gardener will need:
- plastic film (you can use used one) or disposable lunch bags,
- construction substrate,
- toilet paper,
- scissors or knife,
- Earth,
- seeds.
How to properly plant tomatoes in a “snail” without soil
It should be noted right away that when using this method, tomato seeds do not need to be pre-soaked or germinated.
These activities are replaced by the method of growing seedlings without land.
- You should prepare a strip of plastic film with a width equal to the width of the toilet paper sheet - this is the base.
- Place 2 layers of paper on top of it.
- We moisten from a spray bottle with a solution of the drug “Epin” or “Zircon”, “Energen”, “Chlorella Suspension”. You can use any other biogrowth stimulator.
Chlorella suspension is a natural biostimulant that accelerates root formation, increases resistance to stress, and a natural antibiotic completely destroys pathogenic microorganisms.
- Stepping back 1 cm from the top edge, we begin to lay out the tomato seeds, maintaining the same interval between the grains.
- The seeds cling well to a moistened match or toothpick and remain just as well on damp paper.
- Place another layer of paper on top of the seeds and lightly moisten them.
- Now carefully roll up the rolled-up cigarette, secure it with an elastic band or tape and place it in a glass with a small level (1-1.5 cm) of the same biostimulant.
- Be sure to write on the roll the type of tomato you sown.
The method of growing seedlings without soil is recommended to be used before the formation of cotyledon leaves.
For further development, the plant requires a large amount of nutrients, and paper simply does not have them. This method is also good for determining the percentage of seed germination.
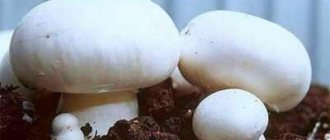
Having a large supply of seed from his own plot, the gardener, without wasting time, effort and useful space, will select the strongest and healthiest sprouts from the seedlings. In addition, the seedlings are sterile and are never subject to the “black leg” disease.
How to properly plant tomatoes in a “snail” with soil
Those who do not risk transplanting seedlings at the cotyledon leaf stage can sow the seeds in the same “snails”, but with soil, and wait for tomato bushes with 2-3 leaves.
For this method, it is more advisable to use a laminate underlay. The “snail” holds its shape better and is more stable.
- First, we decide on the place of work and prepare a strip of base 10 cm wide. Knowing how many seeds you have, you can approximately calculate its length. But it is more convenient to work with a canvas of 80-100 cm.
- Having placed the substrate on a flat surface with the narrow side facing you, add soil and level it, slightly compacting it. The result should be a layer 1-1.5 cm thick. We wet the surface with a spray bottle and proceed to sowing.
- Using a match or your hands, spread the tomato seeds over the surface, departing 1 cm from the top edge. Leave the distance between the grains 1.5-2 cm.
- We roll up the “snail” without making much effort, otherwise the earth will be squeezed out.
- Pour soil onto the next section of the base and repeat the above steps.
When the “roll” stuffed with soil and seeds is ready, you need to secure it. Scotch tape, rubber bands, or any adhesive tape are suitable for this.
The “snail” is installed in a transparent container - it is easier to regulate the water level when watering. A plastic bag is placed on top - a greenhouse effect is created.
Now the entire structure should be placed in a warm place with t=25-28⁰C. This is the optimal temperature for tomato seed germination.
What other plants can be planted in “snails”
Pepper seedlings in a snail
The saving in useful space is immediately felt and gardeners who use this method for the first time have a desire to sow something else in the same way. Easily!
You can sow peppers, eggplants, cabbage, nigella onions, melons, watermelons, cucumbers, and all kinds of flowers in “snails”.
Only the sowing depth is adjustable. For small seeds, such as cabbage or nigella, the distance from the top edge is slightly reduced.
For very small seeds, such as petunia, first prepare a “snail” with soil, and only then sow on the surface of the soil.
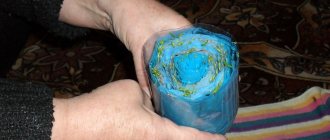
How to dive into a diaper
We continue to save space on the windowsill and cut the grown seedlings into “diapers”. Again you will need a construction substrate or plastic film.
This material will serve as “diapers” for the sprouts.
- We are preparing a workplace where a low container with fertile and slightly moist soil should be located in close proximity.
- It is necessary to prepare a container in which improvised cups with seedlings will be installed. It is advisable to fill the bottom of the container with wet sawdust if you do not plan to bend the film to create a bottom.
- Always have a small watering can or spray bottle at hand.
- A spoon or small spatula will be needed to separate the sprouts from the substrate in the “snail”.
- Toilet paper will come in handy if you decide to make a cup with a bottom. During work, the earth will not crumble from below, but you can do without it.
- Rubber bands (adhesive tape) may be needed if the backing serves as a “diaper” - they are placed on the cup for fastening. If the sprout is transplanted into a roll of plastic film, then this is not necessary, they already hold up well.
Let's begin the process of swaddling tomato sprouts. It is more convenient to carry out work on a pallet with low sides. It is easier and easier to remove spilled soil from it.
- The base is placed on the pallet with the narrow side facing you. In the lower part, at 1/3 of the height, lay a strip of toilet paper equal to the length of the film - this is the bottom of the cup.
- Pour in a large spoon (or handful) of soil, 7-8 cm from the edge, and moisten it with a sprayer.
- The “snail” is unrolled and the desired sprout is selected. Remove from the substrate with a spatula and transfer to the “diaper”.
- Add another spoonful or two of earth on top. Toilet paper is folded up and sprayed so that you don't have to hold it.
- All that remains is to wrap the film to make a glass with a sprout inside.
If the soil from the upper part has crumbled, it is filled to the edges.
Cotyledon leaves should be 1-1.5 cm above ground level
Seedlings harvested in this way will have a separate feeding area and can be easily rotated around its axis for uniform illumination.
Picking tomatoes in diapers - video
Picking
Picking up seedlings grown in such rolls is very simple (Figure 3). There are several ways to carry out this procedure. For example, you can carefully examine the roll to determine where the roots are, and then step back 2-3 cm from this point and simply cut off the bottom part of the film. Then the seedlings will be easy to transplant into individual cups or individual rolls. This method has only one drawback - if you plan to use the same film next year, this will become impossible, since during such picking the material is damaged and becomes unusable.
Figure 3. Stages of picking seedlings
There is another pick that is suitable both for seedlings grown without soil and for those that were germinated in a substrate:
- Take a thicker film and cut it into the required number of pieces (the size should correspond to the area of a regular notebook sheet).
- Place a tablespoon of soil on the upper left corner of the film.
- Carefully remove the sprout from the roll and place it on the ground so that the lower leaves of the sprout are located above the edge of the diaper.
- Sprinkle the roots with another spoonful of soil.
- We bend the bottom edge of the film so that the soil does not crumble, and roll the film into a roll. To secure the structure, it can be secured with a regular rubber band.
If you want to plant seedlings in ordinary cups, then simply carefully unroll the roll of seedlings and transplant each of them into a separate container with a nutrient substrate. However, if you decide to plant seedlings in diapers, you should take into account that you will need to pay a lot of attention to soil moisture. The film retains water for a long time, so before watering, be sure to determine the humidity level by touching the soil with your finger. If your finger is dry, it means the plants need watering. And if soil sticks to your finger, this means that the soil is too wet and watering can be postponed for 2-3 days.
Growing in a "snail" without diving
But if desired, you can exclude the seedlings from diving into the “diapers”.
- To do this, when sowing tomato seeds in a “snail”, increase the distance between the seeds to 7-10 cm.
- After the seedlings have completed the formation of 2-3 true leaves and the nutrients are running out, the bundle is unrolled and fertile soil is added to the root system area.
- Then the bundle is returned to its original form and proper care is provided.
Timely watering, fertilizing with complex fertilizers once every 2 weeks and sufficient lighting will help grow strong seedlings without much expense.
The longest period for keeping sprouts in such conditions is one and a half months. After which the seedlings are planted in the greenhouse.
The advantage of this method is that the plant does not need time to adapt after transplantation. The entire growing period will be spent on developing the root system and increasing green mass.
Growing tomatoes in a snail without picking - video
Recipes for liquid fertilizers from Yulia Minyaeva
Anyone can make liquid fertilizers without significant costs. Fertilizers recommended by Yulia Minaeva:
- Nutrient liquid from grass clippings.
- Yeast feeding.
Every plot, regardless of its size, has to mow the grass several times a year. Instead of sending it to the compost, you can prepare a liquid for feeding tomatoes with your own hands. Add a glass of soda ash and directly cut grass to 200 liters of water. Cover the barrel with film and wait a week. Minaeva’s advice: use a diluted mixture for fertilizing in the proportion of 1 liter of fertilizer per 10 liters of water.
1) The “Droplet” shaped greenhouse with a pointed roof does not retain snow. 2) Wide, comfortable gate with a built-in door - you can drive it with a wheelbarrow; when digging, you can use a walk-behind tractor. 3) The space in the greenhouse allows you to place a barrel inside to create a watering/automatic watering system. 4) Polycarbonate with UV protection, hard, dense, excellent quality. 5) Reinforced polycarbonate fastening. The latest development of the plant: Reinforced fastening of polycarbonate with self-tapping screws through galvanized tape allows you to avoid damage to the polycarbonate, as well as its tearing off the greenhouse under the influence of strong winds. YOUR POLYCARBONATE WILL NOT FLY THROUGH YOUR NEIGHBORS' VEDGED. Thanks to this fastener, accidental pushing of the polycarbonate during installation is eliminated. 6) Height of the greenhouse. The larger and higher the greenhouse, the better and faster the crop grows! 7) Additional automatic vents - for this size we decided to install 6 pieces so that the greenhouse would be properly ventilated. In summer, depending on the temperature, they open and close independently. Plants don't burn. For this size, greenhouses are necessary. Protective tape for polycarbonate: very convenient and practical, because... Dirt, insects and birds do not get into the polycarbonate honeycombs. 9) Convenient location of the beds. In a greenhouse of this size, you can create 3 full-fledged wide beds with convenient paths.
Other videos about greenhouses: Do-it-yourself greenhouse made from window frames. Super DIY greenhouse: cheap and simple. https://www.youtube.com/watch?v=ptopJB4z4a8&list=PLqCZWqsWs4QKhSFl6ctS6PYdMdggRb8Lc&index=97
Which greenhouse to choose??? My choice. https://www.youtube.com/watch?v=BQ_GT2fJwoo&list=PLqCZWqsWs4QKhSFl6ctS6PYdMdggRb8Lc&index=39
******
Seedlings in a snail is a method of planting seedlings, which remains in first place for me. I'm very pleased with the snail.
Video about “snail”: Snail for seedlings. Where to begin. https://www.youtube.com/watch?v=GqGq47NaS4Q
Seedling. There is so much in this word :-) Now it’s time to prepare for our long-awaited gardening season. Planting seedlings was the first step. There is so much to do: twist the snails, prepare the cups, make seeds on the tape and carry out other preparatory work.
Good seedlings to you!
Yulia Minyaeva, on the channel In the garden or in the vegetable garden. (Yulia Minyaeva, Vo sadu li v ogorode).
Caring for seedlings in “snails” and “diapers”
The “snail” with tomato crops is kept warm under a cover made of a plastic bag. At this time, they require daily ventilation and removal of condensation to avoid the appearance of mold on the soil surface. If necessary, spray the soil from a sprayer.
After the first shoots appear, the container with the “snail” is moved to a bright place. After mass shoots, the “snail” is freed from its shelter from the bag and regularly rotated around its axis if the sprouts bend in search of light.
Seedlings from early sowings need to be provided with additional lighting. Daylight hours for tomato seedlings should be at least 12 hours a day.
Water the seedlings in a container, making sure that there is no water in it constantly. A week before diving, fertilizing is carried out with complex fertilizers, but in a lower concentration.
After transplanting into “diapers”, the seedlings are shaded and not watered for several days (4-5). Further care for young tomato bushes consists of regular watering and providing the required amount of light. Once every 2 weeks, watering is combined with fertilizing with a full range of fertilizers.
Preparation
Wash the beets and grate them on a coarse grater or, to reduce labor costs, use a food processor. We will stew the prepared beets. A large, thick-bottomed stainless steel pan works well for this.
Ingredients and utensils
Place the grated beets in a saucepan. Add salt, sugar, vegetable oil, vinegar and water.
If your beets are very sweet, then you can put less sugar, in this case it is better to focus on your taste. The volume of water of 300 ml is also given approximately, since beets can be of different juiciness, but more on that below. No need to add any spices.
Mix all the ingredients thoroughly and place the pan on the stove. The beets are stewed over low heat for 2 hours after the start of boiling. You need to stir it regularly and make sure it doesn’t burn. If you see that there is not enough water for stewing, you need to add a little boiling water (100 - 200 ml).
There should be enough water for stewing. Place the finished beets in sterilized jars, compacting the mass a little with a spoon from time to time, so that there are no voids occupied by air. We seal the jars and turn them over.
You can see the whole process of preparing beets by watching the video. Its author is the famous blogger Yulia Minyaeva. Yulia also talks in detail about how she sterilizes jars in the oven and then uses them for preparations.
THE RECIPE IS THE BOMB! WE ATE THE WHOLE JAR IN ONE EVENING! TOMATOES IN GEORGIAN STYLE.
Georgian tomatoes are another delicious tomato appetizer. Salted tomatoes recipe: https://goo.gl/S5ytT2 Assorted.
Apples for the winter in a jar! | Apple Recipe In Season.
Soaked apples. My grandmother's recipe. Other recipes for winter preparations: Tender, crispy cabbage! https://www.y.
I cook them again and again! Flatbread in a Frying Pan With Potatoes. Giveaway from KITFORT.
THE GIVEAWAY IS CLOSED. How to make flatbreads is the topic of this video. Planetary mixer Kitfort KT-1308-2, white https://goo.
Awesome Apple Pie. Even a Child Can Cook!
Bulk pie with apples (apple pie). Subscribe to Channel 7DACH https://goo.gl/sqE5GL Website 7DACH https://7dach.ru/ If you are tired.
Advantages and disadvantages of the method
Each gardener has his own experience of growing tomatoes in “snails” and “diapers”. But there are general parameters that speak for and against this method.
Advantages
- The first and generally recognized advantage of the method of sowing in “snails” and “diapers” is the saving of space on the gardener’s first spring bed – the window sill.
- Soil saving. The soil is used only for the development of the root system.
- You can grow seedlings before planting in open ground. To do this, you need to sow the seeds at a distance of 7-10 cm from each other and periodically add soil to the root system.
- Significant budget savings. Purchased containers and mini-greenhouses for seedlings are much more expensive than a building substrate.
- Space saving. Bulk seedling boxes need to be stored somewhere, and small strips of substrate after washing are rolled into small rolls and put away in a secluded corner.
- When transplanting plants from a “snail” to a “diaper”, it is possible to interrupt the work at any time. The roots of neighboring sprouts are not damaged, since they do not touch each other. Add a handful of earth to the vacant space and roll it up. The “snail” will bide its time.
- There is no risk of intertwining of the root system and transmission of diseases through the soil.
- There is a real opportunity to increase the volume of soil in the “diaper”. To do this, simply unroll it and add the required amount of soil.
The disadvantages of the method include painstaking work, lack of skills and dexterity. But experience comes with practice, and gardeners have excellent patience.
Preparing seeds for germination
Before you start planting, you should pre-sort the seeds. Empty seeds, those that are of the wrong color, or that are too small in size should be selected so as not to sow the precious area with previously rejected material. You can also use special techniques that help increase seed germination.
Seed treatment methods. Table
| Name | Description |
| To stimulate germination of seeds, you can soak them in water. For these purposes, warm water is needed. The seeds are placed in gauze or bandage and soaked until they swell. To harden the seeds, you can soak them in cold water for 24 hours, which should be changed after 3-4 hours. |
| To speed up the germination of seeds, you can soak them in microelements dissolved in water 10-12 hours before planting. This method is good because the resulting seedlings are of high quality and strength. |
| For these purposes, ultraviolet light and potassium permanganate are used. Onions and legumes can be placed under open sunlight or an ultraviolet lamp. A 1% aqueous solution is prepared from potassium permanganate and water, into which the seeds should be placed for 20-30 minutes. To disinfect seed, you can use garlic water: 20 grams of chopped garlic per 100 grams of water. It is recommended to keep the seeds in this solution for an hour. After the procedure, it is advisable to rinse the selected planting material. |
Common mistakes gardeners make
Despite all the positive qualities of the “snail” and “diaper” planting method, the seedlings can be ruined. And the reason for this is the gardeners themselves, who make some mistakes.
- Uncontrolled watering leads to excess moisture in the soil. The root system experiences oxygen starvation and often rots.
- Wrong choice of tomato variety. In a city apartment, it is better to grow determinate varieties. In tall varieties, with this method of cultivation, the formation of the flower cluster is disrupted and the stem bifurcates.
- You should not sow tomato seeds for seedlings before mid-March . Plants from early sowings are often elongated, have thin stems and pale green foliage.
Preparation of planting material
For 1 liter of water take 100 grams of salt. Place tomato seeds into the solution and mix. In a couple of minutes, empty seeds float to the surface. They are drained together with the solution. Then the seeds are treated with the usual growth activator. Sometimes tomato seeds are simply soaked in water or a weak solution of potassium permanganate.
Sorting
Seed grading consists of the careful preparation mentioned above. The seeds are then dried. They prepare soil for them, which is also disinfected with incandescence or potassium permanganate. A snail needs little soil.
Germination
To ensure that shoots appear in the snail, the seeds are germinated in a glass with an activator for about a week. Today, planting seeds without germinating is like playing the lottery. You can never know for sure how many shoots you can expect from a particular variety.
Hardening
Tomato seeds, like the seedlings themselves, are put through a hardening procedure. This strengthens the plant's immunity. Plant seeds are frozen before activation, and the seedlings are taken out to the veranda overnight, leaving them at 5–6 degrees Celsius.
Growing problems
Problems with growing seedlings at home are most often created by gardeners themselves. It happens that a seemingly healthy plant breaks and falls . This is a sure sign of damage to the so-called “black leg”. The reason may lie
- in increased soil acidity;
- in high soil moisture;
- dense planting;
- sudden change in temperature;
- in the use of contaminated soil and seed.
It is unlikely that it will be possible to save infected plants, but it is necessary to inspect the seedlings. Remove damaged plants and water the soil with a 1% manganese solution. It is easier to prevent a problem than to treat it, so constant monitoring of air temperature and soil moisture is recommended.
Yellowed leaves on tomato seedlings can also be the result of an imbalance in water balance. In this case, the reason may lie not only in overdrying of the soil, but also in waterlogging.
The next factor is a lack of microelements. If everything is in order with watering, it is recommended to apply a full range of mineral fertilizers. You can use the drugs “Emerald”, “Fertika Lux”, “Ferovit”.
Heavy soil in a seedling box dooms the root system of seedlings to oxygen starvation, and the result may be yellowed foliage.
You can often see elongated, thin and weak tomato bushes on windowsills. Most likely, the seeds were sown early and she did not have enough sunlight. Don't despair. Such seedlings must be planted in the ground with a significant penetration of the stem into the soil. The stem will give additional roots and the gardener will have a good harvest of tomatoes.
Arc
How to make a greenhouse for seedlings with your own hands?
Structures on a frame made of arcs are the simplest and easiest to install. The frame is made of pipes of various materials (metal profile, plastic pipes, wire). It is even possible to use an old hose with willow twigs inserted into it. To give metal arches the desired shape, you will need a special tool - a pipe bender, but plastic or polypropylene pipes are quite easy to bend by hand.
Metal arcs up to 2 meters long are stuck directly into the ground. For plastic arches, it is advisable to install a wooden rectangular box and secure the pipes to it. As an option, the pipes are placed on metal or wooden pegs stuck into the ground.
The distance between the arcs must be 50-60 centimeters; with more, the coating will sag.
ATTENTION! For additional strength, the structure can be secured with a horizontal rail attached to the tops of the arches along the entire length of the tunnel. To strengthen the frame, wooden blocks equal to their height can be installed under the outer arches.
For the top covering of arc frames, polyethylene film or non-woven material is used. Moreover, at the beginning of cultivation , when the air temperature is not high enough, it is the film that is used , since under it the ground warms up much faster than under the covering material.
IMPORTANT! It is preferable to use reinforced or bubble-air film, because it is much stronger than regular film and, due to its thickness and design, retains heat better.
As the plants grow, the film is replaced with a covering non-woven material to ensure maximum air access to them. In addition, plants under plastic film may begin to burn from overheating.
The covering material is attached over the arches. For fixation, you can put on the arcs pieces of soft hose cut lengthwise or pipe clamps designed for installing pipelines. To make it easier to open the film, you can attach a long strip along the edge onto which the covering material will be screwed.
You can see how to quickly make a greenhouse from scrap materials with your own hands in this video:
You can see other greenhouses that you can also assemble or make with your own hands here: From plastic bottles, From PVC, From arches, From polycarbonate, From window frames, For cucumbers, From profile pipes, Under film, For the dacha, For peppers, Winter greenhouse , Beautiful cottage, Successful harvest, Snowdrop, Snail, Dayas
Reviews from gardeners about the method
Lubastik 12 January 22, 2022 17:45
Last year, due to a lack of space, some tomato seedlings were grown in diapers. I didn’t like the result: the plants looked dead and couldn’t be compared with those grown in boxes. Watering is difficult and inconvenient - it's a long stretch. It’s also difficult to add land. One advantage: they take up little space.
Soboleva March 10, 2022 Pervouralsk 16:50
I am very glad that I learned about this method of growing seedlings. The first experience turned out to be very successful. It seems that more has come up than she sowed. Eggplants, peppers, flowers are so thick-legged and handsome. I haven’t dived yet, but I will definitely do it in diapers.
Akshiri March 15, 2022 Ekaterinburg 14:46
This is the first year I’ve been planting snails, I tried it according to Yulia Minyaeva’s recommendations. Girls, beauty! My mother-in-law sowed the old fashioned way, and all the peppers died. Now she asks me to tell you about my method and is waiting for me to give her pepper seedlings.
Zanoza March 16, 2022 Sverdlovsk 12:38
Personally, I really liked sowing into snails. I sowed tomatoes in peat pots and snails at the same time. In the peat pots the sprouts have stretched out, and in the snail they are sitting strong.
Method three. We use the substrate
This method is very similar to the previous one, however (due to the use of a small amount of soil when sowing) the film will be preserved until the seedlings take root in the garden bed. This stage can be skipped if the seedlings are subsequently planted under some kind of shelter and early. Similarly, seedlings are planted in diapers after diving.
The algorithm of actions will look something like this.
Step 1. First, prepare a moistened soil mixture, as well as film strips, as in the previous method. The film can be covered with toilet paper, although in this case it is not necessary.
The film is covered with damp toilet paper
Step 2. Plant seeds (any seeds, including germinated ones) or sprouts. The distance should be several centimeters.
Seeds are laid out on damp toilet paper
Step 3. Sprinkle some moistened soil on top, then cover with paper and film.
Step 4. Roll it all up, secure it with an elastic band, and place it in a tray.
Ready roll
Rules for feeding tomatoes in the garden
Minaeva begins basic care of plants after planting them in a greenhouse or open ground. This is where fruiting will occur, so it’s time to stimulate the growth and development of tomatoes. The main food should be in the ground itself. The blogger carefully fertilizes the soil before transplanting the seedlings, which were previously in “diapers.” The peculiarity of the fertilizing method is that only natural fertilizers are used.
Yulia Minyaeva keeps poultry. Manure fertilizer is a great option. The gardener adds bedding from the barn to a pre-dug hole. The big advantage of manure is that it does not change the acidity level of the soil, so additional treatment with lime or chalk is not required and the roots of the tomatoes will be warm. Yulia sprinkles compost on top of the manure, and only then comes a layer of soil in which the tomatoes are planted. This nutrition should be enough until the end of the season for the growth and development of fruits.
Many viewers fell in love with Julia for her ingenuity. Another original idea that the host of a popular Internet channel came up with is to keep birds in a polycarbonate greenhouse before the start of the summer season. In this case, fertilizing may not be necessary at all, because the soil is fertilized naturally. Yulia does not stop there and uses fertilizers that our grandmothers still remember, and these mixtures can be diluted in ordinary barrels.
Why doesn’t Yulia Minyaeva feed the seedlings?
When choosing seeds in a store, a summer resident sees concentrated liquid fertilizers for seedlings on the shelves and thinks about purchasing these jars and bottles. Everyone wants to take good seedlings to their garden plot. At home, an amateur can grow healthy plants if you watch the video of a famous blogger who runs a live magazine “In the garden or in the vegetable garden.”
Yulia Minyaeva’s skeptical attitude towards feeding seedlings is due to simple logic. An experienced gardener advises viewers not to let their tomatoes become overgrown. Plants should be strong and stocky before planting in the garden. The use of store-bought fertilizers stimulates growth, resulting in entire trees growing on the windowsill in a couple of days. Once planted in the garden, seedlings accustomed to fertilizing experience stress and may die.
The method of planting tomato seeds in a “snail” made from a laminate substrate, invented by Yulia, was loved by many. A gardener from the Moscow region believes that for good nutrition, seedlings need dampness, warmth and nutritious soil. It is these conditions that are created in the “snail”. The method of planting on toilet paper did not justify itself, so the main feeding at the seedling stage can be considered the use of fertile soil. It contains enough microelements, unlike coconut substrate or seedling tablets, which are only needed for spitting seeds.
Picking tomatoes is mandatory. Julia is not a supporter of planting two tomato roots in one hole, because in this case the plants will compete for nutrition, no matter how good the fertilizer they are treated with. The gardener advises planting plants one at a time in soil taken from a summer cottage. This way the tomatoes will be ready to receive food from the soil.