Greenhouse owners are well aware that one of the basic rules for growing plants is to organize a flow of fresh air. The task is not easy, because we must take into account that there must be a certain microclimate inside the greenhouse in order to prevent the green spaces from overcooling. It is difficult to control this process manually all the time. And in some situations it is simply impossible. Therefore, an excellent option has been proposed that solves this problem - automatic opening of the greenhouse.
Device for automatically opening windows in a greenhouse Source images.ru.prom.st
Design features
So, what is ventilation of greenhouses, what principles does this process follow? Essentially, these are several vents installed in the greenhouse structure, which automatically open and close.
And here the question arises about the number of vents to be installed. That is, how many of them are needed so as not to change the microclimate. To do this, you will have to calculate the internal volume of the greenhouse, and based on this parameter, select the number of openings. It is not recommended to do this on your own; you can make a mistake that will negatively affect the future condition of the plants. Leave it to the experts.
Next, you need to decide where the windows will be located. There are two options here:
- End location. To do this, doors and vents are installed on the end walls of the greenhouse. By opening them, you can quickly reduce the humidity inside the room. This is a good ventilation option, which also has a significant disadvantage - the formation of drafts. And this often leads to diseases of green spaces.
End arrangement of vents Source freeimport.ru
- Lateral location. Better than the end one in terms of proper air circulation. Namely: from bottom to top. Therefore, it is recommended to place the windows as high as possible. At the same time, cold air, sinking to the ground, has time to heat up. That is, it does not have a negative effect on plants.
Lateral arrangement of vents Source static.wixstatic.com
See also: Catalog of popular garden house projects
Reliable automation with pneumatic drive
You can equip automatic ventilation of greenhouses with your own hands. The simplest option is a pneumatic drive from a hydraulic cylinder.
List of required materials
For installation you will need a couple of days, tools and several components:
- a piece of plastic pipe in the form of a cylinder with a length of 300-350 mm and a diameter of 200 mm;
- a piece of plexiglass with a thickness of 5 mm;
- wooden stick for making a rod;
- soccer ball camera;
- thin hose 1.5 - 2 m long.
Attention! A plastic pipe can be replaced by any cylinder made from scrap materials. For example, from polycarbonate left over after installing a greenhouse or greenhouse.
Pneumatic greenhouse ventilation
Preparing to install the cylinder
- Take a pipe and make two sealed plexiglass plugs for it. The top one will serve as a guide for the rod.
- Make a piston from plexiglass. It should be 1-2 mm smaller than the internal diameter of the cylinder.
- The rod is made of wood or a piece of plastic pipe (size 32). If you choose the wooden option, then a stick 500 mm long and 40 mm in diameter needs to be sanded and coated with an antiseptic.
- Drill holes in both plugs. On the bottom – with a diameter of 10 mm. On the top - such that the rod fits in it.
Classification of automatic vents
Automatic ventilation of a greenhouse is the process of opening and closing the windows without human intervention. That is, you can safely leave, leaving the greenhouse unattended, and be sure that the microclimate in it will be in the required condition.
What kind of windows do companies offer today? In principle, this is a standard type of design. They differ from each other only in the drive that opens and closes them. There are two options here:
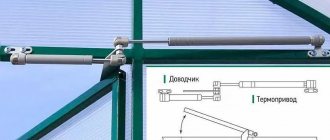
- Hydraulic. The design uses a conventional hydraulic cylinder into which a liquid is pumped that responds to changes in outside temperature. That is, when the temperature inside the greenhouse has risen greatly, the liquid inside the cylinder expands and puts pressure on the pusher. He, in turn, pushes the window. And, conversely, when the temperature drops, the liquid contracts and pulls the pusher towards itself. It should be noted right away that such automatic opening of a window in a greenhouse is non-volatile, that is, not connected to the power supply.
Automatic opening mechanism with hydraulic cylinder Source newplastic.rf
See also: Catalog of companies that specialize in the sale and installation of greenhouses
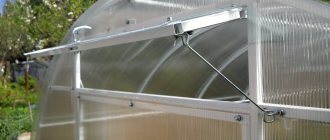
- Electric , in the design of which a thermal drive is installed. From the name it becomes clear that the window opening drive is powered by an electric current network. And this, on the one hand, is a minus, because power outages outside the city are not uncommon. These devices also include sensors that monitor the temperature and humidity inside the greenhouse. It is from them that the signal to open or close the openings comes. Some models are additionally equipped with fans with heating elements and hydraulic nozzles.
Automatic opening mechanism of electric type Source images.ru.prom.st
Which model to give your preference is difficult to answer. Each summer resident solves his own problems on his own. But it should be noted that the hydraulic option is much cheaper. And it refers to non-volatile units. The only negative is the slow opening and closing of the windows. It's all about the fluid inside the hydraulic cylinder. Because it takes time to cool or heat up. At the same time, the hydraulic mechanism for opening a window in a greenhouse has limited possibilities to open the opening slightly - 45 cm, no more. And the minimum temperature at which it closes the transoms is 15 °C.
In all these respects, electric ones are superior to hydraulic ones. They quickly open and close, which makes it possible to maintain the microclimate inside the greenhouse with high precision. And temperature and humidity sensors strictly monitor all required air parameters. But these models are very expensive, and some summer residents cannot afford them. Therefore, the latter choose hydraulic models. At the same time, the device for opening a window in a hydraulic-type greenhouse is simpler. Essentially, it is a small diameter cylinder to which a lever is hingedly attached. The latter is attached to the window frame with its free end.
Fastening to the greenhouse frame with bolts Source st47.stblizko.ru
DIY making
How to make a device for ventilating greenhouses with your own hands? For self-production, the simplest and most effective thermal drive option for greenhouses is hydraulic .
To assemble it you will need:
- 2 glass jars (3 l and 800 g);
- brass or copper tube 30 cm long and 5-7 mm in diameter;
- plastic tube from a medical dropper 1 m long;
- a piece of wooden beam equal to the width of the opening transom. The cross-section of the block is selected taking into account the weight of the window, since it will be used to make a counterweight;
- rigid metal wire;
- sealant;
- two lids for jars: polyethylene and metal;
- nails 100 mm - 2 pcs.
The assembly sequence will be like this:
- 800 g is poured into a three-liter jar;
- The jar is tightly sealed with a metal lid using a seaming machine;
- a hole is punched or drilled in the lid into which a brass tube is inserted. You need to lower the tube until 2-3 mm remains to the bottom;
- the joint between the tube and the lid is sealed with sealant;
- One end of the plastic tube is placed on the metal tube.
Next, they work with a jar of 800 g, only it is left empty, closed with a plastic lid and a plastic tube is inserted at the other end. 2-3 mm is also left from the cut of the tube to the bottom of the jar.
The final stage is to place the jars at work stations. To do this, hang a three-liter bottle with a nail and a metal wire next to the rotating window so that, in any position of the window, the length of the plastic tube is enough to reach it.
A small jar is also attached to a nail and wire on the upper part of the frame of a horizontally rotating window. To balance the mass of the can, a counterweight block is nailed from the street side of the window to the lower part of its frame.
Now, if the temperature in the greenhouse rises, the air heated in the large jar will begin to squeeze water through the plastic tube into the small jar. As water is filled into the small jar, due to the increased weight of the upper part of the window, it will begin to rotate around its axis, i.e., it will begin to open.
As the air in the greenhouse cools, the air in the three-liter jar will begin to cool and compress. The resulting vacuum will draw water back from the small jar. The latter will lose weight and the window frame will lower to the “closed” position under the weight of the counterweight.
The not-so-intricate design of the hydraulic thermal drive allows you to independently assemble a device that greatly facilitates the care of the greenhouse. With its help, there is completely no need to control the air temperature in the greenhouse.
How to ventilate a greenhouse correctly
In fact, the process of ventilating greenhouses is limited only by the required temperature and humidity inside the structure. After all, the main task is to create optimal conditions for plant growth. Therefore, we suggest that you familiarize yourself with the basic rules:
- You cannot create conditions under which drafts will occur inside the greenhouse.
- For uniform ventilation, openings with opening frames must be installed evenly along the entire length of the building.
- It is better to ventilate the greenhouse in the evening and in the morning, when the temperature outside is more favorable for plants.
- Plant inside the greenhouse only those plants for which the humidity and temperature conditions of growth will be approximately the same.
- Purchase ventilation mechanisms strictly according to the load they can withstand. The manufacturer must indicate this in the product passport. To do this, you will additionally have to determine the weight of the window.
Bimetallic ventilation system in action
Operating principle of a bimetallic device
Metals, like liquids, expand when heated. From them, it is also possible to install a ventilation system for heifers, which operates on the difference between the expansion coefficient of two metal strips. A simple and effective device - an automatic device for ventilating a greenhouse made of boards and metal
Attention! Any automation needs protection from direct sunlight. The mechanism should be heated not by the sun, but by the air.
To build the device you will need:
- wooden beam;
- board;
- metal strip;
- nails;
- hinge.
Sequencing:
- The metal sheet and board should be fixed vertically to the floor.
- Insert a wooden beam in the middle between them.
- Fasten the entire structure.
- Attach the metal strip to the window using a hinge. Ready!
Metal that responds quickly to increased temperature will flex and open the frame under the force of expansion. Once the sheet cools, it will return to its original state.
Caring for the thermal drive
In order for the thermal drive to work for a long time, it is recommended to follow a few simple recommendations:
- the structure requires regular lubrication, since metal components come into contact with moist air;
- It is not recommended to disassemble the device;
- in the cold season, it is advisable to remove the thermal drive;
- nothing should interfere with the functioning of the structure; for this reason, its fixation is prohibited;
- When opening a window or door with a built-in device, you should not apply significant force.
Projects and schemes of smart greenhouses
Among admirers of home and garden robotization, the Arduino-powered smart greenhouse enjoys the greatest respect. The main component of the controller board is a processor equipped with a memory chip. The circuits used for smart greenhouses differ in processor brands and functionality.
One of the simplest circuit projects for an automatic greenhouse using Arduino Uno (mini) is shown in Figure 1.
Rice. 1
Illumination is assessed by a photoresistor. The temperature regime is determined by the TMP36 sensor. Irrigation intensity is adjusted based on data from the humidity module and DHT11 sensor.
An advanced option for controlling the microclimate in a greenhouse involves the Arduino Mega board. The project diagram of the intelligent “vegetable grower” is presented in Figure 2.
Rice. 2
The heart of the hardware platform is the ATmega1280 microcontroller. 8 outputs are used to read/transmit digital information. 10 ports are used to process analog data.
Another version of the greenhouse with Arudino is shown in Figure 3.
Rice. 3
GyverControl can also be used as a universal timer-controller for a smart greenhouse (Figure 3).
Rice. 4
The smart device is equipped with seven logical outputs with a voltage of 5V. 3 separate channels are provided to control servo and linear drives.
The above diagrams are not the final solution for greenhouse robotization. The emergence of new, more advanced controllers expands the capabilities of automation and makes it more efficient.
Remote control and regulation capabilities
In addition to local control, a smart greenhouse based on Arduino provides the ability to remotely control equipment and exchange data via a remote control, mobile gadgets and personal computers. The interface can be USB, Bluetooth, Wi-Fi, GSM and the Internet. Intermediaries in this process are the corresponding modules and applications, which are presented:
- RemoteXY;
- Blynk;
- Virtuino;
- Bluino Loader;
- Arduino Bluetooth Control, etc.
Particularly noteworthy is the BT Voice Control for Arduino software, which provides control of greenhouse equipment using voice commands. When synchronized with Alice, this application offers a lot of conveniences.
Installation of thermal drive
When the thermal drive is ready, it can be placed in any suitable place - on the structure of a vent, window or front door.
It has been experimentally established that the number of vents under ideal conditions should not exceed 25% of the greenhouse area if they are evenly distributed.
Before installation you must:
- check the “operability” of the device - the tested load should not exceed 5 kg;
- It is advisable to provide the bracket with the ability to make movements within 10 cm (the device is secured with self-tapping screws indoors with a window opening outward);
- The clamps are attached to the thermal actuator and to the spring part.
To protect the structure from condensation and corrosion, it is recommended to place the mechanism and spring slightly below the opening rod.
Forced ventilation with fans
Forced ventilation of greenhouses is used for large areas. The principle of operation is several fans for air inflow and outflow, located at different ends of the greenhouse. The fans are controlled by a single-channel, two-channel and three-channel thermal drive (one channel for each mechanism).
Forced ventilation in a greenhouse
Automatic ventilation from computer parts
Usually they buy fans, but domestic DIYers have also found a way to build automatic ventilation in a greenhouse with their own hands.
Conditions: greenhouse 3x8 m. There are two vents on the end sides. Natural ventilation is not sufficient for a greenhouse of this size. The only thing left is to build a compulsory one.
The following materials are required for work:
- 2 old power supplies from the computer system unit;
- bimetallic thermal relay;
- car battery;
- wires.
Computer cooler