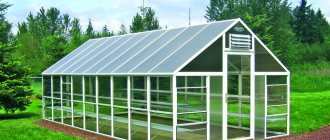
Greenhouse / Covering
Fixing greenhouse film
The easiest and cheapest way is to make a greenhouse or greenhouse with a film coating, which is what many summer residents do every spring. The main task in this case is to securely attach the film to the greenhouse. How to do this, depending on the frame material, we will tell you in this article.
- 1 Options for attaching to the frame 1.1 Wooden frame
- 1.2 Metal frame
- 1.3 Frame made of plastic pipes
How to stretch film onto a greenhouse
How to attach the film to the greenhouse?
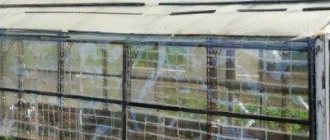
Almost every owner of a summer cottage knows how to cover the wooden frame of a greenhouse or greenhouse with film. Difficulties arise when greenhouse film is installed on a metal frame. It is important that the coating fits tightly around the frame and does not break under the influence of the wind - such extreme conditions will lead to premature wear of the material.
How to make sure that the greenhouse stands, as they say, “like a glove,” pleasing you not only with its aesthetic appearance, but also with its direct functional purpose - obtaining a high yield? Let's talk about how to choose the right material for attaching to the frame and, accordingly, about options for installing it yourself.
Film selection
There are many different types of film for attaching to a frame with your own hands, which is used as a covering material for greenhouses and greenhouses. When choosing a material, the consumer should focus on the following criteria:
Basic Rules
In order for the greenhouse to serve for a long time, you first need to decide whether it will be a winter one, capable of protecting against frost and frost, or will be used in the warmer seasons. This will allow you to choose the right covering material for it. Then the material is calculated and some features of its fastening are taken into account.
Calculation of materials
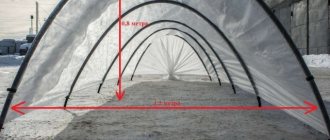
The amount of film that will be needed to cover the frame of the greenhouse can be easily calculated if the width of the film roll and the length of the frame are known. The value corresponding to the dimensions of the frame is divided by the width of the covering material. The resulting number will display the number of canvases. Here we must remember that the canvases are overlapped.
If the greenhouse has an arched structure, then the length of the canvas will be equal to the length of the arc. If the structure has a pitched roof, then the lengths of all sides of the structure in cross section are summed up, and 10% is added to this value for fastening the material around the perimeter.
To find out how many meters of film are needed to cover a greenhouse, you need to multiply the number of sheets by their length. To this value should be added the amount of film required to cover the ends of the structure. To do this, their area is calculated.
How to attach the film to the greenhouse?
We recommend
Why do you need reinforced film for greenhouses?
How to make a mini-greenhouse for a cottage or room?
Types of greenhouses Summer resident and characteristics
Almost every owner of a summer cottage knows how to cover the wooden frame of a greenhouse or greenhouse with film. . It is important that the coating fits tightly around the frame and does not fray under the influence of the wind -.
“like a glove,” delighting you not only with its aesthetic appearance, but also with its direct functional purpose - ? .
Film selection
. :
- . ;
- ability to transmit light;
- market price.
. . e..d.
: (also polyethylene based), light-scattering and light-stabilized, polyvinyl chloride.
In addition to those listed, there are also specialized species with unusual properties () intended for growing exotic plants. .
. For this purpose, there are specialized forums and numerous articles on the Internet. – .
Simple mounting methods
You can attach the coating to the following methods.
. (). If the clamps are not supplied with the greenhouse frame, you can make them yourself. To protect the shelter from mechanical damage, the clamps can be equipped with rubber gaskets.
. . You must first stretch the film onto the frame and secure it on top using the proposed methods.
. .
Cord (line 0.5 -1.0 mm). . .
And further. . .
Some subtleties you should know
. A simple way to solve the problem is to glue the contact area between the frame and the covering material with construction tape.
– heating. Metal covered with white construction tape will heat up less, which means the impact of high temperatures on the coating will be minimal.
conclusions
. .
- ;
- The frame should be covered approximately 3 days before placing the seedlings in the greenhouse;
- It is strictly not recommended to use nails, screws or wire to secure the film. .
Mesh or cord
This is the oldest method of fastening; our ancestors knew it. It is rightfully considered the most durable film fastening, because previously everything had to be done reliably; the survival of the family depended on the quality of the harvest. To perform this method, it is necessary to make holes along the edges of the joints with a thick needle or, better yet, an awl. The only main thing is not to tear the film in the process.
Then a cord or mesh is threaded through the holes and tied to the greenhouse frame. Although this is a reliable method, it is a rather lengthy method; securing the film in this way will take a lot of time. If there are several greenhouses and they are rather large, then this method will become unrealistic. You'll just spend the night on the property trying to tie down all the film.
How to fix the film on a greenhouse made of arcs
Home » Outbuildings » How to fix the film on a greenhouse made of arcs
26.05.2017 288
Such structures are frames covered with glass or transparent thick polymer. In this case, only very durable film is selected for greenhouses, capable of withstanding significant loads.
We use clamps
Arc greenhouses are very common, since their construction is not so complicated and can be made from several types of materials. One of the most difficult problems is fixing the film to the surface. This can be done in several basic ways, using the following devices:
- Clamps. Such mechanisms are special tubes that can be placed over a round pipe or fittings. In most cases, they come complete with standard designs of this type.
- Stationery clips. Used only for fittings or small plastic pipes.
- Homemade clips. They can be made from tubes whose diameter is slightly larger than the size of the arc frame. To be able to put them on the top of the system, small longitudinal cuts should be made in them, after which the sharp edges should be removed by grinding or melting.
Please note that if the greenhouse is made of metal pipes, then in the places of fixation it is necessary to place gaskets that will protect the film from overheating and rapid destruction.
Alternative options
You can also fix the film on the arc greenhouse in several other ways:
- Net. This technology involves placing the film on the frame and covering it with a special mesh, which is already attached to the base of the greenhouse. The disadvantage of this method is the gradual weakening of the polymer tension and the need for periodic tightening.
- Cord. This approach is very similar to the previous fixation principle. Only here the surface is already sewn up with ropes over the entire surface of the greenhouse. Some experts recommend placing such systems both outside and inside. This will improve the quality of fixation and prevent the film from coming loose.
The film can also be secured using holes made into which special metal clips are inserted to prevent the material from deteriorating further. But this approach is only possible for very durable polymer materials.
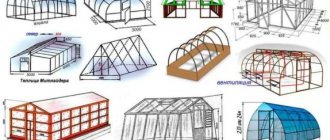
Shapes and designs
Before the master has to start drawings and preparations for the construction of a greenhouse made of metal profiles, it is worth deciding what its shape and design will be.
These types of greenhouses are most often constructed.
- Gable. This form is considered classic, as it has been known to people for many decades. The greenhouse looks like a simplified house with a gable roof. The advantages of this frame include high rigidity, no problems with accumulation of snow on the roof, no need to purchase a flexible profile, the entire area of the greenhouse can be used for agricultural purposes. Disadvantages include high material consumption, complex design and inconvenient roof lining.
- Arched. Such greenhouses are the most common today. This is a set of profile arches that are connected to each other with ties. Farmers consider the advantages of such a greenhouse to be a simple design, a small amount of material consumption, resistance to wind gusts, quick assembly of the frame and convenient cladding. The obvious disadvantages of such greenhouses include the need for constant cleaning of sediment, the need to purchase a flexible profile, as well as tools to bend it. The greenhouse also has areas that are unsuitable for use.
- A-shaped. This greenhouse has the appearance of a triangular roof, which is extended upward. Due to the unusual nature of their design, such greenhouses are rare. The advantages of this design include the lack of hassle with clearing snow, simple assembly and original appearance. Disadvantages: small amount of area for use, labor-intensive covering, inconvenient work in rows.
- A lean-to greenhouse. It looks like an ordinary greenhouse, the roof of which is tilted to one side. The pros and cons of this design are similar to the gable version. This greenhouse can be attached to a residential building, which will look quite organic.
More complex types of greenhouses are also known, such as ball or dome.
These greenhouses have a rather complex design, so they are not considered a good option for self-construction from light metal. An interesting subtype of a structure with a gable roof is considered to be the Mittleider greenhouse. What distinguishes it from the original is the location of the tops of the slopes, which are located one above the other; windows can be installed in the resulting vertical wall at the top. This type of greenhouse is considered the best in terms of ventilation efficiency and air circulation.
How to securely attach the film to the arc greenhouse frame
Valera How to fix the film on a greenhouse made of arcs so that it doesn’t get torn off by the wind?
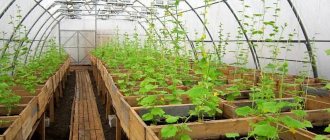
Greenhouses are present in almost any garden or summer cottage. Planting plants in closed soil makes it possible to obtain a harvest ahead of natural deadlines or to grow a crop that is not entirely adapted to the local climate. A greenhouse made of arches covered with film is the most common and simplest option. After installing the frame, the owner becomes faced with the urgent task of securing the covering material so that it is not torn off by a gust of wind.
How to cover and secure the film on a greenhouse
Tension the material on the frame as follows:
- do not cut the rolls in advance;
- throw a whole skein through the arc;
- pull it so that there is a margin of 20-25 cm on both edges for fastenings;
- cut off;
- repeat the procedure, covering the gaps in the frame with an overlap;
- fold all the strips on a flat surface and glue them with tape;
- lay and fix on the structure;
- cut out the end parts with a margin and also secure them;
- cut out and fit the details of the windows and doors.
Advice. To ensure that the tape holds the parts well, clean and degrease the gluing areas.
Fastening the frame film is an important component of the durability of the arc greenhouse. If the base is made of a metal pipe, pieces of plastic pipe or unnecessary hose are put on it. If a profile is used, it can be wrapped in white cloth. This will protect the film from overheating in places of contact with metal.
Read also:
16 excellent varieties of plums for the Moscow region
A popular method of fastening is with a thick fishing line or cord. The thread is fixed in the lower corner on one side of the greenhouse. Then, in a tense state, they are raised in a zigzag from one edge to the other at the top point. A similar procedure is carried out from the inside so that the film is between the stretched fishing line.
Other methods:
- For a frame made of plastic pipe, prepare pieces of pipe with a slightly larger diameter.
- For reinforcement structures, ordinary office paper clips are used.
- The film can simply be nailed to a wooden frame or screwed with self-tapping screws. In order not to damage the coating, it is fixed with overlays made of wood or old linoleum.
Tips for covering a greenhouse
Experienced farmers give recommendations for the correct procedure:
- Calculate the amount of material. The film is sold in rolls. Knowing their width (standard - 1.5 m), as well as the width and length of the greenhouse arc, you can easily calculate the required length. Don't forget the ends. Please note: the polymer material in a roll can be two-layered.
- If your greenhouse will be used from March to late autumn, it is wise to purchase reinforced film. It is stitched with plastic threads and consists of cells, therefore it is more durable and resistant to the weight of snow, water, etc. For other cases, a simpler and cheaper material is suitable.
Advice. Buy the film overlapping in the required length so as not to worry about its accidental breaks or damage.
Start laying the film immediately when the frame is installed and secured in the ground. Choose a dry and warm day without strong wind. The film stretched during the cold period will sag after the temperature rises. If you work in the heat, the material may tear the next night.
DIY greenhouse: video
Article rating:
Loading…
Materials
- Galvanized profile. Rack profile - vertical posts that indicate the height of the greenhouse. The guide profile is horizontal jumpers that make the frame strong.
- Galvanized square pipe 20/20,20/30 mm.
There is a zigzag profile for greenhouses on the market. If the greenhouse is being built seasonally, then you can use glass or film for the covering material. How to bend a profile for a greenhouse? To do this, cut the ribs with metal scissors and bend them to the radius required.
How to attach the film to the frame of the greenhouse so that it does not tear?
Tell me how to attach the greenhouse film to the frame so that it does not tear? Maybe there are some unusual and preferably simple ways? Best regards, Valentin Ivanovich.
Hello, Valentin Ivanovich! This question is especially relevant for those summer residents who periodically have to disassemble and assemble their greenhouses. Very often it is necessary to remove part of the covering during the summer heat, and then, with the onset of cool nights, reattach the film in place. In this case, damage to the covering material must not be allowed. There are simple ways to attach film that do not require large material costs.
Important! The standard option of pressing plastic film using a strip is rather unreliable. Under the influence of gusts of wind, the film is pulled out from under the slats, fluttering, clinging to the nails, and, ultimately, torn to shreds. In addition, removing the film with this method of fastening is not entirely easy.
Fastening with planks
To attach the film using this simple method, you will need square planks with a side of 10 cm. After sawing the planks, be sure to round off the sharp edges. This will help prevent the film from tearing.
Next, coat the boards with rubber glue and wrap them with pieces of plastic film. At the attachment points, glue the prepared block to the film with the same glue. Then drill a hole in it and attach it to the wooden frame of the greenhouse with a self-tapping screw. Summer residents who use this method speak well of it. Indeed, it is much easier and faster to manipulate the coating.
Important! It is more convenient to attach the film to the pipe frame using special clamps sold in hardware stores.
Ready-made clamps make things a lot easier
Using leftover linoleum
The option described above can be significantly simplified. You just have to use the remains of linoleum instead of planks, gluing them to plastic film in the places of intended fastening. In this way, it is possible to further strengthen the strength of the film so that it is firmly held by screwed screws with wide heads.
The wall of the greenhouse facing the north side can be covered with reflective opaque film instead of film. This will allow the sun's rays to be reflected and better illuminate the plants planted in the greenhouse.
- Author: Mikhail
Rate this article:
- 5
- 4
- 3
- 2
- 1
(0 votes, average: 0 out of 5)
Share with your friends!
And also NEW - ZigZag clip beam with a load-bearing capacity of up to 3 meters. (see below)
Used for attaching one or two layers of film or other covering materials - tarpaulin, awning, etc. total thickness up to 400 microns. on the frame of the greenhouse.
The clip consists of 2 components: Profile and Snake fastener.
The profile is made of galvanized steel with a thickness of 0.7 mm, and the snake retainer is made of galvanized spring wire with a diameter of 2.5 mm.
The reusable use of the clip is ensured by the high quality of its components, which also makes it possible to work at sub-zero temperatures.
The clip can be used both on straight sections of the greenhouse frame and on arcuate sections (bending radius of at least 1.25 meters).
The material of the greenhouse frame does not matter when installing the clip and is carried out with all available types of fasteners (self-tapping screws, rivets, screws, bolted connections).
Today, attaching film to a greenhouse using ZigZag Clips has become the standard. The clip allows for quick installation and removal of the film, securely fastens it in windy weather and is reusable.
Weight : Profile. 0.36 kg/linear meter
Snake fastener. 0.04 kg/linear meter
Length: Profile. from 2.0 to 6.0 meters
Snake fastener. 2.0 meters
Packaging: Profile in a briquette 0.17*0.07*4.0 meters and weighing 72 kg (with a 4-meter profile length). Quantity - 50 pcs or 200 linear meters.
The briquette is packed using strapping tape and technical stretch film. If necessary, cardboard packaging is possible
Snake retainer in a briquette 0.05*0.05*2.0 meters and weighing 4.0 kg. Quantity - 50 pcs. or 100 linear meters
For wholesale quantities, packaging is agreed upon.
COST, rubles per linear meter (PRICE FOR July 2019):
1. When ordering from 102 to 1100 meters - 47.5 rubles. profile, 10.5 rub. retainer
2. When ordering from 1101 to 3300 meters - 46 rubles. profile, 10 rub. retainer
3. When ordering from 3301 to 5500 meters - 44.5 rubles. profile, 9.5 rub. retainer
4. When ordering from 5501 to 10,900 meters - 43 rubles. profile, RUR 9. retainer
5. When ordering from 10,901 meters - 41.5 rubles. profile, 8.5 rub. retainer
SKETCH profile and clamp
Rules for attaching film to a metal greenhouse
Schaeffer Georg Anton Alois 0 Comment
Construction
Greenhouses have become an integral part of the modern gardener. That is why gardeners should be aware that attaching the film to a metal frame is a very important activity and the service life, as well as the climate inside the greenhouse, will depend on this.
Basic fastening rules
It is enough to make just one mistake at the moment of attaching the skeleton itself or at the moment when the film is attached; this situation can also result in:
- Cold air will penetrate into the greenhouse;
- Destroys the crop.
In order to avoid this, you must follow the rules.
After you have installed the main part of the skeleton, you should start thinking about how the film will be attached. The most common fastening option is planks that are nailed on each side, and the width of this board does not exceed 10 cm.
It is worth remembering the fact that before nailing the board, you need to take care of the safety of the future film: the corners of the board must be rounded, otherwise breakage may occur during the wind.
Also, more experienced gardeners recommend packing each plank in a separate plastic film.
The procedure for covering the greenhouse with film:
- Each fixation point where the board is located must be processed;
- Small holes must be drilled in each plank;
- Carry out the actual fastening to the frame.
Based on the above recommendations, it becomes clear that installing a greenhouse and covering it with film is quite simple, quick and affordable.
But it is worth understanding that applying the above method in practice is only suitable in those climates that belong to the moderate class for those zones where strong temperature fluctuations do not occur.
Attaching the film to a metal frame without nails
The technology of attaching the film to the frame without the use of mechanical damage itself implies the use of wire, wooden slats or fishing lines. In this matter, it is very important to note the fact that nails are absolutely not needed for attaching the film. It is also worth realizing that in order to obtain a long-term result, you need to think in advance about the correct location of all fasteners.
Experienced gardeners have long noticed that tension in those places where the roof of the greenhouse is located has an extremely negative effect in the future, the same applies to the side openings.
Therefore, at the moment when the film is stretched, it is worth understanding that it should not be too stretched; this will allow capricious nature not to destroy the structure.
The positive aspects of this method of fastening:
- This type of assembly does not require serious experience;
- The service life and warranty for heat in a greenhouse are much longer;
- Fixation is carried out without pins;
- Only once every three to four months is it necessary to check the greenhouse for structural integrity.
The opportunity to abandon fastening with nails occurs at the moment when the skeleton of the greenhouse itself is made of metal.
It is at the moment when the design takes place that the gardener must carefully think about the location and also decide on the method of fixation.
Advice from an experienced gardener - you need to understand how the greenhouse will suffer from the effects of wind and other natural phenomena.
Attaching the film to the frame using welding
To be sure that the greenhouse will serve you for several seasons without the use of nails, you need to understand the correct diameter of the skeleton itself. At the moment when the skeleton is made of PVC pipes, the fastening can be limited to ordinary clamps.
This staple method is very tight and works well for attaching the film in just a few places. If the structure is more massive, it is worth taking stronger (steel) clips. Finding such accessories is easy; just go to a specialized gardening store.
Sometimes situations arise that a person does not have the opportunity to purchase special clamps, but this is not a problem; you can make them yourself:
- First, you will need to decide on the exact number of required fasteners;
- Next, you will need to cut plastic or metal pipes;
- Carefully remove the side part from each part;
- Round the edges of the fastener itself, this will protect the film from warming;
- Also, during installation, you will need to make sure that there is a piece of fabric between the clamp and the film itself; this will ensure that repairs will be needed soon.
Depending on the conditions of the greenhouse, the type of fastening will depend. The operating conditions and climate play an important role, and the location is also very important; if the greenhouse is in a draft, then it will be almost impossible to avoid breakthroughs.
It is also worth paying attention to the information before purchasing a greenhouse. The manufacturer provides all the necessary information about the greenhouse in the instructions that are attached.
Add a comment Cancel reply
Profile selection
A metal profile, which is used for the production of greenhouse structures, provides them with rigidity and stability, reliability, durability and tightness. Thanks to this material, the master can create a structure that has any length, width and height.
Galvanized profiles for drywall have the following types.
- U-shaped section. It is quite easy to install, and also helps to complete the greenhouse with additional power parts. Thanks to the use of this profile, the structures have high stability and reliability, as well as the ability to withstand 150 kilograms of load per square meter.
- The V-shaped section has good rigidity and at the same time an affordable price. When installing the greenhouse, you should avoid any distortions, even minor ones. The thing is that such materials cannot withstand high loads, for example, heavy amounts of snow in winter. The maximum load is considered to be 110 kilograms per square meter.
- W-shaped sections have practically no disadvantages, are characterized by strength and do not curl. They can withstand a maximum load of 230 kilograms.
- With square and rectangular cross-section. Its edge has dimensions of 20 by 20, 20 by 40 and 20 by 60 millimeters. Provided that the pipe wall has a thickness of 0.01 cm, the resistance to high load will be significant.
Galvanized profile pipe for a greenhouse can also be divided into two types.
- Arched. It has found its application in creating complex arched structures. Typically used for finishing ceilings and walls.
- Wall. Often used to install the frame of partitions between rooms. These pipes have high rigidity.
A flat CD profile is used for ceilings and walls; it is load-bearing, as it bears the brunt of the entire load.
Frames are made from it. The length of the material is 30 or 40 cm, the height is 0.6 cm, and the width is 0.27 cm. The UD guide profile is designed to create a sheathing frame; the profile of the previous type is laid into it. The material has a width of 0.28 cm and a height of 0.27 cm, often available in lengths of three or four meters and a wall thickness of up to 0.06 cm.
A metal profile with a thickness of 0.06 cm should be used if it is necessary to form a suspended ceiling system. And material with a thickness of 0.04 cm is often used for wall cladding.
Partition profiles are presented in two types.
- UW guides. This is a profile that is used in the installation of a supporting profile; it is used to form a partition in the installation plane. This profile is installed on floors, walls, ceilings.
- CW-rack and load-bearing profile , with its help a frame is formed.
The difference between a partition profile and a planar profile is the shape of the section. In addition, the partition profile has a pair of longitudinal ribs, making the wall stiffer. There is also a special type of profile - zigzag, the purpose of which is to firmly secure the film.