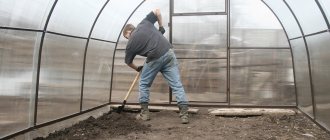
We love gardening; this tradition has long-standing national roots. But our climate is harsh, and often the cold and short summer is not enough for the plantings to bloom and bear fruit. Therefore, we definitely need greenhouses for normal farming. You can also buy ready-made greenhouses. They are very different and sometimes very beautiful, made of metal, wood and plastic; covered with glass, film, plastic. But they are quite expensive, and it is often difficult to choose the most suitable greenhouse for your needs. Therefore, you can easily and quickly make a good greenhouse, simple in design, and here many possibilities open up: for example, move away from the usual plastics and pipes and build a greenhouse from completely waste material, which is in abundance everywhere. From plastic bottles.
Pros and cons of plastic bottles as a material for greenhouses
As a blank for constructing a greenhouse, plastic bottles have a number of advantages over other raw materials: film, glass or wood.
- Strength. Provides a high level of reliability for the greenhouse frame. This is a lightweight substance that will not tear or fade in the bright sun, and will not break under the weight of snow. Unlike a layer of glass, the bottle is much stronger and will not break or burst in severe frosts.
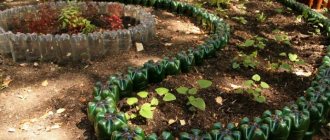
- With the help of different colors it becomes possible to control the dark spots. For example, using green or brown, you can create comfortable conditions for shade-loving sprouts. Transparent, colorless - provides bright light, scattering ultraviolet rays, thereby protecting plants from their harmful effects.
- Excellent thermal insulation. Due to its structure, plastic is capable of retaining heat without blocking the access of oxygen, and thanks to the air gap in the bottle, heat conservation reaches the highest level. In areas with cold climates, 2 rows of containers are constructed to protect seedlings from frost and drafts.
- Cheapness. Compared to other materials used in the construction of greenhouses, plastic bottles cost significantly less. You don’t have to buy it, just be patient and start preparing it in the fall. Plastic does not harm plants and soil; it is a relatively environmentally friendly material that can replace metal and wood covered with plastic film. A greenhouse made from this material will not rot or rust and will serve its intended purpose for a long time.
- Processing plastic containers is very simple and non-traumatic; even a child can be entrusted with such work. This does not require any special skills or abilities, just enthusiasm and your own desire. In addition, plastic is not heavy, so construction will not take much effort.
However, there is one drawback because of which gardeners abandon this idea. In order to construct a strong, sustainable greenhouse that will last for many years, you need to have 600-2000 plastic bottles. True, it is rather a matter of time and patience, having accumulated the required amount of blank material, otherwise the assembly is not difficult.
What can be used for the frame
Almost any material is suitable for the frame You can choose metal, wood or plastic.
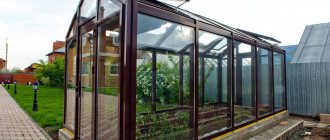
The metal profile will last for many years. Metal will provide the greenhouse with strength and durability. All that is required is just to paint it from time to time and wash it from infection at the end of the season. But to assemble such a frame, some skills in working with metal and special tools are required. It is most convenient the metal frame .
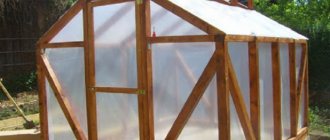
Wood as a material impresses with its availability and low cost. It is quite light and easy to work with. With proper design, the frame will also be strong enough to withstand wind and snow loads.
Every
every year the wooden base will have to be treated with special antiseptics .
The service life of such a frame will be comparable to a bottle coating. Most likely, you will have to change the coating and frame at the same time.
An alternative to traditional material is a frame made of PVC pipes . They are very light and allow you to make a greenhouse of any shape: not only single- or double-slope, but also arched. Perhaps such a frame will require more careful strengthening to withstand any bad weather.
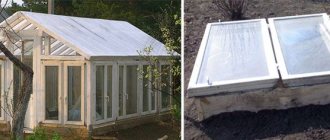
If you have old windows lying around your dacha, then you can use window frames as material for greenhouses.
Required Tools
During the construction of a greenhouse, from measuring the site to installing the frame and assembling the main part, it is necessary to prepare special tools in advance:
- construction awl;
- cutter;
- hacksaw for wood and metal;
- hammer;
- nails of various sizes;
- nylon thread and copper wire;
- tape measure and measuring tape;
- level;
- pencil, paper, ruler;
- plastic bottles;
- wooden beams;
- mounting rail.
At various stages of construction, the need for certain tools will arise, so it is important to organize the workplace well.
When building, it is necessary to wear protective gloves to avoid damaging your hands; it is also advisable to wear special overalls and goggles when working on wood to prevent sawdust from getting into your eyes and clothes. In addition, you should always have a first aid kit on hand in case of unforeseen circumstances.
Preparatory work
Before building a greenhouse from PET bottles, it is necessary to carry out a number of preparatory work. The first stage of preparation should be a design drawing, where all dimensions and total area of the building will be calculated.
Calculation of the quantity of materials
The next point in the construction plan is to calculate the required amount of containers. If the walls of the greenhouse are to be made of plates, then it is necessary to measure the diameter of one bottle and the height without the bottom and neck. Example: a 1.5 liter bottle has a diameter of 90 mm and a height of 150 mm. To calculate the length of the layer that can be cut from such a bottle, you need to multiply the diameter by 3.14. The result must be rounded: 9 mm * 3.14 = 282 mm.
The size of one plate will be 282 mm x 150 mm. When gluing plastic rectangles, about 20 mm will go to the seams, which means you need to assume that the area of the plate will be equal to 260 mm x 130 mm.
It remains to be seen how many bottles will be needed to cover one square meter. To do this, the sides are multiplied by each other: 260 x 130 = 33800. Now 1,000,000 square meters. mm divided by 33800mm. Result: per 1 sq. m you need 30 bottles of 1.5 liters.
If you plan to build a greenhouse from whole bottles, then the calculation formula will be as follows: the circumference of the bottle 280 mm is divided by 2, the result is 140 mm. This is the width of the whole bottle, which is multiplied by the height of the container with a neck, but without a bottom: 140 * 270 = 37800. Now 1000000 sq. m divided by 37800. Per 1 sq. m will require 26 whole bottles.
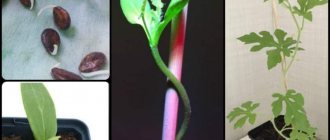
Preparation and selection of bottles
It is better to build a greenhouse from transparent plastic bottles. Sunlight passes through them well. The north side of the building can be covered with brown plastic. Dark color attracts and accumulates heat. Green and yellow containers are usually used as decoration to give greenhouses an original look.
Collection of material begins 2-3 months before the expected construction date. Where to get bottles:
- buy clean containers where they sell drinks on tap;
- hoard used bottles;
- ask friends or neighbors for help;
- look for containers in parks and other areas where city holidays are held or large numbers of people spend their leisure time.
When the required amount of containers has been collected, you need to wash all the bottles and then dry them. For designs made from whole material, it is necessary to cut off the bottom of each bottle. To create a plastic sheet, you need to remove the neck.
Comment! To assemble one wall, you need bottles of the same shape and volume. It is easier to connect them together and calculate the amount of material.
Required Tools
To make a greenhouse out of a plastic bottle, you need additional tools.
| Tool | Mode of application |
| Awl | Making holes for the thread to pass through |
| Cutter | Trimming excess parts |
| Hacksaw | Sawing off parts of a wooden base |
| Hammer and nails | Assembly and fixation of the frame |
| Level | Level arrangement of elements |
| Roulette | Measuring the area of a structure |
| Nylon thread or wire. | For stitching plastic |
Fishing line or ordinary thick threads are not suitable for sewing plates from bottles. Such seams quickly fray and are exposed to strong environmental influences.
Preparing plastic bottles
Before starting the construction of the greenhouse, the blank material must be prepared. To achieve this, a number of activities are carried out:
- To begin with, the bottles need to be sorted according to certain parameters, such as color and volume. It is not necessary to divide plastic into green, brown and transparent; color or colorless sorting is enough. It is necessary to be precise with the volume so that there are no difficulties during assembly.
- Each container should be cleaned: remove labels and adhesive layer. To do this, they need to be placed in water and left for 2-3 days. Thanks to this procedure, the containers are disinfected, and the remaining glue is easily separated.
- After cleaning, they should be tested outdoors for a few days. This is done to ensure that all unpleasant and chemical odors disappear.
This procedure is time-consuming, since it is necessary to carefully process each of the 2000 containers, so it is carried out gradually, as the necessary materials are acquired. After completing the preparation of plastic blanks, you can begin construction.
Working on creating a project
The easiest option to construct is a rectangular structure with a pitched or gable roof. A flat roof is not suitable for a greenhouse, since rainwater will collect on it, which can lead to deformation or complete destruction of the structure.
A project is a drawing drawn up on paper or electronically. It is necessary to determine the height, width and length of the structure. Then the number of load-bearing elements is calculated and the roof is formed. Drawing up a drawing is necessary to prevent inaccuracies during the installation of a dacha building.
Selecting a location
The best location for a greenhouse made of plastic bottles will be the southern or southwestern part of the site, depending on the development of the area and the placement of the beds. Shaded areas near buildings and fences should be avoided; it is important that the greenhouse has direct direct access to sunlight.
Plastic perfectly scatters ultraviolet radiation, so there is no need to create additional darkening. It is worth paying attention to the direction of the wind, since due to an unstable foundation, strong gusts and hurricanes can cause the greenhouse to overturn. It is advisable that the wind does not penetrate the structure. If the greenhouse is located in an open space, then you should only think about placing the beds inside and strengthening the foundation using available means: tires or concrete. In particularly rainy regions, the choice of location should be approached with particular caution. It is important that the foundation does not wash out, and that the tree serving as the frame does not rot, otherwise the greenhouse may collapse, destroying the seedlings.
In this case, you need to place the building on a natural or artificial hill, covering the foundation with pebbles or crushed stone.
You should not construct a greenhouse in extreme proximity to flower beds and beds, so as not to damage the root system of plants. Once the location is determined, the ground needs to be prepared. To do this, a number of works are carried out to level the soil and clean the area from debris, weeds and residual root systems. Stones found in the soil should also be removed; the soil should be soft and loose. Having prepared the site, you can begin marking the territory.
Features of growing plants in greenhouses
Greenhouses and greenhouses are cultivation facilities for year-round cultivation of flowers, herbs and various agricultural plants. Small-sized structures consist of a frame and translucent material that performs the functions of walls and roof.
Thanks to the use of translucent material, greenhouse structures can collect thermal radiation coming from outside and turn it into heat. Accordingly, stable temperature and air humidity are maintained inside such buildings. A favorable microclimate, maintained directly by humans, leads to an increase in the productivity of cultivated crops.
Cultivating plants in greenhouses and greenhouses has its positive aspects, in particular:
- air temperature regulation;
- creation of a favorable microclimate;
- protection from wind, precipitation and other atmospheric phenomena;
- protection from active invasion of harmful insects;
- possibility of growing plants all year round;
- early fruiting;
- the possibility of harvesting two or more crops;
- high yields.
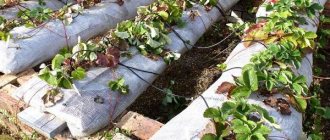
From whole bottles
This method is the most popular due to its simplicity and practicality. Preparing the material and carrying out the relevant work will not take much time and effort. Also, the appearance of the finished greenhouse is quite original; the structure will serve as a bright decoration of the site.
To construct it, you must follow the step-by-step instructions:
- To begin with, you need to remove the bottom of cleaned bottles so that the cut area is approximately at the curve. Thus, the diameter of the resulting hole will be slightly smaller than the diameter of the container in the middle part.
- The greatest strength is achieved by stringing the finished plastic material together. Carefully press the top of one bottle into the cut at the bottom of the other. It is important to ensure that the containers do not slip and are held tightly.
- The frame must be prepared in advance. The best material for it is wood, as it is light and strong. On the frame it is necessary to stretch 2 rows of elastic threads at a short distance equal to the approximate width of the bottles.
- Then, between the threads, carefully lay dense pipes consisting of plastic bottles connected together. It is necessary to ensure that there are no gaps between them and that they fit closely to the walls of the frame, otherwise the structure will be unstable.
- For greater reliability, after installation, plastic pipes should be carefully secured with tape, electrical tape or wrapped with thick adhesive paper. If everything is done correctly, the structure will be able to withstand any bad weather, even in winter: heavy snowfalls and snowstorms. Disassembling the frame with the onset of cold weather is not necessary.
- A structure of this type will function for at least 10 years, after which it must be updated by replacing tape and damaged plastic bottles.
For a project of this type, solid containers with a displacement of 1.5-2 liters are used. Moreover, all bottles must be the same size. The minimum amount of blank material is 400 pieces, there is no upper threshold. During construction, it is not recommended to use unreliable tools, which will only shorten the service life of the greenhouse. For example, you should not fasten containers using a stationery stapler, otherwise in a strong wind the plastic will tear and the structure will collapse.
The stability of the frame will also be negatively affected by fishing line, which will fray in 5-6 years due to exposure to sunlight. An ordinary thread can rot, which is dangerous not only for the longevity of the structure, but also for the plants.
Preparation for construction in general
First of all, we need to understand what size greenhouse we need. Considering the complexity of collecting components, there is no need to make it too large.
Let our structure be on a wooden base, in the form of the most primitive small house. We assume the dimensions of the base are 2x3 meters, the height of the greenhouse walls is 2 meters, the height of the ridge is 1 meter.
We draw the drawing by hand, set the dimensions and estimate how much timber, slats, screws and corners we need to purchase.
Drawing of a greenhouse, sketched in haste
For the frame we will need a thin pine beam 40x40x6000 mm.
Edged pine block 40x40x6000 mm - the basis of the structure
To connect it into the structure there are metal corners.
Corners are needed to strengthen joints
To connect bottles into pipes, use thin wooden slats 20x20x3000 mm.
Pine slats 20x20x3000 mm
To fix the parallelism of the walls, use three rolls of thick fishing line.
Fishing line is needed to fix the walls
To cover the roof - a piece of hose film.
Tubular film is needed not in a roll, but in footage
When we calculate the required amount of materials, we will be pleasantly surprised at how cheap our project is. It’s funny, but the most expensive thing is not even the timber, but the strip needed to be threaded into the bottle “pipes” to create stiffening ribs. in fact, you can do without slats, or thread a wire or wire into the “pipes”. And the bottles will not cost anything at all - except for the labor of collecting enough of them.
Bottle preparation
- You need to collect about four hundred two-liter bottles. White plastic (water bottles) transmits ultraviolet light better. And to decorate the structure, you can choose a number of bottles of a different color: blue (sparkling water), green (drink bottles) and brown (beer bottles). In fact, bottles come in all the colors of the rainbow. But only these four are produced en masse (in order to collect the required quantity).
The four most common bottle colorsWith some effort, you can create beautiful ornamented greenhouse walls from them.
A greenhouse with a smile, creativity is immediately visible - Bottles must be removed from stickers in advance. It is better to use bottles with regular paper stickers that can simply be soaked.
Required Tools
- Bayonet shovel
- Shovel
- Power saw (hacksaw).
- Hydraulic level.
- Carpenter's corner.
- Drill (with a set of drills).
- Hammer.
- Awl.
- Shoe knife.
- Roulette.
- Screwdriver.
- Installation stapler.
Calculation of required materials - table
| Position | Name | Specification | Quantity | Unit price | Price | Notes |
| 1 | Edged pine beam | 40x40x6000 mm | 6 items | 95 RUR/piece | 570 rubles | |
| 2 | Equal-sided galvanized mounting bracket | 40x40x60x2.0mm | 25 pieces | 35 rub/piece | 875 rubles | |
| 3 | Planed pine slats | 20x20x3000 mm | 50 pieces | 35 rub/piece | 1750 rubles | |
| 4 | PET bottles (plastic) | capacity 2 liters | 400 pieces | |||
| 5 | Fishing line calibrated 1.00 mm | 1.00 mm x50 m | 3 skeins | 90 rubles | 270 rubles | |
| 6 | Polyethylene film 80 microns | width 3m / sleeve 1.5m | 4 meters | 20 rub/m | 80 rubles | |
| 7 | Antiseptic impregnation (and optional paint) | As needed, but small quantities | ||||
| 8 | Adhesive tape transparent wide technical | 75 mm x 50 m | 3 skeins | 49 RUR/skein | 147 rubles | |
| 9 | Self-tapping screws | About 2 kg | As needed | |||
| Total | 4412 rubles (excluding the cost of screws, impregnation and paint) | |||||
From bottle plates
This method is more complex and requires more dedication, but the result is worth the effort. The greenhouse is not inferior in reliability and structure to wooden and metal buildings, and its appearance resembles a glass greenhouse.
- First, the bottle must be cut at both ends, removing the neck and bottom. The resulting part should have a rectangular elongated shape.
- To stop the plastic from curling, the sheets must be carefully smoothed with an iron, using thick paper.
- The aligned blanks should measure 17x32 cm, after which they can be sewn together with metal wire.
- The plastic sheets need to be stacked on top of each other so that there is no space between them.
- The finished plates must be secured to the frame with nails.
Photo
In order to better understand what a bottle greenhouse is, you can view the photographs below.
Greenhouse for tomatoes and cucumbers
The basic principle of this type of design is to alternate bottles with colored and transparent plastic, resulting in a semi-darkening effect, which has a beneficial effect on the growth of cucumbers and tomatoes.
- First you need to select a suitable rail so that it matches the height of the entire structure.
- Plastic plates, pre-made from bottles, are attached to the slats using a furniture gun. It is important that the workpieces are the same size.
- You can also place a film on the inside for greater reliability and insulation.
Method number 4. Greenhouse with slats for plates
Work order:
- The collected materials are prepared for the manufacture of shields: in their head part, at the base and along the bottle itself, it is necessary to cut “seams” - special places for gluing. It looks like a rectangular plate, and you need to prepare a sufficient number of such plates.
- Now slats are made - longitudinal and transverse. To fasten the transverse one, you will need slats, the length of which is ideally equal to the length of the workpiece.
- A frame is made - a rail with a cross section of 3x3 cm and a height the same as the greenhouse itself will be taken (1.5 m, for example). This rail needs to be stitched transversely, which is equal to the dimensions of the shield.
- Now the blanks need to be shot at the frame with a furniture gun, and the joints must be covered with strips from the same bottles.
All maintenance of such a wonderful structure means removing the top part for the winter so that it is not damaged by tons of snow.
Mini greenhouses
Making such a greenhouse is very simple: just remove the bottom of the bottle and cover the plant with it. The result is an individual greenhouse. The lid should be opened as needed for ventilation.
Such a greenhouse can be used both in an open area and in an apartment when growing seedlings. To do this, you need to divide the bottle in half and make holes for drainage in the lower part, fill it with soil and cover it with a second fragment on top. It is recommended to select bottles with a volume of 3-8 liters, depending on the size of the shoots.
Availability of material
Material for any greenhouse or greenhouse requires a lot of costs. The thinnest film for a greenhouse costs from 40 rubles per 1 meter. One greenhouse will require at least 10 meters - and this is only for one summer. Plastic bottles are waste material ; during the autumn-winter season you can accumulate it for several greenhouses without spending a penny. Such a greenhouse will serve for 3–5 years, no less. Your neighbors will be happy to help you collect the required amount of plastic, because when burned, this material releases many hazardous substances into the atmosphere, poisoning the air. Recycling plastic bottles is also an environmentally important cause that many will want to contribute to.
ATTENTION! Due to the properties of the material, such greenhouses and greenhouses are durable, lightweight and do not require additional heating.
During cold spells and frosts, retaining heat well, they are not afraid of strong winds and hail.
Method 5. Pyramid greenhouse
- All seams for such a greenhouse must be perfectly smooth. Therefore, in order to make this whole process simpler, of higher quality and more time-saving, it is better to put it on stream, that is, to adapt boards that have specially drilled holes at the same distance. It is especially convenient to stitch plastic on such boards. This is best done using three awls: pinned with two, and pierced with a third awl.
- Now the bottles, sewn into stripes, must be assembled into sheets along the length of the prepared frames. For one such frame, the size of which is 75x150 cm, you will need about 40 bottles, and the frames will be light and durable. If the greenhouse is large enough, it will take about 900 bottles.
Any volume can be assembled from frames
- The finished canvases produce greenhouses with dimensions of 2.9x2.9 m . Plastic sheets should be attached to frames using shingles, and glazing nails should be slightly longer than for film. Or rather, shingles can press plastic much better than a gun or stapler. The main thing is to leave one or two side frames of the greenhouse open so that ventilation is possible.
Advice! The northern part of the greenhouse can be made from dark, green bottles, but the southern side can only be made from transparent ones. You can also build a roof for a greenhouse out of plastic, if the winter is not too snowy, or use a polycarbonate layer or reinforced film instead of plastic.
These are the basic principles; you can create a lot of variations. Now you can easily make a greenhouse out of a plastic bottle, so you can start drinking more bottled water, lemonade and beer (although we don’t recommend the latter).