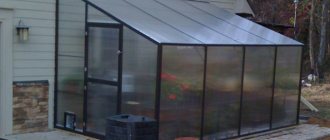
DIY polycarbonate greenhouse
Polycarbonate is one of the most popular materials for the manufacture of greenhouses. On the one hand, it is strong enough to withstand gusts of wind and even hail, serving for more than one season. On the other hand, polycarbonate allows sunlight and heat to pass through, allowing plants to actively develop and bear fruit earlier than when planted in open ground. The frame for the greenhouse can be assembled with your own hands from various materials. It’s worth briefly talking about the most popular ones.
With a frame made of plastic pipes
A greenhouse made of plastic pipes is popular due to its low weight and unpretentiousness. Plastic is not afraid of high humidity, as it does not rust or rot, unlike metal and wood.
Polycarbonate
To assemble such a greenhouse with your own hands, first of all you need to prepare the foundation - we’ll talk about it later. The entire frame is assembled on the base. One of the simplest options is arched, as it requires the least amount of adjustment and cutting of material.
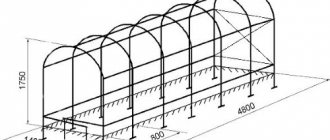
Scheme of a greenhouse made of polycarbonate and polypropylene pipes
The construction of the frame does not take much time - plastic pipes are bent and fixed to the base. If the future greenhouse made of polypropylene pipes is high enough, then it is necessary to add additional stiffeners - strengthen the structure in three or four places. One stiffening rib should be on the left and right, and another one or two on top.
Frame made of plastic pipes
Construction of a greenhouse frame using PVC pipes
After this, the finished frame is sheathed with polycarbonate sheets. The sheets are laid end-to-end so that the protective film is on top. To fix the polycarbonate, you need to make holes in it in advance using a drill or screwdriver. Moreover, the holes should be slightly larger than the diameter of the screws, otherwise the material will crack during installation. To increase the tightness of the future greenhouse, it is advisable to use thermal washers and special corner profiles to remove cracks at the corners. The ends are covered with an end profile and punched tape. When the work is completed, the protective film should be removed from the surface.
Polycarbonate perfectly tolerates significant temperature fluctuations
As soon as the greenhouse made of PVC pipes is assembled, you can start growing your favorite crops.
Video
With a frame made of profile pipe
A metal frame is more expensive than plastic pipes and is more difficult to process. But high strength compensates for these shortcomings in the eyes of many users. We also must not forget about the susceptibility of metal to corrosion - so that it does not reduce the service life and the metal greenhouse lasts as long as possible, the pipes should be painted.
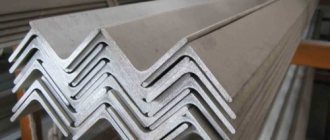
Types of profile pipes
The cross-section of the professional pipe is selected depending on the expected load and dimensions of the structure
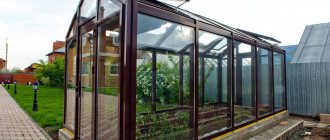
Most often, classic greenhouses are assembled from profile pipes. However, today it is possible to build an arched one (it is also known as a booth greenhouse) - it has proven itself excellent, thanks to its low wind resistance, and the snow does not linger on the surface - you do not have to get rid of it manually. True, in this case, the arcs for the greenhouse will have to be bent using special equipment, which is only available in large industries. Therefore, in most cases, you still have to build a classic greenhouse, also known as a straight-walled one.
Fastening profile pipes
Various options can be used to assemble the frame. Firstly, pipes can be connected by welding. The option is quick, but not everyone at their dacha has a welding machine. In addition, when working with galvanized pipes during welding, the protective coating is damaged and the metal becomes vulnerable to corrosion. Secondly, you can use a regular screw connection. To do this, you will have to make holes in the profile into which screws will subsequently be screwed, firmly connecting the profile pipes into a single structure. Drills and self-tapping screws can be seen in craftsmen's households much more often, so it will be easier to do such work with your own hands.
Polycarbonate fastening
When the frame is ready (it is better to draw up a drawing with dimensions in advance), all that remains is to cover it with polycarbonate, as mentioned above. Now the long-awaited greenhouse made of metal profiles is ready and will allow you to harvest the most capricious crops!
Video
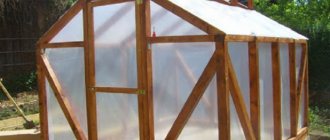
With a wooden frame
The main advantages of wood are low cost, lightness and ease of processing. However, if you want a wooden greenhouse to last for many years, take care of high-quality protection against rotting. The material will have to be impregnated with an antiseptic or coated with paint.
The choice of designs is not the largest - you will have to build a straight-walled greenhouse. Whether to build a foundation or not is up to you to decide. A wooden greenhouse is light enough that you can do without it.
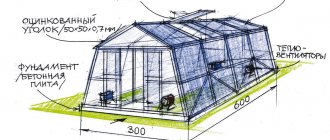
For construction you will need a wooden beam 50x50 mm. The optimal connection method is using long thin self-tapping screws. It's easy to screw them into wood using a cordless screwdriver.
First of all, the base is assembled - a rectangle of the same shape and size as the greenhouse will have. A vertical beam is already attached to it. In the upper part it should also be connected to each other, forming an additional stiffening belt. What kind of greenhouse will be made of wood under polycarbonate - single-slope or gable - must be decided by the summer resident himself. It’s easier to make a lean-to greenhouse with your own hands, but with a gable greenhouse, the snow melts off more easily on its own, allowing you to avoid wasting time on cleaning in winter.
Polycarbonate sheets are screwed to the assembled frame. This must be done carefully so as not to damage the material - if it becomes covered with cracks, then later they will most likely grow and turn into cracks. And in general, the strength and reliability of the structure will decrease, and a wooden greenhouse will not last as long as it could.
Video
With frame made from plasterboard profile
Today, homemade greenhouses are often assembled using a profile that is usually used with drywall. It has a number of serious advantages - from durability to ease of fit. True, it costs more than we would like.
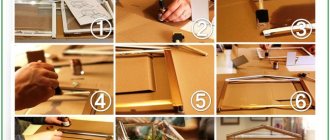
For work you will need the following tools and materials:
- level,
- screwdriver,
- grinder (as a cheaper option - metal scissors),
- plumb line,
- bolts with nuts.
Tools
Greenhouse materials
The greenhouse should be installed on a foundation. The most commonly used is concrete.
Before starting work, you need to draw up a suitable plan. Its presence will simplify the purchase of material, as well as its adjustment - it is advisable to cut the profile into pieces of the required length in advance, and then assemble the frame from them, without being distracted by preparatory work.
Drawing of a greenhouse made from a plasterboard profile
The rack profile must be perfectly vertical - for this you will need a plumb line with a level. The optimal step between them is 1 meter. The guides are attached horizontally at a distance of 60 cm. To assemble the structure, you will have to make holes in it in advance using a screwdriver or drill. Then bolts are inserted into them and secured with nuts. This option has advantages over welding - if necessary, the greenhouse can be easily disassembled or rebuilt.
Sheathing with polycarbonate is no different from the situation when wood is used as a frame.
Fastening the stiffener for the rafters
Frame assembly
Gable greenhouse
Video
Which polycarbonate to choose
How long a polycarbonate greenhouse, purchased or built with your own hands, will last, how well it will “work” depends on the parameters and quality of the polycarbonate. One must take his choice responsibly - the sum is considerable.
This kind of polycarbonate greenhouse is the easiest to make with your own hands. But this is a seasonal option
Types of polycarbonate
There are three types of this material:
- Monolithic. It looks like glass, but transmits light better, is two to four times lighter, and several times (100-200) stronger. Thickness - from 0.75 mm to 40 mm. The disadvantage is the high price. This material is used if there is a risk of damage - it often hails, the greenhouse is positioned in such a way that icicles and snow can fall on it. There is multilayer monolithic polycarbonate. There can be up to 3-5 sheets, they can have different properties. For example, for greenhouses a double layer is usually used - the first layer is characterized by increased strength, the second does not transmit ultraviolet radiation. Monolithic and profiled are good for seasonal greenhouses
- Corrugated (profiled). Appeared relatively recently. It is formed from a monolithic sheet on which a relief is formed. There are types similar to corrugated sheeting and slate. The thickness of this type of polycarbonate is 0.8-1.2 mm. With such a small thickness, it can withstand hail impacts up to 20 mm in diameter, bends well, and tolerates frosts down to -50°C. Cellular (cellular) suitable for year-round greenhouses
- Cellular (cellular, structured). Consists of two (or more) polycarbonate sheets connected by jumpers. The shape, size, thickness of the jumpers - all this affects the quality and performance characteristics. The thickness of cellular polycarbonate is 4, 6, 8, 10, 16, 20, 24 and 32 mm. For greenhouses, it is better to take no thinner than 10 mm, multilayer.
What type of polycarbonate is best to use for building greenhouses? Depends on the operating mode of the greenhouse. If it is heated, you will need a cell phone. If this is an option exclusively for the warm season, a corrugated (or monolithic) one is more suitable. Monolithic is also not bad, but corrugated has more rigidity. For greenhouses that are planned to be used from early spring or throughout the winter, cellular polycarbonate is installed. Due to its structure, it has superior thermal insulation characteristics - it retains heat better, although it transmits light worse (86% versus 95%).
Choosing cellular polycarbonate
It is not difficult to choose corrugated or monolithic - we are guided by the stated characteristics. It is only important that there is protection from ultraviolet radiation. There are no other pitfalls. But with a cell phone there are many nuances. You need to pay attention to the following:
- The thickness of the outer layers and their number. The sheets should be of the same thickness without sagging or thinner places.
- The location of the jumpers and their thickness. These types of cellular polycarbonate can be
- The presence of a layer that protects against ultraviolet radiation.
The easiest way to check the quality of cellular polycarbonate is to try to squeeze it between your fingers. If it doesn’t press through, even if you make a significant effort, you can take it. If it squeezes easily, look for another one.
Installation features
According to the technology, polycarbonate is mounted using starting and connecting profiles. First, profiles are installed on the frame, a sheet of cellular polycarbonate is inserted into them, which is fixed to self-tapping screws with special press washers, which at the same time protect the attachment point from leaks. Profiles, in addition to holding the sheets in place, also protect the cuts from dust and dirt getting into the bottom. The system looks neat and works well, but all the components cost a lot of money.
This is the correct fastening system
Aesthetics for a greenhouse is not the most necessary property, therefore, if you need to save money, they prefer to mount it in a simple way, without profiles and press washers. Here's how to do it:
- The edges of each sheet are covered with silicone. They must be closed, otherwise condensation will accumulate inside, in which mold and fungi will develop over time, and the polycarbonate will lose its transparency. So the edges must be sealed carefully, leaving no room for air and moisture to penetrate.
- The sheets are laid with an overlap of several centimeters, and pressed on top with a strip of tin. The fasteners are installed in an “overlapping” manner through a tin strip. This is how they attach it incorrectly, but cheaply. For greater reliability, you can add a tin strip
- You can place regular wide washers under the screw heads.
- The UV protection layer must face outward during installation. It is important. Otherwise it doesn't work.
This is what directly concerns the fastening of cellular polycarbonate. There is one more point that became clear during the operation of polycarbonate greenhouses. Polycarbonate should not be placed close to the ground. It is desirable that it starts at least half a meter from the surface. Why? Because firstly, it still gets dirty and almost no light passes through it, so it does not affect the overall illumination. Secondly, it begins to deteriorate—blacken and flake. It is not clear what causes this reaction, but it is common. So, when developing a model of a polycarbonate greenhouse with your own hands, provide half-meter walls made of another material - brick, building blocks. Doesn't matter.
Film greenhouse
Today, another option is also popular - greenhouses made of film. Yes, in terms of durability and strength it cannot be compared with polycarbonate. Very rarely such a greenhouse can last more than one season. And even under strong gusts of wind it is often damaged. On the other hand, film is much cheaper than polycarbonate and lighter. Well, of course, making such a greenhouse with your own hands is much easier.
The greenhouse frame under the film can be made of wood, polypropylene or plastic pipes, as well as metal arcs, sold in specialized stores. The most complex options have already been described above, in the section on polycarbonate greenhouses. In fact, assembling the frames is no different.
When the frame is assembled from a suitable material, you should proceed to the next stage - covering it with film. It is advisable to use a dense film with a thickness of 20-30 micrometers. Yes, it costs more and you will need tape to install it. But it is dense enough to withstand powerful gusts of wind. But you can also take stretch film. Despite its small thickness, it does not tear easily and one layer sticks perfectly to the other, which often makes it possible to do without adhesive tape.
Now it’s worth telling how the greenhouse is covered with film. All work consists of several stages. You need to start with the roof - first cover the lower part, and then move to the upper. The layers are applied overlapping - the overlap is about 5-10 cm. If stretch film is used, there should be at least 5-6 layers. For a thick film, two layers are sufficient. One is applied from the inside, and the second is applied from the outside. This creates a thermos greenhouse that retains heat. You can glue the film with wide tape.
When the roof work is completed, you should wrap the frame - here you also need to start from the bottom. A thick film also needs 2 layers, but stretch film takes less than a roof - 3-4 layers are quite enough. The film is attached to the frame using a construction stapler.
In places where there will be window and door openings, the film is attached to the frame using strips and screws. All that remains is to make holes for the door and windows and the film greenhouse is ready!
Video
Types of frame
For the frame of a greenhouse that will be built with your own hands, you can use various categories of building materials, including metal, wood or plastic.
It should be borne in mind that the characteristics of different materials may have significant differences, which must be taken into account during planning and construction.
- The metal type of frame is durable, strong and relatively low cost.
- The wooden version of the frame is very short-lived and requires treatment with special antiseptic compounds, but it has the advantage of being inexpensive and easy to maintain.
The metal type of frame is durable, strong and relatively low cost
A frame based on a plastic pipe is the most durable and does not require additional processing. It should be taken into account that such a frame structure is subject to deformation under the influence of high temperatures.
In addition, a structure built from brick, which is not capable of deteriorating for a long time and has excellent performance characteristics, is quite practical.
When building a frame with your own hands, it is advisable to give preference to materials that do not require special skills or the use of special, professional tools to carry out the work.
Greenhouse made from old window frames
Another good, durable and inexpensive material for making greenhouses with your own hands is old window frames. Moreover, both wooden frames and PVC are suitable.
Window frames weigh a lot, so it’s impossible to do without a reliable foundation. Which one to choose - you need to decide for yourself, but we, in turn, described the 4 most popular types of foundation in the corresponding section of the article.
In addition to the foundation, you need to take care of reliable drainage - if water stagnates in the greenhouse, this will lead to increased humidity, which will cause the frames to begin to rot. Fortunately, the task is not difficult to cope with. It is enough to dig a pit about 25-30 cm deep inside the foundation (one bayonet of a shovel), then fill it with crushed stone and sand on top, compacting it thoroughly. With this approach, the water will not stagnate, the soil will absorb as much moisture as it needs, after which the excess will go down.
A beam with a slightly larger cross-section than the thickness of the frames is laid on the foundation and securely fixed to it. Windows are already attached to it. The easiest way to do this is with short and thick self-tapping screws. It is advisable to direct the window vents inward - then they will be easy to open to ventilate the greenhouse.
When all the windows around the perimeter are installed, all that remains is to work on the roof. It can also be made from old windows. Whether the roof will have a pitched roof or a gable roof must be decided by the master himself.
Video
Design Features
The gable version of classic greenhouses has the shape of an ordinary house. Moreover, any walls and roof structure in such a structure are transparent, which has a positive effect on lighting. The most common load-bearing elements are standard wood bars or metal profile corners. Glass or ordinary greenhouse film is traditionally used as a coating material.
If glass is used in the construction in combination with metal supporting structures, then there is a need to seal any junctions using high-quality silicone sealant.
It is quite possible to make such a greenhouse structure with your own hands, but it is necessary to take into account any pros and cons of “house”-type structures when designing.
The walls and roof structure in the “house” greenhouse are transparent, which has a positive effect on lighting
Greenhouse made from barrels
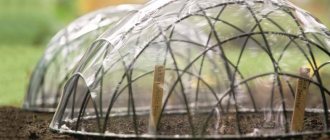
Of course, a polycarbonate greenhouse is a great thing. But this requires spending a lot of money. Is it possible to do without costs using improvised means? It turns out that there is such an opportunity - a mini greenhouse made from a barrel. Almost any plant grows in it - from strawberries and radishes to tomatoes and potatoes. However, due to the limited area, you should not count on an impressive harvest. Rather, this is an opportunity to get some fresh vegetables or berries a few weeks before the bulk arrives.
The design is extremely simple. Even a novice summer resident builder can do it with his own hands! For work you will need: a barrel, some polyethylene and guides - thick wire or thin fittings will do.
It is important to choose a suitable place for the barrel, protected from the cold north wind and illuminated. It is advisable to raise the future greenhouse above the ground. It is also possible to install it on a material with low thermal conductivity in order to reduce heat losses from contact with unheated soil. Small branches or straw are placed at the bottom to improve the air supply to the root system. On top is not completely rotted manure. It will simmer, releasing heat and warming up the barrel even on the coldest nights of April and May. Compost or fertile soil is poured on top.
All that remains is to secure the guides, curved in the shape of an arc - two pieces are enough. Some craftsmen attach them to the barrel (welded or threaded into specially prepared holes). Others are stuck into the ground at opposite ends of the container. When the base is ready, it needs to be covered with polyethylene. The barrel greenhouse is ready!
On warm days, you can peel back the film, allowing the plants to receive maximum sunlight. And in the evening, return it to its place so that accidental frosts do not destroy the harvest.
Types of greenhouse structures
Taking into account the flexibility of the material, ease of installation and the ability to form structures of any shape, greenhouses of the following configurations are constructed from polycarbonate:
- In the form of an arch.
- In the form of a house.
- According to the customer's individual sketch.
Among all types of greenhouse structures, polycarbonate greenhouses with a house deserve special attention. They are most widespread due to the ability to vary the size and geometry of the building. One of the main parameters of a greenhouse-house is the angle of inclination of the roof. By including the configuration and dimensions of the roof in the drawings in the photo, in this case, you can adjust the following design options:
- Resistant to loads from snow, rain, hail.
- Ability to withstand strong winds.
- Adjust the angle of sunlight.
- The roof configuration allows you to adjust the rigidity of the entire structure.
In order not to make mistakes in the calculations, it is recommended to use the diagram in the photo, which displays the basic formula for calculating the height of the roof ridge.
Greenhouse made from plastic bottles - step-by-step instructions
Surely readers have a question: is it possible to build a reliable and durable greenhouse from useless garbage? Craftsmen have found the answer to this too - they are building small greenhouses from plastic bottles! And this is not a joke - this option has excellent characteristics. These include:
- durability - this plastic is not afraid of high humidity, direct sunlight and temperature changes;
- strength - damaging such a wall is very problematic;
- low thermal conductivity - bottles filled with air do not transfer heat well and can be used even in winter, subject to additional heating;
- low cost - plastic bottles can be collected in large quantities completely free of charge or for a nominal fee;
- good light transmission - thin, clean plastic allows sunlight to pass through freely.
The only thing you have to spend money on is boards and timber. The timber will be used to make the base, and from the boards you need to assemble a frame - corner pillars and the edges of the roof. Stretch a thick cord or thin wire in two rows between the posts and the edges. The distance between the rows should be slightly less than the diameter of the bottle.
Now let's take on the walls themselves. The necks of the bottles are carefully trimmed so that the top of the bottle is slightly smaller than the widest part. All that remains is to insert the base of one bottle into the new “neck” of the other. Having strung a sufficient number of bottles in this way, install them between the cords. So, row by row, fill all the walls with rows of empty containers.
The final stage, to make the structure airtight, wrap adjacent rows with wide tape or stretch film. As you can see, the design is as simple as possible; any master, even an amateur, can handle it.
Video
How to make a 3x6 greenhouse drawing
In order to assemble a full-fledged greenhouse, it is necessary to work it out in detail on paper.
The more accurately the drawing is made, the fewer problems will arise at the stage of practical operation. Do not think that professional engineering skills are required here. This is not about conveying on paper as accurately as possible the position of each element of the site, but about correct mathematical calculations. Simply put, a sketch helps to make the correct calculation of the materials needed for construction.
The following practical tips will help simplify the task for novice designers:
- Taking into account the depth of groundwater - this kind of information can be obtained from a land management office. Based on the information obtained, it is necessary to mark the groundwater on the sketch and select the appropriate foundation.
- Depending on what you plan to plant, the width of the structure is selected. It is necessary to correlate the width of the base and frame. If its height does not exceed 2.5-3 meters, then the greenhouse is made with a foundation of 2 rows of bricks. This amount must be increased by 1.5 times if the greenhouse grows to 4-6 meters.
- Ventilation system and drip irrigation - it all depends on what exactly you plan to grow. As mentioned earlier, the use of moisture-resistant material is recommended in the case of sowing radishes, cucumbers and tomatoes. Inside the greenhouse you need to place at least 2 windows on opposite walls. The situation is more complicated with drip irrigation. It must be placed in such a way that the layout of the greenhouse is not affected.
Drawing up a drawing is a prerequisite when assembling a greenhouse of any complexity with your own hands. The sketch should take into account the depth of groundwater, the number of ventilation holes and the irrigation system. Based on the prepared project, the required consumption of materials is determined.
Winter greenhouse with heating
Many options for greenhouses are described above. Each of them can effectively retain heat. But in winter there is a critical lack of heat. Therefore, you have to seriously think about additional heating. Which option should you choose? Let's look at the most popular options:
- A heat gun is a reliable way to increase the temperature in a greenhouse in the shortest possible time. It is important that you can install it yourself. The main thing is to ensure that the flow of hot air does not harm the plants. You can install it at any time and also move it at any time or remove it altogether.
- Warm floors are a great way to raise the temperature to the desired level. It is important that it is not the air that is heated here, but the earth itself, from which the heat is already distributed throughout the entire volume of the room. It must be installed before planting, not forgetting about reliable waterproofing. Alas, constant heating takes a lot of electricity, so this option is not cheap.
- Stove heating - you can use an ordinary potbelly stove made by yourself. It can be heated with any fuel: cardboard, coal, peat, wood. But there is also a drawback - you have to regulate the heat yourself. And, as always when working with open flames, there is still a risk of accidental ignition and fire.
- Infrared heating is carried out using special infrared lamps. The heat is evenly distributed over all surfaces: plants, beds, external walls. You can turn it on and off at any time, and there will be no problems with installation or dismantling. But the power is relatively low - it is almost impossible to raise the temperature by 20-30 degrees.
- Water heating - is connected by an additional circuit to the heating of a residential building or other facility. An excellent heating method - efficient, reliable and not too expensive. At least the heat consumption does not increase. The main disadvantage is the complexity of installation. It needs to be planned from scratch and preferably simultaneously with drawing up a heating project for the house itself. Well, installation costs are high. Suitable for professional greenhouses, and not for country greenhouses built by yourself.
So, you have a great opportunity to choose exactly the heating option that suits you.
Types of covering materials
Before construction, you should make a choice of basic materials, including covering materials, on which the thermal insulation abilities and light transmittance directly depend. Today, several variants of covering materials are produced that can be used in the construction of greenhouse structures of the “house” type:
Polycarbonate has optimal properties for arranging greenhouses and greenhouses
Polyethylene film
The cheapest and simplest material for covering greenhouses, which is most often used for arranging temporary and seasonal buildings. The material is not suitable for permanent structures, which is due to low thermal insulation capabilities, poor resistance to mechanical stress and insufficient light transmittance.
Sheet polycarbonate
The second most popular material, which has optimal properties for arranging greenhouses and greenhouses, including light transmission, thermal insulation, ease of DIY installation and low weight. A certain disadvantage may be the relatively high cost of such material.
Traditional glass
Modern double-glazed windows and classic glass have excellent properties that allow such fragile material to be used as a covering for a greenhouse for a long time. Glass remarkably retains thermal energy and promotes adequate lighting inside the greenhouse space. It should be remembered that in addition to fragility, the material is quite expensive and heavy.
Round greenhouse
A novelty in our country is a round or domed greenhouse - you can’t see it on every site. Which is understandable: making such a work of art with your own hands is not easy.
So, what are the merits of this solution? Mainly in the ability to grow tall plants. For example, bushes like cherries, or trees like persimmon and other heat-loving trees that are not able to withstand the frosts of the Central Russian strip. In addition, even the tallest summer resident will be able to walk freely in them, straightening up to his full height. Also, do not forget about the originality of the design. The greenhouse will not only allow you to get an early harvest, but will also decorate any area.
True, there are also disadvantages. And not only the complexity of construction - ordinary beds will not work here, you will have to think through the design from scratch. In addition, for such a volume, the size of the area sheltered from the cold will not be too large - in a simple greenhouse this figure is more impressive. But if you are serious about making a domed greenhouse, here are step-by-step instructions.
The following materials and tools will be useful for the work:
- timber with a section of 20x30 mm,
- screws,
- polycarbonate,
- connectors for 4 and 6 petals,
- screwdriver,
- hacksaw,
- meter.
It is best to assemble a round greenhouse from triangles - less fuss and calculations than with pentagons and hexagons. It is very important to carry out calculations here to determine how many triangles are required for a greenhouse of a size that suits you. And it is important to cut the timber with extreme precision - deviations of a few millimeters can ruin everything.
First you need to clear the area and arrange the base - from thick and durable timber. After this, the prepared timber is cut into pieces of exactly the same length. Connecting them using self-tapping screws in threes, make the required number of triangles. It is advisable to treat the tree with an antiseptic, increasing the service life of the structure.
Now the bars are fixed on the base, onto which the first row of triangles is attached. The following triangles are installed on them using metal connectors. If installed correctly, you can create both diamonds and hexagons. The dome structure becomes more rounded and is eventually completed by installing the final triangles at the very top of the greenhouse.
Video
Advantages and disadvantages
Despite a slight decrease in the interest of summer residents in gable greenhouse and greenhouse structures, it should be remembered that such structures have certain undoubted advantages:
- the high version of the gable greenhouse is ideal for growing tall and heat-loving plants that are sensitive to light;
- building such a structure with your own hands or assembling a ready-made version if you have certain skills and abilities is quite simple and the construction process does not take much effort and time;
- convenient configuration has a beneficial effect on the planting area and internal volume of the greenhouse;
- greenhouse structures with a “house” belong to the more reliable category and are designed for significant snowfalls and wind loads;
- the special roofing structure does not allow snow to accumulate, and when it slides to the ground, the snow masses do not put pressure on the frame elements and covering;
- Not only sheet polycarbonate or film, but also glass can be used as a coating.
The main disadvantages of such greenhouses are the relative high cost and some labor intensity when assembling the structure.
Drawings of wooden greenhouse frames have significant differences from structures based on polycarbonate or other materials
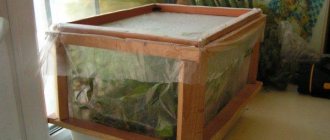
Do-it-yourself “breadbox” greenhouse – drawings and dimensions
An interesting solution is a greenhouse in which the parts move freely. This allows you to easily and quickly ventilate the internal volume, expose the plants to the sun during the day, and cover them as night approaches. If only one flap moves, then it is a “shell” or “snail” greenhouse, and if there are two at once, then it is a “breadbox”. If the walls do not move, but rise up, then you have a “butterfly” greenhouse in front of you.
How to design it with your own hands? Let's look at this issue.
First of all, let's look at the size. There is no such thing as a large “bread bin” - usually they grow flowers, herbs or a small amount of vegetables. Outwardly, they resemble an arched greenhouse, but with lifting walls.
The height, as a rule, is no more than 1-1.2 meters with a length of 2-4. The width should not be too large, otherwise there will be problems with access to the plants. It is better to design a building with a width of 80-130 cm. Although, if this is a classic “breadbox”, then you can increase the width to 2 meters - you will be able to reach the plants from both sides.
It’s worth noting right away that the frame is made of a metal profile and will have to be welded or bolted together. If you are interested in a greenhouse made of boards or plastic, then it is better to pass by this option.
First, two arcs of the same length (it is better to use a metal profile with a square section) are bent into a quarter circle. After this, four pieces of the profile are cut and welded in pairs to each other at right angles. Ready arches are already attached to them. Now they are connected to each other by two pieces of profile - on the side in the middle and in the middle of the arcs. If the length of the greenhouse is more than two meters, then a third arc should be added to serve as a support for the polycarbonate.
To make a moving part, make the same part, but of a smaller size - reduce all measurements by 3-5 cm. Insert the smaller part into the larger one and connect it together with bolts. The top part is ready.
Weld a frame that is suitable in size for the previously made part. Weld the top part with smaller arcs to it. Leave the larger one free - you can open and close this lid at any time.
All that remains is to cut the polycarbonate into pieces of the required size and attach it to the frame. This can be done using a profile or thermal washers. When using washers, make holes no closer than 40 mm from the edge of the sheet - otherwise the polycarbonate may crack. But it is impossible to seal polycarbonate so that it retains its strength.
Video
Features of drawing up a drawing
Most summer residents and owners of private suburban real estate prefer to install objects with their own hands. Greenhouse structures in this regard are no exception, but to obtain a high-quality structure, you must correctly draw up drawings of such a building, including even the smallest construction features. It should be taken into account that the drawings of wooden greenhouse frames have significant differences from structures based on polycarbonate or other materials.
Greenhouse houses are convenient because when developing drawings for the construction of such a building, it is necessary to refer not to the category of material, but to the planning of the internal space. Features of calculating the dimensions of a greenhouse built by yourself:
- height parameters are determined by the growth indicators of the person serving the greenhouse space, taking into account the height of the grown plants;
- width parameters depend on the number of beds expected to be arranged inside the greenhouse and their dimensions;
- length parameters are based on the area allocated for the greenhouse structure in conjunction with the wishes and financial capabilities of consumers.
Do-it-yourself foundation for a greenhouse - which one is better?
It doesn’t matter what you are building - a greenhouse made of polypropylene pipes and polycarbonate or a greenhouse made of pallets and film. In any case, the structure needs a solid foundation. What can you build a foundation from and how to do it? Let's look at this stage of construction.
Made from concrete
The most durable, strong and not too expensive foundation that you can build with your own hands. Disadvantages - it cannot be moved, there is a large amount of work, and it will take at least a few days to gain strength. So how does the work get done?
First, excavation work is carried out. You need to dig a trench around the perimeter of the future greenhouse. It is not necessary to make it deep and wide - a depth of a shovel bayonet and a width of 15-25 cm is enough. A sand cushion is laid on the bottom, after which formwork is constructed from plywood, slabs or boards. Then concrete is poured into it. If you prepare the solution yourself, then you need to mix cement, sand and crushed stone in a ratio of 1:3:5. Since the load on the foundation is small, it is quite possible to do without reinforcement.
Concrete sets within 72 hours. After this, you can begin building the greenhouse.
Video
From timber
If we are talking about making a foundation for a greenhouse with your own hands, then this option is much simpler and faster. In addition, a foundation made of timber is easy to move to a new location. Alas, this base is not durable - the wood quickly rots in high humidity. Even if you coat it with an antiseptic, this will increase its service life, but it is unlikely that the wood will last longer than 10-15 years.
But the manufacturing process takes a little time. A timber with a cross section of 100x100 or 100x150 mm is suitable for work. Four pieces are cut corresponding to the size of the future greenhouse. They are treated with waterproofing. Copper sulfate is suitable, or even better - bitumen mastic.
Then they are connected to each other. Some craftsmen connect in half a tree or even in paws, but such an adjustment takes a lot of time. It is much easier to assemble the timber using long and thick self-tapping screws.
All that remains is to lay the base on a few bricks to reduce the likelihood of contact with the ground, and you can begin further construction.
Video
From blocks
If it is important for you to build a durable and high-strength foundation, then it makes sense to choose concrete blocks. Such a foundation is guaranteed to last for many decades and you have to wait less for its readiness than for a concrete one. True, it costs more.
It is very important to adjust the dimensions of the greenhouse to the length of the blocks so that you do not have to cut them (especially if you do it yourself, you will spend a lot of time and effort). Having marked the area and perfectly leveled it and dug a trench suitable for the foundation, begin laying. You need to perform it from the corners, moving towards the middle. It is useful to check the adjacent ones using a level so that there is no distortion. The blocks are fixed to each other using anchor bolts. Fill the voids in the block with concrete and insert a bolt with a diameter of about 10-12 mm into it.
After completing the first row, the second begins to be laid. Before this, lay the solution on the surface of the first one and, having carefully distributed and leveled it, lay a new block and tap it, leveling it. The gap between the rows should be no more than 25 mm. It would also be a good idea to check this with a level.
After just two or three days, the foundation is ready for further construction.
Video
Planting and caring for plants
The width of the greenhouse we have chosen is 3 meters, so it would be natural for the width of the two beds in the greenhouse to be approximately one meter each, as well as the width of the passage between them. The width of the beds is slightly wider and, accordingly, the passage is narrower or, vice versa, at the discretion of the gardener.
Arranging the vegetables that you plan to grow in the greenhouse so that it is as convenient as possible for them to grow and bear fruit is not an easy task.
In this case, it is necessary to take into account the cold resistance of plants and their maximum height. The compatibility of plants located in the neighborhood is also important (some plants oppress their neighbors, others, on the contrary, help them grow).
So, on the north side of the greenhouse you can safely sow seeds of radishes, salad crops, and dill, and tomatoes and cucumbers will do well in the central part of the greenhouse. On the south side of the greenhouse, it is advisable to plant seedlings of peppers and eggplants, as the most heat-loving crops.
Subsequent care of plants in the greenhouse includes mandatory watering (after watering, the greenhouse must be ventilated), fertilizing the plants with fertilizers (fertilizers must be selected individually for each type of plant), and combating diseases and pests.
Layout
Before building such a facility, you should draw up a preparation plan for work. After all, a design with imperfections may ultimately turn out to be useless and will bring a small amount of harvest.
The design of a greenhouse is carried out in several stages.
Selecting a location
The ideal option would be a sunny place near the house, protected from strong gusts of wind. You cannot build a greenhouse on lowlands, as they are susceptible to frost, and on a hilly surface, because then the greenhouse will not stand level.
Sizing
We decided on the dimensions; the greenhouse will be 3 meters wide and 6 meters long. The height of such greenhouses is standardized - 2.1 meters. Next, you should mark the selected location using pegs and thread, pulling it along the outer edge.
Choosing a greenhouse shape
The shape directly depends on the type of plants that will be in your beds.
Arch. The most convenient and economical option. It is suitable for sun-loving crops. Such a complex is easy to install on your own. It is easy to use and snow does not accumulate on it in winter.
Layout of doors and windows
All plants need fresh air, so the organization of vents is mandatory.
The door width must be 1 meter to allow passage with a trolley and other large tools.
Choosing a foundation type
The foundation depends on the size of the greenhouse and its mass. Many people prefer to place the greenhouse directly on the soil, but it is this additional layer that will protect the crop from frost, underground animals and insects. The foundation can be wooden, brick, or poured. You can calculate the size using a special calculator.
Drawing
This item involves drawing up the final drawing in two projections: from the end and in length (side view). Its algorithm is simple and universal: know the parameters of the greenhouse, take into account the maximum load on the frame, take into account the presence of a foundation, doors and vents.
The drawing will help you understand the shape, size and quantity of material required, transforming your ideas into a real picture.
Advantages of professional pipes for greenhouses, choice of type, size
Structures of various types are erected from this material, it all depends on the wishes and needs of the owner of the personal plot.
Advantages of metal profile greenhouses
Considerable strength of a homemade greenhouse made from a profile pipe with relatively low weight. This effect is achieved due to the geometry of the section - square or rectangular. Four ribs provide sufficient rigidity of the structural elements. An ordinary round pipe of comparable strength with approximately the same cross-section (for example, 30 mm) will weigh much more. A greenhouse made of galvanized pipe 25x25 mm is able to withstand high snow/wind loads, regardless of what it is covered with. During installation, the planes of the elements have a large contact area. The result is high strength of connecting nodes
This is especially important if you plan to build a greenhouse from a profile pipe with your own hands - the structure turns out to be very durable. There are different ways to connect greenhouse parts to each other. This is welding, self-tapping screws, crab clamps
They can be used alone or in combination with each other. The profile pipe is sold already with an anti-corrosion coating. After completing the construction of the greenhouse, only the cut/joint areas of the parts will have to be processed. Greenhouses made from corrugated pipes can be mounted on a foundation or without it.
Greenhouse with a house made of a square profile pipe, covered with polycarbonate. Please note: the listed advantages of a profile pipe allow it to be used for the construction of greenhouses of any size and geometry. There are no restrictions, you just need to choose the right type of section and size of profiles
How to choose a profile pipe for a greenhouse
- Material of manufacture. There are painted and galvanized steel pipes on sale. The former are cheaper, but the coating deteriorates over time, and the exposed steel will begin to rust. Galvanized profile pipes for greenhouses do not face these problems; a structure made from it will last about 20 years. The highest quality material must be marked GOST 14918-80.
- Section, wall thickness. If a small greenhouse is being built, the material is selected, as they say, by eye. For example, a small greenhouse made of a 20x40 mm profile pipe, wall thickness - 3 mm. The values here can vary up or down. To select pipes for large-sized buildings, you should look at SNiP, namely sections P-23-81 and 2.01.07-85.
Please note: greenhouses with an area of 10 m2 or more cannot be built without preliminary calculations using SNiP. An improperly designed structure may deform or collapse under its own weight or snow/wind loads.
To make a greenhouse from metal pipes with your own hands, you need to choose the right section of profiles