For summer residents and owners of country houses with a small plot of land, a great idea might be to build a greenhouse attached to the wall of the house. This structure takes up little space, but does not lose any of its direct function. A wall-mounted greenhouse is simply an ideal option for using every square meter on your site to your advantage. Moreover, this wall-mounted structure is not only useful, but also has lower construction costs in contrast to a free-standing structure.
Types of wall greenhouses
Having decided to attach a small wall-mounted greenhouse to your home, it is important not only to choose the right place for its construction, but also to decide on the type of future structure. As a rule, even such a modest building is divided into types depending on its location and complexity of the design.
End
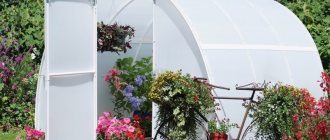
An end-wall greenhouse is a very convenient design that is attached to the wall of a house with its end. Thanks to this arrangement, it can be single-pitch, gable or arched. Sometimes an end greenhouse is made with two entrances, one from the street, the second from the house.
The length of the building is unlimited, depending only on the available area of the site.
Polygonal
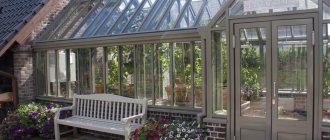
The polygonal appearance of a winter greenhouse attached to a house is more of a decorative structure, and it often acts as a winter garden. It is quite impractical to use this structure for the purpose of growing garden crops in it. The structure itself is usually made of a wooden frame, and the covering is made of glass or polycarbonate.
Single-pitch
A lean-to greenhouse is the most economical to build, which is why it is considered the most common. Its design looks like a gable greenhouse, but divided in half. They attach it along the wall, the entrance is usually located on the side of the building.
The only disadvantage of a lean-to wall greenhouse is the small usable area; from the photo you can see that the greenhouse has limitations in size.
Semi-arched
Attached semi-arched greenhouses are less popular than lean-to greenhouses. Their design is much more complex and it will be difficult to carry out independent installation, since the structure implies the presence of bent elements. Polycarbonate is mainly used to cover this type of building.
Attention! In specialized stores it is possible to purchase a ready-to-assemble semi-arched greenhouse structure, the installation of which is not difficult to do yourself.
Recommendations before construction
Construction of a greenhouse without certain knowledge is impossible, since the correct choice of design is very important. Only an optimal design guarantees the efficiency of the structure, on which the volume of future harvests depends. In this case, you need to consider some factors in advance.
- Location of the structure. In most cases, greenhouses are stationary structures, the movement of which is simply impossible due to their large dimensions and foundation. This means that a well-chosen location is a requirement that ensures maximum productivity. Good lighting throughout the day is the most important aspect, so it is not recommended to choose a place that is shaded by trees or bushes, buildings, or fences. Taboos are lowlands that lead to the appearance of late blight in plants.
- Greenhouse dimensions. Here, an important role is played by the area of the site itself, the characteristics of the material chosen for construction, the needs of the owners of the country property, and the degree of their willingness to devote the maximum amount of time to plants. If we settle on the optimal dimensions, they are as follows: height 250 cm, length 600-800, width 300 cm. The latter value will ensure ease of movement and sufficient space for planting, and you can choose the length yourself.
- Internal layout of the greenhouse. It is provided for at the design stage. Irrational use of space will lead to its shortage or surplus. It is especially important to provide wide paths. Otherwise, caring for seedlings will become much more difficult. Sometimes it is only after the stage of drawing up the internal plan that the ideal external dimensions for the structure are found.
- Features of building materials, their quality and requirements that ensure long-term operation, nuances of working with them.
Advantages and disadvantages
The considerable popularity of wall-mounted greenhouses can be easily explained, because this design has many advantages. It is economical to install, takes up little space on the site and is sufficiently protected. The advantages of the building also include the following:
- rational use of the land adjacent to the house;
- lower construction and material costs due to the capital support (wall);
- stability of the building;
- the possibility of supplying central heating, as well as simple connection to the electrical network and water supply;
- no need for additional heating.
But, like any building, this building also has its disadvantages. There are few disadvantages to a wall-mounted greenhouse, but they are quite significant and include:
- in a small area - due to its location close to the house, the size of the greenhouse has its own limitations, which depend both on the size of the supporting wall and on the available area;
- in limited light conditions, the wall to which the greenhouse is attached not only protects the building from the winds, but also creates shadow;
- in constant humidity inside a wall-mounted greenhouse, which can cause destruction of the wall of the house.
- How to attach a greenhouse to the wall of a house with your own hands
Building a wall-mounted greenhouse with your own hands is not easy, but doable. And before starting construction, there are three main aspects to consider:
- Location of the future building.
- Type of greenhouse.
- Material used.
When considering the location of a future wall-mounted greenhouse, you should know that plants need good lighting. And since one of the disadvantages of this building is the limited lighting of the interior, you should choose the sunniest place. The best option is to choose the south wall of the house. If you plan to attach the greenhouse to the garage, you should also choose the side that faces south.
It is better to choose the type of greenhouse itself based on the following criteria:
- maximum spacious interior space;
- good lighting;
- the design must have low thermal conductivity;
- convenient ventilation system;
- ease of maintenance.
If we consider existing types of construction, then most of all the specified criteria correspond to wall-mounted lean-to greenhouses. Such a building allows enough light to pass through, and the pitched roof will prevent the accumulation of precipitation.
As a material for constructing a lean-to wall greenhouse with your own hands near the wall of a house, you can use a wooden beam or a profiled pipe for the frame base and cellular polycarbonate for the covering.
Lean greenhouse - advantages and disadvantages
Fundamentally, a lean-to greenhouse is no different from a regular one - it is a structure designed for growing various crops, in which the design creates favorable conditions for plant life. The differences are in the design and the place where it is built. As the name implies, the standard greenhouse roof is “halved” and only one slope remains, resembling a right triangle in cross-section. As for the location, most often such a greenhouse is not located in an open area and is an extension to a residential building, fence or garage, or is adjacent to one of the walls on a hill.
Lean greenhouse adjacent to the house
So what are the advantages of such a design? Why does it make sense to build not an ordinary arched or gable greenhouse, but a small extension, more like a barn or gazebo? There are several reasons.
- Compactness - the lean-to greenhouse itself is small; when attached to a house or fence, it will not take up much space, and previously empty square meters will be put to good use.
An example of a lean-to greenhouse
- Easy start - not many plants can be accommodated in such a structure, caring for them will require less time and effort. Therefore, if you are new to the dacha business, then a lean-to greenhouse near your home will help you gain basic skills in caring for agricultural crops. And after that you can easily increase the scale and make a separate building with a larger area.
- Seedlings - even if you have a large separate greenhouse, a small lean-to building will not be idle, because it can be adapted for growing seedlings. The small usable area of the structure will not be a hindrance - using racks, gardeners place a large number of cucumber, tomato and other seedlings in lean-to greenhouses. At the same time, in such a small volume, creating an optimal climate for plants is much easier and, importantly, cheaper.
- Savings - a lean-to greenhouse next to a fence or wall requires less building materials than a free-standing greenhouse. In addition, connecting lighting, heating, automatic watering and forced ventilation will cost you much less - there is no need to conduct communications through half the site.
- Reliability – a greenhouse with a pitched roof attached to the house rests on a strong solid wall. In addition, a fence, cottage or other structure protects from strong winds.
- Heating – a greenhouse with a pitched roof placed on the south side of the house will be less exposed to frost or cold. In addition, a certain amount of heat from the house will penetrate through the main wall.
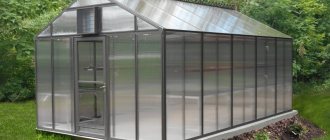
Wall-mounted lean-to greenhouse made of monolithic polycarbonate
Simple options for wall-mounted lean-to greenhouses
A smaller version of a greenhouse with a pitched roof, used for growing seedlings in racks
This design is not without its drawbacks. It was already mentioned above that most greenhouses with a pitched roof, built against a wall, have a small usable area. And while this has its advantage for beginning gardeners, for experienced gardeners the opposite is true - you cannot grow many vegetables, berries or flowers in such a structure. In addition, some believe that a greenhouse with a pitched roof attached to a wall or fence receives significantly less sunlight than buildings located in an open area.
Another difficulty that accompanies greenhouse extensions with a pitched roof is the need to carry out work near the house. This includes noise, construction debris, and the possibility of inadvertently damaging any communications laid under the house. Therefore, when planning to build a greenhouse with a pitched roof near your cottage, find out where the underground pipes and cables run.
Lean greenhouse
Required materials and tools
In order to independently make a lean-to wall greenhouse made of polycarbonate on a metal frame, you will need the following materials:
- wooden beam for foundation construction;
- profiled pipe for the frame;
- polycarbonate sheets;
- fastening elements (anchor bolts, self-tapping screws);
- corners and loops.
Advice! The thickness of the sheet should be selected taking into account the time of use of the greenhouse: if for year-round use, then the thickness should be 15 mm, and for seasonal use, 6-8 mm is sufficient.
During the installation of a wall-mounted polycarbonate greenhouse, the following tools may be required:
- yardstick;
- square and building level;
- saw for wood and metal;
- a circular saw for cutting polycarbonate (you can use a construction knife);
- hammer;
- screwdriver;
- welding machine and electrodes.
Summing up
The article examined options for placing greenhouses on the site from the point of view of the convenience of its owner and the comfort of the plants.
But what about the distance to the neighbor’s fence - what should it be? According to the standards prescribed in SNiP, no matter how many acres you have, the distance between outbuildings and the fence is at least 1 m. But in general, it is better to increase this distance, since snow will inevitably accumulate in this passage in winter. What to avoid when placing a greenhouse
Excavation
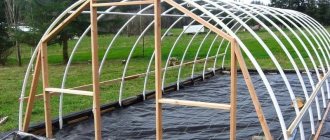
The very first thing that needs to be done is to clear the construction site. Be sure to remove all debris, remove weeds and other vegetation. If there is a flooded blind area near the wall of the house, it should be dismantled. Afterwards, the surface of the site is leveled and excavation work begins.
Mark the contour of the foundation using pegs or small pieces of reinforcement and rope. Then, along the marked border, they dig a trench of the required depth for laying the timber frame (the depth and width of the trench should be slightly larger than the cross-section of the timber). A sand cushion is formed at the bottom of the trench, followed by leveling the sand using water and a tamper. Afterwards you can begin building the foundation.
Take a fresh look at the area
The installation of a greenhouse will depend on the type and location of the plot you receive. If you are planning to develop a completely new and free plot of land, you have some room to turn around. And you have many options for the location of the greenhouse. It’s worse if the area is already partially sown and planted with trees - in this case, the “room for maneuver” is significantly reduced.
Before installing the greenhouse, the site should be cleared of debris and all holes should be filled.
There are at least four important factors that you definitely need to pay attention to so that the planning and construction of the greenhouse goes smoothly.
- Characteristics of a dacha landscape . These include the presence of slopes, elevation differences, groundwater levels, the presence of reservoirs, the depth of soil freezing, etc.
- Location relative to the cardinal directions and the movement of the sun, as well as the general illumination of the area. Plants in a greenhouse should receive maximum light per day - the speed of their growth and maturation directly depends on this. Therefore, greenhouses cannot be placed in the shade of trees, houses or other buildings.
- The composition and quality of the soil in the proposed location of the greenhouse.
- Convenience of placement.
Sometimes all the factors are not in favor of installing a greenhouse (the site is on a slope, groundwater is close, the soil is heavy and poor, there is an abundance of shade on the site). In this case, it is better to abandon the construction of a greenhouse altogether, since it will be impossible to achieve good harvests. If all components of the site are more or less favorable for the placement of the greenhouse, you can proceed to detailed planning.
Foundation
For the construction of a foundation, a beam with a cross section of 100x100 mm or 150x150 mm is suitable. It is measured and cut according to the required dimensions. Before laying in prepared trenches, lumber must be treated with an antiseptic.
Advice! For the foundation for a wall-mounted greenhouse, it is best to choose larch timber, as it is characterized by high strength and moisture resistance.
Immediately before laying in the trench, the beams must be connected to each other. The connection can be made using a metal corner and self-tapping screws; fastening with dowels is often performed by connecting “into a paw” or “in half a tree”.
The resulting box of beams is then carefully placed in the trench, after which the box is leveled horizontally using a level.
The last thing to do is fix the foundation made of beams. This can be done in two ways:
- Drill a through hole in the beams at the junction, and then drive a metal rod at least 50 cm in length into the ground through it.
- Install metal pins 50 cm long at the inner corners, driving them firmly into the ground.
After the foundation of the greenhouse is securely fixed, you can begin to assemble the frame for the extension to the house.
Lean greenhouse - design
Before any construction work there must be a planning stage; in the case of a greenhouse with a pitched roof, it consists of the following steps:
Lean greenhouses
We will consider each of the actions one by one, with tips and recommendations.
Definition of tasks. At first glance, this action looks redundant - why think about what a greenhouse is needed for, if it is already known that it is required for growing plants. But what kind of crops will it be? In what quantity? How tall can they grow? Will it be just seedlings or full-fledged fruit-bearing bushes? Are there plans to grow crops in late fall and winter? Take a piece of paper and a pen, write down the questions above for yourself, and answer them. Everything you decide will affect the design of the greenhouse and the construction process in the future.
Choosing a location. Start by determining the cardinal directions on the site - a greenhouse with a pitched roof should be placed on the south side of the house, garage or fence. If for some reason this is not possible, give preference to the eastern side. In addition, note whether there are tall bushes, trees and other structures near the site for the greenhouse - they should not obscure the future building, the plants in it should receive maximum sunlight and heat.
Optimal location of the greenhouse on the cardinal points
A greenhouse with a pitched roof does not have to be located just next to a house or a fence - there are buildings that stand separately
Definition of design. If you need a winter greenhouse that can provide optimal conditions for plants even in extreme cold, then you will need a fairly deep foundation that protects the soil (or floor) in the building from freezing. For the summer option, you can get by with a base made of antiseptic-treated timber with a cross-section of 100x100 or 150x150 mm.
Wall greenhouse frame
Another example of a wall-mounted lean-to greenhouse frame
Scheme of a lean-to greenhouse-thermos
As for the structure, it is divided into the following elements.
- The foundation has already been discussed above.
- The lower frame frame is beams laid on the foundation along the perimeter of the walls of the future greenhouse. It is very important to firmly connect the harness to the base of the structure.
- Vertical corner posts are the main load-bearing elements of the structure and must be strictly vertical. A reliable connection to the bottom harness is required.
- Intermediate corner posts are also load-bearing structural elements, but the requirements for them are somewhat milder.
- The upper frame frame consists of horizontal beams mounted on vertical posts. The final element of the walls of the greenhouse is used as a support for the rafters, which is why it is sometimes called the Mauerlat.
- Rafters are load-bearing elements of the roof; sheathing is laid on them. They are characterized by the angle of inclination of the slope, directly proportional to the snow load in a given area. The higher the load, the larger the angle should be. The edges of the rafters should extend some distance beyond the walls, forming a cornice.
- Struts and jibs are additional frame elements that are installed between the vertical posts and under the rafters. Necessary to strengthen the greenhouse structure and prevent displacement of the main frame elements.
- Sheathing – installed on the frame of the greenhouse. In our case it is cellular polycarbonate.
- Doors and vents - serve to enter the greenhouse and ventilate it.
3D model showing the structure of a greenhouse with a pitched roof. 1 and 2 – lower and upper frames, respectively, 3 – vertical posts, 4 – rafters, 5 and 6 – vents and door
Recommendation! Most greenhouses with pitched roofs have a floor level to the ground and sit on a foundation dug into the ground. But in some cases it is advisable to make a pit 1.2-1.5 m deep and thus dig the greenhouse into the ground. The result is a thermos greenhouse with a pitched roof, where the soil plays the role of a kind of heat insulator, and only the upper part of the walls and the roof are located above ground level. But you should understand that such a design turns out to be quite expensive and complex.
Thermos greenhouse with pitched roof
Prices for cellular polycarbonate
cellular polycarbonate
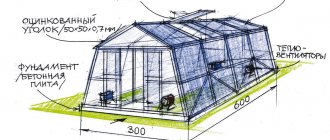
Dimensions. The length and width of a greenhouse with a pitched roof are selected based on the budget and the number of plants that are planned to be grown in it. In this case, the length of the structure should not be greater than that of the wall to which it adjoins. The width can vary from 2 to 4 m; when choosing it, also take into account the space for passage between plants - the process of caring for and harvesting should be comfortable and safe.
The height of a greenhouse with a pitched roof is limited by the height of the wall to which the building adjoins, and is selected based on the comfort of work (it will be more difficult to work in a structure that is too low), the temperature regime of the plants and their maximum possible height. In this case, two heights are determined - for the outer wall and for the one adjacent to the house or fence. On average they are 160-180 and 210-250 cm, respectively.
Drawing of a lean-to greenhouse (side view)
Greenhouse drawing (front view). Dimensions are given as an example and are indicated in centimeters
Materials. The choice of foundations depends on the design - it can be either larch beams, concrete, or brick blocks. As mentioned above, cellular polycarbonate is used as cladding - a durable, lightweight and transparent material that can last 8-10 years with proper installation. All that remains is to make a choice of what to build the greenhouse frame from. The main materials suitable for this are shown in the table below.
Table. Materials for the frame of a greenhouse with a pitched roof.
| Title, photo | Peculiarities |
| Wooden beam | Simplicity and manufacturability of processing. Subject to technology and careful construction, it has an attractive appearance. Requires protection from high humidity, rot and pests. |
| Profiled pipe | Used to construct a durable metal frame. For connection you can use bolts, screws or welding. The material requires constant monitoring of the integrity of the anti-corrosion coating at all stages of construction. |
| Polyvinyl chloride profile | Cheap and lightweight material for the frame. It is easy to assemble. In terms of strength, it is slightly inferior to metal and wood; at high temperatures, it changes its dimensions upward. |
Having understood the design, dimensions, materials used and other features of a greenhouse with a pitched roof, draw up an approximate drawing of the structure on a piece of paper or on a computer, preferably in several projections. During the upcoming construction work, the plan will help prevent annoying mistakes.
An example of a simple drawing (here - a recessed lean-to greenhouse)
Recommendation! When purchasing building materials for a greenhouse, take with a margin of 10-15%. The reserve will allow you, in the event of damage or defectiveness of some part of the materials, not to interrupt construction in its midst.
Creating a wireframe
To create a frame, it is best to use a profiled pipe with a cross-section of 40x20 mm for frames and 20x20 mm for spacers. Measure the required length and cut the required number of pipe sections. Then they begin to attach the inside of the frame to the wall. To do this, you can use brackets or clamps. If the wall material allows, then you can fasten the pipes using dowels. External supports are also fixed
Important! There must be a gap of at least 40 cm from the overhang of the roof of the house to the highest point of the wall-mounted greenhouse. Otherwise, icicles growing from the roof of the house can damage the roof of the greenhouse.
Then horizontal transverse pipes are installed from the internal pipes, which are directed from the wall to the external supports. They are fastened (you can make a screw connection or use welding). Then they begin to install the rafters. Their tilt can be arbitrary, but not less than 30 degrees. The length of the rafters should be such that they extend beyond the outer edge of the frame up to 25 cm. Also at this stage it is necessary to consider the presence of a window in order to create natural ventilation inside the wall-mounted greenhouse.
If they plan to make an attached greenhouse to the house more than 2 m, then the installation of additional spacers is required.
Upon completion of the frame assembly, it is advisable to paint the profiled pipe to prevent corrosion.
How to place two greenhouses on a site
If you decide to install not one, but two greenhouses at once, it means that the size of your plot allows this. All that remains is to decide on their relative position. The ideal option is to place the frames side by side, with a step of 80-100 cm. At a minimum, this will make it possible to walk between the greenhouses and remove debris or snow.
If the length of the site allows, the greenhouses can be joined at the ends in one line or perpendicularly, which will save space and simplify the laying of communications.
Options for placing two or more greenhouses:
PENTAX Image
Greenhouse on the roof
The lack of building space forces people to get creative when figuring out where to place a greenhouse. The option with a used roof is not the worst. It is advisable to include it in the design, although some manage to redo the existing roof.
Greenhouse on the roof
This option can only be implemented on a reinforced concrete floor (read the article on how to make floors in a house), taking into account the weight of the soil and ensuring the proper level of waterproofing. Although, in our opinion, remodeling the roof is not economically feasible. After all, this is how much vegetables need to be grown in a greenhouse for these costs to be recouped! It’s another matter when you are building a new house with a glazed roof, and instead of a winter garden you want to organize a greenhouse there.
House with a winter garden on the roof
Covering the greenhouse with polycarbonate
Before installing polycarbonate, you first need to cut it correctly. One of the disadvantages of this material is its fragility, and if it is cut or fastened incorrectly, there is a great fear of breaks and cracks. Therefore, it is recommended to make cutting at a distance of 4-5 cm from the intended drilling location.
After cutting the polycarbonate sheets to the required sizes, drill holes for fasteners. The finished sheets are applied to the frame with a stabilizing coating and secured. The connection of polycarbonate sheets can be done using:
- thermal washers;
- rubber gaskets;
- plastic profiles.
It is better to make the door to the polycarbonate greenhouse attached to the house in one of the side walls. For installation, you can use a ready-made door frame of suitable size. First, two pillars and a transverse lower crossbar are installed. The door hinges are fixed to one of the support posts, then the door itself is installed.
After completing the construction of a wall greenhouse with your own hands, you need to seal the building. For this purpose, special silicone-based sealing compounds are used.
Main types of structures
Greenhouses attached to the house are very convenient to use. Firstly, less materials will be needed to create and maintain them, since 1 of the walls of the building will be part of the house. Secondly, you can use the area that was previously empty. To preserve all the advantages of the extension, we came up with several basic options for its placement.
There are currently 3 common types:
- Bay window - an extension protrudes in a certain direction and stands out strongly against the background of the facade, but is small in size.
- Void-filling - the greenhouse is located between other structural elements so that it fills the empty space. A very convenient option because maximum space is used.
- A continuation of the main structure - the greenhouse is made in the form of a natural extension of a country house. Most often it occupies the entire wall, therefore it is the largest type of such extensions.
Ideas for greenhouses attached to the wall of a house
Below are interesting ideas for building a wall-mounted greenhouse to the wall of a house, garage or fence.