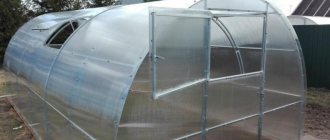
The beautiful and stylish greenhouse “Signor Tomato” appeared on the market in 2009, and immediately received the title “New”. After all, the absence of analogues of its design is even confirmed by documents from Rospatent of Russia. Its unique PVC profile was developed by a whole group of designers and designers and has no analogues like it. That is why, already in the first two years of its appearance on the market, “Signor Tomato” became a sales leader, and today it is rightfully considered one of the best greenhouses that exist today.
The width of the “Signor Tomato” greenhouse is 3 m, height – 2.10 m, length – 4-6-8-10 m. If desired, the length of the greenhouse can be made to any size due to special inserts, but it must be a multiple of 2 meters. It gained its popularity primarily due to the simplicity and reliability of its design.
The already familiar PVC plastic, from which warm and stylish windows and doors are made today, can withstand temperature changes from -50 to +70 degrees, and their service life is at least 40 years. Moreover, PVC does not emit any toxic substances into the atmosphere, so the Signor Tomato greenhouse is absolutely safe in environmental terms for both humans and plants.
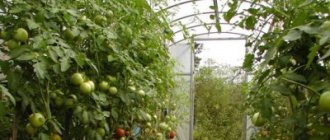
And finally, the Signor Tomato greenhouse has a particularly long service life - more than 10 years. Most often, “Signor Tomato” is used for planting tomatoes and sweet peppers, but not only tomatoes, but also many other garden crops can be grown successfully in this greenhouse: onions, radishes, etc.
The main advantages of the Signor Tomato greenhouse
The main trump card of “Signor Tomato” is the frame, which is made of modern PVC material, which is quite durable and aesthetic, due to which the greenhouse can easily withstand severe snow loads and sudden temperature changes. Even if there is frost in early spring, the crops will be preserved, making it possible to plant early crops in this greenhouse. The roof is an arched ceiling, where a special smooth ultraviolet film on polycarbonate helps the snow slide off on its own. And inside the greenhouse there are additional internal stiffeners, which makes the structure so durable.
In addition, the PVC frame, unlike the metal one, does not require painting at all and is not subject to corrosion, and unlike wooden ones, it does not absorb moisture at all. Polycarbonate only needs to be installed once, without being removed for the winter. Profile dimensions – 40x40 mm. In total, the greenhouse has two doors and two windows, which effectively ventilate the greenhouse, which is very important during the flowering period of the plant, because excessive heat seriously impedes pollination. It does not require a foundation; Signor Tomato is attached using special legs made of a plastic profile by deepening them 30 cm into the ground.
They even jokingly say that you can safely play football near their greenhouse - the structure of the greenhouse is so strong that it is not afraid of even strong blows.
Growing and caring for seedlings
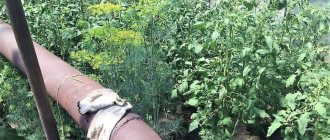
Growing tomato seedlings is perhaps the most crucial period in the entire cycle of growth and development. After all, without high-quality and healthy bushes, you won’t get strong, strong, well-bearing plants. Therefore, it is so important to pay special attention to the process of growing seedlings. How to avoid making mistakes and, having achieved good seed germination, get strong bushes and a good harvest later? Just follow the instructions.
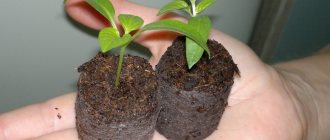
Tomato seedlings
Step 1. Prepare the soil for seedlings. You cannot sow seeds in soil collected anywhere. It is best to take turf soil from your plot in the fall (not from the greenhouse) and leave it in bags on the balcony or outside - this will rid the soil of weeds and pests.
Soil for seedlings
Step 2. Around January, bring the soil home, sift through a large sieve, removing sticks, pebbles and other debris - the soil should become light and clean. Spill it with water and put it out in the cold again. After a few days, bring it in and let it thaw again.
The soil for seedlings must be cleared of debris.
On a note! Freezing does not always protect against infections, which is why some summer residents advise additionally steaming the soil. To do this, soak it in a water bath for 2-3 hours.
Step 3. Now prepare the soil mixture - mix the soil with peat and humus in a ratio of 1:1:1, lightly moisten and add coarse sand, superphosphate and ash (based on a bucket of soil - a liter of sand and a tablespoon of ash and superphosphate). If you use ready-made soil from the store, then additional fertilizer is not required.
Preparation of soil mixture
Step 4: Disinfect the seedling boxes by at least rinsing them thoroughly under running water. Containers should not be less than 7 cm in height.
Container for seedlings
Step 5. Fill the boxes or cups for the seedlings with soil, water them and let them sit for a couple of weeks.
The container is filled with soil
Step 6. Start preparing the seeds. Dilute a little Fitosporin-M and place the seeds in the resulting solution for 15-20 minutes, and then soak in any growth stimulant.
Seeds need to be prepared
"Fitosporin-M"
Prices for Fitosporin-M
phytosporin
Step 7. Make small grooves about 1.5 cm deep in the pre-moistened soil and place the seeds in them at a short distance from each other. Sprinkle with soil and cover with plastic wrap immediately or 3-5 days after planting the seeds.
You need to make small grooves in the moist soil
On a note! Tomato seeds are sown around February-March, although this largely depends on the specific variety. However, these are the approximate dates.
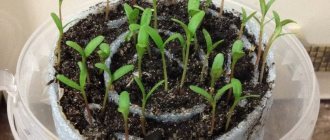
Step 8. Place the boxes with the sown seeds in a warm room where the air temperature does not drop below +22 degrees.
Containers for seedlings on the windowsill
Step 9. After the first shoots appear, slightly reduce the air temperature in the room with the seedlings, but maintain at least +18 degrees during the day.
Tomato shoots
Step 10. Do not forget that the plants must breathe - open the film slightly, and eventually remove it altogether.
Step 11. Water the seedlings with warm water, gently under the roots (it is especially important to be careful while the plants are still very tiny).
Watering seedlings
Prices for tomato seeds of different varieties
tomato seeds
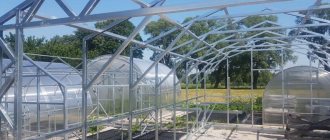
Features of assembling such a greenhouse
According to the manufacturer, assembling the Signor Tomato greenhouse is no more complicated than a basic children's construction set. And, of course, any summer resident can do it. The assembly instructions are extremely simple and clear.
“Signor Tomato” is supplied in 5 packages, each weighing up to 50 kg. All necessary fasteners are already included in the kit. All that needs to be done during assembly is to insert the frame parts into each other and fix them with self-tapping screws. In total, five packages will contain:
- Direct parts with instructions.
- Arc details.
- Straight pieces for ends.
- Clamps with accessories.
- Insert 2 m.
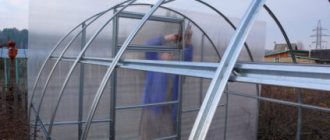
The polycarbonate is attached to the PVC profile with self-tapping screws and a rubber gasket.
In total, installation will take at most three hours. The only tools you will need are a screwdriver, a marker, a tape measure and a sharp knife. The packaged greenhouse itself is so compact that it can be easily transported by car.
Video with assembly example #1:
Video with assembly example #2:
Soil preparation
To a bed of loamy or clayey soil, add one bucket of peat, sawdust and humus per 1 m2. If the beds are made of peat, then add one bucket of humus, turf soil, sawdust or small shavings and half a bucket of coarse sand. In addition, add 3 tablespoons of double granulated superphosphate, 1 tablespoon each of potassium and potassium sulfate, 1 teaspoon of urea or sodium nitrate, 1-2 cups of wood ash and dig everything up. And before planting, seedlings are watered with a solution of potassium permanganate at a temperature of 50–60 C (1 g of potassium permanganate per 10 liters of water) at the rate of 1.0–1.5 liters per hole.
Correct operation
A properly assembled greenhouse does not require special operating conditions, however, it is recommended to follow the basic rules of care (especially for the winter period).
Winter care
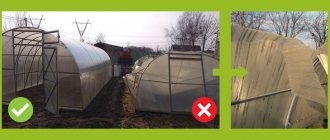
The greenhouse design can withstand a snow load of up to 80 kg per 1 m², which approximately corresponds to 13–15 cm of compacted snow or 25–30 cm of loose snow, immediately after a snowfall. On a sunny day, snow can slide down the arched roof slope on its own, but after heavy snowfall it is better to clear it with a blunt wooden tool.
The greenhouse frame can be equipped with additional supports along the entire length (in 1 m increments) to enhance its strength. You should also take extra care when opening doors and vents, since the PVC profile becomes less durable when the air temperature drops significantly.
Greenhouse care in summer
In the warm season, product care consists of cleaning the attachment points and monitoring the integrity of the structure. In case of shifts, they must be eliminated manually. During the summer heat, regular ventilation inside may not be enough, so the transparent roof may need to be shaded. Polycarbonate is sprayed with a chalk solution, which is then washed off with water.
Seed selection
When choosing varieties of tomato seeds and hybrids for a greenhouse, you should opt for disease-resistant, self-pollinating species with a growing season of up to 4 months.
Self-pollinating varieties and hybrids of tomatoes for a greenhouse are a guarantee of obtaining a harvest, because it is not always possible to place more insects for pollination indoors.
If the height of the structure allows, preference should be given to the seeds of tall tomatoes for the greenhouse in order to make maximum use of the space inside it.
To get a harvest in the shortest possible time, you must definitely choose early tomato seeds for the greenhouse. It is also worth planting mid-early varieties or hybrids in order to harvest in stages.
The best varieties of low-growing tomatoes for the greenhouse:
- Valentina;
- Banana legs;
- Oak;
- Aphrodite F1;
- Benito;
- Amur standard;
- Swamp.
The best tall tomato varieties for a polycarbonate greenhouse:
- Mystery of nature;
- Cho-chio-san;
- Evpator F1;
- Black icicle.
By choosing the best tomatoes for the greenhouse, you will ensure a large harvest in the future.
Design of the “Signor Tomato” model
The Signor Tomato greenhouse is the brainchild of . The model is produced in four sizes – from a small building 2*3 to a structure 3*8 m.
Frame Features and Benefits
The frame of the greenhouse is made of durable PVC profile that does not rust, does not absorb moisture, does not rot, and can withstand temperature changes, gusts of wind and snow weight up to 30 kg per 1 m. sq. The uniqueness of PVC, or more precisely, polyvinyl chloride, is that it is an innovative material belonging to the group of thermoplastics, durable and resistant to alkalis, solvents and corrosion.
Features of the “Signor Tomato” greenhouse frame:
- section 40x40 mm;
- service life: up to 40 years;
- tolerates temperature changes: from -50 to +70 degrees;
- resistant to chemicals, moisture, corrosion;
- environmentally friendly.
The PVC profile is not only wear-resistant and reliable, it is also an aesthetically comfortable material: even, smooth, without roughness or nicks, and does not cause unpleasant sensations when touched. Polyvinyl chloride does not heat up in the sun and does not freeze in frost, remaining outwardly as good as new even after many years of use.
There is no need to treat PVC with antiseptics against insects and paint, but you can safely clean it with any detergents. With such a base, “Signor Tomato” will serve well for many years.
Factory equipment of the model
The set of the Signor Tomato greenhouse consists of 5 packages.
When purchasing a greenhouse, the kit includes all the parts for assembly, as well as detailed instructions. The simplicity of the design allows you, armed with a set of construction tools, not to seek help from specialists, but to install the frame yourself.
The kit includes:
- straight parts for the side walls of the greenhouse;
- upper arches;
- parts for ends;
- clamps with accessories;
- cellular polycarbonate 3 sheets: 2.1 x 6 m, 4 mm thick;
- instructions.
Depending on the size of the future greenhouse, the frame can be made longer by 2, 4 or more meters by purchasing additional packages with additional sections. When installing a greenhouse, it is not necessary to build a foundation. The structure has legs made of the same profile as the frame parts, which are simply dug into the soil 30 cm. After installing the frame and covering it with polycarbonate, the structure acquires a stable position that can withstand winds and bad weather.