The basis of the strength of any greenhouse is the frame, for the manufacture of which you need to use the strongest and most durable materials. Many summer residents build greenhouses on a wooden frame to save money and time, but if you want the greenhouse to last for a really long time, you should give preference to more reliable materials. A galvanized profile is considered one of the best for the construction of greenhouses: it is quite easy to work with, and the finished structure has high strength and a long service life.
In this article we will look at the main pros and cons of polycarbonate greenhouses, and also consider the main stages of building such a structure with your own hands.
Pros and cons of galvanized profiles in greenhouse construction
Even a beginner who has no experience in construction can assemble a profile frame. He will need an electric jigsaw, a screwdriver and a drill. Metal profile is a durable material, but its cutting is often done using an ordinary saw (if a jigsaw is not at hand).
Galvanization corrodes less often than other materials. It does not require painting or the use of anti-corrosion agents. The durable and lightweight frame can be assembled, disassembled and installed in another place at any time.
Advice! If you wish, you can immediately buy a ready-made frame. It is sold unassembled. A diagram is attached to the set of parts, according to which the structure will be easy to assemble.
The disadvantage of the material is that it cannot withstand much weight. If there is wet snow more than 5 cm thick on the roof of the greenhouse, the structure will not withstand the weight and may collapse. That is why greenhouses are most often made with arched or gable roofs. Thanks to this shape, snow and other precipitation does not accumulate at the top.
The metal profile is resistant to corrosion. On the other hand, if the integrity of the zinc coating is damaged, corrosion penetrates into the metal. In this case, it must be painted with durable paint.
Additional rigidities
After all the profiles are secured, you can make sure that the frame is level and practically does not wobble, but to be completely sure that the greenhouse will withstand all adversities, additional rigidities can be placed in each opening between the profiles diagonally from corner to corner. This kind of fastening is considered the most durable, and you can even put your entire weight on the finished greenhouse structure and it will not bend.
Drawings of greenhouses and greenhouses made of profile pipes, diagrams with dimensions
When drawing up a diagram of a greenhouse or greenhouse from a profile, you must rely on its length.
For example, elements of an arched structure should be located at a distance of 1 m from each other. Thus, for a 3*6 greenhouse made of a square pipe, you will need six profiles in the form of arcs. The standard length of the profile is 6.1 m. It will make a semicircle with a radius of 1.9 m.
Helpful information! If you plan to make the walls of the structure from cellular polycarbonate, it is better to choose a greenhouse height of 1.85-1.9 m with a bottom width of 3.7-3.8 m. This will help save on materials, because standard sheathing sheets 6*2.1 m.
When constructing a greenhouse with a gable roof, the height of the walls should be 1.7-2 m and the width 4 meters (with a slope of 30-45 degrees, length 2.25-2.45 m). Jumpers on such a structure are mounted in the upper part of the arches and in the middle of the slopes (2 pieces on each side). The back wall must be secured with a pair of crossbars. There is an opening for the door on the facade. Based on its dimensions, the amount of additional material is calculated.
The best profile for a greenhouse is a profile with a wall thickness of 2 mm or more, with a cross-section of 4*2 cm or 4*4 cm. It is highly durable. For horizontal screed, pipes with a thickness of 1-1.5 mm are suitable.
The drawing must indicate the exact dimensions - length, width, height. Without accurate measurements, it will not be possible to build a high-quality and durable structure.
Based on the size, the required amount of materials is purchased. It is important to consider that pipes should always be taken with a margin of 10% (in case they suddenly become damaged during transportation or installation). First you need to draw up a drawing, then calculate the amount of material for construction.
Stiffness and additional skates
When the back and front walls are ready, you need to cut profiles to fit the height of the greenhouse and bend additional skates. The distance between the rigidities must be clearly measured, since polycarbonate has standard dimensions, and in order not to cut each sheet to length, it is easier to install the ribs to the required size.
The standard size of polycarbonate is 2.1 meters, but this is too large a distance, which means it needs to be divided by two, and it turns out that the distance between the rigidities should be 1.05 meters. Based on this, the number of required profiles and skates is calculated. We also immediately cut off four pieces corresponding to the length of the greenhouse.
Step-by-step instructions for building a greenhouse with profile pipes and coating materials
Let's look at how to make the simplest arched structure. Before making a greenhouse, you need to think in advance about the necessary tools. Will need:
- shovel for leveling the area;
- drill for installing racks;
- grinder for cutting pipes;
- screwdriver for installing fasteners;
- pliers and hammer;
- measuring instruments (angle, level, tape measure);
- welding machine;
- a hacksaw if the walls are planned to be made of polycarbonate;
- wooden stakes and rope for marking the area.
It is recommended to install the greenhouse on sandy, dry soil to avoid stagnation of moisture. The long side of the structure should face the south side so that the crops receive maximum light. It is also important to take into account design features during installation. So, for gable and arched greenhouses, the longitudinal axis should have a direction from north to south, a deviation of 15-20 degrees is acceptable. And if, for example, you decide to build a simple greenhouse with a pitched roof, the slope must be made to the south.
In the selected area you need to make markings using pegs and rope. And also dig a trapezoidal trench into which to pour biofuel to quickly warm the soil.
Foundation
For a profile greenhouse, a columnar foundation will be sufficient:
| Illustration | Actions |
| Make holes in the ground located at the same distance from each other. Their diameter should be 1-1.5 cm larger than the circumference of the posts. | |
| Place asbestos pipes inside. Fill the gap between the pillars and the ground and compact it with a sand-crushed stone mixture. | |
| Pour cement inside the pipes so that there are no voids. Place a metal plate or piece of reinforcement into the concrete. In the future, they will become the connecting link between the foundation and the frame. |
For an arched greenhouse, you can also make a strip foundation, but this will take more time.
Cold and hot pipe bending step by step
To give the pipes an arc shape, you can contact specialized companies; they will bend them using special equipment.
You can do this yourself in several ways. One of these technologies is called cold. For cold bending of pipes, a spring with a diameter such that it can be inserted inside the profile is used. Thanks to the spring property, it is possible to change the cross-section and change the shape.
If the profile is less than 1 cm, it does not require filler. When the pipe is thicker, you need to pour rosin or sand inside. In winter, you can pour water and wait for it to freeze.
Another technique is called hot, because. produced by heating profiles. It can be used at any time of the year. It is recommended for pipes with large thicknesses. To carry it out you will need a manual, factory or stationary pipe bender.
Step by step steps:
- Make a pair of plugs for both ends of the profile. Their length should be 10 times greater than the width of the base. The wide part is 2 times the circumference of the pipe opening.
- Make grooves in one plug to allow gas to escape when heated.
- Heat the pipe bend.
- Sift and dry the river sand. Heat on a sheet of metal to 150 degrees until the moisture has completely evaporated.
- Install a plug without gutters on one side of the profile.
- Pour calcined sand from the other end, periodically tapping the walls so that it compacts.
- Attach the second plug.
- Mark the fold location with chalk.
- Fix in a vice, placing it on the template.
- Heat the metal until red and bend it with a smooth, precise movement.
- Compare with the template, if everything is correct, you can remove the plug and shake out the contents.
Note! If the profile has welding seams, after bending this line should be located on the side. It is not advisable to bend along it.
Installation of arches
If you plan to make the greenhouse collapsible, then it is recommended to use bolts for fastening. They are also used to secure the doors (by the way, they are often used for greenhouses, for example, the Butterfly or Bread Box design). If the structure is stationary, it is better to weld its elements.
It is necessary to cut the racks to which the arcs are later attached. Also required are strips that will connect the bent pipes. The joints are fixed with crabs or a welding machine. The frame is placed on the foundation and attached to metal plates or reinforcement.
Helpful information! If there are welding seams, it is recommended to seal them with a primer. This will make the structure more reliable.
Sheathing
The following materials can be used for cladding:
| Type of coverage | Advantages | Flaws | Material cost |
| Polyethylene film | It's cheap Easy fastening. Quick replacement. Little weight. Ideally attached to the zigzag profile. | It quickly becomes unusable (service life is about 2 years). Deteriorates under the influence of ultraviolet rays and breaks easily. It transmits light poorly and poorly insulates. | From 30 rub. per linear meter or from 3000 rubles. per roll (1 m * 100 m) |
| Non-woven fabric | The service life is longer than that of film, about 5 years. It allows sun and moisture to pass through well and protects crops from aggressive environmental influences. | It breaks easily, for example, under strong gusts of wind. | 20-150 rub. / lm (depending on thickness) |
| Glass | Available in many areas after renovation. It transmits sunlight well, protects from frost and retains heat inside. Tomatoes, cucumbers, peppers, etc. grow well in such a greenhouse. Fire resistance (for those structures that are heated additionally). Low sensitivity to temperature changes. Easy to care for. | Difficult to install. High fragility. In hot weather it lets in too much light, in cool weather it cools the greenhouse too much. Heavy weight. | Window glass – from 800 rub. per sq.m. |
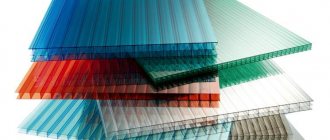
| Polycarbonate | Solid polymer with high strength and low weight. Provides diffused light, retains heat well, is fairly easy to install, fire resistant, and durable. Perfectly protects against UV rays. | High price. Intensity of thermal expansion. | From 1000 rub. per sheet |
Note! If the structure will stand in winter without a canopy, it is recommended to use polycarbonate sheets for cladding, because they can withstand the weight of snow.
There are disadvantages
When there is heavy rainfall in winter, there is a risk of deformation of some elements. To avoid these disastrous consequences, experts advise not to forget about maintaining the aluminum profile greenhouse; it is necessary to promptly clear the snow on the roof.
When designing, a similar nuance is provided in advance; if you reduce the distance between the arches, then problems can be avoided; only careful thinking through the actions and strict adherence to the scheme will bring success.
Some owners use a removable roof; in winter this part is dismantled, and the partitions will not succumb to excessive loads, and the components are reattached according to the season.
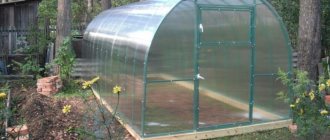
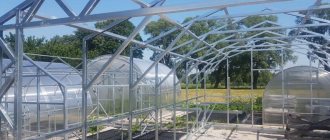
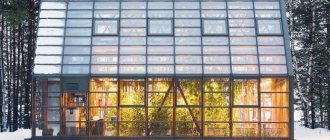
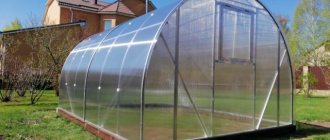
Galvanized greenhouses made of polycarbonate or under film
Since a galvanized profile frame is not able to withstand heavy weight, it is better to use film or polycarbonate as a covering. Film coating is considered a budget option, but the film does not have a long service life and will have to be changed periodically.
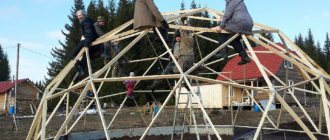
Figure 1. Photo and drawing of galvanized greenhouses
Polycarbonate is a better investment. Despite the fact that its cost is significantly higher than conventional film, it will last much longer without loss of light transmission. At the same time, both film and polycarbonate have one common advantage - they are quite lightweight and ideal for greenhouses made of galvanized profiles.
Made from galvanized steel profile
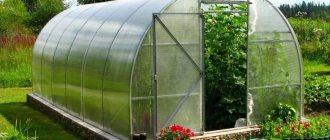
The construction of a building begins with choosing the type of structure, drawing up drawings and calculating the necessary materials. As mentioned above, gable and arched models are most suitable for buildings made of this material (Figure 2).
Drawings of the finished greenhouse can also be found on the Internet. As a rule, they clearly indicate the dimensions of the building, according to which you can calculate the required amount of material.
The construction of a greenhouse made of galvanized steel profiles is carried out using the following technology:
- Preparing the site and pouring the foundation: the soil in the selected area needs to be leveled, and then markings must be made along which the foundation will be built in the future. A concrete, brick or wooden base plays an important role in successful operation in the future, as it not only protects the internal space from drafts, but also provides reliable protection from the wind. If desired, a strip concrete foundation can be built under the building, but a simplified version of the foundation is made of wooden beams. To install them, a shallow trench is dug along the perimeter of the future greenhouse, several layers of roofing material are laid in it and timber is laid on top. At its corners you need to make grooves for connection, and in order to increase the strength of the fastening, the corners need to be additionally fastened with corners and self-tapping screws.
- Frame assembly: we will look at the construction of a frame from a steel profile using the example of a gable greenhouse. To do this, on a flat area you need to lay out a rectangle from the profile, the lower and upper parts of which form the width of the building, and the left and right parts form its height. The profiles need to be inserted into each other and fastened with self-tapping screws. There is no need to drill separate holes for fasteners, since galvanization is soft enough that even an ordinary screwdriver can pierce it. To ensure that the finished structure is strong and does not wobble, two self-tapping screws must be secured to each corner.
- Installing the walls and roof: After you have assembled the square base, find the middle of the top piece and draw a perpendicular line up from it. This will give you the mark for the top of the roof ridge. After this, you need to take the size from the corner of the square to the ridge of the roof and multiply the resulting figure by two. This way you will get the length of the required blank for the roof. After cutting off the desired piece of profile, make a mark in its center and make a cut in this place. This way you will get an already bent blank for a gable roof. Next, this part needs to be attached to the finished square. The result is a back wall. It is advisable to further strengthen it with stiffening ribs so that it does not bend under the weight of the roofing material and snow. The front wall is assembled in the same way, with the only difference being that a frame for the door is additionally installed in it. After attaching the end walls to the foundation, the required amount of profile is cut for the construction of the side walls. The length of the blanks must correspond to the height of the building. Next, these blanks are attached to the foundation, and the distance between them should correspond to the width of the polycarbonate sheet, divided in half (about 1 meter). After the vertical posts are installed, they are connected from above with a horizontal profile. It will be good if at this stage you have an assistant who will control the evenness of the supports. But, if one person will be engaged in construction, supports can be installed to secure the supports.
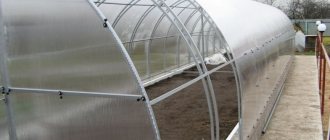
Figure 2. Construction of a frame from a profile
To make the structure more durable, you can install additional stiffeners. This will not only give the structure additional rigidity, but also provide the necessary protection from strong gusts of wind. Stiffening ribs are installed between all supports: for this, two pieces of profile are attached diagonally between all corners.
Made from galvanized profile pipes
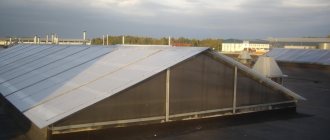
Unlike a galvanized profile, a pipe made of a similar material is more suitable for the construction of arched greenhouses. The fact is that it is difficult to give the profile a rounded shape, while the pipe can be easily bent at the desired angle using a special pipe bender tool (Figure 3).
Figure 3. Design options for galvanized pipes
As a rule, a pipe with a cross section of 25 x 25 mm is used for construction. A building made of such material has fairly high strength and durability, but a foundation must be erected for it.
From a technology point of view, the construction of a greenhouse from galvanized profile pipes is no different from the construction of a building from a profile. First of all, you need to make the upper and lower trim from the profile. After this, arcs are made from the pipe, which are attached to the foundation with bolts. The distance between the arcs should be about 50-80 cm, and the junction of the arcs with the harness is fastened with bolts or welding.
Galvanized tape for greenhouses
Another important stage of construction is coating the finished frame with polycarbonate. This is exactly why galvanized tape is needed (Figure 4).
Note: When traditionally fastening polycarbonate sheets, self-tapping screws or special thermal washers are used. But the use of tape allows you to make the structure more durable and stable.
Fastening polycarbonate to a frame using galvanized tape appeared relatively recently. Typically, this method is used for arched structures. In this case, each polycarbonate sheet is laid overlapping the previous one. Next, take the tape and lay it on top of the sheet. One end of it is secured at the base of the arc on the right side, and then thrown over the building and secured on the other side. After this, you need to connect all the arcs from the tape to each other with one or more transverse pieces.
Figure 4. Fastening polycarbonate using galvanized tape
The advantage of this method is that polycarbonate is fastened quickly, and the material itself is not damaged by holes for screws and washers. However, it should be taken into account that over time the tension of the tape becomes weaker and the polycarbonate sheets can be torn off by a strong gust of wind. You also need to remember that the coating secured with such tape can be easily removed, and this can be done not only by the owner himself, but also by intruders. Therefore, if you leave your greenhouse unattended for a long time, it is better not to use this method.
Foundation arrangement
Some readers may have doubts whether a foundation is needed for a greenhouse at all. On the one hand, this is not a heavy building, and the greenhouse is unlikely to sag under its own weight. But for a greenhouse without a foundation, there is always a risk that it will be blown away by the wind. In addition, the base laid under the greenhouse protects plants from drafts, freezing, rodents, insects and other pests.
Before starting to build the foundation, you need to choose the place where the future greenhouse will stand. Ideally, this should be a flat area with a minimum slope, rich soil, no shade from buildings and some kind of shelter from the north winds in the form of a fence or hedge.
Important! Do not place the greenhouse between two houses or next to such a place - this creates a “wind tunnel” effect, that is, constant and strong drafts.
Choosing the right location to install the greenhouse
The simplest and most affordable type of foundation is a timber structure. Arrangement of some other types is possible, but redundant. For your convenience, step-by-step instructions are provided below.
Step 1. Clear the area for the greenhouse from debris, stones and tall vegetation.
Step 2. Make markings. To do this, you can use pegs or pieces of reinforcement and a thread stretched between them.
Marking a site for a greenhouse
Step 3. Determine the condition of the soil. If it is sufficiently solid, then the timber foundation does not need to be deepened. Otherwise, there is a need to construct a trench.
If the soil is hard, then the timber foundation does not need to be deepened.
Step 4. If the soil is soft, then dig a trench along the perimeter of the greenhouse with the width of a beam and a depth of one spade bayonet.
Foundation trench
Step 5. Compact the bottom of the trench and add a layer of sand or gravel. The layer thickness should be 25-30% of the ditch depth.
Step 6. Measure and cut the timber to the length and width of the greenhouse.
Advice! It is advisable to use larch timber as a material for the foundation - it is resistant to rotting and mold.
Larch timber
Prices for larch timber
larch timber
Step 7. Treat the wood with an antiseptic. Alternatively, you can use copper sulfate, bitumen or used motor oil.
Timber treated with bitumen and joined “in half a tree”
Step 8. Assemble the timber into a rectangular box. Connections can be made using dowels or long half-wood self-tapping screws, or using galvanized metal corners.
Fastening beams to corners
Step 9. Transfer the timber box to the trench, lay it there and level it horizontally. To do this, you can use sand, earth or thin planks.
Step 10. Drill through holes in the corners of the timber box and insert 1 m long reinforcing pins there. Drive them into the ground. This is necessary to securely fasten the foundation of the greenhouse so that it will not be blown away by the wind.
In some cases, it is not necessary to drive pins into the wood itself - reinforcement dug into the inner corners can also protect the greenhouse from being toppled over by the wind
Step 11: Fill the gaps between the trench and the foundation with sand, gravel or soil.
Step 12. For additional protection of the timber, the foundation can be covered on top with a layer of roofing felt or other roll waterproofing.
Do-it-yourself greenhouse made of galvanized profile - step-by-step instructions
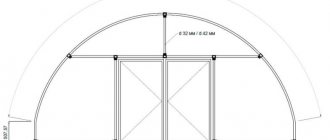
We discussed the process of building a gable greenhouse from a galvanized profile in previous sections. However, this option can also be used for the construction of arched buildings, but for this you need to use a special V-shaped profile (Figure 5).
Step-by-step instructions for construction look like this:
- Cut the profile into several separate pieces that will make up the arch. The optimal number of such blanks is 5 pieces per arch. To give them a rounded shape, use a pipe bender. As a result, you should end up with several blanks with different bend angles: one with the maximum (will be located at the top of the arch), two with a smaller angle (located on both sides of the central part of the top) and two more - almost even, since they will be attached to the foundation.
- In each part you need to drill several holes on both sides, and use them to fasten the arch parts with screws or bolts. To strengthen the structure, it is necessary to additionally attach jibs and crossbars to its internal part.
- Vertical posts, oblique cross members and a door frame are mounted on the pediment using corners and triangle plates. You also need to attach corners to fix the horizontal ties of the structure.
- The side and top horizontal ties should be secured to the pediment, and intermediate arches should be attached to the ties. These steps should be repeated until the full length of the greenhouse frame is complete.
- On the rear side, another pediment is installed (without a door frame) and the finished frame is secured to the foundation.
At the final stage, you need to check the strength of all fasteners and the symmetry of the structure. After this, you can begin covering the greenhouse with film or polycarbonate.
The process of assembling a greenhouse from a galvanized profile is shown in more detail in the video.
We carry out calculations and make a drawing
A greenhouse made from a plasterboard profile always begins with calculations. Here you will need to calculate the following indicators:
- perimeter of the building. To do this, you need to multiply the width of the greenhouse by its length;
- calculate the step for attaching the metal frame. In order for the building to be durable, the distance between adjacent profiles must be 100 cm;
- also, to increase the rigidity of the frame, oblique transverse bridges are sometimes used;
- Besides this, don’t forget about the door. It is best to choose a standard doorway width.
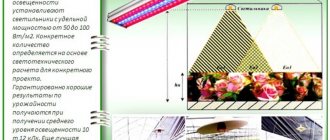
Usually vegetables are grown in a greenhouse, but some people can plant small fruit trees or simply heat-loving trees and plants in it. In such a situation, it is necessary to calculate the height of the greenhouse. The height should be slightly higher than the trees or shrubs growing in it. But it is not recommended to build a very high building. Typically the height is 2.5 m.
Greenhouse drawing
All calculations should be included in the building drawing to avoid possible problems at the stage of assembling the structure. Having carried out the above calculations and drawn a drawing, you can very easily determine the amount of materials required for the work and not buy them in excess. But you still need to have a small supply of materials just in case. It is better to leave approximately 10 percent of the final amount of materials in stock. If you don’t want to bother at this stage, you can find on the Internet many ready-made drawings of greenhouses with calculations and assemble a structure based on them.
Greenhouse made of galvanized profile or painted – what to choose
One of the main advantages of a galvanized profile is its resistance to corrosion. Accordingly, the frame does not require additional painting or treatment with special anti-rust preparations.
However, in practice it often turns out that over time the profile begins to rust. This occurs when there is mechanical damage to the outer coating of the profile. As a result, even reliable galvanized material has to be painted.
At the same time, if you are faced with the question of choosing a greenhouse made of galvanized profile or painted metal, it is better to choose the first option. The fact is that any metal frame needs to be painted and treated immediately after assembly, whereas with a treated profile it may take several years before the frame needs additional treatment.
Figure 5. Installation stages of an arched profile greenhouse
In addition, the financial issue also plays an important role. The galvanized profile itself is cheaper than metal, especially since you will not need additional costs for the purchase of paint and anti-corrosion compounds. It is also quite possible that the frame will not be damaged and will not require painting, whereas a metal pipe greenhouse will have to be painted annually.
A-frame model
To achieve maximum illumination during the day, most owners prefer just such greenhouses made of PVC profiles; there are no problems with precipitation, and maintenance becomes quite simple.
Installation will also not cause problems; you do not need to have special skills to implement it, you just need to follow the diagram and correctly measure the length of the components.
An unusual appearance can add zest and decorate the area, and the plants will receive the right amount of lighting without additional devices. There are some disadvantages, among them the following should be highlighted:
- Usable area is limited.
- The sheathing is difficult to install.
- It may be difficult to use in some areas.
The edges of the structure are located too close to the soil, which does not allow planting there plants that reach large sizes at the time of their growth.
Getting to this area is also problematic; pulling out a weed or watering a crop will require maximum effort, and older people will face inconvenience.
How to bend profile pipes for an arched greenhouse
The profile has one drawback. It is difficult to bend the pipe into an arc for an arched greenhouse. Stiffening ribs prevent uniform bending. It would be nice to bend a profile pipe for a greenhouse yourself using a pipe bender, but there is no point in buying an expensive machine for one day of work. It is better to order ready-made profile arches in the workshop. If this is not possible, they try to bend the pipe, resorting to folk tricks.
Using sand
The profile bending method is considered simple and effective. First, prepare the sand. It is sifted from large stones and spread out in the sun to dry. If the weather is cloudy, sand is spread in a thin layer on the tin. A fire is lit under the sheet metal. After calcination, the sand is allowed to cool.
Wooden plugs are cut into the ends of the profile. They should fit tightly with a hammer. One plug is installed at once. Dry sand is poured inside the pipe. The second end of the profile element is similarly closed with a plug. Place the pipe between strong supports and try to bend it with gentle pressure. The sand inside the profile will create pressure that prevents the square walls from deforming. When the profile arch is ready, the plugs are removed. Sand is poured out of the workpiece.
Using water (winter method)
The traditional method has many disadvantages. Firstly, you can only use it in winter, when there is severe frost outside. Secondly, if the technology is violated, frozen water can tear the walls of the profile during expansion.
To bend the profile blank, you will need plugs in the same way. The plugs are made so tight that they prevent water from flowing out. The plug is driven in with a hammer from one end of the profile. Water is poured inside the pipe and closed with a second plug. The profile blank is left in the cold. When the water turns into ice, the metal element begins to bend. The result is similar to sand.
When the profile arch is ready, the plugs are removed. The profile is heated over a fire until the ice is completely melted.
Grinder cuts
The bending method with notches is considered the most difficult, but guarantees a 100% positive result. The profile is clamped in a vice. Markings are applied in the form of wedges at equal distances. According to the markings, cuts are made with a grinder, but not through. Only wedges are cut. The opposite flange of the profile remains untouched. After cutting, the pipe is bent into an arc. If the radius is large, cut out several more wedges. The procedure is continued until the arch bends to the desired radius. The cut areas are welded.
What can you build with?
For installation work you will need the following tools:
- Bulgarian;
- metal scissors;
- screwdriver;
- building level and plumb lines;
- roulette.
For materials to build a greenhouse with your own hands, you will need:
- metal profiles. It is best to use rack profiles, 50 or 42 sizes;
- dowels and screws with which the profiles will be fastened together;
- polycarbonate sheets used as flooring.
This set of materials and tools will help you quickly and easily install a metal frame with your own hands.
Advantages and disadvantages of profiles for the manufacture of greenhouses
Manufacturers offer ready-made greenhouses of any size and shape. However, building such a structure yourself is both interesting and profitable.
Greenhouses made from profile pipes are more durable. They are heavy, which means they can withstand winds very well.
We recommend that you read: Hydrodynamic flushing of the sewerage system - cleaning pipes from various types of blockages
Thick-walled metal and a well-thought-out design make it possible not to worry about removing snow from the roof in winter - it moves down on its own as it accumulates or when it warms up.
In addition to a metal profile pipe, craftsmen use the following types of profiles to make a greenhouse frame with their own hands:
- V-shaped (or W-profile) metal profile with special strips for fastening. The material is designed specifically for frame structures of this type. It is convenient to work with, but in terms of strength such a frame will be inferior to structures made from a profile pipe.
U-shaped profile made of galvanized steel or aluminum. It is inferior in strength to a profile pipe, but significantly benefits in price. Used for various structures during repairs and construction.
Rack and guide profile designed for installation of drywall. For the construction of street structures, these metal parts are somewhat weak, but can be used in areas protected from the wind.
In order not to make a mistake in choosing a suitable building material, you should know its advantages and disadvantages for structures of this type.
The disadvantages of the products include the cost of the material, the heaviness of the finished greenhouse, and the need to use a welding machine for installation.
Note! To build a greenhouse based on rectangular profile pipes, a light foundation is often installed or a brick platform is built.
Advantages of using lightweight profiles:
- lightness and mobility of the resulting structure;
- saving budget on materials;
- ease of installation.
The main disadvantage of lightweight structures is their insufficient strength to withstand external mechanical loads. Such greenhouses can be carried away or overturned by strong winds. In winter, they often sag under a layer of snow.
Material advantages
You can construct greenhouses with your own hands from a wide variety of materials. Here it is allowed to use the following materials for various elements:
- tree;
- metal;
- plastic;
- all types of film;
- polycarbonate;
- plexiglass.
It should be noted that greenhouses made from plasterboard profiles will have the best characteristics. The advantages of choosing just such a material (metal profiles) are as follows:
- simplicity and speed of installation with your own hands;
- financial inclusion;
- environmental friendliness;
- high wear resistance;
- durability.
Other materials cannot compete with such advantages.
Types of galvanized profiles
There are several types of galvanized profiles. They are used in various fields of construction. The cost of each of them depends on the quality of the metal and its strength. For greenhouses, due to their structural features, it is recommended to choose durable types of materials.
What is an omega profile
Omega is a strangely shaped letter of the Greek alphabet.
It resembles an open Russian letter “O” or a saucepan with handles turned down. Omega profile deserves special attention. Its unusual shape can support more weight than standard types of profile structures. In construction, metal elements from 0.9 to 2 mm thick are used. This is interesting! Builders often call this type of profile “hatted”. Now its name can be easily remembered.
Galvanized steel profile 20x20, 20x40
It looks like a pipe with a cross-section similar to a square or rectangle. Used for the construction of lightweight metal structures. Suitable for welding work, withstands wind and snow well. The material is durable, so the distance between the arcs of the building can reach 1 m.
Double galvanized steel profile
To make it, a stiffener made of the same material is welded to the main pipe. This is a highly durable design. A greenhouse of this type does not require constant maintenance and will withstand any weather conditions: snowfall, gusty winds, heavy rains.
Open steel profile
It has a square-shaped section 20x20 or 20x25 mm in diameter. The thickness of the material is from 1 to 1.2 mm. It is better not to use it to build greenhouses, because its strength is weak. The design will be flimsy, and it will take a long time to assemble.
W-profile
The wall thickness of the W-shaped profile is 0.8 mm. The frame is assembled using nuts and screws. The profile is durable, weighs little, but is inferior to pipes in strength. If you build such a greenhouse, you will have to assemble it for the winter: the frame will not withstand the snow.
Angle profile
It looks like a beam with a cross section in the shape of the letter “L”. It is used as elements that can withstand axial forces (compression and tension). It serves as an additional fastening.
Reviews
Ivan (Moscow region)
“I bought an omega profile for the greenhouse. I took the most reliable one, 2 mm thick. The frame is stable and withstood the first winter and snowfalls perfectly.”
Sergey (Kaluga)
“Five years ago I built a greenhouse at my dacha with a frame made of galvanized profiles. The structure is stable, but rust has appeared in some places - especially where the screws are screwed in. I painted it with acrylic paint - the greenhouse has been standing for six years, the roof does not rust or sag.”
The strength of its frame depends on the choice of metal profile for the greenhouse. It is recommended to use cheap material for seasonal buildings, but if you do not plan to dismantle the greenhouse for the winter, it is better to make an expensive but reliable frame that will serve for many years.
Structural elements
Greenhouse structures differ from each other in shape, materials and technologies used. Greenhouses that have one or two slopes, a tent shape or an arch are most popular. From a design point of view, greenhouse structures can be made in a stationary form, when there is no possibility of dismantling them, and in the so-called mobile form, which allows the greenhouse to be disassembled for the purpose of storing it in any room in the winter.
As for the structural elements, their set is as follows:
- The foundation is the part of the structure that serves as its foundation, which is necessary to provide stability by distributing the resulting loads. Various materials are suitable for making foundations, such as wood or brick. The best option for constructing a base for a greenhouse is to build a strip foundation in the form of a single monolith, which must be embedded to a depth of at least 80 cm, but ensuring that the freezing point of the soil will be above this mark.
- Frame is a part of a structure, defined as a load-bearing structure, which is assembled using wooden elements and made of PVC or steel. The strength of the frame is the stability of the entire structure. Depending on the chosen material, the pros and cons of this part of the structure manifest themselves. The choice of wood for making the frame significantly reduces the complexity of installation, but is due to the disadvantage of a short service life. Even treating wood with water-repellent compounds does little to improve the durability of the frame compared to a similar structure made of steel. At the same time, the steel frame, although characterized by a long service life and the ability to withstand heavy loads, is susceptible to corrosion.
- PVC frame – strength, flexibility, tightness and safety. This material has a higher price compared to those already mentioned. It is very reliable, which is ensured by stiffening ribs in the form of arches, which are installed every 2 meters. The result is a streamlined shape that eliminates the retention of precipitation on the surface. Assembling a frame from a profile pipe is a low-labor activity that does not require the use of special equipment.
- A profile pipe is a durable structural element that provides additional convenience, which is manifested in the fact that lighting, an irrigation system, etc. can be mounted on its inside.
- Coating is protection from the negative effects of the environment, the manufacturing material of which is usually glass, polycarbonate and film. Fastening is carried out on the frame of the greenhouse. The optimal coating is polycarbonate, which is a reliable barrier to cold air, but does not prevent the passage of sunlight. A coating made of this material gives the greenhouse an attractive appearance and ensures durability of use at relatively low costs for its acquisition.
- Fittings – everything that is part of the fastening system. Its selection depends on the design of the greenhouse and the covering material. If you plan to use polycarbonate, then you will need thermal washers, connecting profiles and self-tapping screws necessary for attaching this material to the metal. A special profile is used to fasten polycarbonate sheets. And if it is aluminum, then this is an ideal option, but quite expensive. It is equipped with rubber seals that provide the required level of waterproofing.
What are the problems with a metal profile not coated with zinc?
In addition to zinc, metal profiles used for the construction of greenhouses are often powder coated in white or another color. Such material is somewhat cheaper, but you have to pay for it with less durability. Why? Let's explain now.
An example of powder-coated ends for a greenhouse
The main problem with powder paint, even the most modern one, is its weaker (compared to zinc) “adhesion” to steel and lower resistance to mechanical stress. And metal profiles for greenhouses are constantly faced with the latter - starting from the warehouse at the factory where they are made, and ending with the transportation of finished elements to the personal plot for assembly. Any sufficiently strong impact or fall results in small, often almost imperceptible chips of paint from the surface. And after some time, this place becomes a source of corrosion on the finished greenhouse frame.
Therefore, if you are interested in the greatest possible durability of the greenhouse, choose only galvanized steel profile. At the same time, do not forget to ensure that the coating is applied efficiently and without defects.
Galvanized greenhouse assembly
And for interior decoration you can use such galvanized beds
Greenhouse assembly
When building a greenhouse, it is better to use an omega profile. Before buying material, you will need to make a drawing and diagram of the arrangement of elements and sectors of the structure. This will help you avoid common mistakes.
Manufacturing of end walls
When using an omega profile, the roof must be gable. The end walls are made in this way:
- before work, the finished elements are placed on a flat surface;
- from them they lay out the shape of the future greenhouse, marking the bottom and top at the frame;
- Before fastening the parts, measure the distance between the corners located opposite each other. If the shape of the square or rectangle is correct, the difference between the length of the diagonal sides of the frame will be no more than 5 mm;
- the ends of the frame elements are fastened and tightened using self-tapping screws;
- a line is drawn perpendicularly from the top of the frame (this is the future ridge of the roof);
- measure the distance from the ridge to the corner parts of the frame. If everything is done correctly, the amount will be the same;
- the two sums are added to obtain the profile length;
- cut it off using a jigsaw or hacksaw;
- mark shelves on the sides on the workpiece;
- bend it into the shape of a gable roof.
All that remains is to attach the roof with dowels to the frame, reinforcing the corners with stiffening ribs.
To do this, the remaining scraps of material need to be screwed obliquely. The resulting roof is fixed to the frame with self-tapping screws, creating a rear end wall. The front wall is made according to the same principle, leaving space for the doorway. Two vertical posts are used as its basis. Important! The door is assembled last. This will help avoid mistakes.
After the work with the roof and walls is completed, you need to cut new pieces of material and make additional skates from them. At the same time, their dimensions should be similar to the dimensions of the walls. Additional ridges are used to strengthen the roof to reduce the width of the spans. They will not sag or break under the weight of snow. The pitch between skates is about 1.05 m.
To fasten the end walls you will need 4 more parts of the metal profile. Their size must correspond to the length of the greenhouse.
Assembling the greenhouse profile frame
Before assembling the frame, both end walls are installed, securing them with temporary supports.
The walls are fixed to each other with four profiles. The upper corners of the opposite walls are secured with two blanks horizontally. The same needs to be done from below. The frame is almost ready, but it has not yet been strengthened. The upper and lower horizontal profiles are marked every 1.05 m. Frame stiffeners must be attached to the marks. Skates are also attached here, which must be ready in advance. All that remains is to install the ridge element on top of the roof.
Reinforcement of the frame with additional stiffening ribs
Despite the strength of the frame, it would not hurt to improve it. For this you will need stiffening ribs. They are made from the remains of the profile and attached diagonally.
Polycarbonate sheathing
Polycarbonate cladding consists of a number of sequential actions:
- the lock is attached to the profile with self-tapping screws at the joints;
- Before screwing in the screws, you need to drill a hole;
- installation begins from the roof: you need to insert the sheet into the locking grooves and screw it to the profile with self-tapping screws;
- snap the lock cover.
Important! Polycarbonate is covered with a protective film. When laying, it should face outward, and the ends should be closed with plugs. After finishing the work, the film is removed.
Assembling the frame
At this stage, the structure of the greenhouse will turn out to be crooked and unstable, but you should not pay attention to this, in the future it will strengthen and level out.
So, it is necessary to install the walls at the required distance from each other, in the place where the greenhouse will be located. Here you may need help from someone to hold the walls upright, but if no one is there, you can simply install temporary spacers.
When the walls are exposed, we connect them together with a horizontal profile along the top of the square. We do the same on the other side, and only after that we fasten the lower ties. As a result, we get a finished frame, which is still sagging and does not look like a greenhouse.
Now we make marks on the lower and upper horizontal lines every 1.05 meters. In these places we install galvanized rack profiles, which add rigidity and even out any sagging.
When all the ribs are installed, the frame needs to be leveled. At this stage he can still move, but later he will not be able to do this.
We attach additional ridges to the exposed frame of the greenhouse, which should be flush with the rack profiles. The next stage is attaching the ridge profile. It is necessary to remove the walls in those places where it comes into contact with the corner parts. Thus, you get an even ridge that does not stick out above the top point.