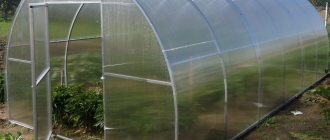
Greenhouses are an indispensable element of a summer cottage. It allows you to grow heat-loving crops in cold climates, including in the winter season. With its help you can speed up the process of growing seedlings. Until recently, an arched greenhouse made of polycarbonate sheets was little known. But thanks to progress, polycarbonate structures are gaining popularity among gardeners. Without a good greenhouse it is difficult to achieve high yields.
Advantages of arched greenhouses
Arch-shaped greenhouses have a number of advantages. They
- Provide uniform and high-quality lighting for the plants growing in them;
- Easy to install (installation does not require special skills);
- They can boast of a minimum of seams, which has a beneficial effect on their tightness;
- They can withstand unfavorable weather (they are not afraid of rain, snowfall, hail, or hurricane winds);
- Do not accumulate masses of snow on the roof;
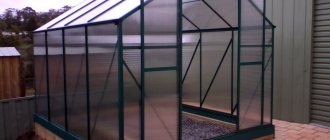
- Attractive in appearance;
- Easily disassembled;
- Durable and reliable.
If it is necessary to enhance the strength properties, then experts recommend installing the greenhouse on a foundation made of concrete blocks or bricks. The seams between the blocks are filled with foam to ensure heat retention.
The disadvantages include:
- Impossibility of use in winter (applies to the collapsible version without a foundation);
- Stationarity (cannot be transferred).
We choose a place and make a foundation
When choosing a location for a greenhouse, you need to follow a few simple rules:
- The long side of the greenhouse should be in an east-west orientation. This way the plants will receive the most light.
- In windy regions, it is necessary to additionally protect the structure from the wind. To do this, you need to place it next to the house, fence or hedge.
- There should be easy access to the greenhouse: wide paths, proximity to the house.
The choice of foundation will depend on the scale of your structure. If it is light plastic with a polyethylene coating, then it will be enough to make a frame from timber and attach it to the ground with long reinforcement so that it does not tip over from the wind.
For stationary options, the following options are suitable:
- Monolithic strip foundation;
- Prefabricated strip foundation;
- Columnar foundation.
The material can be reinforced concrete, stone, brick, blocks, wood.
For example, consider the construction of a strip monolithic foundation with a small brick base.
READ ALSO: Floor coverings from EvaLine.
Greenhouse foundation diagram
- Dig a 40*20 cm trench and install the formwork.
- A 10-15 cm layer of sand should be poured into the bottom of the trench.
- Tie the frame from the reinforcement. Also make anchor bolts to secure the base and arches of the greenhouse.
- Pour concrete into the formwork. Check the fill level to ensure there is no slope. The surface must be horizontal.
- After the concrete has hardened, lay brickwork on it in 2-3 layers. The seams must coincide with the exit of the mortgages for fastening the frame.
- Lay down a layer of roofing felt and begin installing the frame.
Dimensions of arched greenhouses
The size should be selected based on the plan for the number and placement of beds. The most common are structures with an area of 3 * 6 m. Two beds are conveniently laid out in them, and there is quite a lot of space left for passage between them.
- If you make the beds wider by reducing the width of the passage, you will have to do gymnastics to get to each seedling bush.
- As a result, it is necessary to correctly determine the proportions between the area for planting and the ease of caring for crops.
You can expand the space for garden beds using a different scheme, for example, by planting plants in the shape of the letter “P”.
Unfortunately, in such a situation it will be impossible to use the entrance from the second end. Another solution would be to organize three beds parallel to each other.
Arched greenhouse frame
The frame is made of metal profile. To protect the material from corrosive destruction, it is galvanized. Moreover, it can be either one-sided (external) or double-sided (when internal surfaces are also processed).
This technology can significantly increase the service life of the greenhouse and the degree of its resistance to precipitation.
As for reinforced models, double and solid arches, spacers, stringers and other elements that improve strength properties are additionally used.
Installation instructions for an arched greenhouse
Assembly work should be carried out in the absence of wind. First you need to level the area on which the structure will stand. Then you need to build the foundation.
For it you can use a 50 by 100 board, 100 by 100 timber or sleepers. Procedure:
- Lay out the beams around the perimeter.
- Level using a level.
- Secure with a corner.
- Align diagonally.
The algorithm for further steps is as follows:
- Lay the end parts so that the door and windows swing upward.
- Take cellular polycarbonate and cut a piece of 6 * 2.1 m. Lay it face up on the end, aligned with the base and in the center of the left post. Be sure to remove the protective film from the back of the polycarbonate.
- Secure the covering with self-tapping screws and cut along the resulting arc. Close the second end in the same way.
- Place the remaining material with a soldered edge on the left side of the end part, align it with the left post, leaving a gap of 3 mm, and secure with self-tapping screws. Carry out the same manipulations with the second end element.
- Make a door and windows along the counter.
- Assemble and attach a steel frame to the foundation.
- Install the assembled ends.
- Install the arcs on the guides. Connect them to the ends using stringers.
- Carry out work on installing polycarbonate, starting from the edges of the greenhouse. The covering sheets must be overlapped by 100 mm, observing the direction of fastening. It is recommended to cut off excess protruding parts of the material with a knife. The work is done!
The master's work is afraid
Greenhouse parts
Before starting construction of the greenhouse, it is necessary to make a specification of the connecting elements. To do this, you need to make a sketch of the greenhouse and literally draw each node. There are not so many connecting profiles, their design is not complicated.
Connecting profile
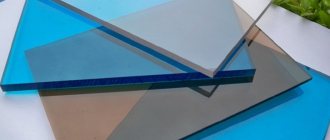
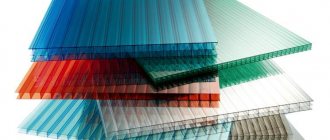
The following types of profiles are used to connect polycarbonate sheets:
- Aluminum
- Polycarbonate
The difference between them is that the aluminum connecting profile is more durable than polycarbonate. Aluminum profiles and connections last at least 20 years. The difference between them is not only in service life, but also in price.
Angular profile
It is used for mounting the corners of the greenhouse. The elasticity of the polycarbonate corner profile allows for a good seal. To better seal the joints, silicone can be used.
Joining polycarbonate sheets
The figure shows a diagram of fastening polycarbonate sheets to a metal frame using aluminum profiles. All sheets are pressed against the frame through a special rubber seal.
Holes are drilled in the metal profile of the greenhouse frame and threads are cut into them.
Joining sheets with polycarbonate profiles
Another option for fastening sheets using polycarbonate profiles. A whole series of special polycarbonate compounds has been developed. In this case, the lower profile is attached using self-tapping screws to the frame, and the upper one presses the profile.
Small teeth in the profiles “snap” the lock. This makes it easy and quick to assemble the greenhouse. Rubber seals ensure tightness in the greenhouse.
One-piece connecting profile
Using this profile, you can easily and quickly connect two sheets of polycarbonate. Due to its flexibility, this profile can be used for curved shapes.
The joints between the connecting profile and the sheets are sealed with silicone. The profile is attached to the frame with self-tapping screws without too much effort. Polycarbonate material is fragile.
Detachable connecting profile
Another option for the connecting profile. It has special grooves for the rubber seal.
The lower profile is attached to the greenhouse frame. The upper part of the profile is inserted with force and snaps into place.
Detachable connection profile HCP
A special split profile designed to cover the ridge of a greenhouse. Has recesses for rubber seals. Retained in the joint due to the elasticity of polycarbonate.
It is used to install a ridge in arched greenhouses, where two sheets of polycarbonate are connected on the ridge.
End profile UP
Used for sealing the ends of polycarbonate sheets.
These profiles seal the end joints of polycarbonate sheets. This ensures tight corner joints.
The seal between the profile and the sheets can be made with silicone sealants. Holes are made in the end profile to drain condensate.
Ridge profile RP
Another option for a ridge profile
A simple solution for greenhouses where two polycarbonate sheets meet at the top of the arc. Be careful when attaching. The strength of polycarbonate sheets is not limitless.
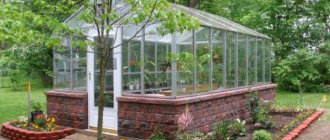
Where to place an arched greenhouse on the site
The place for installing the greenhouse building must be well lit. For construction, choose an east-west orientation - this way the plants will receive maximum light.
The structure can be protected from drafts and wind by placing it near a hedge or fence. But you should not place the greenhouse closer than 1.5 m from the fence.
It is important to decide on approaches in advance. They should allow you to comfortably operate the structure. It’s great if there is water for irrigation nearby.
What can arcs be made from?
To make an arched greenhouse at home, all kinds of materials are used: thick wire, pipes made of plastic, PVC, steel and aluminum, wood. And the most common material is wood. But parts made from it for an arched greenhouse must be treated with an antiseptic in advance - after all, they will constantly be in a humid environment and come into contact with damp soil.
Today, profile pipes are increasingly used for greenhouse construction. And those with a rectangular cross-section are much preferable in this regard - polycarbonate fits on them much better.
It is good to build a light seasonal arched greenhouse from inexpensive plastic arches - the film is removed from it in late autumn, and it itself can be easily disassembled in half an hour and folded up in the utility room until early spring. And what’s good is that such a greenhouse can be placed in a new place every season - this way the soil on the site will rest and the greenhouse plants will get sick less.
Current models of arched greenhouses
Today, the following models of arched greenhouses are the most popular among Russian gardeners:
- Dachnaya-Optima. Manufacturer – Russia. Designed for regions characterized by abundant rainfall. It has excellent strength characteristics and a long service life. Other advantages are good resistance to mechanical loads and temperature changes, low cost.
- Vintage PC. Advantages: high strength and stability, no need for a foundation, resistance to damage. There is a window for ventilation. Frame material – galvanized profiled steel.
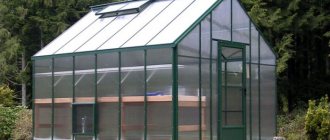
- Northern woman. Designed for areas with cold climates. Not afraid of snow and sharp gusts of wind. Perfectly withstands mechanical loads. Equipped with two doors and two windows for ventilation. Pros - galvanized frame on both sides, bolted connection of elements, long service life, increased strength.
Which design should you choose? It depends on the location of the garden, as well as on your preferences and financial capabilities of the family budget.
An arched greenhouse is an excellent choice for a summer residence. It is reliable, easy to assemble, relatively cheap, and durable. If desired, you can build it yourself, without turning to the help of specialists. The choice of size depends on what plants you plan to grow and in what volume.
From Roman patrician to domestic gardener
Arc-shaped greenhouses became known in our country only 10-15 years ago. Since then, they have been used in country houses and gardens, on farms and in the industrial cultivation of vegetables.
This is interesting! Exotic flowers were grown in the first Roman greenhouses. During the Middle Ages, the Catholic Church declared greenhouses to be witchcraft, an idea that only returned during the Renaissance. Peter I brought the greenhouse design from Europe and during his reign grapes, peaches, and apricots bore fruit in Russian greenhouses.
A standard arched-type greenhouse looks like an arc-shaped structure with straight walls 2-3 m wide, 2.5-3 m high, 2 to 30 m long. The most common option is 2x3x6 m with two beds and an 80 cm passage. Ventilation is carried out through two doors and two transoms above them, located on the end sides.
Arched greenhouse design