Building a greenhouse with your own hands is a completely feasible task that even people with minimal construction skills can cope with. However, in order for the structure to be technologically correct and symmetrical, it is necessary to carry out some calculations even before the start of its construction.
Calculating the amount of material needed and calculating the size of a future building is a rather complex process that requires extreme care. The reliability of the building and its ease of use will depend on this. In this article we will look at the basic calculations that must be carried out before building arched and domed greenhouses from various materials.
- Dome
Greenhouse calculation
Some summer residents have a question about why it is necessary to calculate a greenhouse at all, because it is enough to simply build a base of the required shape and size, install supports and cover the structure with film or polycarbonate.
In fact, correctly carried out calculations are the key to successful construction. Not only the reliability of the finished structure, but also the financial side of the issue will depend on this. With a correct calculation, you will be able to find out exactly what material you will need for construction and how much of it you should buy.
There are many services on the Internet that provide online calculation of all necessary materials. Such online calculators are really very convenient and save a lot of effort and energy for those who are not confident in their own mathematical knowledge. However, to be completely sure that the calculation is correct, it is better to check the data obtained by performing the calculation manually. Next we will tell you how to do it correctly.
Wall thickness
Polycarbonate is available in sheets of different thicknesses. The thickness depends on the climate, time of use (all year round or only in warm months), wind, frame material (metal can withstand greater loads than wood), lathing pitch (the smaller the pitch, the stronger the structure), etc.
There are several types of plastic:
- Polycarbonate with a thickness of 4 mm is the cheapest and most fragile. It is well suited for seasonal greenhouses, since it will no longer withstand snow.
- A thickness of 6 mm is considered optimal and is suitable for autumn and spring.
- For winter it is better to take material 10 mm thick. Snow practically does not linger on the arched roof, but it is not recommended to use thin plastic: during a sharp cold snap after warming, ice will form on it, which will retain the snow.
- It is not recommended to take thicker plastic. Only 25-50% of the sun passes through a wall thicker than 10 mm, which significantly reduces the level of light and heat.
When choosing, you can use ready-made tables for calculations. They indicate specific gravity, thermal conductivity, strength and other characteristics.
Calculation of material for greenhouses
First of all, calculations will be needed in order to accurately calculate the required amount of material for construction. This process includes counting materials for building the foundation, installing the supports, and installing the covering.
The calculation directly depends on what materials you plan to use for construction. For example, wooden beams are often used to construct supports, but a profile pipe is considered a more practical and financially advantageous material. It is inexpensive, but quite strong and durable. In addition, the material of the pipe itself is practically resistant to fungi and mold, so the building frame will require a minimum of maintenance.
The calculation should also include roofing material: film, glass or polycarbonate. We will consider the calculation of the last type of roofing material, since polycarbonate is considered the most reliable and modern option for greenhouse covering.
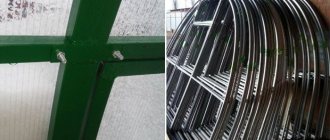
Greenhouse made of profile pipe
A profile pipe is a metal product with a square, rectangular or oval cross-section. Untreated metal pipes are considered the most inexpensive, but galvanized or painted pipes are more suitable for humid environments. However, if you plan to connect structural elements by welding, it is better to buy uncoated pipes, since under the influence of the heat of welding the protective layer will in any case be destroyed and the pipe will have to be repainted.
Note: As a rule, for the construction of closed ground structures, square or rectangular pipes with dimensions of 20 x 20 or 20 x 40 mm are used.
If you connect the supports with bolts or other fastening fittings, you can safely buy galvanized pipe. However, preference should be given to the highest quality products, the galvanization of which will not crack over time. If the protective layer is damaged, all the properties of such galvanized pipes are lost, and the frame will begin to rust in a humid greenhouse environment.
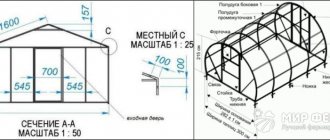
Figure 1. Drawings of the frame of a gable and arched greenhouse made from a profile pipe
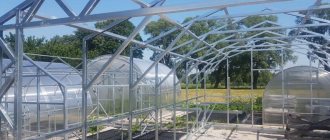
Before you start calculating a greenhouse made from a profile pipe, you should decide on the type of structure. The traditional option is a “house” - a building with a gable roof, but arched and domed structures are considered more modern. Their advantage is that snow does not accumulate on the roof, which can damage the coating, and there is enough space inside for caring for plants (Figure 1).
Note: Regardless of the type of construction chosen, it is better to immediately make the height of the building slightly larger than the height of a person. A lower design will, of course, save you some money, but it will not be very comfortable to work in a half-bent position.
Here are examples of calculations for the most popular types of greenhouses - gable and arched:
- Arched: usually has a height of about 1900-2400 mm. Based on this, we can conclude that an arch is half a full circle. Accordingly, we need to calculate the circumference using the formula L=n*D. The number n (Pi) is a constant value that is equal to 3.14, and D (diameter) is equal to two radii. In our case, the height of the structure is the radius. Let's assume that the height of the building will be two meters. Accordingly, the circumference L will be equal to 3.14 * 4, or 12.56 m. This figure must be divided in half. The result will be 6.28 m, which will correspond to the length of the curved arch. In this case, there is only one problem: the standard length of the profile pipe is 6 meters, so you will have to somehow attach a small piece to it. To simplify your task, it is better to make the height about 1850-1900 mm. In this case, the length of one curved arch will be exactly 6 meters.
- Gable: more difficult to calculate. First of all, it is necessary to take into account the angle of inclination of the roof, which fluctuates depending on the snow and wind load. The standard indicator is 30-45 degrees, and the optimal height of a building with a gable roof is 170-200 cm. To find out the height of the roof, you need to use the Pythagorean theorem, according to which the square of the hypotenuse is equal to the sum of the squares of the legs. Let's assume that the width of our greenhouse will be 2 meters, and the roof angle will be 30 degrees. In this case, the hypotenuse will be considered the length of the slope, and the legs will be an indicator of the width of the building. Using the same Pythagorean theorem, we find out that the leg lying opposite the angle of 30 degrees must be equal to half the hypotenuse. Having drawn up a quadratic equation, it turns out that the length of the hypotenuse is 1.154 m, respectively, the length of the leg is 0.58 m. Taking into account that the height of the wall is two meters, we can conclude that the height of the same structure along the ridge is 2.58 meters.
Using these calculations, you can calculate the required number of supports and arches. In this case, it is necessary to make a reserve, since in addition each greenhouse has doors and vents, which are also made from profile pipes.
Polycarbonate greenhouse
Polycarbonate is a roofing material that lets in enough light for normal plant development, but at the same time has increased strength. That is why it is most often used instead of fragile glass or short-lived film.
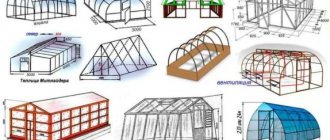
Figure 2. Drawings of polycarbonate buildings
As in the case of a profile pipe for constructing a frame, it is necessary to calculate the number of polycarbonate sheets required to cover the frame (Figure 2). First of all, you should take into account the thickness of the sheets. This indicator depends on the season of use of the building. If you plan to carry out work in it during the warm season, that is, from spring to autumn, sheets 5-10 mm thick will be sufficient. If you are planning to build a year-round heated greenhouse, it is better to give preference to sheets with a thickness of at least 15 mm.
There are a number of factors that must be taken into account when making calculations:
- Sheet size: you need to draw up a drawing of the future building in advance and plan the cutting of the roofing material so that the amount of waste is minimal.
- Properties of polycarbonate: when exposed to heat, this material tends to expand. This feature must be taken into account when calculating the number of sheets and cutting them.
- Possibility of bending: despite the fact that polycarbonate bends easily, some models of the material are quite difficult to give the required shape. Therefore, when purchasing, be sure to ask whether the sheet can be bent. This requirement plays a key role when covering arched and dome models.
It should also be taken into account that to attach polycarbonate you will need special fittings: end profiles, perforated tapes and special screws.
Calculating the required amount of polycarbonate for coating is quite simple. The standard sheet width is 2.1 meters. In this case, the stiffening ribs are located along the sheet, and during installation its edge must be fixed on supports made of a metal profile. In addition, you need to remember that the standard distance between the support posts is 0.7 or 1.05 meters, and the sheets are attached end-to-end using special connecting strips and self-tapping screws with thermal washers. Knowing the width of the sheet and the number of racks in your building, you can easily calculate the required amount of roofing material.
Arc calculation
You will need this type of calculation if you plan to build an arched greenhouse (Figure 3).
Note: The key role in the calculations is played by the total height of the building and the standard size of the polycarbonate sheets.
A standard polycarbonate sheet is 2.1 meters wide and 6 meters long. Accordingly, it is the length that will be the decisive factor in determining the height of the building.
Figure 3. Example of arc calculation
In order to give the sheet an arched shape, it is laid across the frame. In this case, the width of the entire structure will be about 3.80 meters, and the radius of the semicircle will be 1.90 meters. If we focus on the geometric formulas and calculations given in the previous sections, we can conclude that the height of the building will be equal to the radius, that is, it will be 1.90 meters. Unfortunately, this height of the greenhouse is not suitable for everyone, therefore, to increase the height, it is recommended to equip a basement for construction.
Methods for attaching greenhouse arcs
To start fixing the arcs, you need to choose a place for the future greenhouse; it should be well lit (sunny side), a windless place. If you choose a bare, windy place, the greenhouse can simply be torn off or overturned, then strong gusts of wind can damage the seedlings, which will reduce the yield.
Should be considered:
- The height of the arcs;
- The higher the greenhouse, the better it needs to be secured;
- By burying it as deeply as possible, strength increases.
All arcs of one greenhouse must be of a given size; before attaching to the soil, it is necessary to drive pegs in the places where the supporting parts of the arc will be located. The pegs can be wooden or metal; if the arc is made of a tube, then the diameter of the peg should be smaller than the inner diameter of the pipe so that it is possible to put the tubes on the pegs. Attention, do not make the greenhouse very high, otherwise the structure will simply fall apart from strong winds or rain.
Calculation of the size of different types of greenhouses
There are several types of greenhouses that are in particularly high demand. The first is considered an arched structure, which is easy to build with your own hands. In addition, it is easy to work in such a structure, and thanks to the design features of the building, light and heat are optimally distributed inside and plants develop more evenly.
The second popular type of greenhouse is the domed one. This is a relatively new type of building, but due to its unusual appearance it is widely popular among those who not only want to grow vegetables, berries and herbs with their own hands, but also make such a building an original decoration for the site.
Dome
A dome greenhouse is also called a geodome. This is a building that looks like a large hemisphere. To build it, you will need many triangular and hexagonal frame elements that are connected to each other (Figure 4).
Note: Almost any material can be used to cover a dome building. An inexpensive design option is made of wood and film, while a more modern, durable and reliable option is considered to be one made of a profile pipe and polycarbonate.
Since a domed greenhouse is significantly different from other closed ground structures, its calculation should also be carried out taking into account similar features.
First of all, you will need certain materials for construction. The frame can be made from a profile pipe or wooden beams, and any available material (glass, film or polycarbonate) can be used as a covering. You will also need special petal connectors that connect the triangular frame elements to each other, and fittings (screws, nuts, bolts, awnings and handles), which will be needed for attaching the roofing material and making doors and vents.
Figure 4. Drawings and calculations required for the construction of a dome greenhouse
The main calculation that will be needed when building a dome model is to determine the area of the spherical dome. Fortunately, there are special online geodetic calculators on the Internet that will help not only calculate the volume of the dome, but also the number of necessary frame elements for its construction. You just need to enter the desired diameter and height of the building, and the system will automatically calculate all the necessary data. For example, if the greenhouse diameter is 4 meters and the height is 2 meters, you will need 35 and 30 triangles with edge lengths of 1.23 and 1.09 meters, respectively.
Stainless steel arcs for greenhouses
The structure will not decompose, unlike wood. A greenhouse made from arcs is light in weight and will be easy to transport and fold. You can make such an arched greenhouse with your own hands in completely different lengths and heights.
Greenhouses made from arcs with covering material have a number of advantages:
- Economical design;
- Durability;
- Hygiene;
- Practicality.
In many gardening stores, arcs are available for sale individually, in a set, arcs that make up the frame, sewn in the form of an accordion, and also as a kit with film for assembling the entire greenhouse.
Calculation of greenhouse lighting
In addition to the direct construction of the greenhouse, certain calculations are also required for its internal arrangement. Since light and heat play a key role in growing plants in open ground, we will look at how to correctly calculate the lighting and heating of closed ground structures.
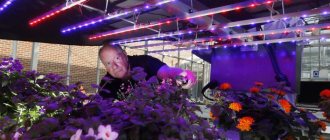
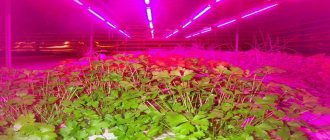
The importance of calculating lighting is explained by the fact that plants require a certain amount of light for full development. If the light is too dim, the crops simply will not grow, and if the light is too bright, they may burn.
When calculating lighting, they are guided by the area of the room and the power of the lamps that are used for lighting. For example, a lamp with a power of 150 W can illuminate an area of 60*60 cm, which is great for small home greenhouses. In industrial structures, as a rule, lamps with a power of 1000 W are used, since they are capable of illuminating an area of 250 * 250 cm. The calculations necessary for installing greenhouse lighting are given in Table 1.
Table 1. Calculation of the power of lighting devices for illuminating closed ground structures
Knowing the area of the greenhouse, you can calculate the required number of lamps of a certain power. At the same time, in small buildings it is not recommended to use too powerful lighting devices, as they can burn the plants. In addition, it should be taken into account that the lamps must be at a certain distance from the plants, and the higher the lamp power, the greater the distance should be. Therefore, in home greenhouses it is not recommended to use powerful lamps, from which the plants can simply burn out, and the optimal distance from the lamp to the beds must be determined gradually: first, hang the lighting fixtures at the maximum height, and if signs of light deficiencies are detected, the distance can be reduced.
How to choose a place
Even in the most modern technological greenhouse, plants will not feel well if it is not positioned correctly. A few points to consider when choosing a location:
- It is better to orient a room with an arched structure in the direction from north to south, while a straight-walled room should be oriented both from west to east and from north to south.
- Install the building in a quiet place, protected from prevailing winds, away from large trees and tall buildings.
- The area under the greenhouse should be flat or slightly sloping to the south.
- The groundwater level should not be closer than 0.8 m to the soil surface.
In the southern regions there is no shortage of sun, on the contrary, there is too much of it. In this case, you need to shade the beds in the afternoon. Use reflective screens and plant tall plants to protect from direct sunlight.
Recommendations
- If the foundation is not level, when laying polycarbonate, bulges and unevenness will form, then cracks.
- The most reliable greenhouse design that can withstand winter loads in the form of snow accumulation is a dome-shaped greenhouse with a sharp “Drop” ridge. It has one drawback - complicated installation.
- Buy greenhouses with arc spacing of at least 0.65 m if you do not want to find your greenhouse with broken polycarbonate after a snowy winter.
- It is better to secure polycarbonate with galvanized metal tapes. Since this simplifies the installation/dismantling of polycarbonate.
- It is better to use polycarbonate with a thickness of 6 mm or higher, depending on the available funds.
- When installing a greenhouse 6 meters or more in length, immediately install additional side windows. If possible, with automatic opening.
Tips for finishing and interior arrangement
Most often, 2 beds are made in a greenhouse - 80 and 100 cm wide. The width of the path should be such that a small wheelbarrow can pass.
Wide path in the greenhouse
If you plan to make 3 beds, then the middle one should be wider than the others. The recommended height of the beds is 40–60 cm. In this case, the soil will quickly warm up in winter. Also, the side walls of the beds will be thoroughly warmed by the sun and blown by a warm wind.
The only disadvantage of raised beds is the need for fairly frequent watering due to good drainage. Therefore, in the process of internal arrangement, it is recommended to provide a stationary water supply for irrigation.
The path in the greenhouse must be durable and comfortable for movement. The minimum width is 0.5 m. Smooth tiles are not allowed for installation, as it is difficult to move on them in high humidity. The path must be made with a slope so that the liquid does not stagnate.
Additionally, curbs can be installed.
Border for a path in a greenhouse
The elements are needed to ensure that the soil from the beds does not fall onto the paths. The height of the fence should be 30–50 mm above the soil level. It can be made from edge stone, board or tile. If you plan to use wood, it should be impregnated with a product to protect against fungus and rot.
To save space inside the greenhouse, it is recommended to install shelves and racks. They can be made of metal or wood. Upper racks are used for plants, and lower racks are used for storing equipment and containers:
Wooden shelving in a greenhouse
It is best to place water pipes under the roof. It is recommended to install an automatic irrigation system
However, it is important to consider that different vegetables require different microclimates: tomatoes need a dry atmosphere and moist soil in the depths, cucumbers need high air humidity and cyclic spraying of leaves
In hot summers, it is necessary to remove excess heat from the greenhouse. If this is not done, the plants will overheat. The beds can be used as heat accumulators, since the soil is always colder than the air. On hot days, only automatic windows can save you.
Automatic vents in a greenhouse
It is important to provide a place for their installation in advance. Increased humidity and temperature not only have a positive effect on the growth of plantings, but also help the formation of various diseases
There is a high concentration of various pests in the soil. For this reason, it is necessary to regularly disinfect the ground, equipment and all structures with copper sulfate:
High humidity and temperature not only have a positive effect on the growth of plantings, but also help the formation of various diseases. There is a high concentration of various pests in the soil. For this reason, it is necessary to regularly disinfect the ground, equipment and all structures with copper sulfate:
Copper sulfate for plant protection
You can protect yourself from late blight in a small greenhouse with several buckets of hot boiled water.
Finishing with these products should be done in the fall, after harvesting.
Video: making a polycarbonate greenhouse
In the video you can clearly see the process of manufacturing a polycarbonate structure.
To build such a greenhouse will not require much time and significant costs for materials. You can build a high-quality structure with your own hands, which will be an excellent help in gardening.
DIY polycarbonate greenhouse: advantages of using the material
The technology of constructing polycarbonate greenhouses has many advantages compared to other materials that have been used for this purpose for many years. For example, the positive aspects of this choice include:
polycarbonate has high strength. If we compare it with polyethylene film or glass, it is several times stronger and much easier to withstand any external influences. This is very convenient if you do not plan to dismantle the greenhouse during the cold period, and it will have to face a serious load associated with precipitation. Glass often cracks in such conditions, and the film does not withstand the pressure of the snow cover at all;
Polycarbonate perfectly transmits sunlight, thanks to which vegetable crops develop and ripen faster
- The presence of a protective layer against ultraviolet radiation allows for optimal plant protection. For example, ordinary glass does not have such a layer, which leads to the harmful effects of sunlight and often causes the death of young plants;
- polycarbonate is a two-layer material, which significantly increases its thermal insulation capabilities. Thanks to this, the plants remain warm even at fairly low ambient temperatures;
- this material is not sensitive to temperature changes and can easily withstand serious changes from -50ºС to + 60ºС;
- Working with polycarbonate is easy and convenient. Being light in weight, the material bends well. There are no problems with drilling, so it is quite possible to use it as a covering material for any, even very intricate designs;
- The material is sold in sheets of various sizes. Having selected the necessary parameters, you can cover the greenhouse with just a few sheets or, if necessary, easily cut them into pieces;
- The light transmittance of polycarbonate also deserves attention. On the one hand, it perfectly transmits sunlight, providing the plants with the necessary amount. But at the same time, it has the ability to dissipate it, which does not allow the leaves to burn, even when under direct exposure to rays;
- Of course, one cannot fail to mention the cost of polycarbonate. Even the highest quality material will cost significantly less than the glass that would be required to build a greenhouse.
Compact mobile greenhouses made of polycarbonate are convenient for use in small summer cottages
Foundation - we solve the problem
We will not dwell in detail on the foundation for this greenhouse. Articles on foundation construction are available on the pages of our resource (see Foundation for a polycarbonate greenhouse).
Also, we will not consider in detail the question of how to install a polycarbonate greenhouse on a foundation with your own hands.
Our task today is to assemble the greenhouse.
Assembling the greenhouse frame
This structure must be assembled as follows:
- Cut the profile to the required length for one frame
- Using self-tapping screws or rivets, assemble the first frame
- For those who have encountered gypsum plasterboard, this will not be difficult for them. In any case, if your hands are in the right place, assembling such a frame will not be a big problem.
Profile connection method.
- Carefully measure the resulting frame.
- After making sure that everything is correct, cut the entire purchased profile to the required size for all other parts.
- Assemble all the frame parts.
Frame assembly.
Now you can connect the individual assembled frame elements into a single frame.
Method of fastening the frame.
The do-it-yourself polycarbonate frame for a greenhouse is ready.
GCR profile service life
A small digression. Some people believe that the metal gypsum board profile will not last long.
This is motivated by the fact that when cutting and drilling, the outer protective coating is damaged, into which moisture gets in, and corrosion can occur in these places, contributing to the destruction of the profile.
We fasten polycarbonate sheets
Installing a polycarbonate greenhouse with your own hands involves installing polycarbonate sheets on a frame. Let's get to it.
There are many ways to attach polycarbonate sheets.
Correct fastening - excellent results
Regarding the fastening of polycarbonate sheets, opinions are also divided.
Some believe that polycarbonate is unsuitable for a greenhouse due to the fact that temperature changes break the tightness of the connection and warm air flows into the resulting cracks and cold air penetrates (for more information on heating a greenhouse, see Heating a polycarbonate greenhouse).
All fears and assumptions are completely in vain; the whole point is not in the polycarbonate panels themselves, but in the method of fastening it and sealing the joints.
The first method of fastening is lining
In the first case, polycarbonate sheets are attached to the greenhouse frame using overlays.
- Strips of rubber are laid on the frame of the greenhouse in the areas where the polycarbonate sheets adhere.
- Next, polycarbonate sheets are installed on the rubber pads.
- Metal plates are installed on top of the joint and secured with self-tapping screws.
- The self-tapping screw passes between two adjacent polycarbonate panels through a rubber lining.
- For additional tightness of the connection, the seams can be treated with sealant.
Second fastening method – H-profile
The second method involves the use of an H-shaped profile.
The H-shaped profile can be detachable or non-detachable.
Detachable mount.
How to secure a polycarbonate sheet using this profile is clearly visible in the figure. The only thing I would like to add is, do not be lazy for better tightness and in this case use rubber linings.
Permanent fastening.
Subtleties of fastening and installation devices
Decide the step of fastening the screws yourself; of course, you shouldn’t overdo it and screw on a bunch of screws, but you shouldn’t be greedy either, everything should be in moderation. Also on our resource you can learn in detail about the assembly of such greenhouses as Orange, 2dum and Perchina.
Installing a polycarbonate greenhouse with your own hands on a foundation is best done while assembling the frame, but sometimes the frame is assembled in one place and then transferred to a prepared place. Both methods do not contradict the assembly, with the only exception: by immediately mounting the frame on the foundation, you can cope with this task alone. In the second case, you will definitely need helpers.
Comments2 comments
- Vadim: 03/22/2017 at 11:36
I agree with the author of the article that welding is the best option for a structure made of profiles in terms of reliability, but it is impossible to foresee everything. Nine years ago, on a summer cottage, I installed a stationary greenhouse made of profiles, concreted the vertical posts, and made all the connections using welding. Three to five meters from the greenhouse, along the fence, blue spruce seedlings grew, which during this time grew into trees. The shadow of the fir trees falls on the greenhouse, there has been no harvest in the last two years, and it is a pity to cut down the trees. You will have to dismantle the greenhouse, cut the structure from the profiles with a grinder, and reassemble everything in another place. - Valery:
06.08.2018 at 19:58The article is really useful. Which doesn't happen often these days. Usually articles are spanked according to the principle of blunder, blunder, quickly. And the benefits from them are the same. And here everything is quite detailed and various practically useful nuances are discussed in great detail. I even added a link to the home screen. Thank you.