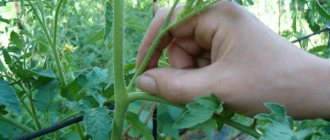
Arched greenhouses are ideal for growing flowers, mushrooms, heat-loving crops, any vegetables, and seedlings. They are seasonal and year-round. Thanks to the oval shape of the roof, the plants receive the maximum amount of light and heat. What features does this design have? How to build it and what is the best way to cover it? Is it necessary to build a foundation for construction? The answers to these and other questions, as well as a description of the problems that may be encountered during construction, are in this review.
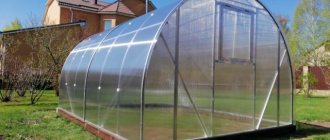
Reliable structure with an arched roof
Advantages of arched greenhouses
Arch-shaped greenhouses have a number of advantages. They
- Provide uniform and high-quality lighting for the plants growing in them;
- Easy to install (installation does not require special skills);
- They can boast of a minimum of seams, which has a beneficial effect on their tightness;
- They can withstand unfavorable weather (they are not afraid of rain, snowfall, hail, or hurricane winds);
- Do not accumulate masses of snow on the roof;
- Attractive in appearance;
- Easily disassembled;
- Durable and reliable.
If it is necessary to enhance the strength properties, then experts recommend installing the greenhouse on a foundation made of concrete blocks or bricks. The seams between the blocks are filled with foam to ensure heat retention.
The disadvantages include:
- Impossibility of use in winter (applies to the collapsible version without a foundation);
- Stationarity (cannot be transferred).
What can be grown in such a greenhouse?
Arched greenhouses are the best option for seasonal or year-round cultivation of vegetables and flowers. However, in order to engage in vegetable growing throughout the day, the greenhouse must have a heating, ventilation and lighting system.
Did you know? The first modern greenhouse was built in Germany in the 13th century. The premises housed the Winter Garden, where King William of Holland was received. Greenhouses appeared on the territory of the Russian Federation during the time of Peter I.
A polycarbonate greenhouse, thanks to its heat-saving properties, allows you to grow a wide variety of vegetables - tomatoes, cucumbers, peppers, carrots, beets, etc. Green onions can be cultivated all year round, but in winter, you will need to take care of organizing additional lighting. The described design is ideal for growing champignons, which do not require additional lighting, but require maintaining a comfortable level of humidity and temperature.
In addition to vegetable crops, peculiar arched houses are suitable for planting various flowers: lilies, roses, chrysanthemums, tulips, etc. Growing flowers is a rather labor-intensive process, but with due diligence, the result can exceed all your wildest expectations.
Important! When growing vegetable crops in a greenhouse, it is necessary to take into account the compatibility of vegetables with each other.
Arched polycarbonate greenhouses are a profitable, economical and simple solution for the successful cultivation of various vegetable crops, fruits and flowers throughout the year. Despite the fact that such structures appeared only 10–15 years ago, today they are in great demand and are widely used both in private plots and in large greenhouses.
Dimensions of arched greenhouses
The size should be selected based on the plan for the number and placement of beds. The most common are structures with an area of 3 * 6 m. Two beds are conveniently laid out in them, and there is quite a lot of space left for passage between them.
- If you make the beds wider by reducing the width of the passage, you will have to do gymnastics to get to each seedling bush.
- As a result, it is necessary to correctly determine the proportions between the area for planting and the ease of caring for crops.
You can expand the space for garden beds using a different scheme, for example, by planting plants in the shape of the letter “P”.
Unfortunately, in such a situation it will be impossible to use the entrance from the second end. Another solution would be to organize three beds parallel to each other.
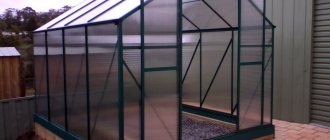
Inexpensive structure with film cover
1-2 people can handle the installation
You can build an arched greenhouse with your own hands from plastic (PVC or metal-plastic pipes), from wooden boards and beams, from metal (profiles, pipes, wire). Possible coating is cellular polycarbonate or film (reinforced, spunbond). Let's consider all the options given.
What you need for a greenhouse with a film coating
PVC pipe frame
To build a 3x2x6 arched greenhouse you will need several days, a plan and the following materials:
- boards coated with an antiseptic solution. The tree will last longer if it is impregnated with drying oil, resin and burned with a blowtorch. Such preparation will take 3-5 days;
- PVC pipes (if you use metal-plastic ones, the structure will be stronger);
- 4 boards and beams;
- dense or reinforced polyethylene. Thick polyethylene film lasts 2 years, reinforced - 3. Reinforced annually loses 8% of light transmission, simple - more than 10%;
- 36 metal rods 1 m high;
- metal loops for securing pipes;
- screws and screwdriver, nails and hammer;
- hinges, locks, handles for doors and windows.
Attention! Various sources indicate that the width and height of an arched greenhouse under film can be arbitrary. But practitioners advise designing the length of the arch according to the width of the film, for example, 12 or 16 m. If you buy a roll 16 m wide, then the arch should be 15 m. 0.5 cm on each side will be left for fastening at the base. This approach will help to use the film rationally.
Assembling a greenhouse from PVC pipes
It is better to reinforce the plastic frame with a transverse bar
After choosing a place to build an arched greenhouse with your own hands, you can start working:
- Level the area. Mount the base from boards in the form of a rectangular box. Strengthen each corner with reinforcement.
- Dig rods along the perimeter of the base at a distance of 50-70 cm from one another. The reinforcement must be positioned so that 40-50 cm are in the ground, and 60 cm on top.
- Place a piece of PVC pipe on one side of the rod. Form an arc by placing the second side of the pipe on the second rod. In this way, form 10-12 arches.
- Attach all pipes to the wooden base with loops using a screwdriver. Strengthen the corners with beams.
- Strengthen the structure by securing a section of a six-meter pipe from the inside, at the top point of the arches.
- Make and attach ends with window and door openings.
How to properly stretch the film
The next stage is coating the base. It is better to stretch the film on a windless day, then it will not sag.
Attention! If you cover the wall on the north side with foil from the inside, more heat will remain in the room.
- Spread the film evenly over the arches so that there is a margin on both sides, and stretch. Nail the covering material onto the slats, wrapping them at least once. The remaining part of the film is covered with earth. It is better that the canvas is continuous.
- Near door and window openings, the film should be folded inward.
- Next, you need to measure the doorway and, in accordance with its size, put together a door from timber. Cover it with a cloth, cutting off the excess.
- Attach the handle and hang the door on metal hinges. Also make the planned number of vents.
Covering with film
The arched greenhouse under the film will be stable, because it is reinforced with a stiffening rib. In the fall, the structure should be dismantled and put away for the winter, since the film will not withstand the pressure of the snow.
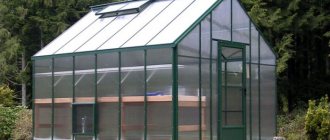
Arched greenhouse frame
The frame is made of metal profile. To protect the material from corrosive destruction, it is galvanized. Moreover, it can be either one-sided (external) or double-sided (when internal surfaces are also processed).
This technology can significantly increase the service life of the greenhouse and the degree of its resistance to precipitation.
As for reinforced models, double and solid arches, spacers, stringers and other elements that improve strength properties are additionally used.
Is “arch” really better than “house”?
The age-old question - to choose a house or an arch? Many experienced summer residents claim that both designs have pros and cons. For example, today an arched greenhouse is built much less frequently compared to a “house”, and all because it is considered less reliable, capable of collapsing from the mass of snow, but no one has yet seen a failed greenhouse with a ridge, even in Siberia. But building a greenhouse-house is more expensive, it has less space and many other disadvantages that can easily outweigh its ability to not retain snow on its surface.
The arched greenhouse has a large number of advantages, thanks to which it is already beginning to gain increasing popularity among summer residents:
- The interior of the greenhouse is evenly illuminated due to the fact that the area of reflection of sunlight in the convex shape is much smaller than that of solid vertical walls.
- Very easy installation. Arched greenhouses built from polycarbonate began to be erected due to the fact that polycarbonate is much easier and cheaper to bend than to cut into several parts and fasten them with metal corners. At the same time, you should not think that the traditional form is in any way better than this “artificial” one, since everything new is always useful and interesting, especially when it comes to the garden.
- There are very few seams that must always be very carefully sealed. But a traditional house will force you to tinker with the ridge.
- Good resistance to many atmospheric conditions, including winds. It is not for nothing that since ancient times domes have been considered the best architectural form - durable and strong. The best example of this form is an ordinary chicken egg, which, although it has a rather fragile shell, is quite strong. It is for this reason that the “houses” are afraid of the elements, and the “arches”, in case of bad weather, can only fall off and roll for a long time across the fields. But this problem can also be solved by properly securing the entire structure to the foundation.
- The assembly of an arched greenhouse is simpler and more constructive. Need to increase the area? You just need to add additional sections and the greenhouse will become larger. You won’t be able to do this with traditional greenhouses, even if you wanted to.
- More air and free space. And indeed it is. But there is also one drawback - it is quite difficult to install shelves. Although, boxes and pots can be installed on high legs or simply hung.
- The arched greenhouse can be disassembled and then installed in another place. If you decide to move to another dacha, then you can forget about the greenhouse-house, while the arched greenhouse can be disassembled and folded even into a passenger car. In addition, even a non-professional can sketch and understand the construction drawing of an arched greenhouse, because it is very simple.
- Beautiful design. You can make an architectural masterpiece that will shine in the sun, surrounded by open beds. Such a greenhouse will look great against the backdrop of an exquisite landscape and will not at all remind you of the village.
There is one myth that needs to be dispelled: an arched greenhouse structure will be much stronger than a “house”, provided that both are made of the same material. The reason for this is quite simple - in the case of an arched greenhouse, the polycarbonate bends and is in a stressed state, that is, under load there is tension or compression, but in a greenhouse-house it bends. Therefore, if you do not install support rails in the “house”, then the negative consequences will not take long to arrive.
Greenhouse houses began to be built at a time when glass was used. It couldn't be bent, so it was simply cut into rectangles, which were then inserted into the honeycomb frame. At the same time, they tried to make the windows as small as possible, since if it breaks, it’s better to replace it with a small window.
Installation instructions for an arched greenhouse
Assembly work should be carried out in the absence of wind. First you need to level the area on which the structure will stand. Then you need to build the foundation.
For it you can use a 50 by 100 board, 100 by 100 timber or sleepers. Procedure:
- Lay out the beams around the perimeter.
- Level using a level.
- Secure with a corner.
- Align diagonally.
The algorithm for further steps is as follows:
- Lay the end parts so that the door and windows swing upward.
- Take cellular polycarbonate and cut a piece of 6 * 2.1 m. Lay it face up on the end, aligned with the base and in the center of the left post. Be sure to remove the protective film from the back of the polycarbonate.
- Secure the covering with self-tapping screws and cut along the resulting arc. Close the second end in the same way.
- Place the remaining material with a soldered edge on the left side of the end part, align it with the left post, leaving a gap of 3 mm, and secure with self-tapping screws. Carry out the same manipulations with the second end element.
- Make a door and windows along the counter.
- Assemble and attach a steel frame to the foundation.
- Install the assembled ends.
- Install the arcs on the guides. Connect them to the ends using stringers.
- Carry out work on installing polycarbonate, starting from the edges of the greenhouse. The covering sheets must be overlapped by 100 mm, observing the direction of fastening. It is recommended to cut off excess protruding parts of the material with a knife. The work is done!
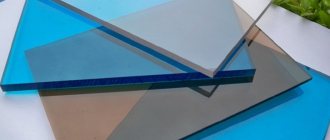
What is the best way to cover such a structure?
For an arched greenhouse, you can use polycarbonate film and sheets. The film is, of course, cheaper - even if you take a special one, with reinforcement, which is designed to last for three years. But minor troubles cannot be avoided: under the influence of direct sunlight, the film will crack in the folds, and from strong winds it will tear. But, if the area where the greenhouse will be located is quite calm, such material can be used.
There is much less hassle with polycarbonate sheets and it is quite convenient to work with such material. And it can be cut at home without any problems. If film is used, it can be secured to the frame with wire and twine.
You can bend polycarbonate yourself - into a half-arc. It will not be difficult to calculate everything - the height of the greenhouse from straight walls to the ceiling is the radius of the semi-arc, and the width of the structure itself is equal to the diameter, because twice the radius. For reference: typical sizes of polycarbonate are 210x600 cm and 201x1200 cm.
It is only important to choose the right fastening material: for PVC and wood, bolts and screws are quite suitable, but it is better to weld a metal frame. Here is the most traditional method of laying polycarbonate sheets: overlapping by 3 cm, followed by treating the seams with high-quality sealant. You can use metallic tape to cover the end strips. And finally, the perimeter of each polycarbonate sheet must be sealed with protective tapes so that condensation does not accumulate in the cells and insects do not infest.
Where to place an arched greenhouse on the site
The place for installing the greenhouse building must be well lit. For construction, choose an east-west orientation - this way the plants will receive maximum light.
The structure can be protected from drafts and wind by placing it near a hedge or fence. But you should not place the greenhouse closer than 1.5 m from the fence.
It is important to decide on approaches in advance. They should allow you to comfortably operate the structure. It’s great if there is water for irrigation nearby.
Material for making arcs
To build an arched greenhouse at home, you can use a wide variety of materials: wood, pipes made of aluminum, steel, PVC, as well as thick wire. But the most common material is, of course, wood. But if you decide to make parts for your arched greenhouse out of wood, do not forget to treat them with an antiseptic in advance, as they will constantly come into contact with damp soil and be in an environment with a high level of humidity.
Currently, profile pipes are increasingly used for the construction of greenhouses. More preferable are those with a rectangular cross-section, since polycarbonate fits very well on them.
To build a light seasonal greenhouse, it is best to use inexpensive plastic arcs, since in the fall it can be very easily disassembled and stored in a utility room until next spring. Also, such a greenhouse can be installed in a new place every year, giving rest to the soil at the previous installation location.
Current models of arched greenhouses
Today, the following models of arched greenhouses are the most popular among Russian gardeners:
- Dachnaya-Optima. Manufacturer – Russia. Designed for regions characterized by abundant rainfall. It has excellent strength characteristics and a long service life. Other advantages are good resistance to mechanical loads and temperature changes, low cost.
- Vintage PC. Advantages: high strength and stability, no need for a foundation, resistance to damage. There is a window for ventilation. Frame material – galvanized profiled steel.
- Northern woman. Designed for areas with cold climates. Not afraid of snow and sharp gusts of wind. Perfectly withstands mechanical loads. Equipped with two doors and two windows for ventilation. Pros - galvanized frame on both sides, bolted connection of elements, long service life, increased strength.
Which design should you choose? It depends on the location of the garden, as well as on your preferences and financial capabilities of the family budget.
An arched greenhouse is an excellent choice for a summer residence. It is reliable, easy to assemble, relatively cheap, and durable. If desired, you can build it yourself, without turning to the help of specialists. The choice of size depends on what plants you plan to grow and in what volume.
Selection criteria when purchasing
Nowadays, with a wide range of products available, there is nothing easier than purchasing an arched greenhouse in a construction market, without spending a lot of time, money and effort on making it yourself from scrap materials. However, the variety of greenhouse models presented in stores from different manufacturers makes choosing the right option quite difficult.
Important! In order for the arched structure to serve for a long time, while maintaining a comfortable microclimate inside, it is necessary to seal all seams using adhesive bases.
Therefore, before purchasing, experts advise paying attention to the following factors:
- Dimensions . Manufacturers offer devices in standard and non-standard sizes. The latter are much more expensive because they are made according to individual sketches, but they allow you to use the available space much more efficiently. When choosing a standard design, the optimal dimensions are: 3x4, 3x6. The most popular greenhouses are up to 6 m long; longer ones require additional partitions to organize high-quality plant care.
- Frame . To make the frame, manufacturers use wood, aluminum, plastic, galvanized metal, and steel pipes. The first option is considered the least suitable, since when exposed to external factors it quickly loses its properties and deteriorates. An aluminum frame, just like galvanized steel, has excellent strength and durability, but is quite expensive. The best option is a structure made of steel pipes, which is quickly assembled and is characterized by excellent stability and strength.
- Covering material . As already noted, PVC film, polycarbonate, and glass are used to cover the greenhouse. A significant disadvantage of glass coating is its fragility and rather large mass. In addition, glass is used only for greenhouses that have a solid and strong foundation. Film is usually used for small structures. It is inexpensive, creates a good greenhouse effect, but has a short service life and quickly deteriorates under the influence of external factors. The best option is polycarbonate coating. It is lightweight, easy to install, durable, elastic, protects vegetation from ultraviolet radiation, and is resistant to negative climatic conditions.
- Optional equipment . If you want to grow vegetables or flowers all year round, when choosing a greenhouse you need to pay attention to the availability of heating, as well as high-quality ventilation. The heating system is selected depending on financial capabilities. To ensure ventilation, the devices described must have transom windows or vents.
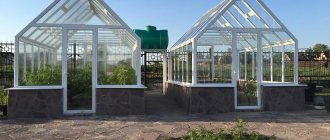
Photos of arched greenhouses on a wooden and metal frame
Bottom line
It is very important not to forget about ventilation, since plants need not only fresh air, but also coolness on the hottest days. But ventilation must be done correctly so that the seedlings do not catch a cold. The simplest option is a window made on the side of the greenhouse that is opposite the door. You can also provide transoms at the top for ventilation.
If you do not want to build a greenhouse yourself, but intend to purchase a ready-made arched greenhouse, then when choosing an industrial model you need to pay special attention not to the material, since now almost all greenhouses are made from pipes or profiles, but to the number of transverse elements and their reinforcement. This is what determines whether the greenhouse will collapse in winter or not. In addition, the distance between the arches plays an important role, since the smaller it is, the better for the greenhouse. Exactly the same rules should be followed when independently constructing an arched greenhouse.
We choose a place and make a foundation
When choosing a location for a greenhouse, you need to follow a few simple rules:
- The long side of the greenhouse should be in an east-west orientation. This way the plants will receive the most light.
- In windy regions, it is necessary to additionally protect the structure from the wind. To do this, you need to place it next to the house, fence or hedge.
- There should be easy access to the greenhouse: wide paths, proximity to the house.
The choice of foundation will depend on the scale of your structure. If it is light plastic with a polyethylene coating, then it will be enough to make a frame from timber and attach it to the ground with long reinforcement so that it does not tip over from the wind.
For stationary options, the following options are suitable:
- Monolithic strip foundation;
- Prefabricated strip foundation;
- Columnar foundation.
The material can be reinforced concrete, stone, brick, blocks, wood.
For example, consider the construction of a strip monolithic foundation with a small brick base.
READ ALSO: Arched greenhouse - reasons for its popularity and design options
Greenhouse foundation diagram
- Dig a 40*20 cm trench and install the formwork.
- A 10-15 cm layer of sand should be poured into the bottom of the trench.
- Tie the frame from the reinforcement. Also make anchor bolts to secure the base and arches of the greenhouse.
- Pour concrete into the formwork. Check the fill level to ensure there is no slope. The surface must be horizontal.
- After the concrete has hardened, lay brickwork on it in 2-3 layers. The seams must coincide with the exit of the mortgages for fastening the frame.
- Lay down a layer of roofing felt and begin installing the frame.
Ready-made drawings of greenhouses made of profile pipes and polycarbonate
When making it yourself, you can choose any shape, size and design of the greenhouse. There are several types of greenhouses, but the most popular are arched ones and those with a gable roof.
Greenhouses "house"
Greenhouse "Butterfly"
Greenhouse "Breadbox"
Calculation of a 20×20 profile pipe for a greenhouse
Drawing of a gable greenhouse
Watch the video: drawing of a greenhouse frame made from a profile pipe.
Features of polycarbonate greenhouses
The classic material for greenhouses is glass and polyethylene film.
But polycarbonate has advantages over them:
The material withstands mechanical stress better than analogues. It may be hit by hail, but this will not lead to complete destruction. This material is used as a roofing material and easily copes with the mass of fallen snow, while this is not available to competitors.
It is important to choose the correct material thickness for the region, as rainfall amounts may vary. The frame must also be appropriate. All together this should hold a huge weight of snow. 17 cm of wet snow on an area of 30 square meters will weigh 17 tons.
Polycarbonate partially prevents the penetration of ultraviolet radiation through it. Thanks to this, UV-sensitive plants will be reliably protected.
The material holds heat well, as it has a honeycomb structure. There is air inside the cells that interferes with heat transfer. The operating temperature range is from -50 to +60 C.
Polycarbonate is elastic, which allows a single sheet to cover arched structures. It is easy to drill and cut, which greatly simplifies the work process.
Cellular polycarbonate, transmitting sunlight through itself, scatters it, which reduces the likelihood of plants getting sunburn.
The material is not the cheapest, but its price is lower than that of glass.
A standard polycarbonate sheet has a size of 210*600 cm. This is 8 m2. Thanks to this, the greenhouse can be quickly covered with just a few sheets.
Size chart of polycarbonate sheets
Polycarbonate also has disadvantages:
Low-quality material will not cope with mechanical loads.
Over time, polycarbonate begins to fade in the sun, which leads to a molecular change in its structure. The material becomes brittle. Its color changes, its turbidity increases, and sunlight gets worse and worse.
Polycarbonate greenhouses are difficult to heat in winter. This material is plastic and can become deformed when the temperature increases.
When purchasing, be sure to ask for a quality certificate. This will be an additional guarantee of purchasing a good product.
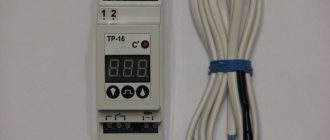
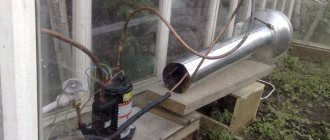
Winter greenhouse with heating
Many options for greenhouses are described above. Each of them can effectively retain heat. But in winter there is a critical lack of heat. Therefore, you have to seriously think about additional heating. Which option should you choose? Let's look at the most popular options:
- A heat gun is a reliable way to increase the temperature in a greenhouse in the shortest possible time. It is important that you can install it yourself. The main thing is to ensure that the flow of hot air does not harm the plants. You can install it at any time and also move it at any time or remove it altogether.
- Warm floors are a great way to raise the temperature to the desired level. It is important that it is not the air that is heated here, but the earth itself, from which the heat is already distributed throughout the entire volume of the room. It must be installed before planting, not forgetting about reliable waterproofing. Alas, constant heating takes a lot of electricity, so this option is not cheap.
- Stove heating - you can use an ordinary potbelly stove made by yourself. It can be heated with any fuel: cardboard, coal, peat, wood. But there is also a drawback - you have to regulate the heat yourself. And, as always when working with open flames, there is still a risk of accidental ignition and fire.
- Infrared heating is carried out using special infrared lamps. The heat is evenly distributed over all surfaces: plants, beds, external walls. You can turn it on and off at any time, and there will be no problems with installation or dismantling. But the power is relatively low - it is almost impossible to raise the temperature by 20-30 degrees.
- Water heating - is connected by an additional circuit to the heating of a residential building or other facility. An excellent heating method - efficient, reliable and not too expensive. At least the heat consumption does not increase. The main disadvantage is the complexity of installation. It needs to be planned from scratch and preferably simultaneously with drawing up a heating project for the house itself. Well, installation costs are high. Suitable for professional greenhouses, and not for country greenhouses built by yourself.
So, you have a great opportunity to choose exactly the heating option that suits you.