How would you like to enjoy fresh fruits and vegetables collected from your own garden in winter? Today, you can make this dream come true by installing a greenhouse on your property. You can get a bountiful harvest in winter if conditions appropriate for the growth and development of crops are created in the greenhouse.
First of all, it must be warm. And for this you need to take care of installing suitable equipment. Today there are a lot of options - a stove, a warm floor and an infrared heater. It is the latter method of heating that is gaining popularity every day.
Kinds
IR heaters are extremely popular despite their rather high cost.
There are many models of different power, for different areas, on different fuels, and so on. According to the installation method, devices are divided into 2 types^
- Stationary - the presence of a heater in this case is provided for at the construction stage. This solution is rational in the case when the greenhouse needs constant heating and has an area of at least 15–20 square meters. m. Otherwise, a mobile model is quite sufficient.
- Portable - designed for heating a small area - up to 15 square meters. m. The heater can be moved from place to place or mounted on suitable surfaces.
IR heating by power type
- Electrical - thermal radiation is generated by a special element. For this to happen, it must be warmed up. In electric heaters this occurs due to electric current. Based on the type of heating element, the following types are distinguished: ceramic – the heating element is a ceramic panel. Its large area guarantees heating of a large area of the greenhouse. Ceramics are practically eternal and do not react to temperature changes. Another interesting property is that the ceramic element does not glow in the dark. The disadvantage of the device is that it takes a rather long time to warm up - up to 15 minutes;
- halogen – the heat source is tubular quartz heaters. This option heats up much faster, but is designed for a smaller area. Performed in any version - floor, wall, ceiling;
- carbon - heat is generated by a quartz tube, inside of which there is carbon fiber. This model is very durable and effective: almost all models are equipped with reflectors. On average, a 500 W model warms up an area of 10–12 square meters. m;
- micathermic - ceramic tubes serve as the heating element. This is the safest option among all electric heaters. This structure is best suited for wall and ceiling units.
- Gas - gas is used to heat the element, which emits infrared radiation. There are 2 types of devices:
But in order for the heat to reach the beds in full, it is worth understanding how to make beds in a polycarbonate greenhouse.
Film - or tape. The heating elements are fixed to foil, which acts as a reflector and is covered on both sides with a laminated film. The thickness of the tape is only 1.5 mm. In rooms, a film heater is usually installed on the floor, but there are ceiling models. They are ideal for greenhouses. The film heater creates uniform heating, does not dry out the air, does not require maintenance and is easy to install.
This is what a strip infrared heater for greenhouses looks like
Devices are also classified by type of radiation:
- light – heat up to 600 C. Models are used for greenhouses with a large area;
- long-wave - they heat up to above 300 C. This power is enough for heating small greenhouses.
Also, don’t forget about how to install it yourself and use it correctly to ventilate a greenhouse.
This parameter distinguishes between:
- models with a thermostat - the device allows you to set and maintain the radiation power, which, in turn, provides heating or temperature maintenance. However, they do not estimate air temperature or humidity;
- options with a thermostat - provides for turning off the heating when a certain temperature or humidity is reached. The thermostat can maintain the temperature according to the set schedule.
Types of country infrared heating systems
Household IR wall heaters for cottages and private homes differ in the type of fuel used, power and other characteristics. Any infrared heaters use the following operating principle:
- Create thermal energy.
2.Convert heat into infrared directed radiation.
Today, there are several modifications of equipment with different efficiencies for heating a building.
Electric infrared heater
Modern heating of a country house with an electric infrared heater operates in a completely autonomous mode. If you use a programmable thermostat, the device can turn on immediately before the owners arrive at the dacha, warming the room to a comfortable temperature.
The advantage of the models is:
- Complete safety of operation.
2. No need to obtain additional permits.
3. Possibility of changing the location of the heater (for models on a stand).
Domestic portable electric infrared heaters for summer cottages with a thermostat are very popular. The devices are equipped with sensors that turn off the electricity supply when the surface overheats or when the heater falls.
The only drawback of electric emitters is the high consumption of electricity. Therefore, it is recommended to use electric infrared heating devices to provide a country house with heat in a constant mode only if it is not possible to install gas analogues.
Gas IR heaters
Suitable for wet and dry rooms, houses built of wood and brick. The heaters feature:
- Performance – the device, compared to electric analogues, warms up the room more easily and maintains the required temperature.
- Safety - a ceiling-mounted gas infrared heater for a summer cottage or its floor-standing version practically does not burn the oxygen in the room during operation, and therefore does not dry out the air. The gas is burned inside a ceramic or metal plate, as a result, flashes during ignition or during operation are completely eliminated.
- Cost-effective – infrared gas heaters for summer cottages during winter living in the house are the best option, as they provide approximately 40% savings compared to electric counterparts.
Heating a country house with infrared heaters will be more profitable if you install a thermostat or purchase a model with a built-in controller.
Choosing a quality heater
There is a wide range of prices on the market for infrared devices and you need to be very careful when choosing.
- calculate how many devices you need and what power. You can do this with the help of a sales consultant;
- if you choose the best option, be sure to check its performance right in the store;
- the heater should not make noise during operation;
- store employees are required to carefully package the purchase;
- do not buy without making sure that the certificate is available. The brand of the product and the data in the certificate must match;
- Don’t leave without a receipt and warranty card.
Reviews about infrared heating devices are mostly positive. One young man complained that the heater clicked loudly when heating up and when cooling down. Most likely, this is related to a specific device. In general, owners note the efficiency and high-quality heating.
Ways to improve the efficiency of a heating system
As you know, infrared heaters do not heat the air, but objects, including the soil of the greenhouse. At the same time, they are only able to warm the soil by 7-10 cm, and as plants such as cucumbers grow, the soil receives less heat. Therefore, to increase the efficiency of the heating system, experienced vegetable growers recommend that the soil be heated. The following options are possible:
- supply of warm air from any source through pipes;
- traditional cable “warm floor”;
- laying a layer of penotherm between the foundation and the ground;
- laying PLEN IR film under the ground.
Penotherm is an effective and inexpensive material for thermal insulation of greenhouse soil
Penotherm is widely used as insulation for saunas and baths. It is also the most cost-effective method of thermal insulation of greenhouse soil. A material with a thickness of 0.5 cm is used, which is laid directly on concrete with an overlap on the walls of the greenhouse to a height of 10-15 cm. A layer of soil up to 50 cm thick is poured on top of the insulation. This “pie” tolerates frosts of 30-40 ° C well.
Infrared film can be laid under the ground to a depth of 30-50 cm in stationary greenhouses or used for temporary heating, covering plants from above only on very cold days. The film under the ground can be mounted either horizontally on a base of concrete or crushed stone, or vertically along the perimeter or between the beds. Film heaters are also convenient when growing seedlings in boxes on shelves or on the floor.
Infrared film can be used to “bottom” heat the soil of a greenhouse or cover plants from above during very cold periods
When placing IR units in a greenhouse, it is also useful to take into account the recommendations of experienced users.
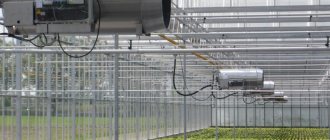
The potential of infrared heating devices with a power of 500 W or more is fully realized when they are placed in the coldest zones of the greenhouse along the walls and windows. Moreover, the distance from the device to the plant should not be less than 1 meter. Powerful heaters with ceiling mounting are effective. They are placed above tables with seedlings, above tall plants in the ground, but the optimal placement height in each case must be determined experimentally independently.
Typically, 1 heater is installed for every 1.5-3 meters of greenhouse length. The higher the greenhouse ceiling, the larger the area covered by one device. True, the higher the unit is located, the less heat the plants receive.
For some plant growers, the infrared heating scheme for a greenhouse with 10-12 heaters with a power of 250 W seems more flexible. It allows you to concentrate more appliances in one zone, leaving another cooler. In this case, the distance between the heaters should not exceed 1.5 meters, and the height of their placement above the plants is also determined experimentally: first they lower them lower, and raise them as they grow.
To increase the efficiency of an infrared heating system and at the same time reduce energy costs, the heaters are placed above the plants in a checkerboard pattern, thereby reducing the number of “dead” zones.
Users note the only drawback of infrared heating of greenhouses is the cost. But plants with rapid growth and high productivity fully compensate for these costs.
Any gardener, from amateur to professional, knows how important it is to maintain a certain humidity and temperature in the greenhouse to obtain a high yield. Various types of plants require a strictly defined temperature for rapid growth, which is very difficult to maintain on your own.
Also, do not forget that at night, especially in the off-season, the temperature can drop very low and the shoots can freeze, which means that you risk not getting a large amount of fresh vegetables to your table.
In order for your plants in the greenhouse to feel comfortable and bring a good harvest, heating is provided in the greenhouses. At large enterprises this is usually water heating or electric, less often air. Large farmers have long realized that heating a greenhouse and extending the harvest until late autumn, and in some cases all year round, can bring good income to the enterprise, because prices for cucumbers in winter are equal to pork or beef. In addition, using greenhouse heating. the seasonal factor is reduced.
How to use infrared emitters correctly
Thanks to its mobility, ease of installation and connection, installation work can be done without the help of specialists. But then you will have to take advantage of the accumulated experience of others who, over the years of operation, have managed to learn all the intricacies of their operation and management.
Using more powerful devices
With this option for using infrared heating, it is assumed that units with a power of 500 watts will be used. The distance from plants to equipment must be maintained at more than 1 m. In those parts of the premises where the lowest temperature is observed, such powerful devices will successfully cope with their work. That is, it is better to place them near windows or walls.
Heaters equipped with a special ceiling mount are more convenient to use. They are convenient to hang over a table with seedlings. It is quite difficult to determine exactly at what height the device should hang. This will have to be clarified only experimentally from your own experience. Having adjusted the equipment to the desired distance, it is not changed until the vegetable crops begin to grow. With their growth, which is already becoming noticeable to the eye, the device is raised higher.
One unit will be for every one and a half to three meters of area. The scale of the greenhouse and the height at which heaters are hung will influence the choice of the specific distance between units. A larger area will be covered by the heater when it is located higher. Whenever possible, infrared equipment should be hung as high as possible, so that fewer units will need to be installed.
It is important to consider here that the higher the heater is located, the less heat the plant receives. Therefore, the level of comfort for seedlings should be given higher priority than savings.
Using lower power heaters
Using a 250-watt heater is the second option for using an infrared heating system. You need to use more devices to get the desired effect. Therefore, the distance between the units should be maintained no more than one and a half meters. As for the level of their placement above the plants, this will also have to be established only in practice.
The position of the heaters must be left stable until the seedlings grow, as in the previous option. They are raised gradually, following the growth of seedlings. The small dimensions and weight of such a heater provide certain ease of use. There is enough wire to hang the device.
There are a few tricks you can use to help you get the most out of your infrared heating. For example, placing heaters in a checkerboard pattern will increase the heat transfer of the equipment, which will help save energy. The number of “dead” zones is minimal. This advice would be appropriate for cases where it is necessary to heat the entire area of the greenhouse evenly. If heat sources are needed only in certain areas, then heaters are hung directly in them.
Main advantages
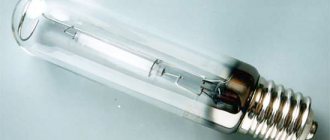
The design of such devices is ceramic infrared lamps, which are located in a frame made of highly polished metal. They work by producing rays very similar to sunlight. In other words, such devices create an imitation of the sun's rays and their heat. When these rays hit objects or any surface, they are quickly absorbed, and then the thermal energy is transferred to the surrounding space.
An important feature of infrared heaters is the coverage of a large area by such rays when the source of thermal energy is removed from the heated surface. In this case, the heating temperature of the heated surface will decrease
In addition to thermal energy, which is very similar to solar energy, fan heaters have the following advantages:
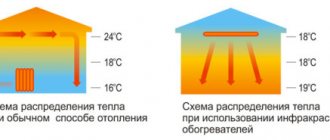
- Best distribution of thermal energy. In other words, uneven distribution of heat is completely eliminated, unlike other types of heaters, in which warm air is at the top and cold air is located near the floor surface. When growing seedlings, this property can be considered a big disadvantage. The infrared heating system does not heat the air space, but only the necessary areas of the polycarbonate greenhouse. Thus, the air in it will always have an optimal temperature for plants.
- Great practicality. It lies in the fact that when using a large number of fan heaters, you can create several different areas in one room. At the same time, it is possible to set the optimal temperature for each individual zone.
- Economical use of electrical energy. With high-quality installation of infrared lamps, you can achieve savings in electrical energy consumption of up to 45%, because it will not be used to heat unnecessary space.
- When the infrared heater is operating, there are absolutely no drafts. By installing such heaters near windows, it becomes possible to compensate for heat loss without much air movement.
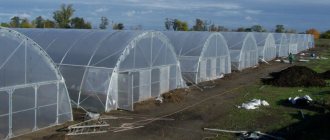
Heating polycarbonate greenhouses in winter: heating options
Thanks to the vast experience of agricultural workers in the use of infrared devices, we can highlight the following recommendations that will help you choose a quality product:
- seed germination increases by 35 percent when using infrared lamps in polycarbonate greenhouses;
- the microclimate in the room is not disturbed and has optimal humidity under the influence of infrared rays, which eliminates the problem of regulating air humidity;
- infrared heaters operate very quietly and do not emit any odors;
- heating the soil to a depth of up to 8 centimeters is possible, which other types of devices with a heating function cannot achieve;
- you can warm the soil in a polycarbonate greenhouse up to 30 degrees Celsius using infrared heaters, and at this time the room temperature will not exceed 22 degrees Celsius.
Thus, it becomes clear that infrared heaters are a very profitable and useful purchase for a greenhouse. To decide on the choice of an infrared heater for a polycarbonate greenhouse, you need to know their following features:
- Light infrared heaters can heat any surface up to 550 degrees Celsius and are optimally suited for industrial premises with a large area.
- Long-wave infrared heaters do not have such great potential, so they are well suited for small rooms, which are found in most garden plots.
- Many models run on electrical energy, but you can find gas units that use natural gas.
Advantages and disadvantages
Infrared heaters are so relevant today that they are replacing traditional radiators in modern cottages. This means that they are quite suitable for people. What benefits do these devices bring to plants? Let's look at the advantages of their work.
- Thanks to the fundamental feature of IR devices (heat does not go to the air, but directly to the soil), thermal energy is distributed throughout the greenhouse in the most optimal way.
- There is no movement of air mass that is familiar to us from bottom to top. This means that there is no circulation of dust and microorganisms. There are no drafts.
- The heat is soft, not intense, the air does not dry out, which means the microclimate in the greenhouse is preserved.
- IR devices can be installed as convenient. On walls, on racks or special mounts, as well as on the ceiling. Experts say that the best option is ceiling mounting.
- They do not make any sounds during operation.
- They have temperature sensors. This means, for example, more heat-loving exotic plants can grow in one corner, and cool-loving crops in another. The temperature can be set initially, and it will be maintained without your participation. You can also regulate the heat supply during the growth of one crop.
- The intensity and uniformity of heating can be adjusted by raising or lowering the device slightly. First you need to install the IR heater a meter from the floor, and then, as the seedlings grow, mount it higher.
- IR equipment is also growing and developing. On a more modern one, instead of a flat screen, there is a spherical one. The light rays are scattered at an angle of 120 degrees and the plants receive even more even heat.
- The room heats up quickly and cools down slowly due to the fact that heat accumulates in the soil.
- Energy consumption is more economical than with other heating options. If we talk about electricity, it saves 30–70%.
- The insulation design has no moving parts or air filters; they do not need to be replaced. This means they are durable. They can work around the clock.
- The devices are compact and easy to transport.
- Heaters are fireproof.
- You can install it yourself; you don’t need specialists for this.
IR heater in a greenhouse
And now the cons:
- If the use is economical, then the acquisition is quite expensive.
- A lot of fakes of famous brands at a lower price. They don't work for a long time.
- You need to correctly calculate how much and what kind of insulation you need to buy for your premises.
How to choose an IR heater for a greenhouse
Of course, it should be taken into account that positive reviews of IR heaters were received from people who were able to choose the right device for their greenhouse and install it properly. The maximum positive effect from the operation of the device depends on the accurate calculation of the heating systems, connection and location.
So, to explain everything simply and quickly, let’s consider the calculation using the example of a standard greenhouse with dimensions of 6x3 m. For such an area, only two heaters with a power of 1.2 kW to 1.5 kW are enough
But it is important to consider not only the power, but also the size of the devices themselves. For example, a device about 1.8 m long with a beam scattering angle of 100-120 degrees is capable of heating an area measuring 2.5x3 m. Even the roughest calculations will make it clear that two heaters are more than enough for the greenhouse taken as an example
Of course, larger areas will require more heaters or more powerful models.
Even the roughest calculations will make it clear that two heaters are more than enough for the greenhouse taken as an example. Of course, larger areas will require more heaters or more powerful models.
For wide greenhouses, there is another option - to install heaters not in the center, but on both sides. To do this, you will need about 4 devices, and their power should be halved accordingly. This way you can be absolutely sure that every square centimeter of space is exposed to the warm rays.
Types of heaters
There are several types of IR for greenhouses. The types of radiation by nature and length were described above, but now the difference lies in the installation method.
Types of devices by installation type:
- ceiling - the optimal location is a meter from the ground surface. Best suited for greenhouses with high humidity levels, creating an additional greenhouse effect;
- ground - placed directly on the ground;
- wall;
- infrared films – can be installed on the ground vertically or horizontally. Vertical installation is carried out between the beds when the film goes around the entire perimeter. When installed horizontally, the film is dug into the ground to a depth of approximately 50 cm under the beds. This method is more suitable for a stationary greenhouse, when you do not need to regularly dig up the beds.
Every greenhouse has its own sun
The cat Matroskin from Prostokvashino also suggested installing his own sun in each house.
His idea came to life since the advent of infrared heaters. These devices heat all objects according to the principle of our sun. That is, they emit waves that absorb all surrounding objects. How does it work? Recall that all living things, as well as warm solids and liquids, emit infrared waves. Infrared rays are electromagnetic waves, just like any light. And the wavelength directly depends on its heating. The higher the temperature, the shorter the wavelength and the greater the radiation intensity. Based on this parameter, there are two types of IR heaters for greenhouses.
Heating a large greenhouse with an IR heater
Calculation examples
Condition: The equipment will be installed at a height of 1.7 m. At a distance from one to another - 3 m, in a checkerboard pattern.
Question: How many infrared heaters will be needed with such an installation for a greenhouse measuring 6 by 12 m and an area of 72 m2?
Solution: If we multiply 3 (m.) by 4 heaters (power 7.5 watts), calculating that each of them can serve three meters of area, then we get 12 heaters.
For a greenhouse 3 by 6 m, two IR heaters 1.7 m long and 3 m wide, with a power of about 1,000 W, are enough.
From these examples it is clear that it is necessary to take into account not only the area of the greenhouse, but also their type and the power of the equipment. The more intensively it works, the fewer devices you will need.
Description of infrared heating
The mentioned equipment is similar in principle to working with the sun. The device emits heat, which is absorbed by objects and surfaces. The latter give them to the air. If you are interested in infrared heaters for greenhouses, we recommend further reading about their main advantages. They include the absence of drafts, optimal heat distribution, high practicality, and the ability to save energy. If you have used heating systems that operate on the convector principle, you have noticed that heated air rises upward, while cold air accumulates below. Such heaters turn out to be ineffective. This is due to the fact that the vegetation is located below. As for infrared equipment, uneven heat distribution is eliminated. Thanks to this, heat loss can be reduced, while the plants will always be provided with the necessary level of heating.