Let's just say that today there are actually fears being cultivated about the growing population - after all, we are running out of land as a resource. It’s not for nothing that films and TV series about a virus apocalypse are becoming more and more popular, when 90% of people suddenly died out, and the remaining lucky ones can finally breathe deeply. Jokes aside, modern cities are really overpopulated and they lack oxygen, greenery, and fresh normal food. The reason is this. Already now in megacities there are practically no normal-sized private plots where you can actually plant something. And many even face a dilemma: either fruit trees and a garden, or greenhouses, which should not be shaded by anything. Therefore, enterprising Russians are building small greenhouses in their own bathhouses and garages, benefiting not only in saving space, but receiving additional bonuses from such an arrangement. And not only Russians - it seems that the whole world has finally come to their senses.
- 2 Fashion, profit + oxygen: advantages of the idea
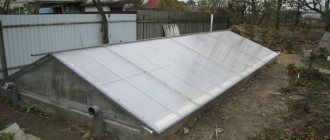
- 3 What about the roof of a bathhouse or garage?
- 4 Features of construction technology
- 5 Subtleties of growing at altitude
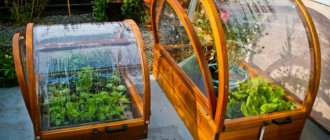
5.1 Option No. 1. Pots and containers
- 5.2 Option No. 2. Hydroponics (full and combined)
Advantages of a rooftop structure
FORUMHOUSE user Alexandra 0605 has an interesting hobby - growing citrus fruits. He even supervised the Perm Botanical Garden at Perm State National Research University and created a rich collection there. But for a long time I could not arrange my own greenhouse. Alexander was inspired to such an original solution (a greenhouse on the roof) by his colleague from Nizhny Novgorod, Sergey Marinkov. The user learned about his experience from videos on the network.
But why not a free-standing structure, traditional and familiar? As Alexander himself notes, the climate in the Urals makes heating greenhouses expensive. There may be a need for powerful heating of the soil, as well as the need for additional work to “cut off” the cold from frozen soil outside the greenhouse building area. And these are not the most expensive activities.
Alexander 0605
“Having placed a greenhouse next to the house or attached it, I will need additional funds and quite significant ones for its construction. You will need: a separate foundation for the greenhouse to the freezing depth; insulated blind area around the perimeter; excavation work (excavation of soil, adding a substrate that will act as insulation; use of sheet insulation both from the foundation and throughout the entire area of the greenhouse); installation of underfloor heating or ground heating pipes; installation of additional water supply for hot water supply and hot water supply, sewerage; installation of an additional pipeline to cut off cold from the ground outside the building area; additional pumping equipment for circulation of coolant through ground heating; screed across the entire floor of the greenhouse, etc. In general, to build and operate a free-standing greenhouse will require significant costs.”
And the construction of a “normal” roof itself will also cost a considerable amount of money. And so our user got 2 in 1. There is a roof and a greenhouse.
Alexander claims that the floor of the greenhouse will be warm from the interior. And the cost of heating the greenhouse will be significantly reduced. Saving land on the site will allow you to grow more crops. The structure increases the thermal insulation of the building and creates additional protection from precipitation.
And lots of natural light. Shading from trees and buildings is not possible. In this case, heat loss is effectively used. There is no reason not to trust the user, because his greenhouse has been standing for many years. How did he build it?
Planning a dream, armed with a pencil and paper
Planning your dream is most effective with a pencil and paper at hand. Your project should contain a house plan with the side to which you are going to add a garden extension with your own hands. You will also need a plan for the second floor - a greenhouse or attic itself, in case you decide to arrange your brainchild on the second floor. In any case, your extension should initially be divided into three areas:
- communicative – these are paths that perform a connecting function in the layout;
- recreational - a place of rest, the interior of which may include not only a sofa or armchair, but also the possibility of eating or negotiating;
- decorative - here are the plants themselves, and the design can be complemented by modern decoration or fashionable decor.
The original extension is the most popular form of arrangement of your brainchild. In addition to it, you can design a layout that will allow you to diversify the project, either as an addition to the main building or as a separate building.
As equivalent options, you can name self-made premises:
- corner (“encircling” the outer corner of a one-story house);
- two-facade (in this option, the other two sides can be the inner corner of the cottage);
- three-facade (here the fourth side is the wall of the main building).
In addition, the project may take into account that the dream being realized will look like:
- buffer zone (has the format of a vestibule or balcony);
- greenhouses (this do-it-yourself garden option assumes the format of a non-residential premises, which is partially heated and the air is characterized by high humidity);
- standard kindergarten (room heated in winter);
- verandas or terraces (this format does not involve heating, and the project itself is an extension to a heated room).
With so many options available, it is possible to make a final choice in the proposed planning and it is necessary to move on to other, no less pressing issues.
Made in USSR
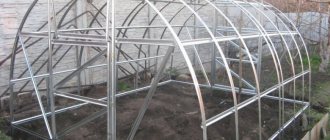
This is what Anthracite greenhouses look like.
When the greenhouse plant was liquidated, the structures were sold at the price of scrap. Alexander purchased Anthracite galvanized structures, a Soviet industrial greenhouse. The rafter system was made on its basis.
The builder was surprised by the condition of the metal with a thick layer of zinc. The material was in perfect condition. No trace of rust. But over the course of several months, the parts had to be disassembled and stored. Alexander found the design documentation and made a drawing. The structure was assembled with bolts.
The area of the greenhouse is 100 m2. The greenhouse consists of 6 trusses, the distance between them is 2 m and a lathing system. The height at the ridge is 3.8 m.
The forum user installed a standard greenhouse on the slabs and secured it with M16 studs, and added mansard-type slopes. The structure was reinforced with double trusses. Alexander pulled the structure together across one span with special tension drums using 5mm galvanized wire. And Alexander fused a waterproofing sheet (Bikrost) onto the slabs.
Basement insulation
Carrying out thermal insulation work
To ensure that the greenhouse idea does not turn out to be a failure, you can calculate the heat loss of the basement. It is difficult to calculate on your own, so it is better to turn to specialists.
But let’s take a closer look at how to preserve heat in the cellar and carry out thermal insulation work on your own:
When insulating the basement from the inside, it is important to remember that you cannot do without a vapor barrier, because it is this that will allow the room to last much longer. There are many types of insulation, but polystyrene foam remains the highest quality, and its price is much lower. But film materials are suitable for vapor barrier.
| Insulation starts from the floor: |
Advice. Small joints (and they should be small!) are sealed with sealant. If heaters appear in the basement in the future, there is no need to insulate the ceiling. If not, then foam plastic is also glued to the ceiling, and for greater strength it is nailed with dowels. |
| After the foam plates are installed, a so-called armor layer is created: | The slabs are again treated with a special glue, and then a special mesh is attached to it, after which the glue is applied again. |
| Then membrane vapor barriers are glued on: |
As a rule, the film is laid with an overlap, then all seams are secured with tape. |
Roof installation
For the roof, Alexander chose 25 mm fine-cell polycarbonate with a cross structure.
Alexander 0605
“It is important for me to reduce heat loss through the roof. That's why I chose 25mm. I thought 16mm would not be enough in my case. And so, they put 32mm. The light transmission of 25mm SPC is sufficient for plants.”
True, some users doubted the choice of material.
Seryoga 567
“I’m building a 6x9 garage this year. The roof is not small. I don’t want this to be a dark closet that you crawl into once every hundred years. There is an idea to make a greenhouse instead of a dark attic that would function both in summer and winter. But I came up against different opinions about the durability and rationality of polycarbonate. Some people say that it will be great, but others say that this thing, polycarbonate (PC), is short-lived.”
Noolegkano
“How will the coating hold snow and what will it say against good hail? I saw its consequences on cellular polycarbonate. I wouldn’t want the roof of the house to look like this.”
According to the greenhouse builder, he chose not ordinary polycarbonate for garden greenhouses, the thickness of which is 4-10 mm. The roof is made of the material chosen for swimming pools, gyms, and tennis courts. Polycarbonate (25 mm), which the forum user chose, has 4 chambers and X-partitions (additional cross-structure). This gives the roof high impact resistance. But the snow doesn’t last long, it slides.
SPK 25 mm Novattro on a cut.
For ventilation, Alexander inserted two balcony doors on each gable. The filling in them is also made of 25 mm cellular polycarbonate. He decided to abandon the ridge vents.
The lower ends of the polycarbonate sheets are covered with punched tape and equipped with a galvanized channel. The element was secured to an aluminum connecting profile with M6 bolts, and the free ends at the edges of the gables were secured with galvanized punched tape to the bolts on the bottom sheathing. To drain water, Alexander drilled channels with a pitch of 300 mm. The filing was covered with a 40 mm plastic sandwich panel.
And to protect the plants in the hot summer, cables were stretched along both slopes, and spandbond curtains were mounted on them with fastenings at the top and bottom. From April to September, the spandbond is stretched, and with the onset of cold weather, Alexander moves the curtains to the gables.
Alexander 0605
“Currently the greenhouse is being tested by abnormal heat for our harsh places. For a couple of weeks the heat reaches +36+38C. In the greenhouse it reaches +40C. Ventilation through gable doors and spandbond shading works great. Plants do not burn or “cook”. All with dense, dark green foliage.”
Special containers for plants
Unfortunately, it is impossible to rest on the beds as is the case with a ground-based greenhouse. It all comes down to too much weight of the structure in the case of adding 50 cm or 1 meter of nutrient soil.
Therefore, you will have to rely on pots, containers, boxes or trays. But the problem is the rapid drying of the soil and the lack of air for the normal growth of the root system; in fact, there is not enough space for its development. As a result, you should not count on a large harvest.
What can be done:
- Use special types of cultivated plants. They are also called: decorative or greenhouse and are better suited for growing in difficult conditions;
- It is necessary to periodically change the soil in the containers. But, in order not to harm the root system, it is worth removing a little from above and adding new soil. Specialized stores offer a pre-prepared fertile mixture for this purpose without the use of chemical additives, since the fruits are used for consumption. Although it is more profitable to independently prepare a supply of high-quality land in advance.
Heating system
It was planned not to install a heating system in the greenhouse. Alexander believed that there was enough heat from the building below and the sun above. At first, 3 convectors (1 kW each) worked in the house and maintained the temperature inside +8-10 °C.
Alexander conducted a test drive to see how the greenhouse will keep warm when it’s frosty outside. At a temperature of -22 °C in the greenhouse it was +6 °C at 11 o’clock. By 13:00 it is already +10 °C, at 14:00 - +13 °C, and at 16:00 - +16 °C. It turned out that the sun warms up the room well.
Alexander 0605
"I am very glad! For citrus fruits, the optimal wintering temperature is +5-10 degrees. This means, as planned, on sunny frosty days it will be possible to turn off the heating. The sun has set - turn it on. I don’t grow cucumbers, so I don’t need to maintain a temperature of +20-25, but only +5-8 degrees. Citrus trees need coolness in winter.”
Moreover, Alexander noted that during the day, in frosty and sunny weather, you even have to turn off the heating.
Alexander 0605
"T. That is, you will have to provide an on-off mode in day-night mode in frosty weather, and when the temperature outside is down to -10-15, you may not need to turn on the heating at all - the house is heated. I planned to make water heating with an electric boiler + heat accumulator for 1m3. But I think such a jerky on-off mode is not entirely suitable for water heating. For now I have stopped using electric heating. convectors."
A FORUMHOUSE user wanted to heat his house with wood, but was afraid that emissions from the chimney would harm the plants in the greenhouse. He did not dare to cut out an outlet in polycarbonate. Infrared floors also had to be discarded as an idea - Alexander grows plants in pots and containers, and such a film will not withstand the load. Some plants with soil and containers can weigh 100-200 kg. As a result, he settled on electric heating at home, which he turns on as needed (at minimum mode).
Alexander 0605
“Heating - four electric. convector Noirot. Each with a power of 1 kW. The selector is at the very minimum +5C. They don't work all the time. During the day they are turned off, because the sun heats the temperature to +8+10C. The sun set, the convectors automatically turned on. In winter I maintain the temperature in the greenhouse at +1+10C. Subtropical plants must rest at lower temperatures.”
Many people advise painting galvanized elements. But Alexander believes that in winter this has no effect, and in summer it only causes harm. Painted metal gets very hot, which has a bad effect on the SPC. And the paint does not adhere well to the zinc and soon hangs in rags and falls off.
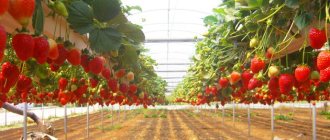
A practical greenhouse in a country house: what can be grown in it
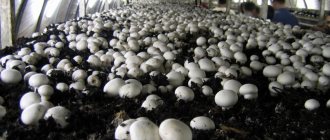
Growing cucumbers in the kitchen or basement of a private house is a very real thing. By building a greenhouse, you can get juicy, environmentally friendly, natural and healthy berries and vegetables in early spring and throughout the year. How to organize such a greenhouse in the basement, or on the ground floor with your own hands? The main problem that will need to be solved is the lack of daylight. And if growing champignon mushrooms may be in the dark, then cucumbers really need a sufficient amount of light.
Since the outside temperature is low in winter, you should insulate the basement. If there are drafts in a leaky basement, then a good crop will not grow there. Once the equipment is installed, you need to think about the soil. For the basement, it is better for you to choose small quartz or granite gravel. When you have prepared the soil, you should consider lighting. For normal, proper growth, cucumbers need at least 10 hours of light every day. An important issue in the proper cultivation of plants is the disinfection of space as a preventive measure for crop diseases from various ailments.
In the basement you can grow:
- Cucumbers;
- Tomatoes;
- Greenery;
- Potato;
- Zucchini;
- Pepper;
- Eggplant.
Each culture requires separate care and its own microclimate. Therefore, before planting any crop in such a greenhouse, analyze whether you can provide it with everything necessary.
When convectors fail
The climate is harsh, so Alexander purchased 4 electric heat guns just in case.
Alexander 0605
“But in case of particularly extreme frosts, I purchased four el. Neoklim PK2 guns. This gun has three operating modes: fan, 1st heating stage 1kW, 2nd heating stage 2kW. I don't use the second stage. Load on each phase, taking into account el. boiler and household appliances will be prohibitive. The gun, similar to a convector, is controlled by a thermostat. I reached the required temperature, the thermostat turned off the heating element, but the fan continued to work. The temperature dropped - the thermostat turned on the heating element. The thermostat on the gun was also set to minimum.”
When frosts hit - 28°C, there was an opportunity to test the guns. And it turned out that the devices heat rooms more efficiently than convectors and disperse heat well throughout the greenhouse. Convectors, according to Alexander, are more suitable for residential premises - a gun in the room creates discomfort due to the effect of a hair dryer.
The user also noted the disadvantages of heat guns. Besides the noise.
Alexander 0605
“The fan runs constantly. When the heating element is turned off, it continues to work. That is, in the daytime, when the sun has risen and heated the greenhouse, the heating element will turn off, but the fan will continue to work. It’s not entirely good when a cannon with the heating element turned off blows cold air over the plants. It's one thing when they are in the cold with still air, another thing when they are in a cold wind. If the heating element has worked continuously for 22 hours, the gun must be forcibly stopped for 2 hours. It's inconvenient to stop the gun. First you need to put it in fan mode. Let it run for 5 minutes so that the heating element cools down and only then turn it off.”
Arranging the interior space of a greenhouse: how to do it right?
The goals and objectives of the arrangement include:
- Create an optimal microclimate for the crops grown: humidity, temperature, lighting and ventilation;
- Organize a comfortable workplace;
- Use space rationally.
Planning the interior space
The main factor in arranging a greenhouse is the design of the beds. Productivity directly depends on their location. Depending on the size and location of the greenhouse, there are options for the location of the beds:
- 2 beds with one aisle;
- 3 beds with two aisles;
- Cross beds.
Construction of beds and passages
To make it easier to care for crops, increase the fertile layer and prevent soil from falling from the bed into the rows, the beds must be raised by 20-30 cm and fenced. For fencing use:
Tree. You can use boards, timber and small logs. But wooden fencing is not durable, since exposure to moisture causes wood to rot, and the use of antiseptic compounds harms crops;
- Brick, concrete or stone. They are durable materials, but installation will require a significant amount of time;
- Flat slate or polymer materials. They are resistant to various influences. Often fencing is available with a polycarbonate greenhouse.
Since there is high humidity in the greenhouse area, care must be taken to cover the paths. Best to use:
- Thick rubber;
- Geotextiles;
- Decking (garden parquet).
Budget coverages include:
- Fine gravel with sand;
- Paving slabs;
- Brick;
- Ruberoid with boards laid on top.
Partition in a polycarbonate greenhouse
The presence of a partition is necessary when there are not very friendly plants nearby. A solid polycarbonate partition with a door will reliably fence off different plants. A partition without a door is used when growing tomatoes, since they need constant air circulation in the structure. If it is not possible to install a polycarbonate partition, it is replaced by a film stretched over the frame.
"Pantry" in the greenhouse
The greenhouse can be equipped with a special place for storing the necessary equipment for working with plants. When creating a drawing, you can allocate space for a “storage room” for storing buckets, watering cans, shovels, rakes, and fertilizers. If this is not possible, shelves for equipment are organized directly in the greenhouse.
Alexander's Harvest
Our user's greenhouse grows citrus fruits, figs, grapes, persimmons, pomegranates, medlars, and peaches. As Alexander himself clarifies, these are predominantly subtropical plants. In winter, the temperature for such crops is maintained at +2-10°C. You can also grow cacti in the greenhouse on the roof, which bloom very beautifully.
Last winter, Alexander harvested the fruits of Moreau's blood orange. Color, juiciness - the harvest is wonderful. The user noted a pleasant sweet taste with berry notes. In February of this year, the peaches bloomed, and in June it was already possible to pick the fruits. Alexander planted fig peach and Red Haven. One of the fruits reached 300 grams.
Alexander 0605
“The peaches turned out juicy, sweet, and very tasty!”
A winter garden on the roof of a house is a fairytale dream. However, using the example of the FORUMHOUSE user, you can see that this is not so difficult and expensive.
Preparatory work
Before you start making a thermos greenhouse, including with your own hands, you need to develop a project, select a place for it, dig a pit and pour the foundation.
It is worth considering a number of important nuances:
- the greenhouse should not be shaded by other buildings and trees located near the future structure;
- You cannot install a greenhouse in areas of nearby groundwater to avoid flooding;
- The thermos greenhouse is a stationary building, so you must initially choose the right place for it.
When digging a pit, special equipment may be required. It is recommended to make the hole at least two meters deep and no more than five meters wide. The choice of length has no restrictions.
After rough work, it is necessary to level the corners of the pit using a shovel. At the same time, you need to think about installing the necessary communications, and then begin pouring the foundation.
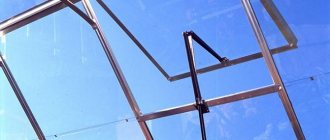
Features of installation of structures
If glass is chosen as the main material, additional reinforcement of the walls is necessary. Before installing the main structures of the greenhouse, a metal frame is installed for the garage building on the roof of which the structure is being erected. Strengthening the walls increases the cost of the project.
It is better to assemble the supporting frame and secure it below, before lifting it to the roof. If the covering is polycarbonate, you should screw it completely and then lift it for installation. If possible, transparent profiles should be used, this will ensure the visual lightness of the greenhouse. The rafter beams are installed in such a way that the polycarbonate sheets are joined in the center. Do not tighten the screws tightly; the sheets should move slightly.
The best shape for a greenhouse is in the form of an arch. This reduces the load from snow and wind on the roof of the greenhouse and the main floor of the building. If rafters are used, the angle of the garage roof slope is set to at least 40 degrees. A greenhouse - an arch is beneficial in terms of material costs, the number of joints on the roof of the greenhouse is reduced, and fewer fasteners and sealant are required.