Growing exotic tropical plants and flowers year-round in a temperate climate is a challenging task. To prevent them from being damaged on frosty winter days, they must be placed in a place protected from the cold with sufficient natural or artificial lighting. To create ideal conditions, greenhouses and winter gardens are built, which differ from standard greenhouses intended for cultivating vegetables and herbs, not only functionally, but also externally.
Winter gardens and greenhouses have some differences in their design, size and construction methods. Their purpose is also somewhat different.
Winter garden - a mini paradise for relaxation
Blooming garden - home decoration
A winter garden is considered to be a room with an area of more than 15 square meters. m, which is adjacent to the walls of the house. The main idea of its creation is to expand the space of the main building. At the same time, the walls of such an extension are made not of capital, but of frame. The frame is usually made of metal or metal-plastic structures. Thanks to this, the walls of the extension look “airy”, which gives the room additional volume.
The difference between a winter garden and an industrial greenhouse is that the latter are intended exclusively for growing edible plants. At the same time, in creating the macroclimate of the premises, they are guided by the needs of agricultural crops. In a home indoor garden, first of all, comfortable conditions for humans are created. Here you can not only grow crops, but also relax, enjoying the view of flowering plants.
Green area as part of the living room
Often, an indoor garden has not so much an aesthetic impact, but is part of a home’s energy saving system. The fact is that such a building is a kind of buffer between the main premises and the environment.
Due to the glass ceiling and walls, infrared radiation easily penetrates into the winter garden, heating the objects inside. At the same time, thanks to energy-efficient double-glazed windows, heat consumption in winter is significantly reduced. True, plants in an unheated winter garden must be cold-resistant.
Successful winter garden design
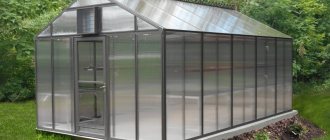
Greenhouse - an oasis for exotic plants
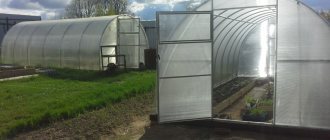
A greenhouse is a room designed for growing ornamental crops. Unlike the winter garden, it is built separately and is not adjacent to the house.
Here, optimal conditions are created for the cultivation and maintenance of southern trees (palms, citrus fruits), shrubs and beautiful rare flowers (orchids, ficus, etc.). The term "greenhouse" (in French "orangerie") originates from the word "orange" (a citrus crop characterized by its heat-loving nature).
Depending on the available temperature conditions, greenhouses are divided into:
- warm (the temperature here stays above 25 degrees);
- semi-warm (temperature ranges from 17 to 24 degrees);
- cold (below 16 degrees).
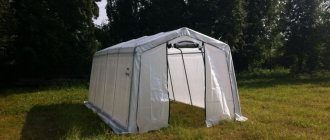
Of course, there are no strict restrictions on the construction of a separate building, and if you wish, you can set up a home greenhouse on the terrace adjacent to the house and even on the balcony.
How to equip a winter garden
An indoor garden, if properly designed and built, will become a real decoration of the house, as it can highlight its design. Thanks to the additional extension, you can easily expand the usable area of any room, creating a corner of comfort and tranquility that will be comfortable all year round.
Types and forms of indoor gardens
Possible shapes and designs
There are several options for architectural solutions for a winter garden:
- L-shaped extensions to the outer or inner corner of the house.
- Rectangular extensions with a pitched roof. They can be a continuation of the main floor of the building or expand on top of it.
- Extension to the corner of a house with a three-beam roof.
The simplest winter garden can be built on a glazed balcony or loggia, using vertical gardening and hanging flowerpots. In country houses, a terrace or covered veranda is a suitable place.
Mini garden in a private house
What materials are used for the frame?
The design of the winter garden is made from a wide range of materials, the most popular of which are:
- Aluminum. This is the most popular material for constructing a winter garden. With low weight it has high strength. This significantly reduces the load on the foundation and makes it possible to use a larger glazing area. Aluminum is not afraid of corrosion, it is easy to cut and install. It can be painted in any color using powder coating or anodizing. The disadvantages include the cost of the metal.
- Tree. Durable and at the same time environmentally friendly material, which is easy to process and relatively cheap. The disadvantage of wood is the need for constant maintenance. Without adequate antiseptic and antifungal treatment, wood will quickly lose its original appearance.
Suitable coating options
Various options are used for shelter:
- Single glass. This solution is not very good for energy efficiency. It does not ensure heat retention in winter and does not prevent its excessive penetration in summer, which can create uncomfortable conditions for the development of crops and human recreation.
- Double-glazed windows. The most preferred option for constructing a winter garden. A double-glazed window made of two or three glasses, due to the air between them, perfectly maintains a comfortable temperature inside the room, but such efficiency has a high cost.
- Polycarbonate. This material is an excellent solution. It bends perfectly, absorbs solar energy well, has low thermal conductivity and high impact resistance. There are also disadvantages. Over time, polycarbonate darkens and wears away. In poorly lit areas, algae may grow on it. Visibility through polycarbonate is minimal, so to enjoy the views of the surrounding nature, it is not advisable to use it.
Garden with tropical plants in a greenhouse
Methods of organizing heating
To create an ideal microclimate and comfortable conditions for relaxation in the winter garden during the cold season, a heating system is installed in it. There are several heating options.
Water heating, in which the heating of the winter garden is integrated into a system that heats the entire house. The disadvantage of this option is that the installation is too complicated. Only a professional can handle it. In addition, the room will be heated constantly, which will increase costs.
Shared heating with the house
The advantages of such a system include the absence of temperature changes between the house and the garden and the ability to constantly maintain comfortable conditions. This type of heating is most often used in industrial greenhouses.
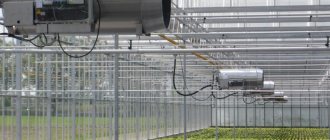
Electric heaters allow the winter garden to gain autonomy. The most commonly used are infrared heaters, which are the best option for electric heating. They are economical and create heat as close as possible to that of the sun.
Infrared heat heats the plants directly and does not dry out the air. A huge advantage is the ability to regulate the heating intensity in different zones.
Infrared heaters
Solid fuel stoves are usually used in greenhouses in cases where it is not possible to choose gas or electricity, or it is necessary to reduce heating costs. They are rarely used in private greenhouses due to the need for constant monitoring of fuel combustion, its load and temperature. The ideal option is a fireplace stove with a glass firebox, which at the same time decorates the garden.
Fireplace with glass insert
The most attractive are modern long-burning stoves. For large rooms, it is best to organize water heating by choosing a stove with a water circuit.
Methods for organizing closed ground for decorative purposes
Winter gardens and greenhouses have some differences in their design, size and construction methods. Their purpose is also somewhat different.
Winter garden - a mini paradise for relaxation
Blooming garden - home decoration
A winter garden is considered to be a room with an area of more than 15 square meters. m, which is adjacent to the walls of the house. The main idea of its creation is to expand the space of the main building. At the same time, the walls of such an extension are made not of capital, but of frame. The frame is usually made of metal or metal-plastic structures. Thanks to this, the walls of the extension look “airy”, which gives the room additional volume.
The difference between a winter garden and an industrial greenhouse is that the latter are intended exclusively for growing edible plants. At the same time, in creating the macroclimate of the premises, they are guided by the needs of agricultural crops. In a home indoor garden, first of all, comfortable conditions for humans are created. Here you can not only grow crops, but also relax, enjoying the view of flowering plants.
Green area as part of the living room
Often, an indoor garden has not so much an aesthetic impact, but is part of a home’s energy saving system. The fact is that such a building is a kind of buffer between the main premises and the environment.
Due to the glass ceiling and walls, infrared radiation easily penetrates into the winter garden, heating the objects inside. At the same time, thanks to energy-efficient double-glazed windows, heat consumption in winter is significantly reduced. True, plants in an unheated winter garden must be cold-resistant.
Successful winter garden design
Greenhouse - an oasis for exotic plants
A greenhouse is a room designed for growing ornamental crops. Unlike the winter garden, it is built separately and is not adjacent to the house.
Here, optimal conditions are created for the cultivation and maintenance of southern trees (palms, citrus fruits), shrubs and beautiful rare flowers (orchids, ficus, etc.). The term "greenhouse" (in French "orangerie") originates from the word "orange" (a citrus crop characterized by its heat-loving nature).
Structural solutions for greenhouses
Depending on the available temperature conditions, greenhouses are divided into:
- warm (the temperature here stays above 25 degrees);
- semi-warm (temperature ranges from 17 to 24 degrees);
- cold (below 16 degrees).
Greenhouse on the terrace of the house
Of course, there are no strict restrictions on the construction of a separate building, and if you wish, you can set up a home greenhouse on the terrace adjacent to the house and even on the balcony.
How to arrange a greenhouse
Home conservatories can replace gazebos and become free-standing living rooms. In design you can use not only plants, but also small architectural forms, miniature ponds, mini-fountains, artificial waterfalls and streams.
Dendroplane and arrangement of the work area
The layout of a greenhouse begins with drawing up a planting plan - even before construction begins, it is important to determine which plants will be grown in order to create ideal growing conditions for them. It is important to understand that the proximity of some crops may be problematic and will require more investment in the project. It is equally important to take care of the ease of maintenance of flower beds and beds, otherwise it will simply be impossible to approach the plants freely.
Mini fountain decorates and creates additional humidity
For small greenhouses, vertical beds arranged in several tiers are ideal. For this purpose, pallets and racks made of moisture-resistant materials are used. You can complement the picture with hanging pots with hanging crops.
The greenhouse should not be cluttered with plants; first of all, it should be a place of relaxation, in which green spaces are present for beauty, and not for practical purposes.
Nuances of construction and technical issues
The performance characteristics and durability of the greenhouse depend on several important parameters:
- Foundation. The basis of the building. The most durable and reliable for such buildings is a strip foundation made of concrete.
- Frame. The best performance qualities (resistance to wind, precipitation, deformation) are provided by aluminum and galvanized steel.
- Coating. Plays a big role in construction. This is what distinguishes this room from others. Continuous glazing creates sufficient illumination for growing plants. Additional sunlight also has a tonic effect on the human body, which is why recreation areas are often arranged here. In a properly designed greenhouse among exotic plants, even in severe frosts, you will feel like you are relaxing in hot countries. Most often, cellular polycarbonate and glass are used for cladding the frame of greenhouses. These materials provide the required level of light diffusion.
- Heating. The same types of heating are used in greenhouses as in winter gardens. Experts advise using combined options, in which, in the event of a failure of one heating system, another is switched on.
- Ventilation. To create an optimal microclimate in the greenhouse, it is necessary to install supply and exhaust ventilation that regulates air exchange. In addition, natural ventilation should be provided (through the windows).
- Lighting. In summer, to protect plants from excess sunlight, you should create natural darkness in the greenhouse (hang curtains or blinds on the windows). In winter, when there is not enough natural light, it is necessary to connect additional lighting (for example, high-pressure discharge lamps).
- Watering. Crops require moisture for timely growth. To do this, you can install automatic watering in the greenhouse.
Mini garden in a city apartment
A tropical paradise can only be built if all the necessary conditions are met. It is then that a greenhouse or winter garden will become an ideal place both for growing plants and for comfortable relaxation.
I briefly told you about my greenhouse.
Yes, I’ll also add on the temperature regime of my greenhouse in the winter. I don’t grow cucumbers, so I don’t need to maintain a temperature of +20-25, but only +5-8 degrees. Citrus trees need coolness in winter. Now I am asking for advice on heating the greenhouse in winter. Let me remind you that the main feature is that the greenhouse stands on a warm base, that is, the house heats it from below. As it turned out experimentally, during the daytime in sunny, frosty weather the heating will have to be turned off - the sun is working. That is, you will have to provide an on-off mode in day-night mode in frosty weather, and when the temperature outside is down to -10-15, you may not need to turn on the heating at all - the house is heated. I planned to make water heating with an electric boiler + heat accumulator for 1m3. But I think such a jerky on-off mode is not entirely suitable for water heating. For now I have stopped using electric heating. convectors. The temperature in the greenhouse dropped in the dark - they turned on, the sun began to warm up - they turned off. But I also have in mind an additional option to convectors - such as air heating. How viable is he and would like to know. Initially, I wanted to heat the house with wood and store heat in a heat accumulator. To do this, I combined a TT boiler with a tank with a volume of 1 m3, welding a homemade firebox into it. That is, the firebox is washed with water in the tank from all sides. I put this monster in the basement. I poured sleeves with a diameter of 325 mm under the chimney in the ceiling of the first floor and greenhouse. After much thought, I gave up wood and decided to heat with electricity. Emissions from the chimney will pollute the greenhouse. You will have to make a hole in the polycarbonate for the chimney to exit, and in general, you don’t want to mess with firewood. There is electricity. The house is connected to 15kW 380V. The line is new, the TP is new. I will store heat from the night tariff in the heat accumulator. In short, a firebox in the tank turned out to be unnecessary. Moreover, there are still two through sleeves left in the ceilings. A thought came. Instead of a chimney, run two air ducts through them - back to back in a sleeve. One air duct supplies air to the greenhouse. Place it on the outlet with a diameter of 250 mm from the firebox. Insert a fan into this duct. The second air duct, passing next to the first in the same sleeve, returns the cooled air to the firebox. I’ll either bring it to the ash pit or lead it straight into the firebox. The water in the heat accumulator will be heated, for example, to +70C. The air inside the firebox will be heated by the water surrounding the firebox. The fan will throw it into the greenhouse through the supply air duct. Through the return air duct, when cooled, it will enter the firebox. It will warm up and go back to the greenhouse. Question: how many degrees will it have time to warm up in the firebox? It is clear that its temperature will not be +60-70C. I assume that I will receive email support. convectors will have enough incoming air temperature +20-25C. to maintain the temperature in the greenhouse at +5-10C. That is, you get combined electric heating. convectors + air heating. At the same time, such air circulation will partially help get rid of condensation. I would really appreciate your advice!
There is only enough space for novice flower growers and gardeners to grow ornamental plants or seedlings.
But if you want to do business on a grand scale, you have to adapt the environment to your needs.
I started growing plants and flowers since childhood. Years passed, the flora on my windowsill changed rapidly, and there was not enough space...
An alternative solution was found quickly: I ordered a second tier - a plastic window sill - from a company that manufactures plastic windows. It was cut out for me on a machine to exactly the size of my window. I attached it to the window like this. First, I used metal corners to the slopes, and for safety (and just for beauty) I attached metal chains bought at a hardware store to the window sill. It turned out very beautiful, and most importantly – practical. And with plants, my “double” window sill began to sparkle with completely different colors.
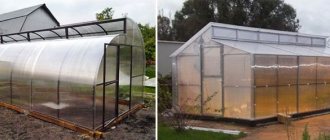
But after some time I realized that I now need my own greenhouse. First, it was necessary to decide on the construction site. Everyone knows that to build a greenhouse, or simply any greenhouse, you need the brightest place where the sun shines most of the day. Such a place, of course, was found in my garden. Based on the size of the plot, I decided on the dimensions of the future greenhouse: 9x4 m plus 1 m vestibule. The height at the ridge is 2.1 m. I made the markings by driving pegs into the ground and pulling a string along them.
Since the greenhouse is, after all, a winter building and it will be heated in winter, it was necessary to decide the question of how best to cover it, with what material. After studying the information on the Internet, I decided to cover it with two layers of cellular polycarbonate. I ordered 10 mm polycarbonate for the outer layer and 4 mm for the inner layer. There is a 10-centimeter air gap between them, creating the effect of a thermos.
The entire process of manufacturing the structure of my greenhouse in a special company took a couple of months. It was delivered to me by a transport company.
I began removing soil from the area that had been marked out in the fall. Since I planned to make the greenhouse 1.5 m deep (below the freezing point of the ground), there was a lot of work to do. Together with a relative, they removed the soil with shovels, since due to the characteristics of the site, the equipment could not go there. To say that it was hard is to say nothing. But as they say, the eyes are afraid, but the hands do. Meter by meter over the course of 2 months, we dug a ditch 1.5 m deep (the height of the planned walls). But to pour the foundation, we also had to dig a trench 0.5 m deep along the entire perimeter. We also poured the foundation manually, stirring the solution with shovels in a huge container. The poured foundation gained strength over the course of a month, after which we began building the walls.
Sand concrete blocks 200×400 mm were chosen as the building material. The laying of the blocks was entrusted to specialists; within a week they laid the walls with 2 bricks, the thickness of the wall was 400 mm. The height of the masonry walls of the main part of the greenhouse was 1.9 m (9 rows).
The vestibule was built a little differently. A trench was dug under the foundation, also 0.5 m deep from ground level. The vestibule dimensions are 1x4 m. It was poured parallel to the main foundation at the same time.
After laying the 6th row of the main part of the greenhouse, the builders released the blocks a little further, put reinforcement on them and continued the masonry together with the vestibule, thereby connecting the two parts of the greenhouse. The construction turned out to be quite large-scale. First, broken bricks and stones were thrown into the resulting hole in the vestibule, sand was poured on top, everything was leveled, and only then they were filled with cement mortar along with small crushed stone, creating a concrete floor.
Next, it was necessary to waterproof the building. This is a very important point, because the brick will quickly collapse under the influence of moisture, and simply the penetration of water through the bricks into the greenhouse is also useless.
To do this, the walls were coated with bitumen, roofing felt was rolled out on top and everything was covered with sand. The filling was done up to the top brick. The final moment of this stage is pouring the top layer of bricks with an even layer of cement mortar so that the lower part of the greenhouse structure can be evenly mounted. To do this, we used a construction water level to stretch a cord around the entire perimeter, then exactly to it, and also along the entire perimeter, on the outer and inner sides of the wall, we nailed restrictor blocks - they prevented the flow of cement mortar. We leveled it using a construction float, and the result was an almost perfectly flat surface. Until the concrete gained strength, the surface was watered. Thus the next stage of construction was completed.
The most exciting and no less important stage of construction remained - the installation of the greenhouse itself. Within 5 days, specialists from the company from which the structure was ordered dealt with this.
All I had to do was make a heating system, install gas (for us this is the best option), electricity and install lamps. Laying a gas pipeline to the greenhouse turned out to be very expensive, because... the building itself is not located next to the house. But in the future it will be cheaper than heating a greenhouse with an electric boiler.
Cast iron radiators were chosen as heating devices. They were installed as follows. Two 10-section batteries were installed on each 8-meter wall, one 7-section battery was installed on one 4-meter wall where the window was, and one 4-section battery was installed on the opposite wall. The result was 51 sections. Perhaps experts will say that this is a lot for 32 square meters. m, but a lot is better than a little. As a last resort, if it gets hot, some of the radiators can be turned off (fortunately, there are taps on each radiator).
A pump for forced circulation of water, an open-type expansion tank made from a regular 5-liter canister, and a faucet with a hose adapter, with which water can be poured and drained into the system, were installed in the heating system.
Additionally, a conventional single-circuit gas boiler with a chimney was installed. The chimney looks like this: inside the greenhouse there is a regular 100 mm pipe from the boiler, and from the street there is a 200 mm sandwich pipe. This is necessary to protect against condensation and icing in winter.
The height of the outer part of the chimney was made higher than the ridge of the greenhouse (2.5 m) so that the draft in the boiler did not depend on the direction of the wind. This is done to ensure free flow of winds from all sides.
All that remains is to install the electrics and install the lamps, as well as connect a temperature sensor, which helps to flexibly regulate the temperature in the greenhouse and save up to 10-15% of fuel consumption, which is important. For lighting I chose lamps with LED lamps. I installed 4 lamps, each with two 18 W lamps. Now the plants had enough light.
All installation and construction work lasted a little longer than six months. And in conclusion, I want to say: do not be afraid of difficulties, go towards your dream and make it come true. The main thing is to believe in yourself, and you will succeed!
4 pcs/set Poly Gel Set LED Clear UV Gel Varnish Decorative…
74.52 rub.
Free Shipping
★★ ★★ ★★ ★★ ★★ (4.70) | Orders (649)
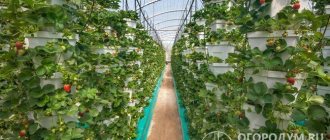
Almost everyone dreams of having a corner with growing and flowering plants in their apartment. Solid designs of greenhouses for growing cucumbers and tomatoes are suitable exclusively for private homes and cottages. How I wish I had a little flower garden at home! How to build a greenhouse in an apartment with your own hands?
Styles and design tips
Like any other room, the winter garden can be made in any style the owner likes. Ethnic styles are usually used for greenhouses, since historically each country has developed its own unique way of decorating such rooms and arranging plants.
English, Dutch and Mediterranean are especially popular among European destinations. Exotic lovers prefer the African, Moorish or Mexican design method.
Classic style
A classic winter garden is always equipped with a soft sofa and a pair of armchairs upholstered in beige tones and a large dining table where the whole family can sit. Both a china cabinet and a fireplace would look appropriate here.
Among the plants chosen for such a garden are clematis, various vines, palm trees and ferns.
English style
The British have fallen in love with winter gardens for so long and firmly that within this style several of their own directions have emerged, each of which corresponds to a historical era:
- Victorian
- Georgian
- Edwardian
What room can be used as a greenhouse?
When you see a blooming and well-groomed greenhouse, a person certainly has positive emotions. If the plants are comfortable, then everyone around them will be comfortable.
This is probably why there is a natural desire to build a greenhouse at home, namely in a city apartment. Subject to certain requirements and conditions, an isolated room, balcony or glazed loggia can become a home greenhouse.
A greenhouse is an artificial ecosystem designed for growing plants or flowers. The greenhouse in the apartment is a kind of winter garden. Home greenhouses are made of plastic or glass; heated air is retained inside, creating the necessary microclimate.
Infrared radiation is used to warm the soil and plants. What needs to be done with your own hands so that the room is not a collection of flowerpots and pots with flowers or plants, but a full-fledged flower garden?
Useful tips
Traditionally, loggias or balconies are used to create a garden or greenhouse. But if you look closely, you can find a suitable place in a small room. For this purpose, multi-tiered racks are used. However, you should not get carried away with creating dense thickets of plants in flower pots of different colors and shapes.
Watering
Despite the fact that most plants in the winter garden grow in tubs, regular watering from a watering can is a tedious task. Therefore, during the construction period, you can install an automatic watering system or do-it-yourself drip irrigation.
In addition, it is necessary to provide an air humidification system in the greenhouse - these can be small ponds, fountains or portable electric humidifiers.
Electrical wiring of a greenhouse in the country
must be well insulated, sockets and switches are located out of reach of direct splashes.
Garden in a bottle or mini greenhouse
Fashionable indoor mini greenhouses are not a new phenomenon. Capricious fashion has more than once returned to the creation of florariums - growing plants in a variety of glass containers. The style and originality of the “garden in a bottle” amazes the imagination, because not only empty bottles or jars are used, but also round aquariums or pot-bellied cognac glasses.
Variants of such mini greenhouses are an excellent decoration for an office or desktop. Planting and subsequent care of plants is simple - place the container in a bright and open place and water. But the soul yearns for more adult and mysterious designs, such as a winter garden and a home greenhouse.
Ventilation
Plants located indoors must have constant access to oxygen. Ventilation of greenhouses can be carried out naturally or using supply and exhaust mechanical ventilation.
Natural ventilation is achieved by opening the transoms, which in winter will negate the maintenance of the required temperature. Mechanical ventilation is carried out using fans that remove air from the room and ventilation ducts located in the supporting structure.
A good option for combining ventilation and heating is a household supply and exhaust ventilation system of the breather type.
Unit design:
air intake channel - a sealed tube through which air is supplied to the chamber;
· heater that automatically regulates the temperature;
· a fan that supplies warm air to the radiators.
The mechanism is equipped with a three-stage filtration system:
· cleaning from bacteria and allergens;
· deep cleaning from exhaust gases and odors.
Where to start arranging a greenhouse
Let's start with the fact that only a kind and hardworking person can become a lover of wildlife, because he will have to take care of the plants every day: watering, spraying, removing pests and dying twigs or stems.
A greenhouse at home requires creating a miniature ecosystem for flowers and plants. The ecosystem for plants is based on the following conditions: light, heat, watering and ventilation. You can purchase special equipment that automatically creates conditions for plants. Naturally, you will have to decide which plants or flowers you plan to grow in the greenhouse.
Useful tips
It is recommended to create a greenhouse with your own hands using unpretentious types of plants or flowers. These are fast-growing and flowering specimens, capable of expanding with modest watering and lighting. Contemplating the potential of plants will stimulate the development of your botanical abilities and capabilities.
greenhouse lighting
The main condition for a greenhouse is the creation of natural light. Of course, an illuminated glazed loggia or balcony can be considered an ideal option. To organize a greenhouse, you do not need a large plantation and super-expensive structures for arranging flowers or watering.
A constant maintained temperature and adjustable lighting level will allow you to create a greenhouse of flowers or greenhouse fruits. What rules should be used to select lamps for lighting a greenhouse? The following lamps should be selected:
With missing shades (the most transparent glass can block about half of the transmitted light)
With reflectors that significantly increase illumination
Protected from dripping water or moisture
With the ability to connect a timer with the installation of several modes.
By choosing the right lighting and installing it, you can enjoy peace and comfort even in a winter greenhouse.
Approximate plan for the construction of a greenhouse
To solve this question: how to make a greenhouse with your own hands? First, you will need to choose a place on your personal plot where the structure will be erected. The main thing here is that it is as sunny as possible. It is also necessary to take into account that the room being built should not be exposed to wind or it should be as small as possible.
The building being built will be quite durable, so the foundation must be strong. It is best to make a strip foundation made of stone or concrete for a greenhouse. The depth of the foundation should be dug to a level at which the soil does not freeze even in the harshest winters. If concrete is used as the base, then it will be necessary to organize drainage, because when wet, concrete will absorb moisture and become slippery.
In addition, it will be necessary to make a blind area under the racks. Polystyrene foam is well suited as insulation; in this case, the foundation will perfectly retain heat in its lower sections. The floor of the greenhouse can be covered with fine gravel or pebbles, they will provide good drainage and get rid of excess dirt.
Return to contents
All about the country greenhouse
Having decided on the need to build a greenhouse at the dacha with your own hands
, preference should be given to a large area of the room.
If in the first years of operation your winter garden does not have the required number of heat-loving exotic plants, the free space can be used for winter growing of vegetables and herbs. It should be taken into account that a greenhouse in a country house
is not only an area for growing plants, but also a place for relaxation, so the layout should include various zones and convenient garden paths. Near the seating area, you can hang curtains on the windows, thereby creating a cozy corner with the required lighting.
In the winter garden it would be appropriate to equip a small pond made of tires or a waterfall with your own hands.
Requirements for constructing a greenhouse at the dacha with your own hands
differ from the minimum building codes, since the room must be well heated, have sufficient light and a water supply. An important point is ventilation, because moist warm air should not stagnate.
You can build a wonderful winter house for your favorite flowers, shrubs or exotics with your own hands.
External works
Return to contents
Greenhouse frame
When building a greenhouse with your own hands, materials such as PVC, aluminum or galvanized steel are most often used.
A good frame for home greenhouses should withstand strong winds and not deform during long-term use. The choice of frame material depends entirely on the material of the external cladding of the building. The heavier the sheathing, the stronger the frame itself should be. When building a greenhouse with your own hands, preference is given to the following materials: PVC, aluminum or galvanized steel. A frame made of these materials will be strong enough to withstand various deformations. A wooden frame is considered a bad option, because over time it will begin to rot and during the operation of the structure will require serious ongoing maintenance.
Return to contents
Building cladding
An important point when building a home greenhouse with your own hands is the choice of material for the external cladding of the frame. This will directly affect the cost of heating, electricity, as well as the durability and efficiency of the room. In order to sheathe the frame from the outside, special materials are needed that have a high level of light resistance and provide sufficient thermal insulation.
Light scattering is also considered equally important. After all, a structure such as a greenhouse requires as much sunlight as possible, but at the same time, plants can die under the scorching rays. Therefore, glass or the following types of plastic are suitable for the external cladding of home greenhouses: fiberglass, polycarbonate, polyethylene film. And for the roof - cellular polycarbonate.
Return to contents
Heating a greenhouse at the dacha
As a rule, a greenhouse is placed directly in the house, or as an extension on the outside of the southern or eastern wall. Then the heating issue is resolved in a comprehensive manner - the pipes laid in the winter garden are connected to the central heating system of the house. If the winter garden is being built autonomously, you can maintain a constant temperature in several ways:
Water heating. A gas or electric boiler, polypropylene pipes and plate radiators are used as a heater.
This type of heating is the most economical and practical - the air does not dry out, a constant temperature is maintained, the installation cost is suitable for the average budget.
Electric heaters. The disadvantage of this method is the high energy consumption and additional costs for air humidification. The advantages include ease of installation, the ability to move equipment indoors and temperature control.
Warm floor system. The advantages of this system include additional heating of the soil and water for irrigation. The disadvantages are:
- high cost of execution;
- problematic repairs;
- design during construction.
Interior work
Return to contents
Greenhouse heating
Gas, petrol and electric boilers are used to heat the greenhouse. Each of these options has its own advantages and disadvantages. Electric heating of a greenhouse is very convenient, since no special air ventilation is required. But if the electricity is turned off, the plants may die. A combined heating system is best suited for such a room. If something happens and one system fails, you can quickly connect another.
To install heating equipment, you can make a special technical room in the basement or attach a greenhouse next to the main room. And if the greenhouse is built close to the house or in the form of an extension it is one with the house, then a home heating system can be installed in this building. In this case, less energy will be spent heating the greenhouse, and the house itself will be much warmer.
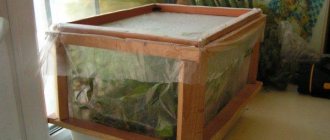
Homemade growbox from a system unit, refrigerator or cabinet
Next on our top list is a homemade growbox
. You can use it to repurpose various cabinets, bedside tables, old refrigerators, and even the case from the system unit of an old computer.
The photo shows an example of a homemade grow box from a systemic.
A homemade grow box is an affordable option if you want to try it, but don’t have much experience or resources. Here you don’t need to think about heating problems; it’s easy to drill technological holes for ventilation. And he doesn’t attract much attention to himself.
The main rule of such a greenhouse: if your hands are not growing from there and you don’t have sufficient knowledge, then it’s better not to do it. Such a design requires certain skills in working with construction equipment: a screwdriver, a jigsaw, and possibly a hammer drill. Plus, such a greenhouse gets very hot, which means you need to think about a good ventilation system, and paint the inner surface of the walls with white paint or cover it with reflective material. And the scale of such a greenhouse is usually more than modest.
In our video blog, we tried to cover in as much detail as possible the question that worries many growers - how to assemble a growbox yourself? Watch the video, ask questions, we will try to help.
The cost of such a homemade grow box can range from just a couple of thousand rubles to significant amounts. After all, the main thing is not the “wrapper”, but its content. Therefore, everything here is very individual.