An ideal greenhouse is not only a durable, reliable and spacious structure, it is also a structure that can allow you to grow vegetables and fruits all year round. Then you can not only provide yourself with fresh fruits, but also set up a full-fledged business selling them. A thermos greenhouse is perhaps one of the best options for winter greenhouses.
Greenhouse thermos
Advantages and disadvantages of a thermos greenhouse
The technology for growing plants in thermos-type greenhouses is very different. Before you begin to build such a complex structure, you need to know its positive and negative sides.
Advantages:
- The main advantage of the design is the fact that the thermos greenhouse is a unique energy-saving technology that allows you to obtain high-quality crops all year round.
- The growth of crops in a thermos does not depend on external weather conditions. Plants are not affected if there is heat, frost or bad weather outside the greenhouse.
- Despite the conditions of the thermos, the seedlings continue to consistently receive up to 90% of the rays of sunlight. It is evenly dispersed throughout the interior of the greenhouse due to the design features of the transparent roof.
- The microclimate inside the greenhouse resembles the effect of a thermos. The main advantage is long-term heat retention. The greenhouse makes it possible to grow heat-loving exotic plants in regions with cold climates.
- For most garden crops, the thermos has enough daylight coming through the transparent roof. There is no need to install artificial lighting in some greenhouse models.
- The microclimate of the thermos allows you to grow seasonal and perennial vegetable crops. The root system of plants will not freeze even in frosty winter due to the uniform distribution of heat inside the greenhouse.
Important!
Greenhouses with a thermos effect appeared in Russia even before the revolution. They were used to grow heat-loving varieties of pineapples. Flaws:
- The main disadvantage of a thermos is not only the complexity of the design. To create a favorable microclimate in a greenhouse, you will need knowledge and experience in installing air conditioning systems.
- The owner of a greenhouse must have skills in arranging garden communications.
- Construction of a thermos will cost more when compared with a classic greenhouse.
Despite the high costs, the thermos has a long service life. If a vegetable grower has decided to seriously engage in year-round cultivation of vegetables, it is worth focusing on this particular greenhouse design.
Types and design
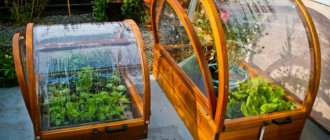
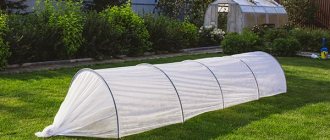
Bodies with a thermos effect are made from different materials. However, the main difference is their design. There is even a budget option - a thermos greenhouse made of stretch film, where the frame is made of thin weed tree trunks. The covering material does not crumble in the cold and can last for more than a year without the need for removal.
An example of a beneficial technology using stretch film for a thermos is shown in the video:
Underground greenhouse-thermos
The most effective, but most difficult to construct, is the underground greenhouse structure. The depth of the thermos reaches 6 m. The earthen walls retain heat as much as possible, which makes it possible to grow heat-loving southern plants in winter in cold regions. The design features of an underground thermos greenhouse require only the walls to be buried in the ground. The transparent roof remains on the ground surface. It is through it that plants receive daylight. However, it is not enough. The underground design of the thermos requires the installation of additional artificial lighting or covering the walls with reflective materials. The descent into the greenhouse is usually equipped with a staircase.
Recessed greenhouse-thermos
The recessed greenhouse option is the most common. The construction differs from an underground thermos by being partially immersed in the ground. The roof and approximately half the height of the greenhouse walls traditionally remain on the surface. In terms of functionality, the buried model is slightly inferior to an underground thermos, but is easier to construct.
The areas of the walls located on the surface can be brick, but to make the greenhouse lighter, they are made of polycarbonate or glass. On the inside, the surface of the walls of the thermos is covered with mirror material.
Chinese
The design of the Chinese thermos differs from classic domestic greenhouses. The building has only one transparent wall. The ends and back wall of the thermos are built from bricks, boards or other building material. The penetration into the ground is insignificant. A Chinese thermos is sometimes built as an extension to a house. The structure adjoins the wall on the south side of the building in arcs. The extension is considered a good solution, since the heat emanating from the house is enough to heat the plants.
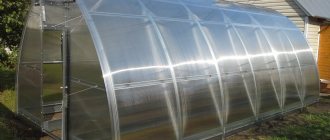
Overhead made of polycarbonate
The design of a polycarbonate thermos resembles a classic greenhouse installed on the surface of the ground. Ease of construction is considered a plus. The downside is large heat losses in winter. A heating system is installed inside the greenhouse, and a complex ventilation scheme is developed. Without heating, a thermos does not function in winter. The temperature inside the room will be below freezing and the soil will freeze.
Important! Each type of thermos differs in the degree of penetration into the ground. The optimal model is selected taking into account the depth of soil freezing, an indicator of the minimum air temperature in winter in the region.
Energy saving materials
To preserve heat in the thermos design, the following materials are used:
- foil with a reflective surface;
- natural wood;
- polycarbonate sheets;
- expanded polystyrene.
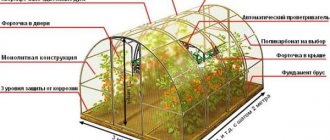
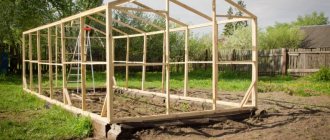
A metal or wooden frame is used for the main structure. When building a greenhouse of this type, gardeners use gable or single-pitch models. In order for the lighting to be excellent, it is necessary to make the northern wing of the roof higher than the southern one.
A more detailed description of the materials is in the table.
| Construction Materials | General characteristics |
| Wooden slats, metal profiles | For the construction of a roof frame. It is easier to make a frame from slats than from a profile. When using a metal profile, you will need to weld the elements together. But unlike wood, the strength is much higher. |
| Expanded polystyrene, mineral wool | The thermos is insulated with these materials. Here only you can decide which material is best to use. |
| Sand, cement, crushed stone, metal reinforcement | For the construction of greenhouse foundations and walls |
| Thermal blocks | They are light weight and have a cavity inside. They retain heat excellently. Concrete is poured into the void. They act as formwork. They are used to build walls. |
| Film with reflective light and thermal insulation effect | Helps increase light intake and additionally protects against heat loss. |
| Polycarbonate | Covering material. |
| Fastening materials | Nails, screws, washers and bolts. |
Preparatory work
If you decide to make a thermos greenhouse with your own hands, work must begin with the preparatory process. At this stage, a site is selected, a drawing of the future design of the thermos is developed, and materials are purchased.
Site selection
A recessed greenhouse is built with partial immersion in the ground. You will have to dig a pit on the site and pour the foundation. In order for the thermos to function effectively, you need to choose the right place for its construction:
- the site should not be shaded by tall trees, buildings, or other tall objects;
- the length of the pit is located in the direction from east to west to maximize natural light;
- an area with high groundwater is not suitable for the construction of a recessed greenhouse due to the likelihood of flooding;
- a stationary structure cannot be moved and this fact must be taken into account when choosing a location.
If you approach it competently from the technical side, then a recessed thermos can be placed in an area where there is a seasonal rise in the groundwater level. To avoid flooding, you will have to carry out complex work on arranging drainage and reliable waterproofing.
Drawing with dimensions
The second stage of the preparatory work is drawing up a drawing for the recessed thermos greenhouse, which will help to correctly calculate the required amount of materials. To begin with, you can sketch out a simple diagram to understand the essence of the device. Next, based on their capabilities, they draw up a drawing indicating the dimensions of the thermos. You can use ready-made greenhouse projects taken from boarding school or literature.
Required materials and tools
The amount of materials depends on the dimensions of the building. The calculation is carried out according to the drawing. To build a thermos you will need:
- beam;
- boards;
- polycarbonate;
- thermoblocks for walls;
- steel reinforcement, profile, corner;
- self-tapping screws for wood, metal and with a press washer for fixing polycarbonate;
- polystyrene foam boards;
- mirror, heat-reflecting material;
- cement, sand and crushed stone for mortar.
The tools you need are a standard construction kit:
- concrete mixer;
- welding machine;
- Bulgarian;
- electric drill;
- screwdriver;
- jigsaw;
- shovel;
- roulette;
- level;
- Master OK.
When the materials and tools are ready, construction of the greenhouse begins.
Useful tips
To make the structure durable and effective, you should follow the recommendations of experts:
- it is necessary to provide waterproofing, drainage, ventilation;
- Long-term operation of the greenhouse can only be counted on if all standards are observed during construction;
- the walls must be made of durable material and, when installed from the inside, be thermally insulated;
- For roofing, you should choose the most durable materials.
If you like to grow exotic plants, but the climatic conditions of your region do not allow this, then a thermos greenhouse will be an excellent solution to this issue. After considering all the stages, principles of construction and installation of an underground thermos greenhouse with your own hands, as well as how and from what it can be built with photos and video examples, almost everyone will be able to build such a structure. By choosing the right site, location, building materials and following construction technology, you can create a building in which the temperature will be above zero even in severe frosts. This will allow you to grow not only vegetables, but also berries and flowers.
Watch this video on YouTube
Step-by-step construction of a thermos greenhouse
The construction process begins with digging a pit, continues with the construction of all elements of the thermos structure and ends with the internal arrangement of the greenhouse.
Construction of the pit and pouring the foundation
Since the winter thermos greenhouse is buried, a foundation pit will have to be dug. For these purposes, it is better to hire an excavator. The minimum pit depth is 2 m. The width is limited to 5 m. There are no requirements for length. The owner chooses this greenhouse parameter at his own discretion. It is difficult to overcome large volumes of soil manually. The main work is entrusted to technology, and the walls and bottom are manually trimmed with shovels.
A small greenhouse can be installed without a foundation if the site has solid, non-heaving soil. For a large building, a foundation is laid out and communications are laid at the same time.
It is easier to make a foundation for a thermos from reinforced concrete slabs or blocks. Here again you will need the help of lifting equipment. If this is not possible, the concrete strip is poured manually. A trench 25 cm wide is dug under the foundation along the perimeter of the pit, a layer of crushed stone or gravel 10 cm thick is poured, and concrete is poured. The monolithic base can be driven to the surface of the earth, thereby solving the problem with the construction of walls. For such a foundation, formwork is placed around the perimeter of the trench, the height of which is 50 cm above ground level. A reinforcing frame is connected from reinforcement rods with knitting wire. The formwork is poured with concrete in one day so that it sets well.
The foundation for a thermos can be made in the form of a monolithic slab on which the walls of the greenhouse made of thermoblocks will stand. First, the bottom of the pit is leveled and compacted. A layer of sand 5 cm thick and crushed stone is poured. Having placed a backing made of pieces of broken brick, a reinforcing mesh is laid. Concrete is similarly poured in one day.
Attention! Any type of foundation must last a month, only after this time can you begin to build the walls of the thermos.
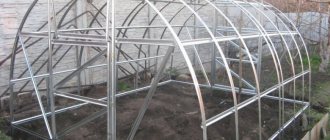
Construction of walls
Thermoblocks are best suited for constructing greenhouse walls. The laying is carried out in rows with bandaging of the seams. Do not forget to string thermoblocks onto metal profiles. They will be needed in the future to secure the roof of the greenhouse. The height of the thermos walls above the ground can reach 1 m, but not less than 50 cm. If you make a small protrusion from the soil, the thermos greenhouse will be flooded with rain and melt water.
During the laying of the walls, an exit from the greenhouse is arranged. It is advisable to do it with a vestibule. The room will be useful for storing equipment and will reduce heat loss, since the thermos will not exit directly to the street.
Insulation
The walls of the underground part of the greenhouse are insulated from the inside with polystyrene foam boards. A foil thermal film is placed on top. In the northern regions it is attached in two layers. The foil will create a reflective effect. In addition, thermal film retains moisture, heat, and carbon dioxide inside the greenhouse.
A plastic barrel or bottles of water are placed inside the thermos as a heat accumulator. The liquid will absorb excess heat and, if necessary, release it back into the room. The floors of the thermos are insulated by laying an electric heating cable. The “warm floor” system is filled with a concrete screed to prevent damage to the cable.
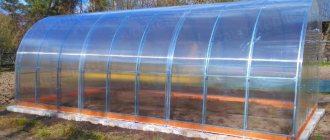
Roof installation
Polycarbonate is most often used for the roof of a thermos. The sheets are laid in two layers with an intermediate profile gasket. Wooden rafter blanks are treated with protective impregnation. The elements are joined using the half-tree method. The lintel is fastened so that a distance of at least 5 cm is formed at the lowest point. After assembling the support from the rafters, the lintels are removed. The ridge element made of timber is installed under the rafters and nailed. Finally, new jumpers are installed. The finished structure is painted with white paint.
The polycarbonate is secured with self-tapping screws to the greenhouse roof frame. First, the sheets are fixed from the inside, and then from the outside. Corners are attached along the ridge element. Thermal insulation material is placed into the void formed between them and the roof. All polycarbonate joints are taped to ensure tightness. The roof of the thermos is securely fixed to the metal profiles protruding from the thermoblock walls.
Important! Instead of polycarbonate, the roof of the thermos can be glazed. However, glass does not retain heat well. Additional heating of the greenhouse will be required, which is associated with unnecessary costs.
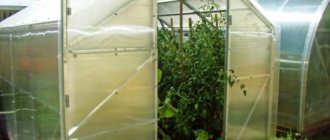
Interior arrangement
The beds inside the thermos greenhouse are arranged using earthen beds in boxes or shelving is installed if only growing seedlings is intended. The soil is fertile. The composition depends on the crops grown. Usually organic and mineral fertilizers and sand are added to the mixture.
Electricity is supplied inside the greenhouse, heaters, air conditioning fans, and lamps are connected.
The heating system of the greenhouse is adjusted so that the soil temperature is stably maintained at approximately + 25 ° C, and the air temperature in the range from + 25 to + 35 ° C.
The best heating system
To create an optimal temperature regime for plant growth, it is necessary not only to heat the soil, but also the air inside the greenhouse. When choosing a heating system, pay attention to:
- What size is the greenhouse?
- How much money can you spend?
- Regional climate.
- Growth conditions.
For heating a winter greenhouse “thermos”, a stove is an excellent option. An ordinary “potbelly stove” is used as a heating device. It is very simple to construct it with your own hands. For this you will need:
- metal sheets made of heat-resistant material;
- cast iron, steel and ceramic pipes of equal diameter;
- metal rods and corners;
- plumb line with tape measure;
- device for cutting metal products;
- welding machine;
- bolts, couplings;
- calcined brick;
- limestone or clay solution.
Important! One stove – a “potbelly stove” – heats an area of about fifteen square meters. A gap of at least 30–40 centimeters is left between the stove and the walls. For polycarbonate greenhouses, the distance is at least 60–80 centimeters.