A polycarbonate greenhouse makes it easier to care for plants in your garden. In protected soil it is easier to grow early greens or heat-loving crops (cucumbers, peppers, tomatoes).
How to choose the right greenhouse size, what are the features of greenhouses, what design to prefer, what to pay attention to during installation - we will talk about this in the article.
Features of polycarbonate greenhouses
Polycarbonate greenhouses 3x4, 3x6 and 3x8 relatively recently appeared on summer cottages. Before this, gardeners made do with film or glazed greenhouse structures. Film shelters are still actively used, especially if it is necessary to urgently protect plantings from unexpected frosts. Glazing is too expensive and difficult to install, so glass greenhouses are not built on personal plots.
Polycarbonate shelters are more durable than film, and are much cheaper and easier to install than glass. Polycarbonate is a universal material, ideal for constructing not only greenhouses, but also gazebos, canopies, and other small outbuildings. For greenhouses, cellular polycarbonate is used - a cellular material that perfectly transmits light. You can find the right polycarbonate here.
Let us list the main advantages of greenhouse buildings made of this material:
- Durability, strength, lightness. After installation, the structure will last at least 7-8 years. This guarantee is provided by the manufacturer.
- Easy to install: polycarbonate is easy to cut and drill. If necessary, it can be glued and welded.
- Polycarbonate is a plastic material. It is easy to give it any shape, installing windows and doorways is also not difficult.
- Greenhouse buildings made of polycarbonate are aesthetic and modern and will not spoil the appearance of the site. On the contrary, with the help of a greenhouse you can zoning your backyard territory and camouflage problematic buildings.
The most noticeable disadvantages of polycarbonate shelters:
- High price.
- The material is flammable and melts in case of fire.
- In hot weather, an extremely unfavorable microclimate is created in a greenhouse: the temperature reaches 50°C, which can cause plant burns. Therefore, it is undesirable to operate a greenhouse without a well-thought-out ventilation system.
How to install a greenhouse with your own hands?
If you plan to remove the greenhouse frame for the winter, then the fastenings for installation are made dismountable, for example, anchor bolts, locks and latches, or bolts with studs. In some cases, part of the frame is installed inside the concrete, but then it cannot be disassembled.
Before installing the greenhouse, a layer of waterproofing, for example roofing felt, should be laid on the base, and the frame itself should be treated with anti-corrosion materials. After installing the frame, it can be sheathed with polycarbonate.
From the video you will learn how to install a polycarbonate greenhouse on a foundation:
Top 3 sizes of polycarbonate greenhouses (3x4, 3x6 and 3x8)
So, you have decided to build a new greenhouse on your property. First of all, decide on the location: the size, shape, and features of the project depend on what territory you can allocate. It is also necessary to take into account the standard dimensions of the polycarbonate sheet. Factory dimensions: length - 12 meters, width - 2.1 m. For sale, the sheets are cut into shorter pieces, 6m or 3m. Therefore, the length of the cover should be a multiple of 2-2.1 m, this will allow for economical use of covering material.
An individual project can be made in any size. The shape also depends only on the desire of the owner, but any non-standard (pyramidal, square, polygonal) structures require large material costs and complicate installation.
The most common typical forms of greenhouse buildings:
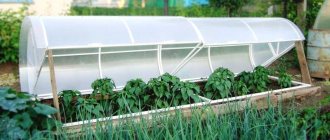
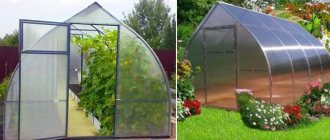
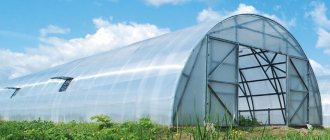
- Arched. Standard semicircular arc shelter, suitable for growing seedlings and any heat-loving garden crops. It is quite easy to install such a structure; snow does not linger on it.
- Gable. A classic project, widespread in summer cottages. A gable greenhouse is more spacious and convenient for growing tall crops. It is easier to arrange a ventilation system in it. It is important to design the roof with the correct slope angle: from 20° to 30°-40°. This will make it easy to clear the roof of snow.
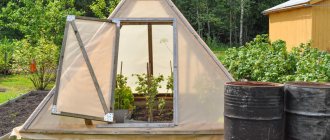
- Single-pitch. The best option for limited area. Such a building can be installed close to a blank wall of a house or near a permanent fence. It is easier to connect basic communications (lighting, heating) to them.
- Dome, polygonal, fantasy. Toy greenhouses. They decorate the area, giving it an intricate and unusual look. They require complex design, detailed drawings and are extremely expensive to install.
Most often in summer cottages there are arched or gable greenhouses. They are easy to install and easy to maintain. Most popular sizes:
- 3x4. Small compact design. Easy to install even in the tightest areas. Will provide a harvest for a family of 2-3 people;
- 3x6. Optimal size for arched shelter. Does not require a reinforced foundation or a complex project. The interior is quite spacious and convenient to care for plants;
- 3x8. Maximum size for amateur vegetable growing. Larger sizes are more often found on farms and are used for growing products in industrial quantities. The 3x8 greenhouse is installed on a solid foundation, and the frame is securely strengthened. You can divide the internal space into 2 compartments and grow crops that require different care and microclimate (for example, cucumbers and peppers).
We recommend reading:
All about greenhouses: purpose, use, care
Types of greenhouses
Various types of greenhouses are developed taking into account the characteristics of growing the plants for which they are intended.
In this case, the light and temperature characteristics of buildings are taken into account.
- Single-pitch. Shed roofs are more suitable for organizing winter gardens, since there is a passage there. It is recommended to build this type of greenhouse on the southern side of the house.
- Gable. This is the most common design with gable roofs.
- Teardrop-shaped. The drop-shaped greenhouse is quite durable; sunlight passes through it perfectly without leaving sediment on the surface of the building.
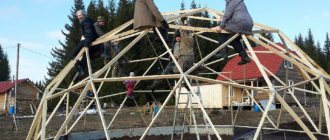
- Dome. To build a dome structure, you don’t need too much material. In addition, its rugged design allows it to be installed in areas prone to seismic hazards.
- Polygonal. Polygonal structures are durable and transmit light well. When installing, you should pay attention to the organization of space. This is done so that the heat can be evenly distributed inside the room.
- Dutch. Dutch greenhouses are durable and reliable. Sloping walls allow light to pass through, which only helps to increase the yield.
- "Baglan". This is the name given to a greenhouse shaped like a tunnel. It is considered a budget option, as it does not require large financial costs. It is mainly used for growing peppers and tomatoes.
A farm greenhouse is made of a metal frame, which is covered with a film covering. This type of greenhouse is also inexpensive and has moisture-proof properties.
What type of foundation to choose
Standard (“factory”) greenhouses are supplied without a foundation or on a weak foundation. Therefore, even if you order a ready-made structure, take care of the foundation yourself.
When designing the foundation, consider:
- terrain features of the site. If you have large differences in soil or shallow groundwater, you will have to prepare the area well. In the most difficult cases, a solid concrete base is poured;
- dimensions of the greenhouse building. A small greenhouse can be installed on bricks and strengthened with strong metal crutches - this is usually quite enough. But starting from a shelter size of 3x5 or more, you cannot do without a reliable foundation. The larger the building, the more serious the foundation needs to be installed. Therefore, sometimes it makes more sense to build two small greenhouses rather than one giant one.
A correctly selected and installed foundation not only makes the greenhouse structure stable and durable. It will help reduce heat loss by 10%, protect the soil from washing out, and plants from spring frosts.
When installing greenhouses, the following types of foundation are most often used:
- Tape. An extremely labor-intensive type of foundation that requires a lot of effort and time. First, they dig a trench according to the size of the future structure. Depth - the level of soil freezing in your region. In central Russia this is about a meter, in the southern regions a little less, in the north - more. The minimum depth, regardless of natural conditions, is 70 cm. Then formwork is placed in the trench and concrete is poured. According to all the rules, the strip foundation must “settle” for at least several months. After this, you can install the greenhouse frame.
- Columnar. Durable and less labor-intensive variation of the strip base. Instead of continuous concreting, several points are poured according to predetermined dimensions. For this it is convenient to use hollow asbestos-cement pipes.
- Wood. For a wooden building, a base made of impregnated timber is best suited. It is usually placed on brick or concrete posts for added strength.
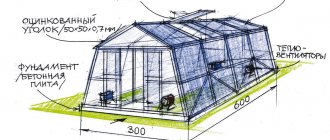
We fix the foundation in a 3 m greenhouse
It is useful for the novice gardener to remember an important construction fact. The more accurately the frame and base are fastened, the fewer problems will arise at the stage of practical operation. Regardless of the height of the structure, it requires a reinforced frame. It is created with mandatory consideration of the climatic characteristics of the region.
The foundation for a greenhouse can be made of concrete or bricks
In most cases, we are talking about materials that can withstand the vagaries of nature:
- Metal corner;
- Wooden beam;
- Metal pipes;
- Guides made of aluminum.
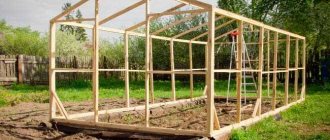
The most common option is a wooden beam, which is attached to the base using an ax and saw. Even a beginner can assemble a structure of this kind. The main thing is to keep the drawing before your eyes and check each step before and after its completion. Further actions largely depend on the level of proficiency with the instrument.
Beginners are advised to stick to using a corner, and professionals – to cut it completely. Generally speaking, the base is attached to the foundation using two common elements - wood or metal. The first is selected for a seasonal greenhouse, and the second for a year-round one.
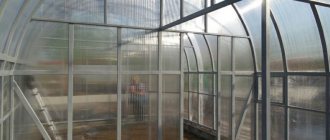
Assembling a polycarbonate greenhouse frame
After preparing the foundation, the greenhouse frame is assembled and installed. Most often used for the base:
- metal corners. The most durable and durable material. Withstands heavy loads, suitable for assembling tall and spacious greenhouses. It is extremely easy to maintain - it is enough to treat the frame from rust and paint it once every 5-7 years. A significant disadvantage is the high price of the metal;
- galvanized profile pipe. Lightweight and fairly reliable option. Ideal for arched structures;
- wood and lumber. Easy to assemble, inexpensive in price. To install a wooden frame, you do not have to purchase special tools: everything you need is available in any home workshop. The tree is quite strong, but short-lived. To extend the service life of wooden parts, treat them with special impregnation compounds, such as Senezh OgneBio;
- plastic pipes and profiles. Cheap and accessible material; working with it does not require special training. But the strength of such structures is low; they cannot withstand heavy snow loads.
Any frame can be made independently or ordered. If you are going to install a galvanized profile arched greenhouse, do not waste time doing it yourself. The ready-made option will cost much less. It is more profitable to make a wooden or plastic frame from pipes yourself. In addition, you can take into account the features of the site and create a drawing according to individual dimensions.
To attach the material to the greenhouse frame, roofing screws and thermal washers are used.
Important! Do not fix the sheets too tightly, as this may lead to cracks and damage to the covering material. For greater reliability, reduce the distance between the mounting points.
Greenhouses made of plastic pipes
Recently, greenhouse buildings built on a frame made of plastic pipes have gained popularity. They are affordable and easy to assemble. You can install such a greenhouse on your site in one day; no special tools are required for this.
Advantages of greenhouses made of PVC pipes:
- ease of installation. Plastic tees, couplings, and plugs are suitable for connecting frame parts;
- the base does not require anti-corrosion treatment or impregnation;
- if necessary, the structure can be easily dismantled and moved to another location;
- You can cut pipes with improvised means (a hacksaw, a sharp knife).
However, the frame made of plastic pipes is too light and cannot withstand strong gusts of wind. Therefore, too spacious and tall greenhouses cannot be installed from PVC pipes.
We will describe step by step the process of manufacturing and installing a greenhouse made of plastic pipes.
- Choose a suitable project. The easiest way to assemble and install an arched shelter. The gable option will require more effort and additional connecting materials.
- Prepare and level the area for installation.
- Drive into the ground and, if possible, concrete pieces of metal reinforcement (according to the number of frame cross members). The optimal length of the reinforcement is 1 m. Bury the reinforcement into the ground by 50 cm.
- Place the transverse posts of the greenhouse onto the prepared pins and securely fix them.
- If you are installing an arched shelter, connect the arches to each other with transverse stiffeners in at least 3-4 places.
- After this, you can attach the covering material to the base.
- Installation of a gable building is more complicated. You will have to use tees to connect the wall and roof parts together and then fix the polycarbonate to the frame. At the end of installation, a plastic corner is installed on the top of the gable greenhouse roof; it reliably seals the roof.
We recommend reading:
Arrangement of the local area
Frame
The frame is the skeleton of our structure. A variety of materials are used. From wood to aluminum. Aluminum is lightness, strength, ease of installation, and elegance.
By the way, a greenhouse is also an element of your landscape. And it should look so that it pleases the eye.
On our resource you can learn in detail about the Tenfi, Slava and Maria greenhouses, which will fit perfectly into any landscape.
Aluminum
Aluminum creates a great impression, but is expensive. Wood can be impregnated and coated with various kinds of paints and special compounds. It may look attractive.
But it is difficult to calculate the thickness of the beam and have confidence in the design. Wind loads and snow can make you nervous.
An acceptable frame option is galvanized cold-rolled steel. Or a square pipe. You can always paint it and it will look elegant.
You can assemble a greenhouse from polycarbonate by following certain rules and techniques.
You need to imagine several step-by-step steps.
- Dig a ditch the width of a spade bayonet (25-30 cm), and up to 1 meter deep.
- Fill the ditch with sand (you can mix sand with fine screenings) and compact it.
- I make formwork from plywood, boards around the perimeter of the ditch and 30 cm high on the ground surface.
- We reinforce the filling space. You can use a mesh with a cell of 10x10 cm and a rod thickness of 4-5 mm.
- Fill with concrete mixture.
Let us recall the composition of the solution:
- cement - 1 part;
- sand - 3 parts;
- crushed stone - 5-6 parts.
When pouring concrete, it is necessary to install embedded elements to which the lowest metal structure will be attached.
The formwork can be dismantled in a couple of days. But we must remember that complete hardening of concrete occurs up to 28 days.
Frame system
Next comes the installation of the greenhouse frame system. Profile (square pipe) 25 x 30 mm. and wall thickness 1.2–2.0 mm. acceptable.
It is permissible to use a profile with a U-shaped section (30 x 25 x 30 mm) to lighten the roof structure.
Polycarbonate is cut with a jigsaw. But it is necessary to ensure that the file on the jigsaw is specifically for cutting plastics and plastics. There is more than one exact instruction for installing polycarbonate.
But you need to follow a few rules.
- The polycarbonate is positioned and attached to the frame so that the stiffeners are in a vertical position (see Attaching polycarbonate to the greenhouse).
- On roof slopes, the ribs are located along the slope. Top down. The tilt angle is recommended 15º. This is subject to choosing a gable roof
- Installation of the sheet must be done without removing the protective film, and with this side facing out. On the side where the picture is (front side) the ultraviolet protection “UF-Protected” is indicated. In addition, the film will prevent unnecessary scratches from appearing during installation.
- The sheet is fastened to the frame using metal screws. In the panels themselves, you need to pre-drill a slightly larger hole.
Considering that the sheet has its own expansion coefficient. A washer with a rubber gasket is placed under the self-tapping screw. The distance between the screws is 40 mm, with a panel thickness of 6 mm.
- The edges of the panels are covered with a special U-shaped profile, and additionally glued with self-adhesive metallized perforated film to allow condensation to be removed.
- The polycarbonate sheets are joined together using the “H” profile. The profile is attached to the frame, and the edge of the sheet fits into the sides of the profile.
Additional elements of the greenhouse are vents and windows for ventilation.
It is better to place them higher, or on the roof itself. Side windows can create a draft, which is very unfavorable for plants. In a greenhouse with a volume of 45 cubic meters. It is recommended to install 3 windows (see Window for a polycarbonate greenhouse).
There is no need to go to the store to purchase a branded greenhouse model, especially if you know how to assemble a polycarbonate greenhouse yourself.
It will serve you for 15-20 years without repair, which means there will be no additional costs required.
How to choose polycarbonate for a greenhouse
Not only greenhouse buildings are sheathed with polycarbonate, but also carports, stationary gazebos, and small utility buildings. For country greenhouses, sheets with a thickness of 4 to 8 mm are mainly used. More durable material (from 10 to 20 mm) is used for stationary canopies and canopies.
Don't overpay for thicker sheets. Of course, it is much stronger, but it is very difficult to attach it to an arched frame. A less stable plastic base will not withstand manipulations with bulky and heavy covering material at all.
The optimal sheet thickness for an arched structure is 4 or 6 mm. A gable greenhouse can be sheathed with 6mm or 8mm covering material.
You shouldn’t go to the other extreme and buy a 3.5 mm thick sheet: it will last 2-3 years, no more.
Transparent polycarbonate is suitable for greenhouses: it transmits sunlight better, which has a beneficial effect on plants. Colored sheets are not used for greenhouses.
How to properly insulate a polycarbonate greenhouse
If you are going to use a greenhouse for all-season cultivation of vegetables and herbs, take care to thoroughly insulate the structure.
Experienced gardeners advise following these recommendations:
- Thoroughly insulate the foundation and seal the cracks, this way you will reduce heat loss by 10-15%. Seams and joints can be sealed using plastic profiles or special paste sealants.
- Use three-layer sheets for all-season greenhouses. The finished structure can be insulated by attaching a second layer of polycarbonate or dense polyethylene film to the frame.
- A vestibule attached to the greenhouse will reduce heat loss. It can also be used to store inventory.
- Create raised beds in the greenhouse (at least 40 cm above the soil surface). Add biofuel into the beds - fresh manure, rotted plant residues. This will increase the temperature in the greenhouse, and you can start planting earlier.
After insulation, you can think about the heating system. Most often, greenhouses are heated using electric heaters, wood stoves or gas. This is extremely expensive and troublesome, suitable only for experienced gardeners who have a reliable distribution channel for their products. Otherwise, the costs of maintaining the greenhouse will not pay off, and the grown vegetables will become “golden”.
Concrete for foundation
In order to calculate the grade of concrete, you must adhere to special tables for calculating the strength of concrete.
The industry produces cement in 50-kilogram bags of various brands.
- M300
- M400
- M500
- M600
In order to calculate the required amount of cement, crushed stone, sand, it is necessary to calculate the volume of all columns. Since concrete is produced in cubic meters, the calculation should be carried out in the same units of measurement.
For example, a column with a cross section of 150*150 mm and a height of 1200 mm will have a volume of: 0.15*0.15*1.2 = 0.027 m3. That is, for 10 columns 1.2 m high with a cross section of 150 * 150 mm, 0.27 m3 of M 200 concrete is required.
There are special tables that discuss various options for preparing concrete depending on the brand of cement, water-cement ratio and various fillers of crushed stone and sand.
Adviсe:
- The foundation of a small greenhouse must be mounted to the nearest millimeter and strictly horizontally.
- If the greenhouse is large, then each column should be set in accordance with the design. The height of the posts regulates the slopes for water drainage.
- Sometimes cement manufacturers print tables on bags for the preparation of various grades of concrete
Selecting greenhouse lighting (3x4, 3x6 and 3x8)
Good lighting is the most important condition for the growth and development of plants. When choosing a location for a greenhouse building, make sure that the sun's rays penetrate the greenhouse during the day. Do not install the greenhouse in the shade of trees or outbuildings.
Replace polycarbonate in a timely manner, do not allow it to become heavily soiled or cloudy. If your site is located near a traffic highway or industrial areas, regularly wash the sheets outside.
Plants require additional lighting in the spring. Seedlings and young plants are especially demanding of light. Therefore, it is advisable to install LED or energy-saving lamps to illuminate plants in April and early May. After planting the plants on the ridges, additional lighting is stopped. Summer sun is usually enough for plants.
Incandescent lamps are not used to illuminate plants: it is too expensive and unsafe.
How to properly care for polycarbonate greenhouses
Caring for such greenhouses is easy. At the end of the season, the metal base is cleaned of dirt, rust, and old paint. If necessary, the enamel layer is renewed. Wooden frames are impregnated with an antiseptic or whitened with a lime solution. The coating is washed with a soap solution with the addition of disinfectants. To destroy pests and pathogens, fumigation is carried out with a sulfur bomb.
In the fall, the structure is further strengthened with wooden or metal supports. In winter, especially after snowfalls, ice and snow are removed from the roof.
Greenhouse buildings made of polycarbonate are durable, reliable, and require almost no additional investment. With regular care, they will last a long time and will delight you with an excellent harvest.