Over time, some gardeners realize that they want to grow plants not only for themselves, but also for sale at the market, or even for supply to restaurants in the city. Building a business on vegetables and fruits is not difficult if you have extensive experience in growing crops of various types. However, it is worth understanding that a small greenhouse is not enough to ensure the constant arrival of a new crop. To turn a hobby into a real business, you need to grow a lot of plants throughout the year.
And then you will need a large industrial greenhouse. The design from the simple and understandable name “Farmer” has proven itself well.
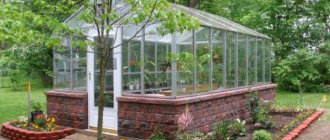
Greenhouse "Farmer"
Industrial greenhouse: features
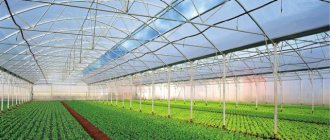
Industrial greenhouses differ from ordinary greenhouses in their large size; they use heating systems, which allows them to obtain several harvests per year. Greenhouse buildings occupy a significant area and, as a rule, have a large height.
Such structures can be multi-tiered and multi-story. For the conditions of the Far North, greenhouse buildings are built with walls made of permanent building materials, in which only artificial lighting is used.
Large greenhouse buildings, maximally equipped with electronic tracking systems and technology, are being built in Holland .
The useful area of such structures is several
thousand square meters .
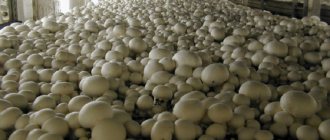
These are real indoor plantations .
Vegetables, berries and flowers are grown here not only in soil, but also using hydroponic .
Then the plants are planted in a synthetic porous material resembling glass wool.
This material is supplied with minerals and water, selected individually for each crop. This technology makes it possible to obtain very high yields.
Special equipment for heating, watering, irrigation, and fertilization is produced for Dutch greenhouse complexes
In such buildings, a multi-tier heating system and a heated floor are installed; the heating system provides for the production and supply of carbon dioxide , which is necessary for the metabolic processes of plants during the daytime. Dutch greenhouses are supplied to customers all over the world.
Russian enterprises have mastered Western technologies for the production of industrial greenhouses.
Russian products are much cheaper than imported ones, and local enterprises that produce farm greenhouses make them adapted to the weather conditions of the regions.
The large volume of industrial greenhouses allows you to grow plants on racks, hanging pallets, using several tiers. The number of “floors” depends on the height of the plants. In greenhouse buildings, artificial lighting , which allows plants to receive more light in early spring and late autumn, as well as in winter.
REFERENCE: Industrial greenhouses have a large area, large volume, various types of heating and lighting.
Industrial greenhouses - photo:
"Farmer 4.6m"
Download price list in WORD
and
PDF
| “Farmer 4.6m” - width 4.6 m, height 3 m, length any multiple of 2.1 m. | |||||
| Greenhouse length, m | 4,2 | 6,3 | 8,5 | 10,6 | 12,7 |
| Frame price, rub. | 35.700 | 42.400 | 49.100 | 55.800 | 62.500 |
| Total cost, frame + polycarbonate + profile, rub. | 56.782 | 68.504 | 83.444 | 95.314 | 107.036 |
| *Prices may change as metal prices change. | |||||
| “Farmer 4.6m” - width 4.6 m, height 3 m, length any multiple of 2.1 m. | |||||
| Greenhouse length, m | 14,9 | 17,0 | 19,1 | 21,2 | 23,4 |
| Frame price, rub. | 69.200 | 75.900 | 82.600 | 89.300 | 96.000 |
| Total cost, frame + polycarbonate + profile, rub. | 121.976 | 133.846 | 145.568 | 160.508 | 172.378 |
| *Prices may change as metal prices change. | |||||
Serially produced models
Large enterprises in all regions of Russia are developing standard designs for conventional and industrial greenhouses. They have created a series of projects and offer the buyer a large selection of products.
REFERENCE: when designing industrial greenhouses, SNiP 2.10.04-85
What types of industrial greenhouses are there? There are several types of professional greenhouses for farmers:
- tunnel;
- multi-tunnel with gallery;
- block multi-span;
- garden centers.
Farm tunnel greenhouses . The series is developed by manufacturing enterprises based on existing building codes and regulations in Russia.
Industrial-scale greenhouses are produced under film and polycarbonate; different types of frames are used in the design. The cross-section of greenhouses can be arched, “Gothic”, “with straight frames” and “straight reinforced walls”. The width of the greenhouse building ranges from 3.5-12 meters .
Farmer Series
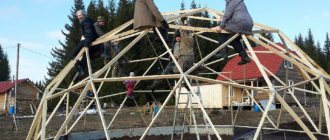
Industrial greenhouses "Farmer" are designed in compliance with SNiP 2.10.04-85 , they are intended for the industrial cultivation of vegetables, berries and seedlings. The frame of the farm greenhouse is assembled from a galvanized profile with bolts.
Arc-shaped trusses are tied together by straight beams. The cross-section of greenhouse buildings is semicircular (arched) or pointed (“Gothic”).
Dimensions of industrial greenhouses "Farmer":
The height in various models of the series is 3-4 meters . This allows you to grow both tall and short-growing crops by placing the seedlings on racks.
Greenhouses of this series are mounted on any foundation or on the ground in which racks are dug. The width of the structure ranges from 3.5 to 7.7 meters . The basic kit includes double-leaf gates, which are mounted at the ends of the greenhouse building. At the buyer's request, additional ventilation vents can be installed.
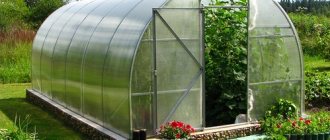
The greenhouses are covered with transparent cellular polycarbonate . The customer can choose the thickness of the polycarbonate - 6 mm (recommended), 8 mm or 10 mm. The polycarbonate is fastened with special “polyclip” fasteners, and the covering material is attached to the end walls with corner brackets. In the Farmer , vegetables can be grown all year round.
Assembly instructions
So, you decided to open your own business and purchased a “Farmer” greenhouse. However, before you start using it, you will have to assemble it. The assembly instructions that come with the design will help with this. Let's look at an example of assembling the Farmer-5 greenhouse.
Scheme of the planned area for a greenhouse. Recesses in the ground must be prepared for the intermediate pillars of the end arches, which, after installing the pillars, are filled with soil or filled with concrete. In the “Farmer – 9” and “Farmer – 10” models there are twice as many intermediate posts, i.e. 4 pieces per arch. Therefore, it is necessary to prepare 4 more recesses (two per side).
Step 1: Carefully unpack the greenhouse parts. Please note that they all have number marks that will make the assembly process easier for you.
Greenhouse frame diagram
Step 2. Assembly begins with the end wall. First, connect the two ridge arches (20) together using bolts. Then connect them together with the upper ridge beam (29). It is attached almost to the very junction of the two previous parts.
End arch
End wall assembly
View A of the end arch
End view of the arch
View B of the arch end
End arch type
Step 3. Then take the usual arches (4), the upper beam (11). Connect them at the next node below the junction of the ridge arches and the top ridge beam.
Step 4. Screw the arc tie (5) to the arches, connected to them with a radial tie (7m).
An arc tie is attached to the arches, connected by a radial tie
Step 5. Next, take the fundamental stand (1) and the side tie (26), connect them to the arches (4).
Side tie fastening
Step 6. Attach the foot (3) to the fundamental stand (1).
Step 7. Attach the stand (9) perpendicularly to the side tie (26), and also take the ridge arc (20c) and, as it were, continue the side tie (26).
Connection of horizontal and vertical ties
Step 8. Take the small corners and use bolts to attach them to those places on the end that are marked in the instructions in one of the pictures.
By the way, the corners are installed partially together with the strips of beams and racks. Only after you screw the corners to them are these parts secured to the main structure.
Step 9. Now proceed to install the purlins onto the assembled end wall. Place the wall on the ground. To the arcs 4 and beams 20, start screwing the end purlins 2k and 2kn along the side flanges of the profiles. Under their own weight they will deviate from the vertical - there is no need to be afraid of this.
Installation of purlins
Step 10. In the same way as you assembled the end wall (only without the elements forming the gate opening), assemble the power arc.
Step 11. Now bring the power arc to the assembled end wall with the installed purlins and connect it to the free ends of the purlins using bolts.
Connecting the power arc with purlins
Advice! First, join the outer purlins and those in the middle to make the work easier. At least three assistants must support the entire structure.
Step 12. The section is almost ready. Now install the slopes of longitudinal rigidity - they seem to connect the purlins to each other.
Installation of slopes of longitudinal rigidity
Installation of windows
Attaching the cord to the window
Scheme for attaching the cord to the window
Step 13: Now proceed to install the end section. Mark the entire structure in the place where the greenhouse will stand. Dig holes around the perimeter 70 cm deep at such a distance that the foundation posts will fit into them.
Attention! If the greenhouse is installed on a foundation, then install mounting angles on it. The ends of the arcs will be attached to them without fundamental posts.
Step 14: Lift the assembled end section and place it in the prepared area.
Raising the assembled end section
Step 15. Now get ready to increase the length of the greenhouse - build up the frame. Assemble the power arcs similarly to step 10 and bring them to the already installed part at a distance equal to the length of the run 2 and 2n along the side flanges of the profiles.
Arch connection
First, connect the outer and middle purlins. Thus, all the arcs are attached to the required length of the greenhouse and the second end wall completing this chain.
Frame extension
Attaching the connection to the end arch
Installing side braces
Step 16. Start assembling the gate. Remember that all overhead parts are installed after the main structure is assembled. Connect the door posts and strips together. Install screws on the left rack (12vl).
Gate assembly
Step 17. Connect the door posts with two diagonals (14c) and strips (13c) at one point.
Installation of door racks
Step 18: Screw the awnings onto the door frame. Assemble the other doors in the same way.
Step 19. Also install corners on the gate in the required places - they are needed for attaching the polycarbonate.
Location of corners
Step 20. The frame is ready. Now you will line the greenhouse. Open the sheet as shown in the picture.
Polycarbonate cutting diagram
Attention! Attach polycarbonate upwards only with the side marked for UV protection. A film with inscriptions will also be pasted on the same side. Do not forget to make marks on each cut piece - after removing the film, you will not be able to distinguish the sides of the polycarbonate from each other without these marks.
Frame cladding diagram
Step 21. Sheathe the ends, securing the polycarbonate to the corners with washers and self-tapping screws.
Step 22. Connect the pieces of coating to each other using a polycarbonate one-piece connecting profile.
Step 23. Install the sealing profile between the arches and the covering at the end.
Step 24. Install the seals on the doors as well.
Step 25. Cut the polycarbonate sheets into 5 m pieces to cover the greenhouse frame. The outer panels fit tightly and with the help of a sealant to the end ones.
Step 26. Attach the polycarbonate sheets to the greenhouse frame using washers and self-tapping screws.
Covering the greenhouse with polycarbonate
Step 27. Install a ridge profile at the top joint of the panels.
Step 28. Connect the side joints of the sheets with a split profile.
Step 29. Install the handles on the doors. The greenhouse is ready.
Greenhouses "Farmer". Assembly instructions. Downloadable file (click the link to open the PDF in a new window).
Assembly instructions
Video – Assembling the “Farmer” greenhouse
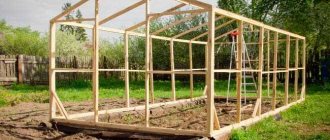
Where to start construction?
- Choosing a location.
- Selection and preparation of the project.
- Materials.
- Greenhouse heating.
Selecting a location
To get the most out of your investment, you need to orient your building .
IMPORTANT: The best orientation of a long greenhouse building for areas located south of latitude 60° is from north to south. In the northern regions of the country, it is recommended to orient greenhouse buildings from west to east.
The construction of industrial greenhouses begins with the selection of a site. It should be as level as possible ( a slight slope of 0.04% is allowed). If hurricane winds occur in the region, provision should be made for the construction of additional shields and fences that will reduce wind speed. They will also protect the building from inflatable snowdrifts.
During melting snow and heavy rains, water should not accumulate on the site, which will flood the greenhouse and destroy the foundation. Before starting the construction of industrial greenhouses, you should think about the water supply. The soil must be fertile , and in order to obtain good harvests, it is necessary to provide for the use of soil mixtures, natural and artificial fertilizers.
Selection and design of the project
Before building a greenhouse, the farmer and the owner of a private farmstead need to decide what he will grow in the summer and winter seasons. As a result, a drawing of a farm greenhouse , as well as a list of requirements.
Experience shows that when building a critical structure that will serve for years, it is better to rely on specialists . In specialized companies, the customer is given a choice of dozens of ready-made projects that correspond to his wishes. Here you can buy a ready-made greenhouse in disassembled form and mount it on the foundation. Typically, businesses offer installation services.
Projects and drawings of industrial greenhouses:
Materials
How to build an industrial greenhouse ? In order for the greenhouse to serve for many years, it must be mounted on a foundation . The foundation allows you to securely fasten the structure, prevent the penetration of atmospheric water from the outside, and protect the crop area from weeds.
For small industrial greenhouses, any type of foundation - on piles, block, point, slab, brick. For large greenhouses, a concrete foundation is usually made; timber is less often used.
Frame
For farm and industrial greenhouses, a durable arched or gable frame is used. The frame is assembled from a hat profile, from a profile pipe or from a corner.
The hat profile frame is installed quickly and easily, but this design cannot withstand the weight of heavy snow. If you decide to build farm greenhouses from a profile pipe, then the frame can be welded. The pipe has a round or square cross-section. This design also cannot withstand heavy snow weight.
The best is a frame made from a corner (angle profile). It is assembled with bolts, without welding, the profile is galvanized and can serve for many years. This design can withstand the weight of snow up to 100 kg per square meter.
The frame is fixed to the foundation. For strength, use anchor bolts or pre-fixed studs. Such fastening will provide sufficient rigidity and strength , while the difference in the thermal capacity of building materials will not contribute to the loosening of the structure in extreme heat and frost.
The frame can also be aluminum . But the aluminum structure can be deformed under the influence of winds and heavy snow.
Winter industrial greenhouse - project:
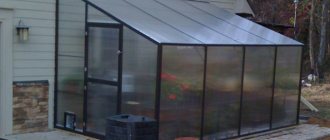
Advantages
What are the main advantages of the Farmer greenhouse? There are quite a lot of them, which makes the structure a worthy competitor to other industrial-type structures.
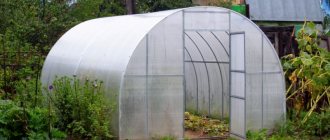
- The arched or gable shape of the structure will not allow snow to linger on the greenhouse. It will easily roll down, and the structure will need to be cleaned in winter only in case of very heavy snowfalls.
- In "Farmer" you can grow any crops, even those that are quite tall.
- The greenhouse is relatively easy to assemble and disassemble. Thanks to this, it can be easily moved to another place if necessary.
- The Farmer greenhouse is not afraid of strong winds.
- The design of the frame allows the installation of additional devices that ensure the creation of an optimal climate for plants - fans, lighting fixtures.
- With properly installed heating in a greenhouse, it is possible to grow crops all year round, even in severe frosts.
- Installation can be done independently and without using a foundation.
- Various size variations will help you choose the greenhouse that best suits your size.
- “Farmer” can be used for various purposes – both for personal use and for industrial use.
- A properly assembled greenhouse retains heat and moisture well.
- “Farmer” looks very aesthetically pleasing, which means it will not spoil your plot.
Greenhouse "Farmer" looks very aesthetically pleasing
Greenhouse “Uralochka reinforced”
In this article you will find technical characteristics, types and instructions for installing the “Uralochka reinforced” greenhouse! We also recommend reading the article about what the Snowdrop greenhouse is.
Covering material
The following are used as covering materials:
- cellular polycarbonate;
- glass;
- polyethylene film.
Cellular polycarbonate
Currently, the most popular covering material is cellular polycarbonate . It is easy to install, is reliable during operation, and is not destroyed by accidental sharp impacts. This material will not be broken even by strong hail.
Foreign industry produces cellular polycarbonate of various thicknesses (from 3.2 to 25 mm) and structure. For small winter professional polycarbonate greenhouses, material with a thickness of 3.2 to 6 mm is used. Transparent polycarbonate is usually used for greenhouse buildings and greenhouses. The light transmission coefficient depends on the thickness of the sheet and ranges from 62% to 83% .
Glass
The light transmittance of glass is high ( 88-92% for glass of various thicknesses). Greenhouse structures can be glazed with both window and greenhouse glass, which is much stronger. Dutch industrial glass greenhouses are covered with a special type of float . This glass is cast into ready-made molds, which increases its strength.
Polyethylene film
Film industrial greenhouses have been used for a long time, but this material has a number of disadvantages. The film is difficult to secure without damaging it. Winds stretch the film, it begins to inflate and tear, which is why it has to be replaced. Arched farm greenhouses under film, which are located in areas of strong winds, have to be closed annually .
Film farm greenhouses - photo:
"Farmer-4.2m"
Download price list in WORD
and
PDF
| “Farmer 4.2m” - width 4.2 m, height 3.18 m, length any multiple of 2.1 m. | |||||
| Greenhouse length, m | 4,2 | 6,3 | 8,5 | 10,6 | 12,7 |
| Frame price, rub. | 34 000 | 40 300 | 46 600 | 52 900 | 59 200 |
| Total cost, frame + polycarbonate + profile, rub. | 55 082 | 66 404 | 80 944 | 92 414 | 103 736 |
| *Prices may change as metal prices change. | |||||
| “Farmer 4.2m” - width 4.2 m, height 3.18 m, length any multiple of 2.1 m. | |||||
| Greenhouse length, m | 14,9 | 17,0 | 19,1 | 21,2 | 23,4 |
| Frame price, rub. | 65 500 | 71 800 | 78 100 | 84 400 | 90 700 |
| Total cost, frame + polycarbonate + profile, rub. | 118 276 | 129 746 | 141 068 | 155 608 | 167 078 |
| *Prices may change as metal prices change. | |||||
Heating
To heat industrial greenhouses in winter, solid fuel, electric, gas and liquid fuel boilers are installed. They heat water , which circulates through pipes running along the contour of the building and under its floor, filling the radiators. Thus, both the air and the soil are heated.
Industrial greenhouses can be heated by supplying warm air from heating electrical appliances . The room heats up very quickly, but after turning off the equipment the temperature quickly drops. In this case, the soil does not heat up.
PLEN infrared heaters can be used to heat farm greenhouses . Heater panels are mounted under the ceiling; during their operation, mainly the soil, plants and structural elements are heated, but not the air.
Infrared radiation works in the same way as the rays of the sun. Excess heat enters the air. This type of heating for industrial greenhouses is expensive , but very effective ; plants thrive in infrared rays and produce large yields.
IMPORTANT: In industrial greenhouses with heating there must be the same temperature in all points of the room.
Tips for use
In order for the “Farmer” greenhouse to serve you for a long time, you need to operate it correctly, do not forget about cleaning, and protect it from damage.
- Try to ensure cleanliness is maintained both inside and outside the greenhouse. This will protect against the occurrence of plant diseases and the proliferation of parasites. Clean the walls of the greenhouse regularly.
- Do not forget to carry out preventive measures - treat the soil from parasites, disinfect the greenhouse at least twice a year to avoid epidemics of plant diseases.
- Regularly clear the structure of snow if it has been a snowy winter.
- When installing the structure, make sure that the greenhouse is installed on a level place to avoid distortion and damage to the structure.
Here, perhaps, are all the main points regarding the “Farmer” greenhouse. After reading this article, you are fully prepared to purchase this design and continue growing your favorite crops, but on a truly industrial scale.
"Farmer-5m" model 2011
Download price list in WORD
and
PDF
| “Farmer 5m” - width 5 m, height 3.6 m, length any multiple of 2.1 m. | |||||
| Greenhouse length, m | 4,2 | 6,3 | 8,5 | 10,6 | 12,7 |
| Frame price, rub. | 39 100 | 46 400 | 53 700 | 61 000 | 68 300 |
| Total cost, frame + polycarbonate + profile, rub. | 68 002 | 84 794 | 101 034 | 117 274 | 134 066 |
| *Prices may change as metal prices change. | |||||
| “Farmer 5m” - width 5 m, height 3.6 m, length any multiple of 2.1 m. | |||||
| Greenhouse length, m | 14,9 | 17,0 | 19,1 | 21,2 | 23,4 |
| Frame price, rub. | 75 600 | 82 900 | 90 200 | 97 500 | 104 800 |
| Total cost, frame + polycarbonate + profile, rub. | 150 306 | 166 546 | 183 338 | 199 578 | 215 818 |
| *Prices may change as metal prices change. | |||||
"Farmer-5m"
Download price list in WORD
and
PDF
| “Farmer 5m” - width 5 m, height 2.85 m, length any multiple of 2.1 m. | |||||
| Greenhouse length, m | 4,2 | 6,3 | 8,5 | 10,6 | 12,7 |
| Frame price, rub. | 37 400 | 44 400 | 51 400 | 58 400 | 65 400 |
| Total cost, frame + polycarbonate + profile, rub. | 58 482 | 70 504 | 85 744 | 97 914 | 109 936 |
| *Prices may change as metal prices change. | |||||
| “Farmer 5m” - width 5 m, height 2.85 m, length any multiple of 2.1 m. | |||||
| Greenhouse length, m | 14,9 | 17,0 | 19,1 | 21,2 | 23,4 |
| Frame price, rub. | 72 400 | 79 400 | 86 400 | 93 400 | 100 400 |
| Total cost, frame + polycarbonate + profile, rub. | 125 176 | 137 346 | 149 368 | 164 608 | 176 778 |
| *Prices may change as metal prices change. | |||||