The greenhouse on the site is one of the most important buildings, you will agree. These and early vegetables and greens for the table, instead of store-bought nitrate ones at an exorbitant price, mean delicious strawberries for the whole summer, and not two weeks a year, and this is an additional important income when they are planted for sale. But what to do when there is an economic crisis in the country, which has clearly become chronic? You can buy one industrial powerful design, but two – this is already considered a luxury.
Let's say even more: recently, with the rapid rise in prices, many have rushed to live in villages - there is Internet, good television, too, infrastructure is developing. And it’s better to grow the same carrots yourself than to buy them at a fabulous price. Village grandmothers are also quite frightened when visiting city youth begin to ask them about how and what to plant. It’s a pity, but the sharp wave of enthusiasm is already waning: growing vegetables with your own hands is not so easy, and the climate is often to blame for this, but buying a greenhouse is no longer possible for those who decide to save on food. So why not go for a purely Russian trick - build small greenhouses from scrap materials for seasonal cultivation? And improvised materials are what is already there, left over after construction or given for free. These include wooden blocks, plastic pipes, bottles, bags, glass fittings, fence mesh, and even branches! Now look carefully at your site: what is lying idle? Maybe you have long had the material to build a good greenhouse?
And now we’ll tell you what to do with all this.
Let’s just first take a closer look at what requirements there are for the design of any greenhouse:
- Strength. Constantly breaking arches and supports are not even funny. These are endless nerves, not to mention crushed plants. If he overwhelms you, he may not get by with ordinary abrasions.
- Sustainability. If your greenhouse collapses from the first wind, or flies away to a neighboring plot, the design will have to be seriously modified.
- Smoothness. If the film constantly tears against the rough frame, you will not buy it.
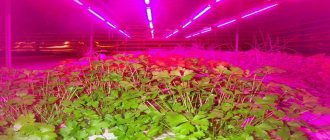
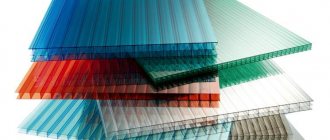
- Access to all spectrums of light. If you covered homemade arcs with the remaining colored film from something, check in advance - will anything grow under it? For example, without the red spectrum they will not have a growing season, and without the blue spectrum they will not bear fruit. And your film or coating repels the color it is painted in - these are simple laws of optics.
- No drafts. Sealing comes first.
- Safety for humans. Thus, some types of plastic and slate release hazardous substances into the air even when heated slightly. Don't take risks!
- Ecological cleanliness. Everything that is bad in the greenhouse soil will one day end up in the plants.
- Anti-corrosion. It’s always humid in the greenhouse, and it’s bad if your frame starts to rust within a month. For this case, there are special impregnations for wood and paint for metal. But PVC water pipes feel best in a greenhouse - they were originally made of a material resistant to constant dampness.
If the material you find meets all these requirements, great! Then start construction to soon please your family with fresh vegetables.
Moreover, shelves for such greenhouses can also be made from scrap materials:
- 2 Design #2 – greenhouse made of branches
- 3 Design #3 – greenhouse made of glass reinforcement
- 4 Design #4 – greenhouse made of pipes
- 5 Design #5 – mesh greenhouses
- 6 Design #6 – greenhouse made from a rubber hose
- 7 Design #7 – greenhouses made from plastic bottles
- 8 Design #8 – underground greenhouses
- 9 Construction #9 – log greenhouse
- 10 Design #10 – greenhouses made of bags
Construction #2 – greenhouse made of branches
You can make a similar greenhouse from vines. So:
- Prepare willow rods 3 meters long.
- Drive reinforcement bars into the ground, 50 cm each. 10-15 cm should remain above the ground.
- Now we bend the vine rods and tie them to the reinforcement.
- We connect every two arches from above and tie them with metal wire.
- Cover with film, preferably reinforced.
Such a greenhouse, of course, is not the most durable, but how much work is it to install the same new one in the spring?
Greenhouse “Breadbox” and “Butterfly” - photo
This design is called a “bread box” because it looks exactly like a plastic bread container. Its lid also rises upward, hiding behind the second half. If you look at the photo, you will understand everything.
You can weld such a greenhouse-breadbox with your own hands from a profile pipe
There are two types of such products: opening on one or both sides. If it is shallow, you can work with a lid that opens on one side. If the width is more than a meter, it will be easier to work if there is access from both sides. This design with two opening sides has its own name: “Snail”.
A film or spunbond is stretched over the manufactured frame, but polycarbonate is more popular for this design.
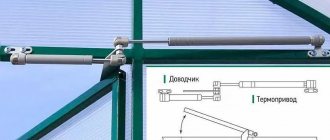
The second design differs in the type of door opening. Its vault is also made on arches, but opens on hinges upward (see picture).
Butterfly greenhouse: when open, the lids resemble wings
They can be installed directly on the ground or on a prepared foundation made of bricks or timber. In some cases, the lids do not open immediately from the ground, but there is a small side of 15-20 cm.
Read how to make a beautiful vegetable garden (decorative and functional) here.
Construction #4 – greenhouse made of pipes
Moreover, polycarbonate can also be attached to propylene pipes. Don't believe me? The main thing is to know how to do it correctly:
- Step 1. Take a polypropylene pipe and make a longitudinal slit 4 mm wide in it.
- Step 2. Insert 4 mm cellular polycarbonate into the slot. The main thing is not to scratch the sheet.
- Step 3. We cook polycarbonate with polypropylene.
Here is another way to attach cellular polycarbonate to polypropylene pipes:
- Step 1. Take two PVC pipes with a diameter from 32 mm to 50 mm.
- Step 2. Heat them well with a hair dryer for welding plastic and bend them into an arc - the same as the arch of a greenhouse.
- Step 3. We buy a clip that is usually used to secure these pipes to the wall.
- Step 4. We insert the pipe into the clip, and screw the slats to the shelves of the clip.
- Step 5. We attach cellular polycarbonate to the rail.
This is one finished section of the greenhouse. If you took a pipe length of 6 meters, then your arch will be 3.8 meters wide and 2.1 meters long. You can, of course, build it with film - it’s cheaper:
If you still have iron pipes, you can bend them too:
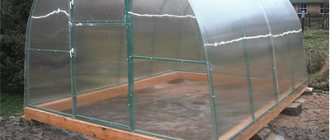
Getting ready for construction work
First, you need to determine which greenhouse design option will suit you best.
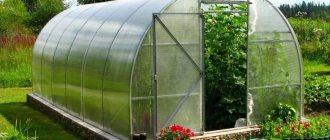
Perhaps a non-standard greenhouse design will be more convenient for you than a conventional house with a gable roof
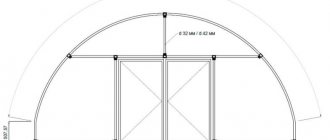
When choosing, take into account the size and shape of the area allocated for the greenhouse, the quantity and type of available building materials, the number of beds, etc. When free space remains only near the house itself, it is worth saving on materials and organizing a wall-mounted greenhouse. And for those who prefer not to spend a lot of time on gardening work, a small round greenhouse is quite suitable.
According to this drawing, it is supposed to build a greenhouse from wood, but if you remove the extra braces, you can use it to assemble a metal or pipe frame
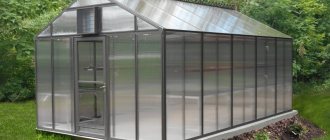
Among gardeners and gardeners, the most popular are medium-sized greenhouses in the form of a house with straight walls and a gable roof. To build the 3x4 m option shown in the drawing, you will need about 150 m of beams, boards or metal pipes. They will need to be cut into fragments of 1.5 m each (vertical posts) - 30 pieces and 1 m each (horizontal lintels) - 110 pieces. The remains will be useful for braces and the frame of the door leaf.
To cover the walls you need 35.5 m2 of film or membrane, this is almost 24 linear meters from a roll 1.5 m high. This roll width is optimal because it allows you to close the walls with a minimum number of joints. To finish the roof you need 24 m2 of material, which corresponds to 16 linear meters of a 1.5 m roll of film or 4 sheets of cellular polycarbonate measuring 1.2x5 m. For gables (triangles at the front and back) you need another 8 m2 of material, that is 5.5 m of linear film 1.5 m wide or 2 sheets of polycarbonate measuring 1.3x3 m.
Design #5 – mesh greenhouses
After building a fence, is there a piece of metal mesh left? It's time to build a great greenhouse!
It is advisable to put the same mesh on the floor, tying it to the side walls - this will make the frame much stronger.
To prevent such a homemade greenhouse from freezing at night, line the sides with straw or cover it with additional bubble wrap.
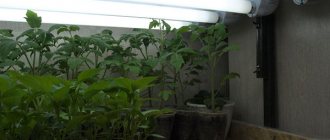
Mini-greenhouses for seedlings
For those who grow seedlings for their own vegetable garden or flower garden, large volumes are useless. We need small greenhouses. Moreover, many grow seedlings on balconies. All of the above designs can be used for a balcony in reduced sizes. For very small plantings, you can even take plastic egg trays. On one side there will be a container for soil and a lid instead of a shelter. Look at the photos for other ideas.
Make a greenhouse cabinet from wooden planks and cover it with polycarbonate
A plastic egg tray can also be used as a mini-greenhouse for seedlings
A box is assembled from planks, glass is inserted, film or spunbond is stretched, and polycarbonate is attached. Mini greenhouse for seedlings is ready
Thick wire arcs attached to the box, film on top. The greenhouse for the balcony is ready
The use of plastic bottles is already common, only the shape is non-standard. The bottle is only cut and a glass with seedlings is inserted inside, or you can plant it directly in the lower part...
Another way to make a small greenhouse
Their plastic tray can be an individual greenhouse for seedlings planted in the ground
Another design of a small greenhouse for a balcony made of arcs
And this is a portable mini-greenhouse for plants
You can assemble a greenhouse with your own hands in a few hours. There is no need to build any complex structures. Everything is very simple, economical and practical.
Design #7 – greenhouses made from plastic bottles
But the most unusual way to build a greenhouse from scrap material is to use empty plastic bottles. The plastic is very light, and therefore even very frail frames will fit under it.
So, you can build a greenhouse from both whole and cut bottles:
For a small greenhouse you will need about 400 pieces, just select them of the same size and standard shape. You will need to cut off the bottom of each bottle and attach it to the frame with a stapler or self-tapping screw. To increase strength, stretch a strong nylon thread inside each bottle, and secure the finished pipes with wide tape. If you also throw plastic film on top, vegetables can be grown even in early spring and late autumn.
If you are making a greenhouse from cut bottles, remove the top and bottom parts, cut them lengthwise along the entire length and smooth the plastic with a hot iron under thick paper (so as not to melt). Sew the resulting sheets into one sheet with a simple awl and soft metal wire. Do not staple the sheets together - such a coating will not withstand the wind, simple threads will rot, and the fishing net will be destroyed by ultraviolet radiation.
You can easily attach the finished canvas to the frame with nails or self-tapping screws. If possible, alternate dark and transparent bottles - this way the sunlight in the greenhouse will be more diffused, which will have a good effect on the harvest.
Greenhouse sizes
Since in a greenhouse the plants are served from the outside, its width is chosen so that it is comfortable for you to process plants planted closer to the middle. You determine this experimentally: sit down and try to reach some area with your hand. Measure the distance. You get the width of the greenhouse with a one-sided approach. This is if the greenhouse is located in such a way that it is impossible to get to it from the other side (near a wall, for example). If you can approach from both sides, you double this result.
It is important to be comfortable at work
The distance is different for each person: height and physical condition affect. You should not chase savings by making it wider than necessary. You will have to spend a lot of time weeding, loosening, fertilizing, and other work. A couple of hours in an uncomfortable position, and there is no strength left. Therefore, it is better to make the greenhouse a little narrower, but to make it convenient to work: while enjoying your work, you spend less effort.
And the length of the greenhouse is chosen based on the layout of the site. It's arbitrary.
Construction #8 – underground greenhouses
Underground greenhouses are more economical in terms of heat, but they always lack light. Although this depends on the area, and no one has canceled the special lighting - it is much cheaper to organize than additional heating. For example, calculate the heat loss from the roof of an underground greenhouse and the heat protection from the walls and floor - the difference in square meters is significant!
To keep the greenhouse warm, place a large container of water. During the day it will absorb excess heat, and at night it will release it when it is cold.
Decorating Tips
To ensure reliable protection of the greenhouse from rotting, mold and insects, all wooden parts of the structure are treated with a glazing wood antiseptic. This is a special composition based on water or oil.
For application use any convenient paint brush. The number of layers applied depends on the density and dryness of the wood. In most cases, applying 2-3 layers is sufficient. The average service life of the protective coating is 2–3 years. When re-applying, the wooden frame is first cleaned of dust and dirt, and only then treated with an antiseptic.
Door trim, in addition to the main material, can be done using ordinary polyethylene film or any other covering material. If the greenhouse is being built in a region where there are strong gusty winds, then the load-bearing base of the structure should be sunk into the ground to a depth of 30–40 cm.
Briefly about the main thing
So, we figured out the question of how to make a greenhouse with your own hands at home. As you can see, there are many options, each of them has pros and cons. The only big advantage is self-construction, which does not require large expenses. But it should be noted that not every greenhouse made independently has a highly reliable design. Professionals will even make “candy” out of waste materials.
| A little more attention! I would like to hear in the comments about someone who has already had experience building greenhouses with their own hands. What materials were used for this, how quickly the construction took place. And also about how effective such a greenhouse is. |
Step-by-step instructions for building a greenhouse from window frames with your own hands
Assembly must begin from the base. The whole process consists of several steps. Necessary:
- Cut the boards according to the dimensions of the drawing. Make side walls from scraps, connecting them with beams.
- Make the front and back walls from long boards. Assemble the base from the finished parts, connecting the corners with bars.
- Make grooves on the board before installing the ridge. Place them on the long side bars. Attach with self-tapping screws to the tops of the side triangular walls.
If desired, wood can be combined with available materials - Install supports from narrow boards so that the frames do not fall into the greenhouse. When lowered, the window panels will fall on them.
- To protect it from destruction, paint the frame.
- Assemble frames. Saw the bars into pieces of appropriate sizes into parts for the frames. Select folds for glass along the inner perimeter. Connect the frame parts with glue and small nails without heads. The glue must dry. Prepare and paint glazing beads. Apply sealant to the places for glass, insert them, secure with glazing beads and nails without heads.
It doesn’t always make sense to make a greenhouse spacious - Place the frames on the base. They should protrude slightly beyond the frame. Secure with loops.
- Install stops on the frames from the inside to secure the open sashes.
To prevent frames from flapping in windy weather, they need to be secured. This can be done using a cord and pegs.
Which tree to choose
The quality of the wood determines how long the structure will last. The following types of wood are suitable for building a frame:
- Pine is considered the most common building material. The wood is well processed, lightweight, and with good protection with impregnations it will last about 10 years.
- Due to the large amount of resins, larch does not require treatment with protective impregnations. The wood is moisture resistant and durable. Only the lower part of the frame in contact with the ground needs processing.
- Oak is a durable, rot-resistant material. However, such a tree is expensive. If you fork out the money, a capital greenhouse will last for several decades.
- Spruce is similar to pine, but is more susceptible to rotting in damp conditions. The wood must be carefully treated with impregnations and painted.
When choosing any type of wood, blanks made from it should not have knots, mechanical damage, or the presence of fungal stains.
Important! For the construction of the frame, only dry wood with a humidity of up to 20% is used. Raw wood will “play.” Curvature of the frame elements will lead to rupture of the covering material.