Your own greenhouse on your personal plot is an ideal way to get fresh vegetables earlier than from open ground, and eat them until late autumn. In addition, the plants turn out stronger and healthier in it than in the open air. They are less susceptible to diseases and protected from bad weather, which often destroys the harvest. There will be no problems with a greenhouse to obtain your own high-quality seedlings, for example, tomatoes.
But if you buy a greenhouse in stores, then the pleasure is not cheap. Therefore, more and more owners prefer to do it themselves. Fortunately, there is nothing overly complicated in this, and the material and tools are easily available for purchase. As a result, the cost of your own greenhouse is much lower than from a store.
How to choose a design
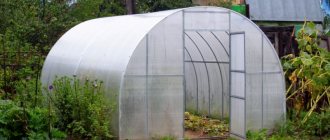
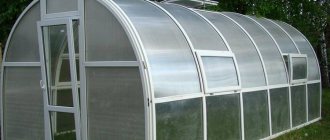
If you decide to build a polycarbonate greenhouse with your own hands, it is advisable to choose a design that allows you to use the main advantage of this material - its ability to bend. These are two types with curved roofs with arch-shaped supports.
In one design, the arcs extend from the ground itself. If they are curved in the form of a radius, a lot of area is lost at the edges, since it is very inconvenient to work there due to the small height.
Another design solves this problem - with a composite frame welded from several pieces. Straight posts emerge from the ground/from the base, which rise to a height of at least one and a half meters. An arc is welded to them. With this arrangement, the roof is rounded and the walls are straight.
You can even work along walls without problems, standing up straight to your full height.
But the rounded greenhouse roof has several disadvantages. The first is that it is more difficult to make ventilation windows in it than in a straight line. The problem can be solved by making transoms in the walls rather than in the roof. The second disadvantage of a rounded roof in a polycarbonate greenhouse is that snow falls off from it worse than from flat, sloping surfaces.
If you live in a region with snowy winters, you will either have to make reinforced trusses, or make a pitched roof - with one or two slopes.
There is a third solution - to make a rounded part of the roof from two arches, welded at an angle, which forms a kind of ridge. With this structure, the snow melts well and the ridge can be protected with a wide strip of metal. This will improve snow melting and protect the joint from leaks.
How to make a polycarbonate greenhouse with your own hands (drawings)
If you decide to assemble a polycarbonate greenhouse yourself, you will need a design plan and certain materials, a list of which you can find below.
Design selection
First, you need to decide on the type and material of the frame for the future greenhouse. There is a huge variety of both standard solutions and individual projects.
- The choice of material is also important. Construction stores sell ready-made kits made from metal profiles that are assembled like a construction set.
- PVC pipes can also be used as a material. They are easy to bend, lightweight and easy to install.
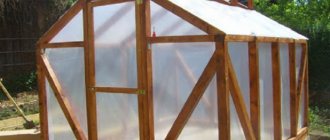
- And of course, one cannot fail to note wood, which also serves as an excellent frame for these buildings, is accessible, cheap and allows the installation of structures of various shapes and sizes.
Drawing up a drawing
A do-it-yourself greenhouse made of polycarbonate, which will not take much time to draw up, will turn out to be large and comfortable, provided that all the necessary rules are followed.
First of all, you need to decide on the size of the structure. They will depend on the area of your personal plot, what and how much you are going to grow, and, of course, on the cost of materials.
Foundation preparation
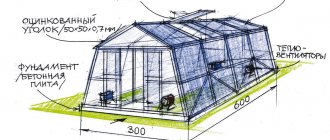
The strength and reliability of the greenhouse will depend on how high-quality the foundation you prepare for it. There may be several options here. The most common is a wooden base. To build it, you will need a beam, a level, a screwdriver, a shovel, a 7-meter tape measure, and a construction knife. It is necessary to cut 2 pieces of 3 meters each and 2 pieces of 3.85 meters each.
When assembling a box from timber, for convenience we place the timber on the narrow part for further ease of installation of the polycarbonate, so that it overlaps the timber. Three-meter beams should cover the end of the beam 3.85 m.
But the most reliable will be a concrete foundation. If you are going to make a large greenhouse and use a metal profile or wooden blocks for the frame, then a concrete foundation will be necessary due to the significant weight of the entire structure.
To install a cement foundation, we make formwork according to the dimensions of the proposed foundation. We cover it with cement and let the cement harden and strengthen.
Foundation
If you are wondering whether a foundation for a polycarbonate greenhouse is needed or not, there is only one answer - it is necessary. And reliable. They fly very well. Therefore, the foundation must “anchor” the building well.
For normal operation, it is better to place a polycarbonate greenhouse on a foundation
Belt type
This foundation is for buildings that are planned for more than one year. The most expensive, but also the most thorough option. If you plan to use the greenhouse all year round, the foundation is made deep - to a depth just below freezing of the soil. For seasonal use, concrete-brick or simply timber is suitable.
Concrete-brick is one of the most common
Concrete-brick (concrete-beam)
Most often they make a concrete-brick version. It is optimal in terms of cost, complexity and duration. The work is carried out as follows:
- A trench is dug according to the size of the greenhouse. Its width is about 20 cm, the depth depends on the type of soil. On heaving soils (clay, loam, black soil), a trench is dug 50-60 cm deep. The edges of the trench are reinforced with formwork - knocked together panels made of boards, plywood, OSB. 15 cm of coarse and fine crushed stone is poured onto the leveled bottom and compacted. The same layer of sand is poured on top, leveled and compacted. This pillow will compensate for soil movements during frost heaving.
- The depth of the foundation on soils not prone to heaving is 25-30 cm. The bottom of the dug trench is cleared of stones, roots and other objects, leveled, and compacted.
The marking is carried out like this
Construction of a concrete-brick foundation
- If it is a 100*100 beam, it is impregnated with a composition for direct contact with the ground. They drill holes in it for the installed studs, put them on them, and tighten the studs with bolts. To prevent the bolts from sticking out, recesses are made using a drill of a suitable size.
Bricks are laid on concrete
If the base is concrete-brick, one or two rows of bricks are laid. You can also use a hollow one, since the mass is small. The laying is carried out so that the mortgages fall into the seam between the bricks.
There are options for this type of foundation. You can install small foundation concrete blocks in a prepared trench and fill the space between them with mortar. They must be installed so that their edge is below ground level. A layer of concrete is poured on top and leveled. Mortgages are secured in the seams.
Empty bottles can be used as building material. They are laid in rows and filled with concrete. It turns out to be a very economical and warm foundation. Its load-bearing capacity is quite enough for a more serious construction.
Beam foundation for a polycarbonate greenhouse
This option is suitable as a temporary solution - it can last two to three years. It depends on the humidity in the area, the quality of the wood and the processing. The timber is used with a large cross-section - 100*100 or more (can be made composite, from several boards). It is treated with compounds for wood in contact with the ground. The order of work is as follows:
- They mark the area and dig a trench. Its dimensions should be 7-10 cm deeper and wider than the timber used.
- The bottom and walls are covered with rolled waterproofing material (it is better to use “Gidroizol”, it will last for a longer period).
- Lay the treated timber and connect it in the corners.
It is easy to make a timber strip foundation for a polycarbonate greenhouse with your own hands, but it will not last long - Waterproofing is wrapped around the timber.
- Using corners driven in on both sides, the beam is fixed in place.
- The remaining free space between the waterproofing and the walls of the trench is filled with crushed stone if the soil is heaving and with previously removed earth if not. The soil is well compacted.
- Next, the strapping beam is attached to this beam. Between them it is worth laying another layer of waterproofing.
This option is only suitable for dry areas with low groundwater. In this case, one can hope that the foundation will survive for at least several years.
Pile-grill
Another type of foundation that will not protect against frost. But it is reliable and will last a long time. Read a full description of the technology for manufacturing a pile-grillage foundation here, and we will provide a short list of works.
- Mark the perimeter of the greenhouse, dig a trench 20 centimeters wide and about the same depth.
- In the corners, holes are drilled with a diameter of 30-40 cm and a depth below the freezing depth of the soil (a drill is used). Then the same holes are drilled around the perimeter. The distance between them should be about 2-2.5 meters.
- Sand is poured into the holes - about a bucketful at a time, then roofing felt rolled into cylinders is placed inside.
- They are equipped with three reinforcement bars with a diameter of 10-12 mm, connected into a single structure. The rods should stick out above the surface of the ground - the harness will be attached to them later.
- Concrete is poured into the holes (1 part M 400 cement, 3 parts sand, 5 parts crushed stone). We must ensure that there are no voids.
- A layer of sand, 5-5 cm thick, is poured onto the bottom of the trench, leveled and compacted.
Pile-grillage foundation - a reliable option for a do-it-yourself polycarbonate greenhouse - Waterproofing (roofing material, Gidroizol) is spread on it.
- The formwork is assembled on the sides and fixed. It may be above ground level. If the soil is not loose, you can do without formwork by covering the walls with waterproofing. But in this case, the foundation will be level with the ground, and it will also be uneven.
- Concrete of the same composition as for the pillars is poured into the formwork. The surface is leveled, covered with film, and waiting for the concrete to set.
Next, you can attach the strapping, or you can add a couple of rows of bricks and only after that install the frame. After this, we can say that the polycarbonate greenhouse with your own hands is almost ready. All that remains is to fix the polycarbonate.
Making a frame from a metal profile
- If you are going to make the frame yourself, then you will need: metal profile: square pipe 25 x 25 mm, pipe bending machine, welding machine, angle grinder.
- And for further assembly of the greenhouse: polycarbonate sheets, metal strips, metal corners, self-tapping screws, including roofing ones.
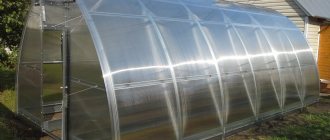
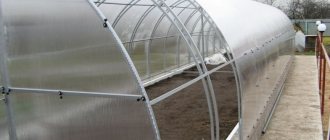
You can easily make a polycarbonate greenhouse with your own hands, the drawings of which are ready. We take a square metal pipe 25x25 mm, preferably galvanized, and roll it through a pipe bending machine, resulting in an arc of the required size.
- We cut the pipe to the size of the structure and weld arcs to it, in increments of 0.65-1.0 m. We make 7 arcs: two for the ends, 5 for the gaps.
- We make the ends - we connect the ends of the arcs with a three-meter square pipe 25x25 mm, weld the door frame and vents. Or such a frame can be purchased at a specialized store.
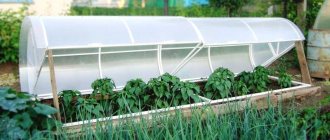
Single-pitch
The peculiarity of lean-to greenhouses is that one side is adjacent to the building. The south side of the cottage, summer kitchen, garage or other building is selected, and a greenhouse is attached closely to it. Thus, one wall turns out to be blank, which means less sunlight reaches the plants. Relevant for winter greenhouses, and also allows you to save space. Another plus is cost savings when constructing permanent greenhouses.
Do-it-yourself arched polycarbonate greenhouse: drawings, photo materials, sketches
- Arched structures are perfect for both small country greenhouses and massive greenhouses intended for commercial purposes.
- Answering the question of how to make a greenhouse from profile pipes with your own hands, we can safely say that the primary thing is to develop drawings and make correct calculations. Arch-shaped greenhouses made from pipes have their own design features. The main determining factors are the height of the structure and the dimensions of standard covering sheets.
- Polycarbonate sheets are traditionally sold with parameters of 6 x 2.1 m. A sheet length of 6 m will limit the height of the arched structure.
To obtain an arched shape, the sheet is placed in a transverse (relative to the frame) position.
In this case, the radius of the semicircle will be 1.90 m, and the width of the structure will be 3.80 m. Taking into account the geometric formulas, the height of the greenhouse will be equal to the radius, i.e. 1.90 m. This height of the greenhouse is not suitable for everyone.
- In order for the arched greenhouse to have a height that meets your needs, you can resort to arranging a base. Moreover, by stopping at a base height of one meter, you can get the width of the greenhouse up to 2.4 m, and increase the total height of the entire structure to 2.2 m.
Having correctly set the main dimensions of the greenhouse, you can develop drawings and sketches for making greenhouses from a profile pipe with your own hands.
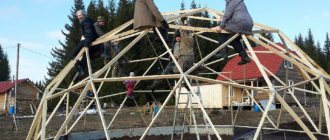
Another feature of arched frame shapes is that the profile needs to be bent into the desired shape. If you don’t have a special machine for bending pipes, you can purchase ready-made arc-shaped profiles or create an arched shape from short sections connected to each other by metal plates.
To design a small (4-5 m) arched greenhouse, two arc-shaped frames will be sufficient: the initial and final ones. In the case where the length of the greenhouse is 6 m or more, the required number of support frames is calculated, which must be a multiple of the thickness of the polycarbonate sheet. A separate diagram indicates the dimensions of the window and door opening.
Helpful advice! When choosing the width of the greenhouse, it is necessary to take into account the number of beds planned in it and the arrangement of the path between them. Convenient width for processing - up to 0.7 m.
Next, a drawing is developed that specifies the features of installing a polycarbonate greenhouse cover with your own hands (the videos will help you understand the process in detail) indicating the fastening spacing.
He must take into account that polycarbonate panels in arched greenhouses should be positioned with edges along the arc.
It is also necessary to take into account that the bending radius of polycarbonate sheets should not be less than that provided by the manufacturer for this material. Polycarbonate sheets should be covered with punched tape at the ends. For clarity, you can use a selection of photos of polycarbonate greenhouses.
Characteristics of the structure
The main difference between industrial greenhouses and country greenhouses is the scale of the structure. In terms of these parameters, industrial buildings are significantly superior to their homestead counterparts. The area of such buildings can be measured in hundreds and sometimes thousands of square meters.
Such large structures require a heavily reinforced frame that can withstand the load of greenhouse cladding. It is also necessary to take into account the periodically added snow load. Frame failure can completely paralyze work.
To maximize profits from the harvest, large-scale greenhouses use the following technical capabilities:
- heating;
- ventilation;
- artificial lighting;
- use especially ;
- isolation from weeds and harmful insects;
- saturation of the internal space of the greenhouse with carbon dioxide.
Drawings of a greenhouse frame with a gable roof
Projects for greenhouses with a gable roof involve making the greenhouse frame with your own hands from a 40*20 mm profile pipe. Such a profile will be able to withstand significant loads in the form of a snow cap or gusty wind.
- The drawings show a diagram of the supporting frame, including the dimensions of the walls, the angle of inclination of the roof, in which ventilation vents are traditionally installed. If you are planning a small greenhouse, you can consider an option with a pitched roof, one edge of which will be located higher than the other, ensuring water drainage and snow removal.
- The angle of inclination of the rafters in the roof of a gable structure is 25-30 degrees. This slope will facilitate the drainage of precipitation from the surface. The roof is considered to be quite flat and does not require the installation of auxiliary slopes on the rafter system.
- In structures of this type, it is assumed that a more durable profile (20x40) will be used for the main posts and base, rafters and ridge beam. For horizontal jumpers, you can use a 20x20 profile pipe. The drawings provide for the arrangement of vertical posts in increments of one meter. It should also be taken into account that if the greenhouse is covered with polycarbonate sheets, the joining lines must be on the profile.
The rafters are also placed at a distance of no more than one meter from each other.
- The design of a greenhouse with a gable roof has some unique features. Here you will need to carefully approach the cutting of polycarbonate sheets for gables. If all dimensions are maintained according to the drawings, this will lead to economical consumption of polycarbonate.
Seasonal greenhouse projects
There are no specific requirements for reliability and strength for the construction of seasonal greenhouses. The drawings of these structures are easy to develop and do not involve complex calculations. The frames of such greenhouses can be built from lightweight profile pipes, and the covering material can be polyethylene film or thin polycarbonate sheets.
As a rule, light greenhouses and greenhouses are not equipped with a foundation.
The type of frame of a seasonal greenhouse does not matter much - the main criteria are ease of assembly and budgetary cost of the structure. Several recommendations will help you avoid mistakes when building small greenhouses:
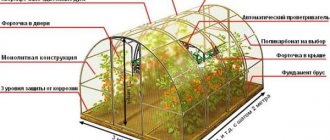
- When developing drawings and sketches, the presence of ventilation hatches at various levels should be taken into account. This will facilitate high-quality ventilation of the greenhouse;
- Fastening of polycarbonate sheets should be done using fastening profiles that do not damage the surface of the plastic. In addition, they can be easily dismantled at the end of the season, eliminating the possibility of deformation of the light frame of the greenhouse;
- the project should provide for the option of simply disassembling the frame for transfer to another location or storage for the winter.
Necessary equipment
When drawing up a greenhouse complex project, it is necessary to pay special attention to the issue of the required equipment. If you make the right choice, you can significantly reduce operating costs and increase productivity
To ensure a continuous work cycle you will need:
- Continuous water drainage system.
- To maintain a certain temperature, it is necessary to install a reliable heating boiler or several units.
- An automatic ventilation system will be required.
- To save water resources and fertilizers, you will need a water filtration installation.
Industrial greenhouses make it possible to obtain good yields in a small area. This production does not depend on weather conditions, which will guarantee the uninterrupted operation of the greenhouse complex. This is the main reason for the popularity of this type of business.
https://youtube.com/watch?v=gjBtvDxcxp4
Features of the design of the greenhouse-bread bin
The main advantages of the greenhouse-bread bin are:
- unusual ergonomic design;
- minimum number of connecting lines;
- regulation of greenhouse ventilation by opening the lid to the required angle of up to 90 degrees;
- ease of assembly and full use of greenhouse space.
The drawing of such a greenhouse provides for the construction of the upper part of the frame from two half-arches, which are fixed to the base on hinges. The frame of the greenhouse is made of a profile pipe of small cross-section. The radii of the lids are selected taking into account the fact that they can easily open without interfering with each other.
The difference in diameter is equal to the width of the polycarbonate sheet - this ensures that there are no gaps when closed.
Helpful advice! Considering the fact that small greenhouses are usually used for growing seedlings that require a special microclimate, it is recommended to use polycarbonate with UV protection for the coating. The percentage of heat retention of this material is much higher than that of polyethylene film.
The dimensions of the greenhouse are selected individually. The length can be from 3 to 4 meters, the height is no more than one meter. The width is taken taking into account how the greenhouse will open - from one or both sides.
For one-way opening of the greenhouse, it is advisable to choose a width of 0.7-1.2 m, so that it is comfortable to care for the seedlings.
Types of polycarbonate
There are three types of this material:
- Monolithic. It looks like glass, but transmits light better, is two to four times lighter, and several times (100-200) stronger. Thickness - from 0.75 mm to 40 mm. The disadvantage is the high price. This material is used if there is a risk of damage - it often hails, the greenhouse is positioned in such a way that icicles and snow can fall on it. There is multilayer monolithic polycarbonate. There can be up to 3-5 sheets, they can have different properties. For example, for greenhouses a double layer is usually used - the first layer is characterized by increased strength, the second does not transmit ultraviolet radiation.
- Corrugated (profiled). Appeared relatively recently. It is formed from a monolithic sheet on which a relief is formed. There are types similar to corrugated sheeting and slate. The thickness of this type of polycarbonate is 0.8-1.2 mm. With such a small thickness, it can withstand hail impacts up to 20 mm in diameter, bends well, and tolerates frosts down to -50°C.
- Cellular (cellular, structured). Consists of two (or more) polycarbonate sheets connected by jumpers. The shape, size, thickness of the jumpers - all this affects the quality and performance characteristics. The thickness of cellular polycarbonate is 4, 6, 8, 10, 16, 20, 24 and 32 mm. For greenhouses, it is better to take no thinner than 10 mm, multilayer.
What type of polycarbonate is best to use for building greenhouses? Depends on the operating mode of the greenhouse. If it is heated, you will need a cell phone. If this is an option exclusively for the warm season, a corrugated (or monolithic) one is more suitable. Monolithic is also not bad, but corrugated has more rigidity.
For greenhouses that are planned to be used from early spring or throughout the winter, cellular polycarbonate is installed.
Heating and lighting
Year-round operation of the greenhouse requires heating and lighting for plants. The greenhouse can be heated using hot water or solid fuel. The best option is to connect the greenhouse to the heating system of a residential building. It is recommended to use phytolamps as lighting devices. They not only illuminate the greenhouse, but also provide some heat and kill fungus.
Fluorescent, LED or metal halide lamps are also ideal for plants. The optimal daylight hours for plants is about 8-10 hours. It is important to set up automatic lighting in the greenhouse, which is activated when the brightness of natural light decreases.
Choosing cellular polycarbonate
It is not difficult to choose corrugated or monolithic - we are guided by the stated characteristics. It is only important that there is protection from ultraviolet radiation. There are no other pitfalls. But with a cell phone there are many nuances. You need to pay attention to the following:
- The thickness of the outer layers and their number. The sheets should be of the same thickness without sagging or thinner places.
- The location of the jumpers and their thickness.
These types of cellular polycarbonate can be
- The presence of a layer that protects against ultraviolet radiation.
The easiest way to check the quality of cellular polycarbonate is to try to squeeze it between your fingers. If it doesn’t press through, even if you make a significant effort, you can take it. If it squeezes easily, look for another one.
Installation features
According to the technology, polycarbonate is mounted using starting and connecting profiles. First, profiles are installed on the frame, a sheet of cellular polycarbonate is inserted into them, which is fixed to self-tapping screws with special press washers, which at the same time protect the attachment point from leaks.
Profiles, in addition to holding the sheets in place, also protect the cuts from dust and dirt getting into the bottom. The system looks neat and works well, but all the components cost a lot of money.
Aesthetics for a greenhouse is not the most necessary property, therefore, if you need to save money, they prefer to mount it in a simple way, without profiles and press washers. Here's how to do it:
- The edges of each sheet are covered with silicone. They must be closed, otherwise condensation will accumulate inside, in which mold and fungi will develop over time, and the polycarbonate will lose its transparency. So the edges must be sealed carefully, leaving no room for air and moisture to penetrate.
- The sheets are laid with an overlap of several centimeters, and pressed on top with a strip of tin. The fasteners are installed in an “overlapping” manner through a tin strip.
You can place regular wide washers under the screw heads.
The UV protection layer must face outward during installation. It is important. Otherwise it doesn't work.
This is what directly concerns the fastening of cellular polycarbonate. There is one more point that became clear during the operation of polycarbonate greenhouses. Polycarbonate should not be placed close to the ground. It is desirable that it starts at least half a meter from the surface.
Why? Because firstly, it still gets dirty and almost no light passes through it, so it does not affect the overall illumination. Secondly, it begins to deteriorate—blacken and flake.
It is not clear what causes this reaction, but it is common. So, when developing a model of a polycarbonate greenhouse with your own hands, provide half-meter walls made of another material - brick, building blocks. Doesn't matter.
Irrigation system
With the help of a modern soil moisture system, the greenhouse can be made almost autonomous. For automatic watering, the greenhouse must be equipped with systems for measuring temperature and humidity levels. When it decreases, the irrigation system is turned on. Humidification occurs as follows:
- Sprinkling. Water pipes are installed above the beds under the roof. They are equipped with sprayers through which watering is carried out.
- Drip irrigation is considered one of the simplest methods. Its essence is to install a special hose with holes in the beds through which a small amount of water flows. This type of watering is controlled manually.
The irrigation system can be connected to a central water supply or to a tank that is installed near the greenhouse.
Important! If you use a water storage tank, it is necessary to install a pump to pump water into the irrigation system.
Deciding on the sizes
To better imagine how to make a greenhouse from a profile with your own hands, you must first decide on the dimensions. And in order not to encounter excessive consumption of material and a large amount of waste, it is advisable to correlate these dimensions with the standard dimensions of corrugated pipes and polycarbonate sheets.
In construction markets and metal depots, profile pipes are sold in 6-meter lengths. In stores you can find a different length - 2 or 3 meters. It is more convenient for independent transportation, but it is more difficult to assemble an arched structure from short sections: there is a need to make additional joints.
If you have no problems with how to bend a profile pipe at home for a greenhouse, it is better to purchase standard whips. Each will make an arch about 2 meters high and with a distance between the legs of 3 meters. This is enough to accommodate two beds and a central passage inside.
If the width needs to be increased to 3.6-3.8 m to arrange three beds, then the height will have to be reduced to 1.8-1.9 m, which can create inconvenience if the gardener is tall.
It would seem that the length of the arch can be increased without problems by welding the required section of pipe. But the length of cellular polycarbonate sheets is also 6 or 12 meters, and such an increase will lead to overuse of this expensive coating, the need for its joining and a decrease in reliability.
Therefore, in such cases, the height is increased due to the foundation or a different form of greenhouse is chosen.
For example, the height of the side walls of a pitched structure should be 1.5-2 meters for ease of work. These dimensions correlate perfectly with the dimensions of corrugated pipes and sheet material, which are cut without waste.
Underground or buried structure
It is known that in winter the ground freezes slowly. At an air temperature of ±1°C, the soil temperature at a depth of 1 meter is about 10°C. When setting up a greenhouse, one cannot help but take advantage of this natural bonus. For construction, you must first dig a hole, 1 to 1.5 m deep, and install a transparent coating on top.
One of the options for a recessed greenhouse is an improved design - a thermos greenhouse, which provides even greater indoor temperature and illumination even in cloudy weather. For a thermos greenhouse, you need to build a reinforced concrete foundation. The coating is often double-layered. Inside, the walls are covered with reflective paint or other material that acts as a solar energy collector.
The disadvantage of this variety is that it is difficult to organize proper drainage in the underground part.
A large in-ground greenhouse takes quite a long time to build due to the need to dig a pit. In addition, you will have to take care of steps at the entrance, waterproofing and protection from pests, which implies additional costs.
Briefly about the main thing
Such a task as welding a greenhouse from steel profile pipes cannot be called simple. At a minimum, you need a welding machine and the ability to operate it. But you can do without it if you use galvanized profiles that are connected with bolts and special plates.
Conventional pipes will require additional anti-corrosion treatment. Another necessary tool for creating arched structures is a pipe bender.
But you won’t need it either if you choose a greenhouse with a pitched roof or use the DIY bending methods described in the article. Before starting work, you need to decide on the size of the structure, focusing on the standard parameters of corrugated pipes and polycarbonate.
Subtleties of doing business
You can reduce the cost of production and increase profits by purchasing materials from the manufacturer. This can be done by concluding agreements for the supply of products. And in order to conclude an agreement, you need to register an individual entrepreneur.
Only an individual approach to each client will help you win the competition and, over time, purchase professional equipment that will allow you to establish a serious technological process.
Video on the topic: Greenhouses - Video review
Selection of questions
- Mikhail, Lipetsk — What discs should I use for cutting metal?
- Ivan, Moscow - What is the GOST for rolled sheet steel?
- Maxim, Tver - Which racks for storing rolled metal products are better?
- Vladimir, Novosibirsk — What does ultrasonic processing of metals without the use of abrasives mean?
- Valery, Moscow - How to forge a knife from a bearing with your own hands?
- Stanislav, Voronezh — What equipment is used for the production of galvanized steel air ducts?
Making a greenhouse in the shape of a triangle
To make the shape of the correct arch, it is best to insert pipes when pouring the foundation. Then you need to make cuts on them (with a grinder or a hacksaw) about 1-2 m in length. After bending and inserting the arcs, they are secured in the pipes with screws, drilled through or filled with cement.
Polycarbonate can be fixed in different ways:
- drill through holes in the plastic and profile and secure with screws (this method is not very reliable) - the material may crack;
- make two holes in the sheets for the width of the profile and secure them with wire, clamps or staples.
The side walls are cut out, doors and windows are inserted.
You can make arcs from PVC pipes, because they bend well. But attaching polycarbonate to them is much more difficult. It will be necessary to secure it with clamps or screw the longitudinal elements of the frame every 50-80 cm.