Due to unpredictable weather, every gardener strives to make his plantings as safe as possible. The main tool in the difficult struggle for the harvest is a well-built greenhouse that will last for many years. Today there are a huge number of variations in designs, coatings and materials.
Snow, rain, gusty winds, unstable soil on the site are factors that can reduce the life of the greenhouse. Therefore, you need to choose it especially carefully, taking into account all the above conditions. One of the most reliable types at the moment is the “Droplet”; thanks to its universal shape, it is not afraid of snow, wind, or quicksand.
Factors affecting the strength of greenhouses
Numerous publications for gardeners are full of ideas for building a greenhouse, and manufacturers vying with each other to praise their products. How not to make a mistake when choosing a greenhouse, but at the same time, not to overpay extra money for unnecessary elements that are useless in your weather conditions? We propose to figure out together what the strength of the greenhouse depends on.
Table. Parameters that determine the strength of the greenhouse
| Parameter | Description |
| Roof | For regions with frequent snowfalls, greenhouses with a steep roof slope will be most relevant; it is this factor that affects the possibility of rapid snow melting. Therefore, for those areas where snow is a frequent occurrence, it is better to choose steep lean-to structures or teardrop-shaped greenhouses. Classic-shaped greenhouses are suitable only if the roof slopes are located at an acute angle to each other. |
| Type of polycarbonate | When assembling a polycarbonate greenhouse, you should definitely take into account its thickness and density. There are many types of this covering material on the market, but you need to remember that for low-wind areas, a material thickness of 4 mm or more is suitable, and for regions that are not very favorable in terms of weather, you need to look for polycarbonate no narrower than 6 mm. |
| If you want to save money or the seller assures you of the super strength of a material less than 4 mm thick, you shouldn’t take the risk, there is a chance that such a greenhouse will not last even one year. Especially if in winter you do not live on the site and there is no way to regularly clear the roof of snow. | |
| Various manufacturers provide quite a lot of types of frames. The frame can be collapsible or monolithic, reinforced or lightweight. You need to focus on the weather conditions that prevail in your region. Non-removable structures, as a rule, are more expensive for gardeners, as they require additional payment for transportation. We still recommend purchasing a frame with additional structural reinforcement; the overpayment is not so high, considering that it is guaranteed to serve you for more than one season. |
| Profile characteristics | With this parameter, everything is quite simple - the denser and thicker the profile from which the greenhouse frame will be assembled, the more reliable its design will be. This is especially true for snowy and windy regions. |
| The distance between the arcs should vary from 50 to 100 cm, in which case the polycarbonate will have a sufficient number of support points, it will not crack under the weight of snow. The main thing is to secure the arcs together using a fastening strip; usually at least three of them are used. |
When planning to purchase a greenhouse, analyze the weather situation in your region, evaluate the frequency of snowfalls and winds. Carefully study all these parameters and determine which greenhouse will serve you faithfully at your summer cottage.
Next we will talk about the “Kapelka” greenhouse; according to many gardeners, it meets all the necessary requirements and allows you to harvest an excellent harvest.
How to prepare a square arc
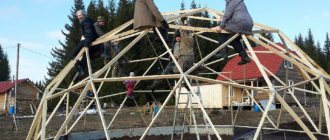
Due to the fact that the metal structure is much thinner compared to wood, there is more natural light in the greenhouse. This material is also more technologically advanced. When constructing an arched greenhouse, the profile needs to be bent. It bends for an arch that runs vertically from the base up, and in the middle, in an arcuate manner. For example, if you choose a Mitlider greenhouse, the strength of the frame will be ensured by connecting the posts and beams. In dome-shaped greenhouses, the structures consist of polygonal frames (aluminum/metal), but they are quite difficult to assemble on your own.
The frame material itself is selected “to suit the design” of the entire structure and its dimensions. If you are going to build an arched greenhouse, the frame of which is made of metal rather than plasterboard, prepare:
- flexible rods (for half-arches) - one and a half meters long, in the amount of 12 pieces;
- for a building 1.8 m high - 10 pieces of rods, the length of which is 2 meters and the diameter is 30 millimeters;
- To make a frame, you must begin by identifying the holes for the rods; sometimes you need to bend a square pipe, in which the cross-section is 20 by 20 and the diameter will be three meters.
You will need these tools:
- bending machine;
- profile pipes;
- tape measure, simple pencil;
- Bulgarian;
- welding.
You can make a bending machine yourself; you actually need to bend the profile pipe on it. Scroll it with the handle. It will take a lot of effort, even when the wall thickness of the material is about two millimeters, because it’s not like folding drywall! If you don’t have a machine, you can bend it with your hands. Secure the pipes running parallel. Draw an arc of the required radius directly on the ground, attach the product and bend it so that it becomes exactly the same as in the drawing. The next arc must be bent according to the pattern of the first.
The pipe must be cut into equal parts in advance using a grinder, and then bent according to the sample. In those places where there were undercuts, process using spot welding. The light and strong profile is quite easy to connect to the planes. In addition, it is able to withstand a fairly large lateral load.
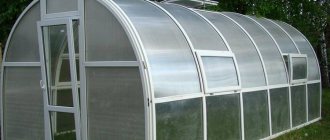
Advantages and disadvantages of the “Droplet” greenhouse
The “Kapelka” greenhouse has earned the recognition of more than one thousand grateful gardeners and gardeners. It has a durable frame, reliable fastenings, an optimal shape to prevent deformation from snow, excellent light transmittance, and various types of modifications. Today there are several leading manufacturers of this type of construction, for example, the trademarks “Orange”, “House of Greenhouses”, Plant of Ready Greenhouses and some others.
We offer you a list of the main advantages of the greenhouse, thanks to which it has become so popular:
- Ergonomic shape. The pointed-arch design allows snow to slide freely down the surface, and the main load falls on the strong side supports. The ceiling inside the greenhouse is quite high, which makes it possible for even a tall person to work there comfortably.
- Durable frame. The frame elements of the “Kapelka” greenhouse are made of durable galvanized steel, which from most manufacturers is treated with a special anti-corrosion compound, which significantly increases its service life. Judging by the reviews from satisfied customers, even in snowy regions this frame has been serving quietly for more than five years.
- Reliability of fastening. All frame elements are securely connected to each other with specially selected self-tapping screws. Possibility to choose the optimal size. Manufacturers offer a fairly large selection of greenhouse size options, the choice of its length is especially variable; the design allows you to purchase additional arcs and zone the internal space.
- Polycarbonate coating. Polycarbonate has long won recognition among millions of gardeners; it is highly durable, easy to install, has a special coating that does not transmit harmful UV rays, but, at the same time, has good thermal insulation and light transmittance.
- Attractive appearance. The greenhouse will be an excellent addition to the exterior of any site; its unusual shape may well become its decoration, and not just a tool for growing vegetables.
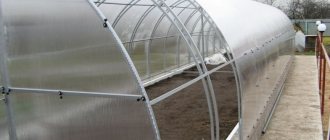
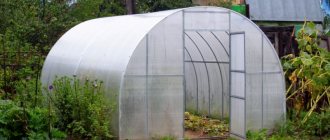
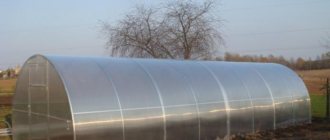
Ready-made drop greenhouse with a polycarbonate coating
Making a drop greenhouse yourself is extremely difficult due to its intricate design, but you can buy it in almost any corner of our country, and detailed instructions will help you understand the assembly process.
If the soil on your site is stable and not affected by groundwater, then it is quite enough to simply dig the base of the frame into the ground 20-25 cm. If you are afraid that the greenhouse may be deformed due to the influence of various factors, then we suggest making a wooden frame foundation depending on the planned size.
Manufacturers offer different design sizes. But there is a general trend that can be identified by analyzing the existing proposals:
- The most common structure height is 2.3 or 2.4 meters. This is quite enough for even a tall person to feel comfortable in the greenhouse, and there will be enough space for the plants to grow and produce a good harvest.
- The length of the greenhouse starts from 4 meters and can be any, but a multiple of two (4,6,8,10 meters and so on at the request of clients).
- The width of the greenhouse varies, you can find an option with a width of 2 meters, some companies offer a frame with a width of 2.4 m, 2.7 m, 3 m or 3.7 meters.
- The distance between the arcs in a drop greenhouse ranges from 65 to 100 cm, the smaller the distance, the more expensive the design.
- Polycarbonate can be included in the greenhouse kit, but is most often sold separately. You can choose the thickness of the canvas yourself; the recommended value is 60-65 mm.
- The drop greenhouse is equipped with a window and a door, one or two depending on the length of the building.
The price of a greenhouse without delivery and coverage starts from 14,500 rubles for a 4*3 meter frame and from 19,900 for a structure with polycarbonate included. The price directly depends on the number of arcs, the distance between them, and the thickness of the polycarbonate.
Like any other invention, the droplet greenhouse has a number of disadvantages. We suggest you familiarize yourself with them before making this expensive purchase:
- Complex installation process. Despite the included instructions, the disassembled view of the structure can confuse an inexperienced gardener. In addition, an additional tool is required, such as a screwdriver. Be prepared for the installation of the structure to take several days.
- Insufficient ridge seal. Despite all the meticulousness of the assembly, the seam at the junction of the slopes in the ridge area remains not perfectly sealed. You will either have to use a sealant, which is purchased separately, or give preference to a conventional arched greenhouse if the tightness parameter is extremely important for future plantings.
- Quite a high cost. Greenhouse options advertised by manufacturers typically have a minimum cost to attract customers. Most often, the design requires additional equipment or changes in parameters, which leads to its increase in cost.
Advantages and disadvantages
How to make a greenhouse with your own hands - a polycarbonate breadbox according to drawings
The modern market for garden products offers a variety of types of polycarbonate greenhouses. Each of them has its own advantages and disadvantages.
Thus, the developers of the drop made every effort to take into account every wish of a potential buyer and created a design with excellent performance for the successful cultivation of cultivated plants. If you want to see a droplet greenhouse, the photo below will help you.
The factory greenhouse has an increased strength frame with an excellent polymer coating.
The creators developed the length of the building according to the needs of consumers. The presence of special rates allows you to lengthen the frame to the required size, instructions for constructing a greenhouse called Droplet to help.
The size of the frame part is optimized to fit the dimensions of the polycarbonate, which minimizes waste and also guarantees the absence of various defects in the form of cracks.
The end sides have door and window openings, which simplifies the care of cultivated plants and also makes it possible to control the temperature in the room.
The greenhouse is characterized by extreme strength; the kit includes the parts necessary for installing the Droplet greenhouse.
Installing a purchased drop greenhouse with your own hands: step-by-step instructions
Click on the drawing to enlarge it.
| Work stage | Illustration |
| Assembling doors and windows. It is with these parts that it is best to start assembling the structure in order to get the hang of it and understand the principle of fastening profiles. At this stage, the two side door strips (13 and 13 a) are fastened together using four transverse profiles using holes predetermined by the manufacturers using a screwdriver and self-tapping screws. When installing the door, keep in mind that the left post has additional holes for the handle, and the right post will have hinges (sometimes they are already welded). |
|
| The cross bars are installed so that the grooves are directed towards the ground to prevent condensation from accumulating in them. | |
| The kit includes profiles with beveled ends to strengthen the structure. Using self-tapping screws and connectors, they are attached diagonally from the bottom to the top corner between the transverse elements of the door. |
|
| Window assembly. For the window, the kit includes 4 parts numbered 7 and 17. Using self-tapping screws, they are connected to each other, forming a rectangle. |
|
| The classic design of a drop greenhouse involves the location of a window in the door structure, so the assembled window is attached to the upper section of the door frame using the included hinges. |
|
| We proceed directly to the assembly of the front elements. The greenhouse frame is assembled in stages from arc-pediments. To do this, two arched profiles are connected to each other using self-tapping screws and a corner tie. | Making pediments |
| To strengthen the structure and prevent deformation, the manufacturer has provided an additional fastening-screed - a horizontal profile that is installed between the two gables closer to the ridge at the junction of the arches. | Profile fastening under the gable ridge |
| To install the frame on the ground and ensure its better adhesion to the ground, the manufacturer has provided special elements - lugs, which are attached to the base of the arches (3). In addition, rack profiles (8) are attached to the upper horizontal profile, connected at the bottom by another horizontal profile (12). | Fastening support posts from the end of the structure, installing lugs, lower metal profile for reinforcement |
| To strengthen the frame, several more profiles (10,11) are attached to the front elements of the droplet greenhouse parallel to the ground. | Installation of profiles on end arches |
| The second front part of the greenhouse is assembled in the same step-by-step manner, onto which the door is attached using self-tapping screws and the hinges included in the kit. |
|
| Special connecting elements (8 pcs.) are attached perpendicularly to the finished front structure, with the help of which the remaining parts of the structure will be attached. | Fastening the connecting elements |
| According to the instructions, holes are made along the length of the entire arc where the polycarbonate will be attached. | Approximate diagram of places where holes should be provided for fastening polycarbonate sheets. Diagram of the location of holes on the window for fastening polycarbonate |
| Polycarbonate sheets are cut independently and fastened using special thermal washers that prevent damage during fastening. The front part is placed on the ground with the outer side up. A polycarbonate sheet is laid on it so that the protective film that prevents the penetration of UV rays is on top. Using a screwdriver, the polycarbonate is attached to the pediment, and the excess is cut off. |
|
| Next, the assembly of the frame begins. Stringer profiles in the amount of 8 pieces (16) are mounted to the connecting elements that you have already attached to the pediment. | Scheme for connecting stringer profiles with frontal arches |
| Once the two main frontal structures are ready, you can begin assembling the intermediate arches. They are fastened together with corners and tightened with a transverse profile. For traction with the ground, lugs are also installed all the way. And for further assembly with other elements, x-shaped connectors are attached along the entire length of the arcs. They do not need to be tightened tightly, so that later they can be easily adjusted to the stinger profiles. | Schematic location of x-connectors |
| Intermediate arcs are mounted at the end of the greenhouse parallel to each other. | Installation of intermediate arches |
| After the frame is almost ready, you can begin installing it on a pre-prepared site. If you do not make a foundation frame, then first mark the area and dig holes for digging lugs into them (the approximate size of the hole is 20 cm wide and 25 cm deep). |
|
| Arcs are installed in the holes, the top is properly compacted with earth, and they are fastened together using stringer connections. And so on along the entire length of the structure. | Drilling lugs into the ground |
| All frame elements are leveled with respect to the ground and to each other using a building level. |
|
| Next you need to cut out the holes for the door and window. This should be done strictly along the internal contour, otherwise a gap may appear that will break the tightness of the future greenhouse. To work with polycarbonate, it is best to use a well-sharpened construction knife. |
|
| Particular attention should be paid to cutting out the holes for the hinges; this work is delicate and requires careful preliminary marking so as not to cut off excess. After the door and window are ready, you can install the handle and hinges. | Marking and cutting holes for hinges |
| The frame is ready, the front surfaces are covered with polycarbonate. You can start covering the main area. To do this, measure the finished structure again and cut the polycarbonate sheets. An important point in the work is to allow about 5 cm so that the polycarbonate sheet extends beyond the frame, forming a kind of canopy on the sides of the greenhouse. | Mounting the ridge, strengthening the structure |
| The ridge of the greenhouse is strengthened separately. A special corner (2) is installed on top of it. The main element in its fastening is the middle arc. It is to this that two tie strips are attached on both sides: the long one (4) runs along the entire length of the arc, connecting in several places with the short one (5). | |
| Pre-cut polycarbonate sheets are attached to the first three rows of stinger profiles using special self-tapping screws with a thermal washer. |
|
| Check the joints for leaks and tighten the bolts. Check the quality of installation of the lugs. The work can be considered completed. | Ready drop greenhouse. |
When you purchase a ready-made drop greenhouse, you receive detailed instructions for assembling it. We have described to you an example of assembling a classic greenhouse; the installation principle is approximately the same for all manufacturers.
Glass or polycarbonate
The next stage in the construction of a greenhouse is the choice of material for the covering.
The leading three today include polycarbonate, film, and glass. The cheapest solution is film; it makes it easy to dismantle the roof or part of the wall to ensure ventilation.
The material is easy to install; you can use it to cover a greenhouse yourself. in the fall it is removed for storage, so the film does not have to withstand strong gusts of wind or the weight of snow. True, with the onset of the new season, the greenhouse has to be closed again. This solution is suitable for summer residents who leave their estate during the cold season and cannot care for outbuildings.
After removing the film, the ground of the greenhouse is covered with snow, which provides favorable conditions for the proliferation of microorganisms. When a greenhouse remains under a roof, the ground freezes and beneficial bacteria die
Therefore, it is important to throw snow or manure into the greenhouse in winter.
Film is the cheapest material, but it wears out quickly, so you have to buy a new one every season. Many types of polyethylene lose their transparency over the summer and wear out under the influence of wind and ultraviolet radiation. In addition, the material can be easily torn or accidentally punctured. However, it will not break, which ensures the safety of people, unlike glass.
Some summer residents use reinforced films, which last longer and are resistant to stretching, due to the presence of a mesh frame inside. Such a film can easily withstand hail and strong winds and can last for several seasons.
Pros and cons of glass greenhouses
Glass has a high light transmittance. A greenhouse covered with such material will provide the summer resident with the following advantages:
- Completely inert with respect to combustion and oxidation, which film polymers cannot boast of. Such a greenhouse can be safely heated in cold weather without fear of fire or release of toxins.
- By combining a glass covering with a wooden frame, the summer resident receives an environmentally friendly structure.
- In warm weather, a static microclimate is created in a glass greenhouse.
- Caring for glass is also easy. It is enough to wash it periodically using mild cleansers.
Among the disadvantages of glass, it is worth noting the high weight of the material, fragility, which poses a danger, and high thermal conductivity. Using glass, you can build a single or gable greenhouse; you will definitely need a foundation. Installation and disassembly of glass structures must be done very carefully.
It is logical that a glass greenhouse will last much longer than a film greenhouse. However, the high thermal conductivity of the material will not allow obtaining a sufficiently high temperature inside the structure without additional heating. Therefore, the harvest there will be quite late.
Polycarbonate greenhouses
A relatively new material is polymer sheets that are resistant to mechanical damage. Polycarbonate has no less transmission capacity than glass, but does not release heat to the outside
When installing, it is important to position the sheets correctly; you must not confuse the front side with the back. the underside of polycarbonate is quickly destroyed by sunlight
Thanks to the properties of polycarbonate, the greenhouse retains heat well, but in warm sunny weather the temperature in it can reach 50°
Therefore, when installing a greenhouse, it is important to immediately make two doors and two vents for ventilation. Like any material, polycarbonate is not without its drawbacks.
It cannot be cleaned with abrasive detergents or wiped with solvents. To build a greenhouse you will need a solid foundation. The material can only be stored horizontally. In addition, polycarbonate is quite expensive.
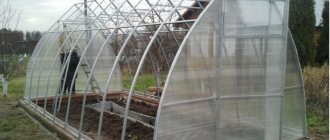
Making a drop greenhouse with your own hands: step-by-step instructions
A drop greenhouse, as we said above, can be purchased without any problems at almost any large garden center; it is produced by many companies. But if you have metal profiles and a device for bending pipes, then you can make it yourself.
This will be half the price of a finished structure with polycarbonate included.
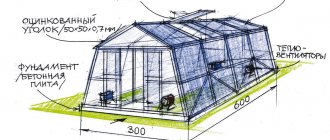
It is better to choose the standard height and width of the greenhouse - 240 by 300 cm. But the length can be varied, choosing its dimensions based on the area of the site.
Step 1. Drawing up a drawing with the dimensions of the structure
The diagram shows a drawing of the greenhouse with all dimensions. To make it, you will need 10 arcs and at least 24 transverse profile bars, provided that the arcs are installed a meter apart from each other. For snowy regions, it is recommended to make this distance smaller. The window and door frame are assembled separately.
Step 2: Choosing a location
Do not place the greenhouse where there is shade.
Before you begin to install the greenhouse, you need to prepare a site for its placement. This should be a well-lit area, and the ground should be leveled if necessary. If the site is prone to quicksand due to groundwater, then you will need to additionally make a foundation or a strong wooden frame.
Step 3. Construction of the foundation
Work on making the foundation begins with preliminary marking of the place where the greenhouse will stand. Along the perimeter of its location, pegs are driven into the ground, between which a thread is stretched. All soil that falls within the marking perimeter undergoes additional preparation - its top layer is removed, and the remaining soil is compacted very well to prevent subsidence and deformation of the structure. For reliability, we suggest making a substrate from a mixture of sand and gravel, this is especially true for areas with groundwater.
Step 4. Making formwork
We strongly recommend making formwork for the greenhouse for the reliability of the structure. It is made from bars with a cross-section of 10×10, pre-treated with a special solution for wood. Using galvanized corners and self-tapping screws, 4 boards, pre-cut to the size of the greenhouse base, are connected to each other, forming a large frame.
Step 5. Assembling and installing the frame
For the frame, it is necessary to pre-bend the metal profile in the shape of an arc. To do this, using a pipe bender, straight metal profiles are bent with an indentation of at least 7 cm from the bottom and 4 cm from the top. The work is not easy; for beginners it takes at least a week. First, one arc-template is made, along which the bend of the remaining elements will pass. The finished arches are fastened together using transverse profiles, the front arches are complemented by a window and a door. The frame is attached to the formwork using corners and self-tapping screws.
Special attention should be paid to the ridge of the structure. It can be made of 80x80 galvanized steel and should be mounted so that it slightly protrudes beyond the gables of the greenhouse.
Determine the distance between the arcs yourself; the smaller it is, the more reliable your greenhouse will be.
Step 6. Attaching the polycarbonate
When choosing polycarbonate, it is better to consider options for rigidity from 35 mm so that it survives the winter well. You will need about 3 sheets of 6 meters each, 2.1 meters wide. It should be placed vertically, with the side with the protective film facing out.
For a better fit of polycarbonate to the arches, self-tapping screws alone are not enough. The sides need to be further strengthened; manufacturers suggest stretching zinc tape over the polycarbonate. But there is an opinion that under the influence of sunlight such a tape becomes very hot and the polycarbonate underneath it deteriorates faster. Therefore, gardeners recommend placing a thermal insulation gasket under the zinc tape in the form of a tape window seal with an adhesive layer.
Bending polycarbonate to give it a droplet shape should only be done across the stiffening ribs to avoid damage and cracks.
The greenhouse is ready. This is not a quick task, but the result will certainly please you, because a homemade greenhouse will cost much less, and will last no less than a purchased structure if the operating rules are followed.
The procedure for installing a greenhouse made of cellular polycarbonate
- Using a screwdriver, remove all screwed elements from the side arched parts of the structure.
Remove the protective film from one sheet of polycarbonate.
Carefully transfer and place the sheet on one of the arched side openings and screw it onto the screws, retreating to a distance of 30-40 centimeters. Here you need to say why this needs to be done. Firstly, you won't get confused with the elements for the side part. Secondly, only professionals can fix carbonate in a vertical position, and why do you need all this?
Trim the edges of the leaf. Now we transfer it to another opening and screw it again and cut it. In the same way, following the template, we screw it on and cut it into the side opening of the end part of the greenhouse.
We place a sheet of polycarbonate on the doorway of the end part of the greenhouse (the one on which the sheet has already been screwed and cut), and carefully screw it into place, cutting exactly along the edges.
We place all the arc elements at a certain distance from each other, starting from one edge. We insert the valves into the grooves with their curved ends into the ground.
We connect the arc parts using side elements. We screw the joints onto roofing screws.
After the entire frame is assembled, you need to use a tape measure to measure the diagonals at the lower base of the greenhouse. If they are not equal, you need to slightly trim the corresponding corners and measure again until the distances are the same.
As soon as the diagonals are set, you can dig holes. To do this, you need to outline the crosses where the holes will be dug and then move the greenhouse frame 40-50 centimeters to the right or left. The depth of the hole for pipes for fastening to the ground should be 1 of the height of the shovel bayonet. After this, you need to level the horizontal plane of the base. It may be necessary to knock down some pipes for fastening to the ground and connections and level them.
We gradually bury the pegs in the ground (we added bricks for pressing) so that it does not accidentally get torn out by a strong wind. We secure the joints with screws. Remove the film from the remaining polycarbonate sheets. Carefully place the sheet on the side arch and stretch it from both sides of the frame. The leaf should protrude 20-30 centimeters above the greenhouse door.
We fix the first side with screws, and then move on to the second. We do the same on the other side. There remains empty space between the sheets in the center of the greenhouse.
We place the last fourth sheet of the greenhouse in the center of the greenhouse. We secure it with screws. Add screws to the very top of the greenhouse using a ladder or rafters. We make sure that there are no deflections. If there are deflections, we manually straighten the pipes by bending them. We open the windows and make hooks for them.
The advantages of greenhouses made of cellular polycarbonate will be described in one of our materials. We really hope that our tips for installing an arched greenhouse yourself will help you cope with the installation of your personal garden or country greenhouse. There is nothing difficult about this, the main thing is to have some time and 1-2 assistants. Happy harvest everyone!
Rules for operating a drop greenhouse
If you purchased a ready-made structure, assemble it strictly in accordance with the instructions. Most often, they begin to read it after there are unnecessary details left. Don’t take risks and first carefully read the instructions, sorting out any unclear points and checking the presence of all parts of the kit.
Clean frame elements regularly. Metal elements should be wiped to prevent water from accumulating there during condensation. It is necessary to wipe the polycarbonate with a soap solution.
Do not use abrasive substances to clean it; they can damage the coating that protects the greenhouse from UV rays.
Brushes with strong bristles cannot be used to clean it, as polycarbonate is susceptible to cracking.
If the winter was too snowy, and the distance between the arcs is more than 85 cm, then additionally clean the snow from the structure.
At the end of the season, check the fastenings and frame elements for their safety and deformation; identifying the problem in time allows you to minimize the cost of eliminating it.
Features of greenhouse care
Polycarbonate is a modern, ultra-strong and durable material, the care of which does not require much effort and time. However, high-quality maintenance of the greenhouse can significantly extend its service life. During operation of the structure, polycarbonate sheets should be regularly cleaned using a regular soap solution and clean water.
Important! When cleaning polycarbonate, you should not use abrasives, as they destroy the ultraviolet coating from the surface and reduce the strength of the sheet itself.
It is recommended to shade the walls using ordinary chalk. In the fall, it is necessary to remove all plant debris from the greenhouse, dig up and loosen the soil, and carry out a thorough cleaning of the structure with its further disinfection. For the winter, the greenhouse must be completely “mothballed” if it is not to be used.
Customer reviews and recommendations
The vast majority of summer residents who purchased a drop greenhouse rate it “excellent.” Everyone notes its reliability; it is the drop-shaped shape that allows snow to calmly roll down and not linger on the structure itself, which inevitably leads to its deformation, as, for example, happens with arched greenhouses. In addition, even a tall person can comfortably stay inside the greenhouse. Along the inner perimeter of the greenhouse, as gardeners note, there are many cross beams where plants can be tied up.
Some gardeners, for example, a summer resident with the nickname Serega, are confident that the greenhouse can be used all year round by covering it with very thick polycarbonate or using durable double-glazed windows instead of polycarbonate. But for this it is necessary to additionally heat the greenhouse space from the inside.
Many users, whose reviews can be seen on the Internet, are in favor of purchasing a ready-made design, rather than making it yourself. This, of course, turns out to be more expensive, but you are guaranteed an excellent result.
Among the disadvantages, some note the high cost of the finished drop greenhouse; its cost with delivery, as a rule, is at least 22,000 rubles and more. Another drawback that can be found in reviews from gardeners is the appearance of small cracks at the joints of polycarbonate, especially in the places where the door and window are attached. After prolonged rains, a slight separation of the polycarbonate from the point of adhesion to the foundation may occur. But all these shortcomings can be corrected; they are also found in other designs using polycarbonate.
Customer review from irecommend.ru
The author has been using the drop greenhouse for more than a year; it was purchased ready-made, disassembled, for 32,000.
A gardener under the nickname DNV Logoped says that he previously had the sad experience of using another form of greenhouse on his property, which did not survive the harsh winter and collapsed. In his decision to purchase a drop greenhouse, he was guided by the reviews and recommendations of his neighbors, as well as the description of the greenhouse on the manufacturer’s website.
The author of the review has been using the greenhouse for more than one year and has already managed to appreciate it, noting its visible advantages:
- Reinforced structure made of galvanized pipe 20*20, which is not subject to corrosion.
- Polycarbonate with UV protection, thickness 4 mm. True, the author of the review notes that you can safely choose sheets of greater density and width, expressing your desire with the phrase: “I would like it to be thicker!!!”.
- The door hinges are already welded to the door structure.
The author notes that in addition the manufacturer suggests purchasing a drip irrigation system or making a few more windows. We assembled the greenhouse ourselves using video instructions from the Internet.
The service life of the greenhouse is more than a year, during which time users have no complaints about it. The teardrop greenhouse, 6 meters long (you can choose it yourself), 3 meters wide and 2.5 meters high, has three beds freely included.
Features and Specifications
To make a polycarbonate greenhouse correctly. To make a polycarbonate greenhouse correctly
Distinctive features of the droplet greenhouse:
- the special drop-shaped roof design does not retain snow;
- the shape of the structure allows it to withstand different weather conditions;
- the steel frame of the greenhouse can withstand heavy loads due to strong transverse fastening;
- parts and fasteners are made of metal and are therefore not subject to corrosion;
- high-quality polycarbonate protects against the negative effects of ultraviolet radiation;
- the light is evenly distributed throughout the entire volume of the room.
The main technical characteristics of a polycarbonate greenhouse are considered to be the reliability and strength of the structure, which consists of all-welded arcs and end modules with two doors and two vents. The distance between the arcs is 63 cm. For increased load from snow, two of the four horizontal lines are shifted upward in the form of a drop. The polycarbonate materials are fastened with self-tapping screws, and the frame parts are secured with bolts and nuts.
Polycarbonate is characterized by a long service life, reliability and durability. Assembling a teardrop polycarbonate greenhouse takes approximately three hours. It can be installed by one person due to its ease of installation.
Construction of a polycarbonate greenhouse
Such a greenhouse is convenient and functional, and in order to assemble it, intermediate and end components with a door and vents are used. Doors and vents, arches, straight and longitudinal materials, foundations and fittings are used for the frame. To cover the roof, polycarbonate material, thermal washers and sealing tape, self-tapping screws, end and connecting profiles are used.
Additional greenhouse parameters include:
- The foundation, which is treated with an antiseptic, is made of timber and connected with corners.
- Additional arched window.
- Additional end profiles.
- Automatic and semi-automatic watering system.
The cost of this type of greenhouse and installation depends on the size of the structure and the availability of additional functions. All parts have their own markings, and instructions for operating the structure are included with the product. How to assemble a “droplet” polycarbonate greenhouse is described in detail in step-by-step instructions, so you can independently assemble a “droplet” polycarbonate greenhouse with your own hands.
Assembling a “droplet” greenhouse.
The greenhouse is quite simple and easy to install, for which you will need a screwdriver and an angle grinder. A screwdriver is needed to twist and fasten the frame, and a grinder allows you to cut material at high speed. It is recommended to install the greenhouse in summer when the weather is dry. Before direct installation of the structure, special work should be carried out to prepare the selected location. Markings are made in the selected area and a small layer of soil is removed. To prevent subsidence of the ground, a sand mixture with gravel is laid under the product. A timber foundation is installed, which is secured with pegs. After completion of the work done, the foundations proceed to the installation of the frame.
The frame is assembled in a certain sequence, which begins with the assembly of the end modular structure with the door. It is assembled from end and intermediate arcs and connected with self-tapping screws. This module is placed on the foundation and attached to it. Then the assembly and installation of additional modular components with a window takes place and are connected to the already installed frames. After installing all the modules, you should install water supply and electrical wires into the greenhouse.
At the next stage, the polycarbonate is laid. To ensure condensate drainage, polycarbonate sheets are laid in the vertical direction of the air movement channels. Polycarbonate sheets should be bent across the rigidity and not crushed when attached to the frame. After installation, the ends of the panels are sealed with a special tape and covered with a profile.
A suitable microclimate in a polycarbonate greenhouse is maintained using an automatic ventilation and ventilation system. It is recommended to regularly clean the surface of the greenhouse using detergent and warm water.
You can purchase a “droplet” greenhouse made of polycarbonate at an affordable price in many specialized companies and stores. The products meet all requirements, undergo quality control at every stage of their production, and have a warranty and after-sales service.
Category: Greenhouses.
Choosing a greenhouse: arched or teardrop-shaped
The arched variety has long been considered the favorite among all other greenhouses available. But over time, its shortcomings became obvious. For many summer residents, the greenhouse could not withstand the snow and ice and became deformed after the winter.
After many similar comments, manufacturers were puzzled by the creation of a more advanced design. This is how the droplet greenhouse appeared. It has fewer joints, which saves money and time for creating additional sealing.
In addition, the droplet shape of the greenhouse prevents snow from accumulating at the top. This helps reduce the risk of deformation and also prevents condensation from appearing on the surface of internal structural elements.
If your region is subject to snowfall and winds, and plantings require staking, then a drop greenhouse will be the ideal solution for your garden plot.
Recommendations for use
In order for the “Droplet” to please you for decades, you need to know how to use it correctly. Here are some simple tips:
- Installation must be carried out strictly according to the instructions supplied with the product. There are no extra elements. If assembled incorrectly, the structure will not last long.
- The greenhouse lining should be regularly wiped with a damp cloth soaked in soapy water. The use of brushes and abrasive cleaning agents is prohibited.
- The maximum snow load is 290 kg per square meter. m. If there is more snow, the roof may not withstand it. Therefore, it is better to clean it from time to time.
- The reliability of fasteners should be checked regularly. If something is loose, you need to tighten it.
- If there are no immediate plans for planting, then the structure should be rid of crop residues and disinfected.
The Droplet greenhouse is characterized by increased durability. Due to the reinforced frame and unusual configuration, it is quite popular among summer residents and gardeners. Gardeners also appreciate the possibility of self-installation.
Assembly and installation
So, having purchased the Droplet greenhouse, you decided to assemble it yourself. Step-by-step installation instructions will help you with this.
Step 1: Unpack the greenhouse parts. They are supplied partly in plastic bags, partly in boxes. The packaging can be thrown away; you will no longer need it.
Step 2. Start assembly with the doors and windows of the greenhouse. Take the left and right door posts (13 and 13a) and connect them to the door crossbars (14) in the amount of 4 pieces.
Attention! The left pillar (13a) must have holes for installing the door handle. The profile groove of the crossbars must point downwards.
Step 3. Attach the inclined door profiles (15) to the uprights. The door is ready.
Tips for use
In order for the “Droplet” to serve for many years, take care of proper assembly and operation.
- Assemble the greenhouse only according to the instructions. There should be no loose parts left. If the greenhouse is assembled incorrectly, it will quickly become unusable.
- Do not forget to clean the greenhouse cover from dirt. Clean with a soft cloth or sponge and soapy water. Under no circumstances should you clean polycarbonate with brushes or abrasives - this can lead to the UV protection simply being erased ahead of time, and the material itself will begin to deteriorate.
Now you have become familiar with the Droplet greenhouse and can decide for yourself whether you need to purchase such a design. However, if you read this article, then most likely you were in search of an excellent reinforced greenhouse. And “Droplet” is one of the best options for this type of structure.
The Droplet greenhouse got its name due to its unusual shape: the frame is made in such a way that when assembled it resembles a drop. This form has practical value, since such a frame can withstand any weather conditions and the weight of snow, so buildings of this form are often used in regions with cold and snowy winters. In addition, drop-shaped greenhouses also have aesthetic value and serve as an excellent decoration for the site.
In this article we will look at the main features of the Droplet greenhouse, the pros and cons of such a design, and also provide detailed step-by-step instructions for building a greenhouse with your own hands.
Using a Pipe Bending Machine
Anyone who has tried to bend a profile pipe is aware that it is very difficult. It is much simpler and easier to work with drywall, but not in this case! Here a special pipe bending machine or a manual method can help. Also one of the ways is fire. One part of the pipe is heated, then, using a lever, it is bent at a certain angle. The disadvantages include the appearance (on completion) - rather unaesthetic and the fact that a lot of physical effort will be required, because this is not drywall!
Dimensions
Typical dimensions of the Droplet greenhouse:
- width – 2.4 m and 2.97 m;
- height – 2 m 40 cm;
- length – 4 m, 6 m, 8 m and more (a multiple of 2 m);
The frame is made of galvanized pipe, zinc coating class 139-179 microns, is not subject to corrosion, and does not need to be painted during use. The greenhouse is covered with sheets of cellular polycarbonate with a thickness of 4 to 6 mm, depending on the climate of the region.
The unusual shape of the greenhouse, a square galvanized pipe 25x25 mm and arcs with intervals of 65 centimeters help the structure to withstand the most difficult weather conditions. The opening and guides are made of galvanized pipe 20x20 mm, metal thickness 2 mm.
The design provides 2 doors and 2 windows on the end planes.