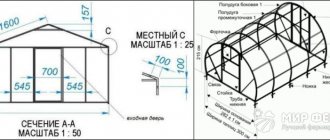
Instructions for the Arched Greenhouse Materials Calculator
Specify the required scale of drawings.
Fill in the greenhouse parameters in millimeters:
X – The width of the greenhouse is selected based on the budget, the availability of free space on the site, as well as your wishes and goals. The standard width of factory-made greenhouses is in the range of 1800-6000 mm. X value for comfortable work in a greenhouse is no less than 2400 mm. This size allows you to equip a passage in the greenhouse with a width of 600 mm (which is optimal), install racks with seedlings or equip beds on both sides up to 900 mm (it is difficult to care for plants reaching beyond the specified distance).
Z – The length of the greenhouse can be any, if the size of the plot allows. When choosing the Z , you should take into account the standard dimensions of the material that will be used for glazing. For example, if polyethylene film is used, the Z should be a multiple of 1000 mm, and if polycarbonate is a multiple of 2100 mm.
One of the decisive aspects influencing the choice of the width and length of the greenhouse is the width of the cover. The standard width of a polycarbonate sheet is 2100 mm, which is the maximum allowable width at which sagging does not occur under its own weight, provided that the edges of the material rest against the frame. A greenhouse covered with material of maximum width is lighter, since in this case fewer posts are used. However, when determining the optimal number of frame posts, you should also take into account the climatic characteristics of your region (snow and wind loads).
Y – The height of the greenhouse is selected based on the convenience of working in it (the determining factor is the height of the worker). Y value affects the length of the frame arc (greater height means longer arc and more material is needed for glazing). The optimal height of the greenhouse is 2000 – 2200 mm.
When choosing the main parameters of a greenhouse, you should take into account the recommendations of SP 107.13330.2012 “Greenhouses and greenhouses” (updated edition of SNiP 2.10.04-85).
A – The number of vertical sections on the façade of the greenhouse should be selected taking into account the geometric dimensions of the cladding material.
E – The number of vertical wall segments depends on the size of the material used for cladding and the length of the greenhouse. For example, for a six-meter greenhouse glazed with polycarbonate of standard width, the E should be taken at least 3.
D – The number of cells in a vertical segment is taken taking into account the properties of the glazing material and the strength of the frame. If polycarbonate is used, a value of D = 3 is sufficient (since in the structure it is bent and stressed, it can easily withstand tension-compression loads); for a greenhouse film, a value of D greater to prevent sagging.
You have the opportunity to select the optimal sizes of sections and cells by changing their number, and the dimensions will be displayed on the drawings of the greenhouse.
Click "Calculate"
The calculator will help you calculate the area, volume and perimeter of a semicircular greenhouse. As well as the area of the roof, side walls and facades and the total glazing area, which is necessary to purchase cladding material in the required quantity. In addition, you will find out the length of the greenhouse arcs (their number) and the length of the materials for making the frame. Using this online calculator will allow you to accurately calculate the materials for making an arched greenhouse with your own hands and estimate the financial investment in its construction. The length and arc of the greenhouse arch will also be calculated.
Important: when using polycarbonate for glazing a greenhouse, it should be bent across the stiffeners.
How to calculate the optimal dimensions of a polycarbonate greenhouse, taking into account the tasks
The high cost of polycarbonate as a covering for a greenhouse frame makes you wonder how you can save on this expense item. Quite often, beginning vegetable growers try to reduce initial costs by minimizing the size of their first greenhouse. At the same time, they overlook several factors leading to significant crop losses.
How do the dimensions of a polycarbonate greenhouse affect its profitability, and what should be taken into account at the design stage?
What affects the sizes and how to calculate them correctly
When deciding what size your greenhouse should be, you need to proceed not so much from the size of the site, but from its purpose. Different plants require different conditions, which can only be provided with certain dimensions of closed soil.
However, for some reason, inexperienced gardeners forget about the purpose for which they are creating a greenhouse and build a structure with inappropriate dimensions in advance.
Dependence of size on the gardener’s goals
So, growing greens in racks requires a lot of light, the lack of which will have to be compensated artificially. Therefore, the frame of a greenhouse for green crops should not block sunlight, and the structure itself should be small - approximately 3x6 m. Its additional illumination on cloudy days will not cost a fortune, and the required volume of harvest can be achieved through proper organization of space.
Tomatoes, especially tall ones, need a lot of space - some varieties may need a greenhouse 2.5 or even 3 m high. Of course, for the sake of several bushes it is not worth building such a structure, otherwise the heating bill will cover all the material benefits from the greenhouse. But, if you plan to get an enviable harvest from medium-sized plants, set the greenhouse height to at least 2 m.
The same rule applies to borage: to grow cucumbers in a full cycle, and not just seedlings, the greenhouse must provide comfortable conditions for caring for them.
Therefore, for both small and medium-sized bushes, it is worth raising the roof of the building to 2–2.5 m precisely for ergonomic reasons.
As for the ratio of the width and length of the greenhouse, you can get by with standard sizes developed in practice by experienced vegetable growers: 3x6 m, 3x8 m or 4x8 m.
However, here too there are some nuances that should be taken into account depending on the shape and how ventilation and watering will be carried out in the greenhouse.
Dimensions of the greenhouse depending on the shape and technical equipment
Arched buildings, despite all their advantages, have a significant drawback - it is very difficult to build side windows in them, and the owner has to limit himself to only cross-ventilation organized through the entrance doors and end transoms.
It is difficult to properly ventilate a structure longer than 6 m in this way, so the optimal size of an arch-shaped polycarbonate greenhouse is: 3x4, 3x6 or 4x6.
A single-slope indoor vegetable garden placed near a blank wall should be made wide (4–5 m) - this way the sun can better illuminate most of it, on which it will be possible to grow light-loving crops. The sizes of gable greenhouses usually vary widely, but owners of long structures often complain about some problems that arise during their maintenance:
- difficulties in organizing watering, in particular, manually or using a hose - manually watering 100-120 bushes every 2-3 days is, to put it mildly, tedious, and with a hose there is a constant risk of breaking the bush;
- slow decrease in temperature - in a polycarbonate greenhouse under the bright sun it instantly becomes hot, and to improve the microclimate it is necessary to regularly turn on powerful ventilation, which leads to an increase in the cost of the final product.
A completely different picture is observed in buildings whose dimensions do not exceed 4–5 m in length - provided that the greenhouse is correctly positioned relative to the wind rose, forced ventilation is only needed in complete calm.
Calculator for calculating a semicircular greenhouse
Instructions for the Semicircular Greenhouse Materials Calculator
All parameters are indicated in millimeters
Z – Greenhouse in length.
X - Width of the greenhouse.
Y – Height.
A - Number of vertical segments along the perimeter of the facade.
D — Number of cells in vertical sections.
E – Number of vertical wall segments.
By changing the number of cells or sections, you can choose the optimal size.
All calculations will be displayed on the drawing.
Cell parameters are calculated automatically.
The program will help you perform an accurate calculation of the materials needed to build a semicircular greenhouse.
Based on the calculation results, you will find out the volume and area of the greenhouse, the perimeter for the foundation, the amount of materials for the frame and the area of its glazing.
How to build a semicircular greenhouse with your own hands
The technology for installing a polycarbonate greenhouse is quite simple, but requires compliance with a number of conditions. For each individual project, a number of features should be taken into account so that the future greenhouse is as functional and comfortable to use as possible.
First of all, we choose an open and sunny place, which we carefully plan and clean. This is very important for the reliability and evenness of the entire structure.
We proceed to preparing the foundation; to do this, we dig a ditch of the required depth and width, which will exactly correspond to the outlines of the future greenhouse. Using the installed pegs, we measure the boundaries of the location of our frame. We begin pouring the foundation with a concrete solution: mix cement with sand in a ratio of 3:1 (M300) or 4:1 (M400) and add water. We fill the entire monolithic foundation to a level that can be marked with a cord or thread. Let the solution sit and harden.
You can either order the greenhouse frame according to your dimensions from the manufacturer, or you can weld it yourself by purchasing all the necessary materials. We will look at the installation of a factory semicircular greenhouse.
Installation
We begin the assembly of the greenhouse structure by fixing the end elements, as shown in the instructions. The central top element is connected to two side long elements. For fastening we use self-tapping screws and clamps included in the kit. To make assembly quick and efficient, you can use a screwdriver. We place the end arch on the finished monolithic base and attach it with clamps.
Having measured the length of the side strips, divide them in half and put a mark on each profile. On each side of the arch we fix horizontal two-meter profiles. Next, we fix the long crossbar exactly in the center of the upper arc.
Important! Greenhouses require accuracy and scrupulousness during installation.
All stiffeners should be located at the same level. According to requirements .
Website about the dacha
Today you can buy anything, and ready-made greenhouses are no exception. Many construction companies offer their services in this area. However, the cost of a finished greenhouse is so high that you can purchase products on the market with a three-year supply.
Also, rumors are now actively spreading about modified genetic products and how they affect humans. In this regard, many owners of summer cottages strive to grow their own vegetables.
And in order not to spend a lot of money on buying ready-made greenhouses, you can try to build one from old plastic pipes, window frames and pegs. It is worth noting that a carefully made greenhouse will not be inferior in quality and appearance to a new one.
In this article we will look at the question of how to make arcs for a greenhouse and what they can be made from.
- How to make plastic arcs for a greenhouse
- How to make steel arcs for a greenhouse
- How to make arcs for a greenhouse from an old hose
Method No. 1. Simple.
- We outline the perimeter of the greenhouse.
- We drive in pins along the entire perimeter of the greenhouse, protruding 15-20 centimeters from the ground.
- We put plastic, pre-bent pipes on the protruding pins.
- To calculate the required number of plastic pipes, you need to know the height of the structure and its length. The distance between each arc must be at least 50 centimeters so that the film laid on them does not sag under the influence of rain and other precipitation.
- When all the arcs are installed, we insert another pipe across it so that it connects the entire structure.
- Cover the structure with film.
- We lay a painting mesh for plaster, made of fiberglass, on top of the film. Thanks to it, the film will be clamped around the edges.
Method No. 2. More complex, but stronger.
In this case, we will also use plastic arcs for the greenhouse, but the constructed structure will be much stronger.
We prepare plastic pipes (even defective or previously used ones will do) and rods on which we will put the pipes themselves. It is best to use metal rods or construction fittings.
The figure below shows the design in detail. By following it, you will make a durable greenhouse.
The rods must be cut to a length of at least 60 centimeters. We drive approximately 20 centimeters of the rod into the ground, the rest will be on the surface.
When all the rods are clogged, you can put on the plastic pipes.
How to calculate the arc length in advance?
Take regular wire and ask friends or relatives to hold it at the edges of the greenhouse. Next, take the center of the wire and pull it to the required length. When you have the desired arc, trim the edges of the wire and use it as a template.
Durable metal arcs for greenhouses
The most durable for large greenhouse sizes are metal arcs, however, to assemble the entire structure, you need welding equipment, or drilling holes for a bolted connection. For the frame of the greenhouse, you can use galvanized profile pipes, which can last up to 20 years.
Nuances:
- A grinder is used to trim the metal profile.
- After drilling holes for fastening, trimming damages the galvanized layer of the profile.
- The drilled areas must be treated with cold zinc.
- Cold zinc will protect metal profiles from corrosion, which will increase service life.
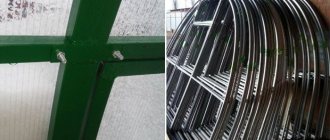
Galvanized profiles can be joined by welding. This is the most rational way to combine all the elements of a greenhouse.
Welding is better than using a large number of bolts, rivets, and self-tapping screws.
Welding damages the galvanized coating, and the joints must be treated with a wire brush and cold zinc applied.
↑ How to make steel arcs for a greenhouse
Steel arcs for a greenhouse are one of the most reliable options for making a greenhouse. However, not everyone has the required amount of this material on their farm. In Soviet times, they were cheap, but now they are quite expensive.
But you can make them yourself. To do this you will need welding or a homemade machine.
Let's say you have collected the required amount of material and now you can begin construction.
- As was written above, we determine the length of the half-arc.
- We take in our hands a pipe two half-arcs long and cut it in half.
- Next, we determine the horizontal pipe (which will go from above) and make crosses along its entire length, with a distance of half a meter.
- We weld half-arcs cut into pieces to the crosspieces.
- To strengthen the structure, we also weld horizontal pipes not only on top, but also on the sides of the structure, as shown in the figure below.
Pepin's formula for calculating the arc length of an ARCH
Pepin's formula for calculating the arc length of an ARCH.
One of these days I will turn 54 years old. Next up is article 54 on the Prose counter. In the convolution, the number 54 gives the prime number 9 - exactly the same number is obtained when convolving my full real name. The idea came to “celebrate” this coincidence of numbers with an interesting article. I decided to publish my formula for calculating the arc length of an arch. (I made my first arch, oddly enough, also 9 years ago.) Who needs this? This is necessary for people like me who, when manufacturing metal products: arched canopies, gazebos, greenhouses and various types of roofs, are faced with the need to calculate blanks for bending arches, say, from profile pipes of different sizes. Arches made of metal profiles are made by rolling the metal in three-roll rollers. By repeatedly rolling back and forth, a straight piece of metal takes the shape of part of a circular arc. The arc turns out, of course, to be an inaccurate geometric copy of part of the circle. But quite a sufficient approximation to the circle. Accuracy depends on several factors: the uniformity of the pipe, the degree of wear of the roller shafts, the distance between the roller shafts and the number of passes - the number of times of rolling back and forth. Well, and of course from the art and skills of the manufacturer. But my idea is that if you know the length of the metal workpiece for a specific arc, then when rolling the workpiece you only need to measure the distance between the ends of the workpiece. And when, during the manufacture of the arc, the distance between the ends of the workpiece coincides with the size of the base of the arc (the straight line limiting the segment of the arc from below), then the arc takes on the specified dimensions, it is ready. But how to calculate the length of the arc, when usually for a canopy or gazebo the size of the base of the arc segment and the height of the arc are specified? It’s good if you already have a ready-made drawing drawn by an architect, designer or advertiser. At least there is an arc radius. And then you can draw a part of a circle with such a radius on a suitable surface. When making the first arcs, this was what we had to do: draw an arc on the ground or floor. And measure the length of the blank for the arc by applying a tape measure to the drawn arc. Then cut the workpiece to that length and roll it until it matches the size of the base of the arc segment. Looking at how beautifully the arcs are drawn in graphic editors on the computer, I kept thinking that there must be a formula by which you can calculate the length of the arc, knowing only the dimensions of the base and height of the arc. Having dug through the available literature on mathematics and construction, I could not find such a formula. BUT I think that it probably exists somewhere. Therefore, I decided to try to derive this formula myself. Fortunately, the children were in high school and there were textbooks on geometry. And... So, with the help of a 10th or 11th grade geometry textbook, I don’t remember exactly, I managed to derive the following formula. The proof itself, even prepared in the form of an article back in 2005, disappeared along with all the information when another computer hard drive died, but the method for calculating the arc length of a segment remained in the form of an algorithm written in a workbook, thanks to the fact that I use this algorithm all the time. I offer this method of calculating the length of an arc based on the base and height of the arc and my formula to all interested people. Let's look at the picture. Let's say we need to find the length of the upper arc of the depicted arch. Draw a right triangle on this arch. One leg is the height of the arch - this is leg b (the leg opposite the angle alpha). It is also part of the radius. The second leg – a (the leg adjacent to the angle alpha), is half the base of the arch segment. Based on the values of the legs of this triangle, we can find the length of the arc of the arch (segment) using formula (3), which I immodestly called the Pepin formula. (3) As we see, to obtain the arc length we need to know the alpha angle. We can find the magnitude of this angle through the ratio of the sizes of the legs known to us, that is, through the tangent of the angle alpha. To do this, according to formula (1), we divide the value of leg b by the value of leg a. By reducing (rounding) the resulting tangent value to the thousandth, we use the abbreviated Bradis tangent table shown in the figure to find the value of the alpha angle. In columns tg ; Only the fractional part of the tangent is given (for simplicity, 0 integers are discarded). My experience shows that for satisfactory accuracy in making an arc, it is enough to know the value of a degree with a tenth of an angle. But we have a table with only integer degrees. If you add tenths, then the size of the table will also increase 10 times. It seemed to me that then I would have to search for a long time. Those who wish, of course, can take the complete table of Bradis tangents and use it. What I do is find the tenth of a degree using a mental estimate. Between whole degrees the difference is from 18 to 34 thousandths of a degree. Dividing this difference by 10 gives me the tangent value for a tenth of the alpha angle. And already, having estimated how much is missing or too much to the nearest whole degree, I find the decimal value of the degree of the alpha angle. Someone, perhaps, will build themselves a table with an accuracy of a tenth of a degree.
↑ How to make arcs for a greenhouse from an old hose
If you have old hoses on your farm, you can use them to build a greenhouse.
- Cut the required number of hoses of the same length.
- If the hose does not hold its shape, we push rods into the hose at one end.
- Next, we insert steel rods into the ends of the hose and fasten them into the ground.
Also, arcs can be made from ordinary 10 mm wire, which is not expensive and is sold in any construction department.
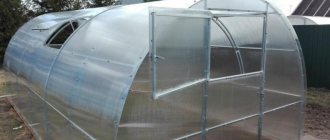
Greenhouses made of arcs with covering material are a simple and effective greenhouse option
Greenhouses made of arcs with covering material are very popular among summer residents and gardeners. The reasons for this popular love include the simplicity and light weight of the structure, the ability to easily install the structure in your garden. Depending on the size of the family’s budget, the greenhouse can be purchased ready-made, or you can make it yourself.
High-quality greenhouses consisting of arches have the following advantages:
- ease of operation;
- simplicity of design;
- the ability to disassemble the structure and store it in winter in suitable conditions;
- the ability to regulate the microclimate inside the greenhouse;
- many options for choosing materials for construction;
- ease of repair;
- affordable price.
Advantages and disadvantages of the design
The advantages of the “arch” are obvious and undeniable:
- its installation will cost less and take less time than installing a “house” type greenhouse;
- good lighting . An order of magnitude higher than, for example, pitched greenhouses;
- stability and reliability . If the structure is correctly secured to the foundation, neither strong winds nor heavy rainfall will damage its integrity;
- if necessary, the greenhouse can always be extended by adding the missing sections;
- Both polycarbonate and film can be used as a covering material . The installation process of the latter takes a minimum of time;
- This leads to another advantage - the minimum number of seams ;
- the ability to independently assemble the frame according to preliminary sketches or drawings;
- easily moved to another piece of land if necessary.
Of course, this design also has disadvantages And it’s better to know about them in advance:
- limited choice of covering materials . As mentioned above, these are polycarbonate and film. Theoretically, glass can also be used. But it will be difficult to install it technologically, hence another disadvantage - higher installation costs;
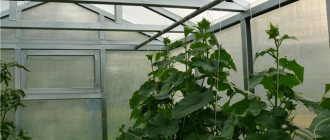
- in an arched greenhouse, the angle of inclination of the walls may vary slightly in relation to the sun's rays. And when light is reflected from the surface on clear days, plants do not receive the heat they need to grow , as well as the energy.
What can greenhouses made from arcs with covering material be used for?
A greenhouse made of arches with a covering sheet can be used for the following purposes:
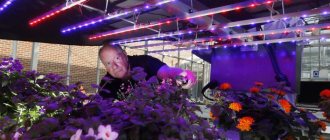
- Growing seedlings. These greenhouses are mainly used for growing flower seedlings and cold-resistant vegetables.
- Early planting and adaptation of young seedlings to open ground. When the weather improves (the threat of frost goes away, the night air temperature rises), the covering sheet can be easily removed.
- Growing heat-loving crops (which are not suitable for this region).
- Growing greens and early vegetables.
- Protection from pests, birds and animals.
- Sheltering crops that have long germination times (dill, parsley, parsnips, carrots).
Types and characteristics of greenhouse arcs
The design of a standard greenhouse is a frame of arches (arcs), which is covered with a special material. Its height does not exceed one and a half meters, its width is just over a meter.
Depending on the expected size and purpose of the future greenhouse, the following types of arcs can be used to build it:
- strong wire made of steel or aluminum 26 millimeters thick;
- a steel tube, the cross-section of which should be no more than 12 mm, coated with PVC (polyvinyl chloride);
- plastic pipe, the diameter of which should not exceed 25 millimeters.
Arcs made of metal-plastic pipes
Choosing metal-plastic pipes will give you the opportunity to build a lightweight, strong and reliable greenhouse. They are not susceptible to corrosion at all and are quite plastic. To build a strong frame, you need to choose pipes with a diameter of 36x40 millimeters. Economical, you can consider purchasing used pipes.
Aluminum and steel
Metal arches are the most durable. They are the most reliable in operation and practically do not deform. Easily enters the ground. Polyvinyl chloride protects metal well from corrosion.
The only drawback of metal arches is that you are unlikely to be able to purchase cheap material for constructing the structure. To purchase pipes of the desired shape, you will need a pipe bending machine. The frame elements are attached to each other by welding.
Arcs made of plastic pipes
When buying arcs made of plastic pipes, you choose the most economical option. The advantages of this type also include the highest level of flexibility. When using them, it is quite easy to form a greenhouse with the required dimensions (the desired width and height of the arches).
The disadvantages of plastic arches include low strength (they can be easily broken). It is also not very convenient to stick the end of the plastic arc into the ground. You may need to prepare deep holes in the ground in advance. For this, it is good to use a piece of reinforcement or special pegs.
Step-by-step instructions for making a greenhouse
Regardless of the materials used, before making a greenhouse you will need to prepare a place for its location. To do this, you need to dig up a ridge or plot of land according to the previously selected dimensions.
The dug up soil must be cleared of small debris, stones and foreign objects. If desired, the soil can be fertilized and loosened using a rake. After this, you can start making a greenhouse. As an example, we will describe the sequence of actions when making an arched greenhouse from plastic pipes.
The greenhouse construction technology will consist of the following stages:
- To make a wooden box for an arched greenhouse, you will need to saw off 2 blanks 1 and 6 m long. To assemble the box, a long board is inserted into the end of a short one and secured with galvanized self-tapping screws 50 mm long.
- To make pegs, a 40×40 or 50×50 mm edged block is used. 4 blanks 30–40 cm long are sawn off from the block. The ends of the blanks are sharpened with an ax or a sharp knife. After this, the pegs are secured to the corners of the frame using galvanized brackets and self-tapping screws.
- The finished box must be treated with wood antiseptic or bitumen varnish 2 times. The second layer is applied only after the first has dried. Next, the box is installed on the prepared ridge. To plant in the ground, the box can be slightly dug up and carefully hammered in with a hammer.
- Arches are being prepared from selected materials. To bend pipes made of polyvinyl chloride or low-density polyethylene, use a heat gun or pipe bender. Hand bending tools are used to bend rebar and steel pipes. Metal-plastic pipes are bent by hand.
- To install the arches, you will need to add the element so that its lower part extends beyond the frame. After this, the arch is fixed with a metal bracket and galvanized screws 30 mm long on each side. If necessary, the work is carried out by two people.
- After installing all the arches with the required spacing, the greenhouse is tied. To do this, a plastic pipe, reinforcement rod or wooden board is laid and secured at the top point of the arches. Self-tapping screws are used to secure the pipe and board. To secure the reinforcement, you can use a bracket or metal wire.
- Start cutting the covering material to the width and height of the greenhouse. If the material is calculated correctly, then you can immediately cover the greenhouse. To do this, a sheet of film or non-woven material is aligned along the top frame of the greenhouse so that an equal amount of material comes from each side. For fixation, plastic staples and special clamps are used.
- To cover the front walls of the greenhouse, a sheet of the required width and height is cut from the covering material. Plastic staples and special clamps are also used for fixation. Excess material is tucked in from the inside or trimmed with a knife.
If desired, the greenhouse arcs can not be attached to a wooden frame, but can be buried in the soil or secured to reinforcement pins. To implement the second method, you will need to cut the reinforcement into pieces 50–60 cm long using a grinder with a metal disc. Each arch will require 2 blanks.
After this, the rods are stuck into the ground to a depth of 30–40 cm, and an arc is strung onto the part sticking out of the ground. A similar approach is used when assembling an arched greenhouse from a profile pipe, when a pipe bent into an arch is put on or welded to reinforcing pins.
Types and properties of covering material
To complete the construction of a reliable, durable structure, it is necessary to select the most suitable covering material for greenhouses and greenhouses. The market may offer you the following options:
Polymer film
A practical and quite economical option. It is made on the basis of polymers. Elastic, does not change its size when climate conditions change. With careful use it can last two years or more. The penetration of sunlight reaches 80 percent. It has the lowest cost compared to other types.
Spandbond
Spandbond is a relatively new type of covering fabric. Thanks to it, you can create a more favorable microclimate for your plants.
Spandbond is a collection of polypropylene threads that are connected to each other by heat treatment. It is used both for small households and on an industrial scale.
- wear resistance;
- heat resistance;
- moisture resistance;
- has different densities.
Polycarbonate
The most modern version of covering material for building greenhouses. Very durable, can last up to 10 years. Has maximum ability to transmit sunlight. But it is advisable to use it only on durable metal structures. For a small greenhouse, it will not be at all convenient to cover it with polycarbonate sheets. And the price of this type of material is quite high.
What frame can I use?
Frames for arched greenhouses can be classified according to the type of material used , namely:
- aluminum _ They are characterized by a long service life and ease of maintenance, since they do not rot or rust. No additional coloring is needed;
- wooden _ Recently, they have been used less and less, since the material itself needs to be further processed before use, in particular - impregnated with special compounds against fungi, rotting, etc. If you make racks from wood with your own hands, they need to be covered with waterproofing material before burying, in otherwise, the structure (arched greenhouse) will quickly become unusable and simply fall apart;
- from PVC . Just like the aluminum frame, it is not susceptible to rotting processes, the negative effects of acids, chemicals, as well as other alkalis and fertilizers. Plus, it has an attractive, aesthetic appearance;
- other metal frames.
The latter can be classified into the following groups:
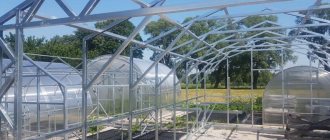
- frames made of profile pipes . An arched greenhouse made from a profile pipe, built with your own hands, is reliable (withstands large amounts of precipitation in the form of fallen snow, rain), is assembled quickly, and does not require special care;
Note! If you are building arched greenhouses and using a non-all-welded frame made of profile pipe, the maximum load on it will be significantly less - up to 40 kg/m. sq. snow.
- from a hat profile . Durable, strong, and resistant to corrosion. Convenient to transport: polycarbonate sheets 2.1 m long are easily rolled into a roll. But such a frame may not withstand heavy rainfall;
- from the corner . Very durable, withstands snow pressure up to 100 kg/m2. The only drawback can be considered the high cost.
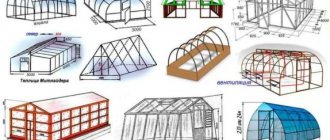
Review of arched models of industrial production
If you decide not to experiment with building a greenhouse, but to buy a ready-made greenhouse made of arcs with covering material, then it will be very useful to familiarize yourself with the most popular models and evaluate their main advantages and disadvantages.
The Dayas model is designed for covering early beds. It consists of arches (plastic) and canvas, which are initially fixed to each other. The standard kit includes pegs for fixation, the length of which is 20 mm. There are also special clips for fixing the canvas.
The basic Dayas model consists of four separate sections. This provides a good opportunity to select individual sizes. It is designed for construction with a length of 4 to 6 meters. The height is fixed and equal to 70 centimeters. Width – 1.2 meters. The width of the covering sheet of the base model is 2.1 meters. The price of a greenhouse, depending on its size, is from 1,600 rubles.
How to make a greenhouse from arcs with your own hands?
If you still decide to build a greenhouse with your own hands and have finally decided on the choice of materials for the structure, then the first task for you is to correctly calculate the exact amount of necessary consumables.
To build a high-quality frame and cover it with special material, you must have the following tools:
- roulette;
- building level;
- hammer and nails;
- self-tapping screws, bolts;
- scissors for plastic pipes;
- sharp knife;
- pencil or marker.
How to calculate the arc length for a greenhouse?
The first step in designing your greenhouse is to calculate the arc length for the greenhouse. It is always calculated taking into account the depth of the pipes into the ground.
Example: to build a small frame, the length of the arc itself is 3 meters. To this indicator it is necessary to add at least 0.5 m for fastening and 0.5 m for deepening. Thus, the arc length for a small greenhouse is 4 meters.
Greenhouse base
The base of the greenhouse (wooden box) is installed on a level, sunny area. It is advisable to choose a place without strong air currents. Pay attention to the condition of the soil, its fertility and composition. If necessary, replace the existing soil with richer and more fertile soil.
Pre-measure the dimensions of the future base on the garden bed. To do this, you can schematically draw or mark the sides of the future structure.
If possible, it is better to choose larch or oak wood for the base. They hold up best over time.
A rectangular box, the height of which is 15 centimeters, is made from wooden boards using self-tapping screws and corners. It is recommended to coat it with an antiseptic first. This will help prevent rapid rotting of the base.
Step-by-step instructions for installing arches:
- Cut the required number of pipes of equal length.
- Dig special spikes opposite each other. The pipes are attached to parallel sides of the box. The distance between the arches must be at least 0.5 m.
- Place the pipes on the pegs.
How much does 1 meter of profile pipe cost?
Profile pipe
price per
meter
from 28 rub.
Interesting materials:
How to register in an apartment for social rent? How to register in a municipal apartment with your husband? How can the owner register in a new apartment? How easy is it to sell an apartment? How to conduct a transaction to sell an apartment? How to conduct an apartment purchase transaction? How is the transaction for the sale of an apartment carried out? How to pay for an apartment when purchasing? How to calculate the state duty for inheriting an apartment? How to calculate property deduction when buying an apartment?