Unlike stationary greenhouses, greenhouses can be mobile and have more modest dimensions. They are not used throughout the year, but only from spring to autumn. In winter, greenhouses are not used due to the lack of a heating system.
There are many types of greenhouse designs, each of which has its own advantages and disadvantages.
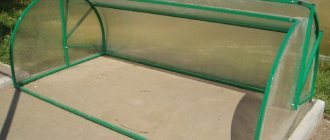
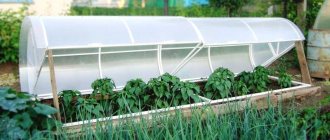
One of the most popular designs is the breadbox greenhouse. This option is compact in size, easy to maintain and not particularly difficult to manufacture. There will be no problem in assembling it with your own hands.
Actually, “Breadboxes” have become very popular among summer residents because they can be easily made. And most importantly - inexpensive.
Using high-quality materials, you can build a fairly reliable and durable structure, which, with proper care, will last for many years, or even decades.
Advantages and disadvantages of the “breadbox” greenhouse + description
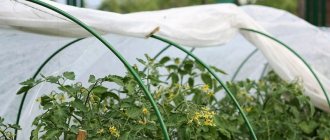
The “breadbox” consists of a light rectangular frame, sides and a roof (one or two doors). A favorable microclimate is created thanks to the arched shape. The size of the arches or its halves with two doors is made such that they do not interfere with each other and join at an angle of 90 ° C. They are opened using a special hinge mechanism.
Advantages of a greenhouse:
- the interior space is completely working;
- installation - simple;
- ventilation - especially convenient with 2 doors;
- size - allows you not to step on the beds;
- weight – small;
- moving is easy, even after installation;
- disassembly for the winter - not required;
- repair is not difficult;
- service life - long;
- cleaning - attach the brush to the top of the frame, the non-opening side, will occur automatically;
- the price is reasonable.
In addition to the many advantages of a greenhouse, it also has disadvantages:
- Tall and climbing plants should not be planted;
- the mechanism needs to be lubricated regularly;
- in the place where the valves move, if the quality of the material is poor, it wears out quickly.
Design Features
The arched structure consists of three parts: the right half, the left half, and the foundation. The hinged elements of the greenhouse ensure that the flaps move up and down, which allows you to regulate the microclimate inside the greenhouse . There are design options: with the opening of one part, or both doors at once.
Summer residents often use a design option with one-sided opening of the entire sash upwards. The hinges in this case are installed on the lower frame on one side. To fix the frame, use a wooden beam with a cut at the end cut.
Operating principle of the model
The action of the greenhouse is similar to the movement of the semicircular lid of the breadbox , from which this type of construction gets its name. The rotation axis of the upper part is located in the end vertical pipe. The sides are tightly closed.
The greenhouse covering material is polycarbonate or film . To open the greenhouse, lift up the rotating part.
The frame is made of hollow polyethylene or metal profile pipes. Cut polycarbonate is inserted into the finished frame or the film is stretched. The material is changed as it wears out.
Advantages and disadvantages
According to gardeners, the “Breadbox” greenhouse has the following advantages:
- possibility of making it yourself;
- simple installation;
- long service life due to the interchangeability of covering material;
- convenient use for growing any crops except climbing ones;
- maintainability;
- light weight;
- affordable price - average in the Russian Federation from 3800 to 8000 rubles.
The disadvantages of the “Breadbox” design are noted:
- the need to regularly check and lubricate the hinges;
- periodically the hinges jam, a creaking sound is heard when opening;
- For transportation, freight transport is required (flatbed, without an awning);
- strong gusts of wind when the sash is open can dislodge the greenhouse or tear it out of the ground;
- A large greenhouse is installed by 2-3 people - the installation cannot be completed alone.
Place for a greenhouse “breadbox”
To build a “bread bin,” you must first decide on a location.
This is an important point, because The amount of harvest obtained depends on it.
Recommendations for distance to other buildings:
- buildings - at least 5 m;
- bathhouse, sauna, summer shower - from 8 m;
- autonomous sewerage (septic tank) - 25 m.
The site for the greenhouse must be leveled - checked with a building level. The building must be positioned in relation to the cardinal directions so that the plants receive maximum sunlight throughout the day.
Usually placed from east to west, in this case the plants receive more heat before noon, and this is beneficial for photosynthesis.
When ventilating, it is better to open the windows on the south side.
Bushes and trees should be located at a distance so that the falling shadow does not obscure the light.
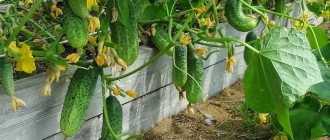
Plants that can be grown in breadbox greenhouses
The following people feel most comfortable in such a greenhouse:
- any types of greens - lettuce, green onions, dill, parsley, etc.;
- low crops - carrots, beets and others;
- garden strawberry (this is the correct name of the plant we all know as strawberry);
- tomatoes are low-growing or they are transplanted as they grow, .
Heating can be installed, then crops can be grown and harvested in cold weather.
Photo
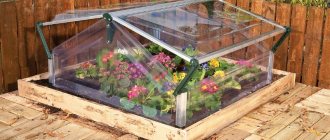
In the Khlebnitsa greenhouse, seedlings and low-growing fruit plants are grown. Watering, fertilizing, soil cultivation and weeding are carried out with the sash open.
Before starting work, calculate the costs of the material, evaluate your capabilities and skills. Perhaps the price of a greenhouse in a store will not be higher than the cost of materials for a homemade greenhouse.
Characteristics and dimensions of the “breadbox” greenhouse
The “bread box” does not have strict dimensions - we select it so that it is convenient to open the doors.
Classic:
- length - 2 m minimum, 4 m maximum, otherwise mechanisms will be required to lift the roof;
- height - 0.5-1.3 m, we select it according to your height: if it is low, it will be inconvenient to maintain, if it is high, the weight of the structure becomes greater;
- the width is such that it is convenient to reach the opposite side: 1.3 m - one leaf, 2 m - two.
The shape is an arched frame, most often made from a profile pipe. Polycarbonate is usually used for covering. It is stronger than film and bends well, protects from ultraviolet rays, and retains heat better. Service life - 10 seasons. Film is used less often, because it is more difficult to secure and needs to be replaced every 1-2 years. The center of the turning line of the valves is located on the lower base or at the end of the vertical column (in the middle).
Drawings of a greenhouse “breadbox”
They begin the independent construction of a “bread bin” by preparing a drawing with dimensions.
We offer you several options: by clicking on the picture, you can enlarge it, and by right-clicking you can save it and print it later. At the top is a greenhouse of one and two sections. Below there are three sections.
A more detailed drawing for a greenhouse measuring 4 by 1.5 m
You can click on the drawing to enlarge it.
It is not necessary to make legs.
Choosing material for a “breadbox” greenhouse
Supporting elements are made from the following materials:
- metal pipes - the best option is 1.5-3 mm thick;
- polypropylene - choose the correct diameter: thin ones do not give rigidity, and thick ones are difficult to bend;
- wooden blocks - the resulting structure will be heavy, bulky, and will need to be constantly maintained.
It is necessary to purchase additional tools for construction, the set of which determines the frame material:
- metal - hacksaw, welding machine, etc.;
- wood - saw, screwdriver, etc.
Choose a covering material - thick PVC film, spunbond (or other covering material) or polycarbonate. Purchase additional materials: hinges, bolts, nuts, self-tapping screws (with thermal washers for polycarbonate).
Detailed step-by-step instructions on how to make a polycarbonate breadbox greenhouse with your own hands
After a location has been chosen, a drawing has been selected, the necessary materials have been determined, costs have been calculated, and construction of the greenhouse begins.
So, suppose we want to make a “breadbox” greenhouse that opens on one side, with a length of 4 m, a width of 1 m, and a height of 0.5 m.
Materials
- Profile pipes 20*20*1.5: 2 pcs. 4 m long, 2 pcs. – 1.6 m, 3 pcs. – 3.96 m, 8 pcs. - 1m;
- 2 sheets of polycarbonate 2.1 * 6 m (6-8 mm thickness);
- Materials for the foundation (depending on the selected type, see below);
- 2 hinges, self-tapping screws, bolts, nuts, self-tapping screws with thermal washers for fastening;
- Metal paint.
Tools
- hacksaw for metal;
- grinder or jigsaw;
- drill;
- a screwdriver or screwdriver for screwing in self-tapping screws;
- welding machine.
Foundation
To build the foundation you will need timber, sleepers, bricks and concrete.
Step by step steps:
| Process | Illustration |
| Dig a trench 20-30 cm wide and 30-40 cm deep. | |
| Make a pillow 10-15 cm high from crushed stone and sand. | |
| Next, you need to lay bricks using mortar around the perimeter or make formwork. | |
| Pour the concrete and wait until it dries completely. Remove boards. |
Please note that the size of the lower frame of the greenhouse must exactly match the dimensions of the foundation, so do everything according to the drawing.
You can also build a foundation out of wood. In this case, it can be easily dismantled and moved to another place on your site.
With the first method, as you yourself understand, this will not work. So, for such a foundation you need 150*150 bars, we lay them around the perimeter of the future greenhouse, deepening them into the ground by 5-10 cm, or placing them on recessed bricks. We fasten with corners and bolts.
On a note! You can naturally heat the greenhouse by filling it with organic matter on both sides (mown grass, dry leaves, manure).
Frame
Briefly:
We mount the arches, reinforce them with guides, and connect them with bolts. The distance between the arches is a maximum of 0.5 m. We position the long side so that it faces south. We drill holes for fasteners at a distance of 0.1 cm from the edge. We weld the bottom frame, then attach the side frames to it. We clean the seams thoroughly. We make holes for the hinges on the outside.
More detailed step-by-step instructions:
- You will need two 1 m long arcs for the moving part of the greenhouse and 2 1.6 m long arcs for the side parts of the frame. We bend them from profile pipes using a pipe bender. The diameter of the circle is 1 m. We mark the middle on the side parts with a marker.
- We assemble the lower frame from two pipes 3.96 m long and two-meter parts, welding them together at the corners. Don't forget to clean the seams.
- Then, using a welding machine, we weld the side parts to the lower frame.
- Then we fix the end posts in the middle of the side and bottom elements.
- The holes for the hinges should be on the outside. We weld a 3.96 m pipe blank to the marked middle of the sidewalls.
Installation
Comparing the frame and foundation. If they match, tighten and attach with self-tapping screws or pins at several points. In a wooden structure, additional bolting must be done to strengthen the connection and extend the service life.
Polycarbonate fastening
First cut the polycarbonate with a sharp knife, jigsaw or grinder.
You need 4 parts for the sides, 1 part for the blind and 1 part for the moving sash. We fasten the material to the frame with self-tapping screws and thermal washers.
We carefully place each part on the frame and fix it with self-tapping screws, first in the corners and then in the middle. We overlap the sheets.
We glue the joints with construction tape for tightness.
The roof is a moving part on hinges. We hang it up and check for proper movement.
Making a “breadbox” yourself is not that difficult, but you can also buy a ready-made structure and assemble it according to the instructions. The price will not differ much from the homemade version.
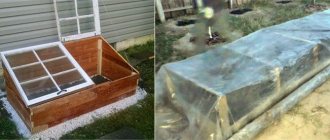
Greenhouse made from old window frames
Another good, durable and inexpensive material for making greenhouses with your own hands is old window frames. Moreover, both wooden frames and PVC are suitable.
Window frames weigh a lot, so it’s impossible to do without a reliable foundation. Which one to choose - you need to decide for yourself, but we, in turn, described the 4 most popular types of foundation in the corresponding section of the article.
In addition to the foundation, you need to take care of reliable drainage - if water stagnates in the greenhouse, this will lead to increased humidity, which will cause the frames to begin to rot. Fortunately, the task is not difficult to cope with. It is enough to dig a pit about 25-30 cm deep inside the foundation (one bayonet of a shovel), then fill it with crushed stone and sand on top, compacting it thoroughly. With this approach, the water will not stagnate, the soil will absorb as much moisture as it needs, after which the excess will go down.
A beam with a slightly larger cross-section than the thickness of the frames is laid on the foundation and securely fixed to it. Windows are already attached to it. The easiest way to do this is with short and thick self-tapping screws. It is advisable to direct the window vents inward - then they will be easy to open to ventilate the greenhouse.
When all the windows around the perimeter are installed, all that remains is to work on the roof. It can also be made from old windows. Whether the roof will have a pitched roof or a gable roof must be decided by the master himself.
Video
The best purchased greenhouse projects “breadbox”
- “Breadbox” - made of cellular polycarbonate and galvanized profile (20x20 mm). Dimensions 2x1.2x0.8 m, the gap between the arcs is 1 m, the top has a double-sided opening. Price — 5440 rub. Assembly service – 2500 rub. The base is made of timber treated with an antiseptic – 2000 rubles.
- The snail (shell) is a convenient design with a hinged lid (one flap) made of a square profile pipe. Dimensions 2.1 x 1.1 x 0.75 m. Easy to assemble. Convenient transport sizes. Cost - 5700 rub. There are options with two doors.
A purchased greenhouse sometimes has additional features: legs that allow you to go deeper into the ground or borders that add protection to the plants.
Adviсe
If the markings are made incorrectly, the coating will be unreliable, leaving gaps for drafts. For production you will need four parts for the side part of the base and two parts for the moving parts. You need to make and secure the coating using self-tapping screws; rubber washers are also used for reliability.
The “Breadbox” greenhouse has a number of positive qualities that allow it to be in trend, for example, it is convenient and easy to grow seedlings in it. Such an object is a huge success among summer residents due to its compactness, reliability and low cost.
To learn how to build a greenhouse with your own hands, see the following video.
Differences between a “breadbox” and a “butterfly” greenhouse, which is better
Sometimes a “breadbox” is compared to a “butterfly”. They are similar, the main difference is that the doors of the latter open along a horizontal axis, resembling the wings of an insect. In addition, it is more difficult to assemble, it has more weight, and the sashes require supports when opening.
Greenhouse "butterfly"
The cost is higher - 6300-10982 rubles. There are various reviews about it, some of them are a terrible greenhouse, so the “butterfly” is less often installed on sites.
The “breadbox” model is easy to assemble and install, performs its functions well, and is not inferior in efficiency to similar greenhouses.
Our own factory allows us to carefully control the production process. This is the largest specialized enterprise in the Volga region. Currently, its products are well known throughout Russia. The current range includes several dozen greenhouse models with different characteristics. Design features of greenhouses from this manufacturer:
- arched reinforced structures;
- load-bearing frame made of pipes with a polymer anti-corrosion coating;
- fittings and fasteners as standard;
- reliable welded connections;
- polycarbonate plates with an outer protective layer against UV radiation.
has been presenting its products on the Russian market since 1998. To extend the durability of the frame, powder coating is used. It is possible to make significant changes to the design upon individual order. Comprehensive guarantees are provided for the greenhouse, equipment, and installation work.
Agrosfera has been producing greenhouses and greenhouses since 1994. A significant modernization of production was made in 2010. After being equipped with modern Italian equipment, it was possible to reduce overhead costs and improve quality. Currently, the company offers only one design in the “Breadbox” category.
Related article:
Greenhouse Butterfly. The device, design and operation features, comparison with the Bread Box, diagrams and recommendations for DIY construction, reviews from summer residents about the practice of using a greenhouse are in our publication.
Bread bin + warm bed
The “breadbox” greenhouse is a good helper, but its qualities can be improved. One option is to use the warm bed method, which will allow you to harvest even earlier and enhance the taste of the crop.
Procedure:
- Before assembly, dig a hole measuring 50*70 cm.
- Along its border we lay out a base made of suitable materials that do not allow the edges to crumble.
- We put cardboard on the bottom, this will protect against weeds and pests. You can add leaves, plant remains, and manure. You cannot use uprooted weeds, especially perennial ones.
- We fill the top with soil.
- We begin assembling the “bread box”.
A properly assembled greenhouse will allow you to retain heat, which will be released by the compost during rotting, which will allow the seedlings to feel comfortable.
Drawing
When drawing up a design drawing, in the case of making a greenhouse yourself, you need to take into account the width of the polycarbonate. Usually it is 2.1 meters. The length of polycarbonate sheets can be 3.6-12 meters. The dimensions of the frame should be calculated so that the material consumption is economical and there is not a lot of waste left. For a small “Breadbox” greenhouse, one three- or six-meter sheet may be enough.
It is also important at the stage of drawing up the drawing to observe the dimensions of the semi-arcs. Retractable door frames should not have a large variation in size. Otherwise, when the greenhouse is closed, there will be a gap between them, which allows for the appearance of a draft, from which the plants may die.