Useful tips
Many summer residents are trying to create drip irrigation, so they are trying to learn more about it, because, having installed such irrigation, you can leave the entire system almost unattended.
The main advantage of drip irrigation is that it works autonomously, and you do not need to stand with a hose or walk with a bucket filled with water to water the seedlings.
However, it is worth noting that ready-made drip irrigation, which is powered by a water supply system, is very expensive.
A good and inexpensive alternative to ready-made irrigation is drip irrigation from a plastic bottle. This option cannot be called completely autonomous, since you will have to add liquid to the bottles.
The benefits of drip irrigation
With all this, the creator of such irrigation will still have time for other activities.
Several important advantages of drip irrigation:
1. No need to purchase material - everyone has plastic bottles.
2. This type of watering is easy to make, even for inexperienced summer residents.
3. Drip irrigation saves time and effort.
4. This watering system is easy to use - just go to the bottle and add liquid.
5. The root system develops due to the fact that all moisture goes under the top layer of soil, thereby feeding only the roots, without spilling over unnecessary territory. It also strengthens the roots of the plants.
6. Water consumption is significantly less and swamps do not form.
7. The excess surface remains dry, which means there are no conditions for weed growth.
Principle of operation
The basic principle of operation of the device is to ensure a constant supply of water to the soil to supply the root system of the plant with a sufficient amount of moisture available to it. Thanks to the device, water flows literally drop by drop, but evenly and with a certain frequency. It is worth noting the fact that watering in this way allows you to supply water not only to the soil, but also to the surface. The flow of water directly into the soil is ensured using a dripper. If it is necessary to moisten the soil surface, the system is supplemented with drip tapes. The drip irrigation method allows you to use water more efficiently, reducing its consumption.
Simple DIY drip irrigation
As already mentioned, this type of watering not only costs almost nothing, but it is also very simple to do.
1. Prepare several plastic bottles and make holes in the bottom of each of them through which water will leak.
* The volume of the bottle depends on the area of the site. The minimum volume is 1.5 liters.
2. Bury the bottles in the ground at a distance of 1 meter from each other.
3. Now simply fill the bottles with water.
* The speed of watering directly depends on the diameter of the holes in the bottles.
* Experts advise making sure that water flows into the ground slowly.
* If desired, you can dilute compost tea in water - it is believed that the water will become more beneficial.
How much is enough?
Since not everyone has the opportunity to spend a lot of time at the dacha, it is better to opt for large-volume containers. This will make it possible to leave the garden plot for longer and not be afraid that the bushes will die.
The amount of watering depends on the following factors:
- soil type;
- frequency of visiting the garden plot;
- weather conditions.
When planning how long it will take to water from a 5-liter bottle, you should consider some points:
If the crop grows in an open area and there is no heat outside, then 4 liters will be enough during the growing season. in Week.- During the appearance of ovaries and at the beginning of flowering, the need for water increases to 6 liters. in Week.
- When it’s hot, watering will require about 10 liters of water every 3 days.
- Water consumption in greenhouses usually increases due to its evaporation.
Based on the experience of summer residents, we can conclude that a 5-liter bottle for watering a greenhouse lasts on average for 3 days, and for open ground – for 5-6 days.
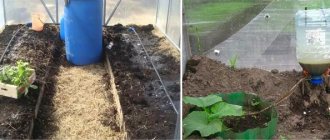
Do-it-yourself watering system for a summer residence
You will need:
- 2 liter plastic bottles
- screwdriver
- stationery knife.
1. Take a utility knife and make 2 cuts at the base and 2 more cuts in the middle of the plastic bottle.
2. Using a screwdriver or awl, make 2 holes at the bottom of the bottle.
3. Check how much water flows from the bottle. Ideally it should drip.
4. Make a small hole in the ground to place the bottle in.
5. Pour water into the bottle.
Advantages and disadvantages
Advantages:
does not require much effort in operation, and the technology for manufacturing the system does not require special skills and knowledge;- saves money (available materials are used for production);
- allows you to reduce water supply fees;
- the water entering through the bottles evenly saturates the soil and maximally saturates the roots of the plants;
- rapid heating of bottled water creates comfortable conditions for most plants;
- The system is not labor-intensive to install or reinstall.
Flaws:
- such a system is not suitable for watering a large area, since it is not rational;
- drip irrigation cannot completely replace traditional watering (the system is used as a temporary measure for moistening);
- When using such irrigation in loams, the system quickly fails due to clogging.
There are some disadvantages to this method. Drip systems become clogged quickly, requiring frequent cleaning. This can be avoided by equipping plastic bottles with drainage. These can be nylon tights, which do not rot and allow liquid to pass through well.
How to do watering yourself
You will need:
— 1.5 liter plastic bottle
- screwdriver or awl
— FUM tape
- clamp.
1. Using an awl, make holes in the side of the bottle. To make the process easier, heat the awl - it will penetrate the bottle more easily.
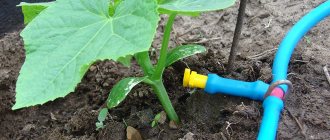
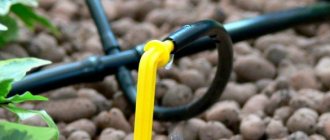
2. Insert the watering hose into the bottle. However, you should first wrap the end of the hose with FUM tape, thereby ensuring a tight connection between the bottle and the hose.
3. Use a clamp to tighten the neck of the sprinkler structure.
* You can also create vertical irrigation. You will need a small stake inserted into the ground. Attach the hose to this post.
4. You can improve the design using regular plastic handles. Use a 3 liter plastic bottle. Make holes in it slightly smaller than the diameter of the pen. Take the handles apart and insert the top half of each handle into the holes.
If necessary, seal the structure with FUM tape.
Make a hole in the lid and insert the hose adapter into it. It is advisable to treat this adapter with silicone glue to make it more airtight. This design will provide water to a large area of your garden and/or vegetable garden.
Where can it be used?
Drip irrigation from 5-liter bottles is suitable for irrigation:
- beds;
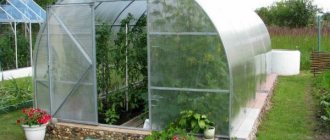
- greenhouses;
- on the windowsills of indoor plants and seedlings;
- bushes;
- trees.
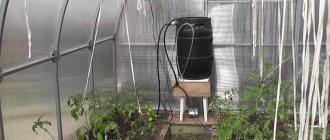
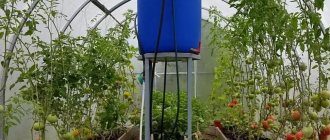
It found its greatest application in greenhouses. Since the temperature is higher there compared to outside, plants absorb more water.
In addition, generally for crops growing in greenhouses, watering with warm water, which bottles can provide, is important. If the crop takes a lot of water, then it is better to use 5 liter bottles. For your information, a 5-liter bottle can be used to water 4 plants at once.
DIY drip irrigation from plastic bottles
This type of drip irrigation is best suited for plants with a small root system. It will not be able to feed long roots, but is great for watering shallow roots.
You will need:
– plastic bottle with cap (1.5 – 2 l)
- an awl, a small nail with a hammer or a screwdriver
- stationery knife or scissors.
1. Make several holes in the cap of a plastic bottle. This can be done using an awl or a screwdriver. It is advisable to preheat the instrument.
2. Make a small hole next to the plants. It should be deep enough to insert 1/3 of a plastic bottle with a volume of 1.5-2 liters.
3. Using a utility knife or scissors, cut the bottom of the bottle.
4. Insert the bottle into the hole, neck down. Use earth to secure the bottle in place. Place some rocks around the bottle to keep soil out.
5. Fill the bottle with water.
Make several more similar designs for the remaining plants.
Reviews
It is best to fertilize plants using drip irrigation using water-soluble formulations that do not contain small particles. Otherwise you will have to clean the system.
Anton, 63 years old, Bugulma
When installing drip irrigation, it is best to connect a programmable automatic timer to the main water supply, which connects the necessary drip tapes to the irrigation at the appointed time.
Vladimir, 34 years old Essentuki
I have been using bottled drip irrigation on cucumber beds for several years now. For three days of my absence I need to fill a 5 liter jar of water. The soil under the cucumbers does not dry out during these three days. I place the jars bottom down. Each jar has 4 holes.
Antonina, 49 years old, Zarechny
Natalia
Author
Ask a Question
Each of the drip irrigation options, be it complex automated systems or simple cut bottles, simplifies plant care, facilitates the work of gardeners, and significantly increases yields. All components of watering systems, if cleaned, washed and stored in places inaccessible to rodents, will serve gardeners next year, again making their work easier and reducing material costs. Health to you and your loved ones!
Do-it-yourself drip irrigation for your dacha
You will need:
- plastic bottle with cap
- stationery knife or scissors
- an awl, a screwdriver or a small nail with a hammer
- thin fabric (cotton) or old nylon tights (to create a filter).
A fabric filter is needed to prevent soil particles or small debris from clogging the irrigation system.
The size of the bottle depends on the size of the plant for which watering is being prepared. For example, for one plant, a small bottle with one hole on one side is sufficient.
1. Make holes over the entire area of the plastic bottle. In this case, leave a little more than 2 cm to the bottom of the bottle. There is also no need to make holes in the lid. A 2 liter bottle should contain about 10 holes.
2. Make a hole next to the plant. Its size should be equal to the size of the bottle.
3. Bury the bottle, leaving its neck on the surface.
4. Attach a nylon stocking to the neck.
* The bottle can be closed with a lid, or left without a lid. The only difference is the rate of evaporation of water from the container.
Now just add water to the bottle when needed.
What can be replaced?
If you don’t have the time or desire to make drip irrigation yourself from plastic containers, you can purchase a ready-made design . There are many devices on the market with a wide range of price categories, ranging from budget options to advanced models with auto-watering functions.
There are several ways of complete drip irrigation:
- Designs with droppers . This is the most popular type among summer residents. It is commonly used to irrigate greenhouses and small crops.
- Device with micro-sprinklers . This option is suitable for any garden. Equipped with modular kits that are easily expandable. Can be used for watering home flowers in pots and cache-pots.
- A sprinkler system creates fog. This option is used for watering large areas and lawns.
Do-it-yourself hanging drip irrigation from bottles
This type of watering is more suitable for short plants, including cucumbers or herbs. To make it, you need to make a frame in the shape of the letter P or G.
1. Bury the posts into the ground at both edges of the garden and attach a long stick to them, which should be parallel to the bed. The height should be such that the neck of the suspended bottle is about 50 cm from the ground.
* Bottle length - no more than 40 cm.
*The number of plastic bottles depends on the number of plants.
2. Using an awl or screwdriver, make several holes in the bottom of the bottle. Also make holes in the lid (their number depends on how much you want to water the plant).
3. Cut off the bottom of the plastic bottle, and next to the cut edges, make holes through which you need to insert a wire or strong rope and hang it upside down from the frame.
* Drops of water from the bottle should not fall directly on the plant, but between neighboring bushes.
* Now all that remains is to add water as needed.
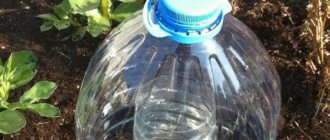
The simplest device
Do you urgently need to leave for a day or two, but it’s very hot outside? You can make a simple design for cucumbers, which will only take a few minutes!
Take the bottle (the size is not important), without untwisting it, make a few holes in it on the side wall. Now go to the garden bed, fill the containers with water and place them between the rows, closer to the plants. Make sure the holes are directed towards the roots. You can safely go about your business, the bushes will receive the necessary amount of moisture.
Such a device will not last long, so when you return home, first of all go to the garden bed and replenish the water supply and give a good, abundant watering. Of course, I admit that all designs made from plastic bottles are imperfect, and you should not rely on them completely. But as a temporary replacement for good moisture from a hose and watering can, drip irrigation is quite suitable.
It turns out that you can make a simple structure yourself that will save plants, right? Considering that you don't have to spend a penny, this is a really great option! I advise you to watch this interesting video; it will definitely come in handy if you decide to undertake such a fascinating experiment. Today I say goodbye, but not for long! All the best!
home
We recommend reading