How to create a greenhouse with your own hands? A properly planned and constructed mini-greenhouse will allow you to grow seedlings on time, create conditions for planting a future rich and healthy harvest, and there is no desire to spend a lot of money on buying a ready-made option, especially now when there is a crisis in the country. In this article we will tell you how to make a greenhouse from polypropylene pipes with your own hands, what materials you will need, and give step-by-step instructions.
Polypropylene pipes as a material for a greenhouse: features, advantages and disadvantages
A greenhouse made of polypropylene pipes is an excellent solution for garden owners. As a frame material they have the following advantages:
- synthetic material that is flexible, durable and highly environmentally friendly at the same time;
- the service life of the manufactured greenhouse will be on average 30-35 years;
- polypropylene structures are not exposed to moisture and can easily withstand any temperature conditions, which makes them a universal material for a greenhouse in any region of the country;
- low construction costs;
- due to their synthetic nature, the pipes are light in weight, which greatly simplifies delivery and installation work;
- affordable price;
- polypropylene has increased wear resistance compared to the same wooden structures.
Another advantage is the wide selection of pipes of various diameters from 20 mm to 1200 mm.
According to experts, the only disadvantages include the need to use a welding machine for installation work and additionally buy fitting connecting parts.
PVC pipes and methods of connecting them
PVC pipes are designed for installation of cold water supply systems and can be operated at temperatures up to +65 degrees. Thanks to the flexibility and wide variety of connecting elements, it is easy to assemble a greenhouse of any configuration from them.
For greenhouses, PVC pipes with a diameter of 20 to 32 mm are used; they provide the necessary rigidity of the frame. Standard pipe lengths can be 1, 2, 3 or 6 meters.
PVC pipes
There are several ways to connect PVC pipes for a greenhouse:
- using clamps, ties;
- on furniture bolts using pre-drilled holes;
- on glue.
When connecting pipes with clamps or bolts, the greenhouse can be completely disassembled and moved to another location, ensuring crop rotation. Film greenhouses and greenhouses are often installed this way. The film is usually removed for the winter to avoid damage by snow and wind, and the frame is dismantled at the same time.
One of the ways to attach PVC pipes
The adhesive connection is permanent, but more durable. It is recommended to be used for greenhouses installed on a foundation and left for the winter. Such greenhouses are usually covered with polycarbonate - it lasts at least 5-7 years and does not require annual replacement.
Connecting elements for PVC pipes used during greenhouse installation:
- corners allow for fastening mutually perpendicular elements;
- tees - connect three pipes in one plane or at an angle (single-plane tees can have an angle of 45, 66 and 90 degrees);
- crosspieces , for connecting four pipe elements.
Fittings for PVC pipes
The number and type of fittings used depend on the design of the greenhouse, as well as the type of connections chosen.
Prices for PVC pipes
pvc pipes
The procedure for connecting pipes and fittings with glue
The connection is made using Tangit PVC-U glue or its equivalent. This glue provides strong fastening of parts and hardens quickly, so installation will not take much time.
Tangit PVC Kleber
Prices for Tangit PVC Kleber
Tangit PVC Kleber
Sequencing.
- Cut the pipe to the required length using a cutter, hacksaw or construction scissors. Check the compatibility of the pipe and fitting: the pipe should fit into it 2/3 of the length of the socket.
- Clean the edges from burrs and use a knife to chamfer the end.
- Degrease the surfaces to be joined with any solvent. Apply glue to both surfaces to be glued: the pipe and the inner surface of the fitting.
- Insert the pipe into the fitting strictly along its axis to 2/3 of the depth until it stops, then turn 90 degrees inside the fitting so that the glue is evenly distributed.
- Fix them in this position for 15-30 seconds, then wait another 1-2 minutes until complete gluing.
Procedure for gluing pipes
The procedure for connecting pipes with bolts
Furniture bolts with a diameter of M6 or M8 are chosen as fasteners, depending on the diameter of the pipes. The length must be sufficient to connect two pipes.
Furniture tie bolt
Sequencing.
- Before installation, places in the pipes are marked for drilling holes.
- Drill through holes with a drill 2 mm larger than the diameter of the bolts.
- Connect the pipes by matching the holes. Insert and tighten the bolts.
Diagram of drilling holes using a simple wooden jig
Holes can also be drilled in place, with the pipe temporarily secured to a wire tie or secured in another way.
Types of greenhouse designs made of polypropylene pipes
Polypropylene pipes have received well-deserved recognition among gardeners due to their flexibility, strength and relatively low cost.
Before building a mini-greenhouse, you need to choose the type of structure. Let's consider the most popular types of structures made of polypropylene pipes.
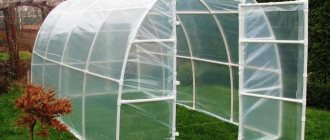
Arched
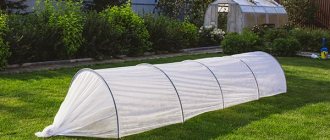
The simplest is a ground greenhouse. Even a woman can cope with its bookmark. To arrange the arrangement, choose a place for future seedlings, prepare a bed and place polypropylene pipes at the same distance from each other, bending them in the form of arches.
Cover the structure from above with either film or agro-fabric, sprinkling the edges of the covering material with the same soil. Such a greenhouse is periodically opened, ventilated and all necessary work is carried out.
Box type
In second place in terms of ease of installation and assembly is the film “box”. This greenhouse is suitable for beginner gardeners. To arrange it, you do not need to make complex drawings and spend a lot of effort.
Thanks to the square shape of this design, so many seedlings can be grown on 1 sq.m of land that the quantity will be enough to plant 200 sq.m of land in the future. The disadvantages of this type, experts include poor lighting inside and rapid depletion of the soil.
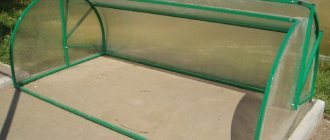
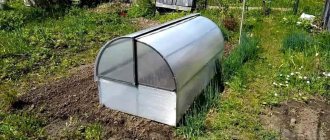
"Breadbox"
The most optimal type of structure for obtaining a good and rich harvest is a “bread box”. The advantage of this greenhouse is that it can be made portable, seedlings can be sown in it immediately after the snow melts, without waiting for warm weather, and not only seedlings can be grown, but also larger crops. The “breadbox” can also be installed on the ground, or a wooden or other frame can be made under it. It is easy to open, ventilate, and care for.
"Butterfly"
The most difficult in terms of installation work is the “butterfly” greenhouse. This greenhouse has “wings” that are opened in warm weather for better lighting and rapid growth of seedlings. It can also be portable or installed directly on the ground, and will last for more than one season.
Gable
The design of the house is familiar to everyone, which can be absolutely any size convenient for you, and also have opening doors and sashes.
Wall-mounted
The most economical greenhouse option. It is ideal for small areas where there is no space to build a full structure. It can be built against the wall of a barn, a house, or even against a fence, the main thing is to choose a fairly bright place.
Sphere
The most difficult type. Greenhouses, as a rule, are not made like this. Here it comes to greenhouses. Making such a greenhouse is not easy, since the design requires special calculations where there is no room for error. But the sphere will become a worthy decoration of the site.
Useful tips and tricks
Before installing the frame, you should carefully study the diagram in order to assemble the structure as accurately as possible.
The site must be prepared. Earth should be added to the depressions and hills should be cut off.
The level should be checked at each stage.
Before lining the greenhouse with polycarbonate, it should be kept in a dry room for a day.
Polycarbonate sheets are laid with a protective film on the outside. It is removed upon completion of installation work.
How to choose a location for a greenhouse
When choosing a place to build a greenhouse, you need to give yourself answers to a number of questions
- Which place has the most light?
- Where should you expect strong gusts of wind?
- What kind of soil is on the site?
- Are there plans for additional communications to the greenhouse?
After analyzing the answers, it will become very clear to you which place on the site will be ideal for the future greenhouse.
Please note that experts recommend placing the greenhouse from east to west; it is in such beds that plants will have enough light for normal growth and development.
Diagram of the most favorable location of the greenhouse relative to the cardinal directions
What materials and tools are needed
To make a standard greenhouse, you need to prepare the following materials:
- five-meter boards with a section of 2x6 cm - 4 pieces;
- boards with a section of 2x6 cm, length 3.7 m - 2 pieces;
- PVC pipes 6 m long—19 pieces;
- fittings 3 meters long (Ø10 mm) – 9 pieces;
- PVC film (thickness 6 mm) – 6x15.24 meters;
- wooden slats (length 1.22 m) - 50 pieces;
- nails or screws;
- metal fastenings;
- door hinges - 4 pieces;
- door handles - 2 pieces.
Materials for the ends of the greenhouse:
- timber 2x4 cm 3.7 m long for the frame;
- 11'8 3/4” - 2 beams 3.6 m long;
- 1'6” - 4 bars of 0.45 m each;
- 4'7” - 4 bars of 1.4 m each;
- 5'7” - 4 bars of 1.7 m each;
- 1'11 1/4” - 8 bars of 0.6 m each;
- 4'1/4” - 2 bars of 1.23 m each;
- 4 bars 1.5 m long;
- 4 bars 1.2 m long.
Required tools:
- hammer;
- Bulgarian;
- electric screwdriver;
- hacksaw for metal;
- electric saw;
- building level;
- roulette.
Selection of polypropylene pipes for a greenhouse
The choice of pipes directly depends on what specific design you choose. For arched greenhouses, it is better to choose pipes with a length of at least two meters and a diameter of 16 to 32 mm. For support posts of rectangular greenhouses, it is better to take more reliable ones with a diameter of 50 mm.
Important! If you plan to cover the greenhouse with film, and your area is not exposed to strong winds, then 16 mm in diameter is quite enough. If you decide to use polycarbonate, then you need to buy pipes with a diameter of at least 50 mm.
Design dimensions
In most cases, two beds are placed in the greenhouse, which are separated by a path.
Beds in a greenhouse made of plastic pipes
The width of the beds is on average 0.9–1.1 m - this makes it possible to plant plants in two rows with the required spacing and provide unobstructed access to them.
The width of the path should be such that it is possible to move comfortably with a bucket and other dacha equipment, including a wheelbarrow.
Correct aisle width
The optimal width of the path is 0.7–0.8 m. In this case, the width of the structure will be 2.3–3 m.
The length of the product will depend on the needs and requirements for the location of the vegetables that are planned to be grown. Planting rates per 1 m2 can be seen in the table below:
| View | Number of roots per 1 m2 |
| cucumbers | 2–4 |
| Peppers | 4–6 |
| Tall tomatoes | 2–4 |
| Eggplant | 2–4 |
| Low-growing tomatoes | 4–6 |
| Pumpkins and zucchini | 1–2 |
Using the table you can determine the length of the building. Typically, structures with a length of 4–6 m are made, since it is impractical to install a greenhouse of smaller dimensions, and for buildings of greater length it will be necessary to use materials of increased strength. Construction technology will also differ.
It is important to know: if you plan to use polycarbonate as the material for covering the structure, then it is recommended to choose a length that is a multiple of the width of the sheets (2 m). In this case, you can avoid unnecessary pieces.
The height of the building should allow you to comfortably move around it. It is worth knowing that there should be at least 50 cm of free space above the plantings.
Correct greenhouse height
Warm air will accumulate in this place and air exchange will occur during the ventilation process. If you plan to grow low-growing vegetables, then a height of 1.9–2 m is sufficient. For tall crops, the minimum greenhouse height is 2.3–2.4 m.
The frame of the tube structure forms half a circle. The width of the product is the diameter of this parameter. If the diameter is known, then the radius can also be determined. The values allow you to calculate the length of the district. This can be done using the following formula:
L = 2πR = πD, where L is the circumference, R is the radius, and D is the diameter. The number π is 3.14.
For example, if you plan to make a greenhouse with a height of 200 cm, then with a correct arc the width should be 400 cm. In this case, the diameter of the circle is 400 cm and the radius is 200 cm.
Accordingly, the length of the district: L = 2 x 3.14 x 2000 = 12560 mm. Only half the circle is needed, so the length of the arc is calculated as follows: 12560 / 2 = 6280 mm.
The arc consists of 2 tubes and a cross, so the resulting value must be divided again: 6280 / 2 = 3140 mm. This will be the size of the pipe.
Next, you need to determine the shape of the structure.
Choosing a covering material for a greenhouse made of polypropylene pipes
We have decided on the pipes, but we will still focus on those whose diameter is 25 mm; they, in principle, are universal. There will be enough of them to build a fairly strong greenhouse. We suggest moving on to choosing a covering material. There are several types of it:
- Glass is a very heavy material that is not suitable for a greenhouse made of plastic pipes. Yes, it is often used in greenhouses, but polypropylene will not withstand it, especially since we are talking about a small structure - a greenhouse. In addition, glass is a very fragile and impractical coating.
- Polycarbonate is the most popular material today. It is easy to install, lightweight and protected from UV rays, retains heat well and transmits light. But it is suitable for a greenhouse only if the design provides for ventilation, otherwise the plants will be too hot there.
- Polyethylene film is the most affordable material. It requires virtually no installation effort; just throw it on and secure the ends with something heavy on the sides of the structure. The only drawback is the fragility of the material, which, even with good care, is unlikely to last you a season. There is also reinforced film, it will last much longer, but its price is quite higher.
- Spunbond is fabric, it is easy to find in specialized stores. It has excellent characteristics for the conductivity of heat, light, oxygen, moisture and will be an ideal coating for your greenhouse, however, good spunbond is not cheap.
Some gardeners also use agrofibre, but do not confuse it with a covering material; the most it can do is protect seedlings during their adaptation.
Features of the material for manufacturing
Metal-plastic pipes are gaining increasing popularity among users who are in search of inexpensive, high-quality materials for the manufacture of greenhouses. Like any other materials, pipes have pros and cons that must be adequately assessed in order to optimize work on site.
Advantages and disadvantages
- The main advantages of plastic pipes:
- resistance to corrosion processes - unlike metal, plastic does not rust when exposed to moisture, maintaining its original appearance;
- low weight - the pipes are lightweight and durable, which is convenient during design and increases the mobility of the greenhouse if it needs to be moved from one part of the site;
- flexibility - the material is sufficiently flexible and easy to cut, allowing you to create simple and complex connections, giving the frame any shape without the use of special equipment;
- fire resistance - the material ignites quite a long time after direct contact with an open source of fire and immediately stops burning after it is eliminated;
- long service life - the service life of such a structure can be 50 years;
- ease of operation - to create a structure, you do not need special tools or additional processing of the material itself in the form of painting or impregnation with an antiseptic.
Did you know? The first creator of a real winter garden, built in the 13th century, Albert Mangus, was accused of black magic and burned at the stake, because people simply did not believe that it was possible to grow plants in winter without using witchcraft.
- Disadvantages of materials:
- decreased ductility at low temperatures;
- release of chlorine compounds during combustion;
- lightness of the structure - you need to take care of securing the building so that it does not tip over from a gust of wind.
Types of greenhouses made of plastic pipes
Depending on the shape, dimensions and purpose, greenhouses made of plastic pipes can be made in several versions:
- single-pitched - structures with a blank northern wall, usually built as extensions to residential or outbuildings, designed for a small number of plants;
- gable - an autonomous transparent greenhouse with an insulated northern vestibule, the dimensions are selected by the user depending on their capabilities, can be used for their own needs or in commercial activities;
- hangar — arched structure without racks inside, due to which the usable area is preserved, can be used on an industrial scale;
- block - the structure consists of several blocks connected by walls with arched or gable roofs, used for the production of a large number of products.
Designs are also distinguished by season:
- summer;
- year-round.
The first ones are simpler and do not require the installation of heating equipment. The latter are more difficult to implement, imply the possibility of climate control, but provide more benefits to users.
Schemes and drawings of a greenhouse made of polypropylene pipes
After you decide on the design of the required greenhouse, you need to prepare calculations and drawings for construction and purchasing consumables.
For any design, it is better to choose a well-lit area with the least airflow. Then you need to determine the area of the greenhouse and the types of crops that will be grown in it.
The optimal sizes are usually:
- width – 3 meters;
- length – from 4 to 6 meters;
- height – 2-2.5 meters.
Example drawings
Arched greenhouse 1.5 by 4 m
If a ground greenhouse is planned, then the recommended height is 80 cm and the width is 1.5 m. The distance between the posts should not exceed 1 m.
It is not recommended to build a mini-greenhouse more than 2-2.5 meters high. Due to the high altitude, the greenhouse effect is lost and the thermal insulation properties of the structure are reduced.
Drawing of an arched greenhouse
To improve the quality of lighting and ventilation for growing seedlings in large greenhouses, windows and doors are installed on each end side.
Profile drawing of a small arched greenhouse with door
When constructing metal-plastic frame models, many use reinforcing bars, which are installed around the perimeter every 45-50 cm, deepening them into the ground by 60-70 cm, which will give the structure stability when the wind increases.
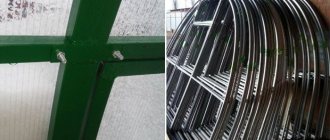
Assembly technology
The construction of the frame begins with the installation of vertical support pins - pieces of reinforcement 70 - 80 cm long. A minimum of 50 cm of this rod must be buried in the soil or reinforced in the foundation structure. A plastic pipe is put on the end of the reinforcement sticking out like a pin. This type of fastening has proven its strength and reliability; it can withstand strong winds, rain and snow. It is better if the fittings are reinforced and their diameter allows the pipe to fit tightly. The length of the stud should be at least 15 - 20 cm, then no additional fastenings with self-tapping screws are necessary.
Greenhouse assembly
After all the arches are installed, they need to be tied with stiffeners. First, the central top row is mounted, then the side parts are evenly secured. The arcs are placed at a distance of no more than one meter, and the horizontal stiffeners should have a pitch of 50 - 60 cm.
Doors and transoms are hung last, after covering the greenhouse with polycarbonate or film. The frame of the door or window is pre-equipped with hinges and locks, and also covered with film (covered with polycarbonate). Completely finished parts are hung from the ends.
Ready greenhouse
Brief instructions for building a greenhouse from polypropylene pipes
Let's look step by step at how to build a greenhouse from plastic pipes with your own hands.
First, prepare and level the place for the foundation:
- install pegs and stretch a rope between them;
- the slope is determined by level and, if necessary, re-leveling is carried out;
- pour a “cushion” for the foundation made of sand with a height of 5 to 10 cm.
Depending on the size of the future greenhouse, consumables are prepared:
- boards – 4 pcs. in length and 6 pcs. in width;
- pipes - with a diameter of 20 mm (3-4 pcs.) and 25 mm (9-10 pcs.);
- reinforcing pins – 18-25 pcs.;
- latch holders – 25-30 pcs.;
- wood screws No. 50 – 36-40 pcs;
- film, either agrofabric or polycarbonate;
- screwdriver;
- hammer;
- sledgehammer
After the greenhouse area is leveled and marked:
- boards or timber for the foundation are impregnated on site with an antiseptic;
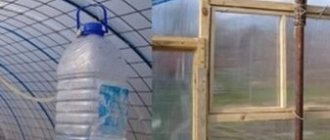
- dry; install them according to marks on a sand cushion and fasten them together; along the outside of the boards every 45-50 cm
- install latches for fittings;
- insert reinforcing pins into the holders, deepening them 40 cm into the ground and snap them into place.
When the foundation of the boards is ready, the installation of the frame begins. A 25 mm pipe is inserted into the first pair of reinforcing pins in an arcuate manner and secured with holders.
Do the same with all other arcs. Then a cross section is assembled from 20 mm sections, connecting them to the arches using latches or special clips. (further we will talk in more detail about the production of such a greenhouse)
After installing the frame, any material chosen for the greenhouse is fixed on top of it: film, spunbond, polycarbonate. The optimal choice, of course, is polycarbonate, since it perfectly transmits light inside to the plants and lasts 5 years, while the film cover must be dismantled every year. If the greenhouse is sheathed with polycarbonate sheets, thermal washers must be purchased to secure them.
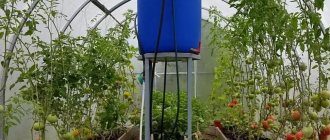
Some gardeners have no less success installing special supports for growing cucumbers made of polypropylene.
These trellises allow plants to grow upward rather than spread out over the beds, making harvesting much easier. In a similar way, you can build a greenhouse from PVC pipes with your own hands.
Types of greenhouses
The classification of greenhouses is quite complex: they can vary in shape, seasonality, presence and type of heating, frame and cover material used.
Variety of greenhouse designs made of plastic pipes
The simplest and most reliable designs are suitable for manufacturing from PVC pipes, including:
- wall greenhouse;
- gable , in the form of a house;
- polygonal , with a complex shape of slopes;
- arched , with a frame in the shape of a semicircle.
Types of greenhouses
Wall-mounted greenhouses are usually attached to the southern or southwestern wall of a house or other room. In this case, the wall plays the role of thermal mass: heating up during the day, it gives off heat at night, which reduces average daily temperature fluctuations and also protects from cold northern winds.
Wall greenhouse
In wall-mounted greenhouses, a microclimate favorable for plants is created, and the cost is lower than that of free-standing models. The main disadvantage of this design is the constant exposure of the wall to moisture and the lack of good ventilation, which can lead to destruction of the wall material.
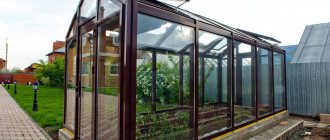
The gable design is one of the most convenient and popular. This is explained by the strength of the frame and its resistance to snow and wind loads. The reflection coefficient of gable greenhouses is low, most of the sun's rays penetrate inside, which increases the lighting efficiency. By increasing the angle of the slopes, you can achieve snow melting in winter, and the greenhouse will not have to be raked.
Gable greenhouse
Gable greenhouses are equipped with one or two doors, as well as vents for ventilation. The side walls of gable greenhouses can be either strictly vertical or inclined. In the second case, the illumination in the greenhouse in the morning and evening hours will be higher, which is important for temperate latitudes.
The polygonal design of the greenhouse practically follows the shape of the arch due to several planes forming slopes and walls. Thanks to this, the internal space is increased and at the same time the main disadvantage of arched greenhouses is compensated for - the high coefficient of reflection of solar rays.
Polygonal greenhouse
It is difficult to assemble a polygonal greenhouse from pipes with your own hands due to the large number of connecting nodes, so it is usually made from metal pipes by welding or from a profile for plasterboard, assembling the frame with self-tapping screws.
An arched greenhouse is perhaps one of the most common designs, and this is easily explained: it is distinguished by strength and stability, a minimum number of connecting nodes and a large internal space. It can be made from almost any type of pipe, choosing any size and height.
Arched greenhouse
The disadvantages of arched greenhouses include increased accumulation of snow on the roof in winter and a high reflection coefficient from the inclined plane of the film or polycarbonate.
Partial reflection is compensated by correct installation of the greenhouse - from north to south. With this arrangement, the side walls are illuminated by the morning and evening sun, and the rays hit the walls of the greenhouse almost at a right angle. During the day, when the sun is high, it illuminates the southern gable and roof, where the refraction of rays is not so strong.
Snow accumulation is dealt with in three ways:
- regular cleaning;
- dismantling the film or the entire greenhouse for the winter;
- changing the shape to a pointed arch.
Lancet greenhouse
Greenhouses in the shape of a pointed arch have a more stable design, and their increased height has a beneficial effect on the microclimate: hot superheated air accumulates at the top and does not depress the plants. At the same time, material consumption and planting area do not differ from similar indicators for conventional arched greenhouses.
Detailed step-by-step instructions for building a greenhouse from polypropylene pipes
Step 1. Draw a drawing
Any construction must begin with the creation of a drawing. Otherwise, the structure may collapse, and the amount of materials may be less or, conversely, more than required. When drawing up a drawing, you need to consider the following points:
- what will serve as the basis;
- what size and shape will the greenhouse be;
- what covering material will be used;
- how the pipe elements will be connected to each other;
- what additional partitions are planned inside.
This way you can understand how many meters of pipes you need, how many screws or clamps you need to purchase, how many boards to prepare for the base, how much film or polycarbonate you will need.
Experts recommend planning beds with a width of 0.8 to 1 meter; this is what is considered optimal for a gardener’s comfortable work. The width of the path should be approximately 70 cm.
Step 2. Calculate the amount of materials
If you are planning to build an arched greenhouse, we offer you a universal material calculation system:
- We determine the width we need (C=b+b) and the height of the structure (a).
- We calculate the distance m (the root of the sum of the squares of a and b, remember the Pythagorean theorem).
- We calculate the arc length using the formula 2*m+(2*m+M)/3, where M is the total width of the greenhouse from arc to arc.
- The resulting number is equal to the length of one arc, multiply it by the number of arcs and get the total length of polypropylene pipes.
- We determine the amount of covering material and calculate its area by multiplying the length of the greenhouse by the length of the arc.
The most necessary calculations have been made, now you can easily determine how many meters of arcs and film you need to purchase. If you plan to dig arcs into the ground, then feel free to add another 20 centimeters to the length of each one (just do not take them into account when calculating the size of the covering material).
Step 3. Prepare tools and materials
We offer you step-by-step instructions for making a greenhouse measuring 3.9 × 2 m with a height of 1.5 m. For this you will need:
- 10 wooden boards treated with an agent against rot and pests: 4 pcs. 5 m long and 6 pcs. 70 cm long.
- 12 polypropylene pipes 4 m long: 9 pcs. with a diameter of 25 mm and 3 pcs. with a diameter of 20 mm.
- 18 pieces of reinforcement 65 cm long.
- 25 fastenings for polypropylene pipes.
- Self-tapping screws for assembling a wooden frame.
You don't need any specialized tools; a large hammer and screwdriver will be enough.
Step 4. Making a foundation or base for a greenhouse
A serious foundation is needed only for greenhouses made of polypropylene pipes. Here's how it's done:
- The site where the structure will stand is leveled in advance.
Selecting part of the site
- Dig a trench, the depth of which depends on the proximity of groundwater. The soil inside the trench is properly compacted.
- Formwork is made from wooden planks.
- Pour the solution inside and prepare the holes where the pipes will be attached.
But building a greenhouse is much easier. Again, because it does not require a reliable foundation, it is quite enough to dig in the reinforcement at a certain distance from each other.
If you want to make the structure more reliable and solid (as in our case), then we suggest making a wooden base.
You should take pre-prepared boards and use self-tapping screws to build two rectangles from them, attaching a transverse strip from a short board in the middle. You will get two wooden frames for future beds; we recommend making the paths between them 50 cm wide.
Frame for future beds
It is logical to assume that this structure will not be capital unless it is further strengthened. For this, you will need reinforcement, which is driven into the ground with a hammer approximately 30-40 cm along the entire outer perimeter of the wooden base and attached to it using special rivets closer to the ground.
Reinforced frame
If it is not possible to use reinforcement, then you can take 4 pieces of metal pipe, drive them into each of the four corners around the perimeter, and connect them together using a metal strip tie.
Step 5. Assembling a frame from pipes: photo instructions
| Illustration | Description of action |
| It remains to connect the pre-cut arcs into the greenhouse frame. This is done simply - pipes are inserted into the prepared fittings, installed in accordance with a predetermined distance between the arcs, which take the shape of the arc. | |
| Each arc is attached to the frame using special fasteners. | |
| We do the same with all the other pipes. | |
| The remaining three pipes will serve as ties for the frame. They are attached to the sides and top of the structure using special pipe latches. | |
| This is what a greenhouse looks like. |
Step 6. Laying covering material
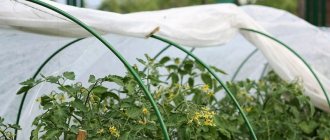
The easiest way is to cover the greenhouse with film or spunbond.
These materials are attached to the arches using special plastic holders.
The material can be attached to the wooden base of the greenhouse with self-tapping screws on one side for reliability, but we recommend simply pressing the other side to the ground with something heavy if you plan to periodically open the greenhouse for ventilation. The end sides can be made blank, or you can also press the ends to the ground and periodically fold them back.
If you took very dense and powerful pipes in advance, you can screw polycarbonate to them. Here are some tips for installing it:
- For installation, use self-tapping screws with a thermal washer to avoid damaging the canvas.
- The polycarbonate should protrude about 5 cm above the ends.
- The sheets are stacked on top of each other with an overlap of 10 cm.
- When working with polycarbonate, a sharp knife is used.
The polycarbonate sheet is adjusted to the shape of the end using a well-sharpened stationery knife
Construction of a frame with plastic walls
It often happens that the standard arc height of a homemade greenhouse is inconvenient for tall family members. An ingenious invention of folk craftsmen will help to cope with the problem, according to which flexible PP and rigid PVC pipes of the variety are used in the construction. In order to increase the height, sections of rigid polymer pipe are first placed on the reinforcement pins driven into the base, to which arches are attached using plastic crosses and tees. There are no other fundamental differences, so instead of a description we will attach a photo selection:
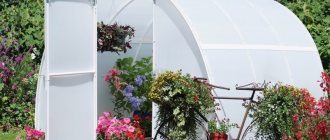
Greenhouse-house: a method of self-production from polypropylene pipes
A greenhouse-house will look harmonious on any site; the gable structure will allow snow to roll freely in winter, and such a roof will correctly distribute the light inside due to its refraction.
Polypropylene pipes are easily fastened together with fittings
When planning the design of such a greenhouse, consider a ventilation system: either the roof will open, or there will be a door and a window at the ends. The side walls can be placed at right angles to the surface of the earth, or they can be made slightly inclined inward, which will increase the area for light penetration.
In addition to pipes, you will need fittings to connect them, as well as a special soldering tool, which can be rented at almost any hardware store for a not very large fee.
Option #3 - from an old hose
Is your old watering hose worn out? It doesn’t matter – you can use it to make excellent arcs for a small structure. To do this, you need to cut the hose into equal parts and insert thick willow rods, previously sharpened at one end, into each of the pieces - and insert them with the blunt end inward. Then you need to attach the hose itself to the ends of these rods and bend it. Now you can stick it into the ground, where the greenhouse will stand. All that remains is to stretch the film.
In general, arcs for very small stable structures can be made even from 10 mm wire, which is sold on the market in rings - it is enough to cut it in half with a grinder.
Photo gallery: greenhouses made of polypropylene pipes
Do-it-yourself greenhouse made of plastic pipes: assembling a frame from HDPE pipes
Quite often you can find do-it-yourself greenhouses made from HDPE pipes. Such pipes are produced in coils of 100 m or in finished sections of 12-13 meters, which can facilitate the implementation of a structure of any length. The technology for their assembly is quite similar to the installation of a frame made of other types of plastic pipes. Here are some advantages of such pipes:
- the price is much cheaper than metal analogues;
- The shelf life is quite long - up to 50 years;
- resistance to chemical influences, corrosion;
- high frost resistance allows greenhouses to be used in the cold season.
The shape, size and choice of materials depend on the plants that are intended to be grown in the greenhouse.