- We create a hydroponic installation ourselves
- ACS system
- DWC installation
- Drip irrigation system
- DIY aeroponics
- Where can I get the components?
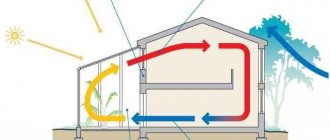
In the modern world, you can grow flowers, harvest lettuce, vegetables and other crops not only in a garden or greenhouse, but also in an ordinary city apartment.
To grow plants at home, it is necessary to create artificial climate conditions for them. One of the most effective growing methods is hydroponics. Hydroponics is a technology for soilless cultivation of plants, which has a number of advantages over the traditional method of growing in soil, namely:
- no need to loosen the soil, fight weeds, or regularly water the plantings;
- complete control over plant nutrition;
- In hydroponics, plants easily receive all the nutrients and do not waste energy on developing the root system.
We create a hydroponic installation ourselves
In order to assemble a hydroponic system with your own hands, you do not need to be a highly qualified engineer. The simplest model will consist only of a container, a compressor with a sprayer, seats and an inert substrate. In some of the more complex systems there may be additional elements, but these are mostly minor.
In the article we will look at several types of different hydroponic systems, but first we will talk about the general rules that must be followed when purchasing components.
Rule 1
The tank intended for the nutrient solution must be made of a neutral material that is resistant to fertilizers and does not allow light to pass through.
Rule 2
The volume of the container should correspond to the number of plants and their “appetite”. Otherwise, you will have to refill the container too often.
Rule 3
Among inert substrates, you can choose mineral wool, expanded clay, coconut fiber, perlite, vermiculite or their complexes.
Closed or open
In the industrial production of vegetables, berries and herbs, both closed and open hydroponic systems are used. Plants develop in a substrate that acts as drainage, holds the nutrient solution and distributes it evenly over the entire surface. Plant roots are located outside the substrate and come into contact with the liquid nutrient medium.
With open technology, the solution is supplied at a certain time, without stopping, it passes into the sewer. Using such hydroponics, garden greens are grown both at home and in industrial conditions. The technique has several disadvantages.
First of all, nutrient fluid is wasted irrationally. It must be prepared every time it is time to water. A drain is specially equipped for waste so that minerals do not pollute the environment.
When growing in closed hydroponics, the nutrient solution circulates in the system or is located in a special container. Throughout the growing season, the acidity and electrical conductivity of the liquid are measured. Add fertilizer or water if necessary.
It is recommended to update the nutrient medium after each growing season. Closed hydroponic technology is suitable for all plants. It is more economical and rational.
ACS system
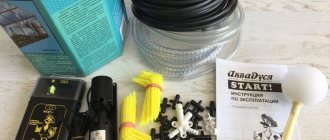
This instruction will help you create a budget system from scrap materials.
You will need:
- 2 plastic containers + 1 lid;
- disposable plastic cups;
- 1 plastic and 1 rubber tube (the plastic drain must have a larger diameter);
- pump with a capacity of 380 l/h (we recommend considering the SP-650 model from the Resun brand);
- knife or drill for punching holes;
- Azud seals and hot melt adhesive;
- 2 G-fittings. You can take connecting elements from high-strength plastic and save money without losing quality. The Azud brand has these.
It is very easy to assemble such a system. To do this, follow the instructions:
- It is necessary to make holes in the lid of the container for seats.
- Cut holes in the bottom of the glasses for the roots.
- Place the upper drawer on the lower one, then one end of the rubber hose should be removed through the cut hole.
- In order to supply the nutrient solution from the lower tank to the upper one, you need to purchase a pump and attach a 10-15 cm long hose to it. The pump must be placed in the lower tank with the nutrient solution.
- The end of the plastic hose should be cut at a 45 degree angle and installed with the cut side down. To seal the holes, you must use special gaskets or hot melt adhesive.
- In the upper container, on opposite sides diagonally, there should be two holes for supplying and draining water. Afterwards, all that remains is to pour the nutrient solution into the lower tank, turn on the pump and check if there is a fountain from the tube (to test the drain for leaks).
- We place the glasses in their places. The hydroponic system is ready!
Types, varieties and features
In the “Guide to Growing Vegetables and Herbs Hydroponically,” based on the principle of water supply, two main types of hydroponic installations are distinguished:
- Active type. In these installations, the working solution is pumped through special pumps.
- Passive type. In such systems, pumps are not used to supply the nutrient solution; moisture is supplied only by capillary forces.
There are also combined type installations. This combines both options for supplying liquid to plants.
What type of hydroponic system would you use?
ActivePassive
Based on the type of solid substrate used, the following types of hydroponic systems are distinguished:
- Aggregate - an inorganic substrate is used: gravel, sand, expanded clay, crushed stone, synthetic agroperlite.
- Chemoponic - the substrate is substances of organic origin: peat, sawdust, coconut fiber, moss.
- Ionoponic – insoluble granular ion exchange resins are used.
- Aeroponic - there is no substrate, and the root system of the plant is placed in a chamber without access to light.
Kate Roberto's book, A Guide to Hydroponics, contains the most common classification of hydroponic systems today based on the technology used. Let's look at each type and its features in more detail.
Wick
This is the simplest passive type installation. You only need a pot with a substrate to secure the plant, as well as a reservoir with a nutrient solution from which a wick will be drawn to the substrate. Through this wick, moisture with nutrients under the action of capillary forces will rise to the roots of the plant.
Any twisted piece of fabric or rope with good moisture-conducting properties can be used as a wick. Any beginner can make such a system and grow his first plant using hydroponics.
Advantages:
- simplicity of design and assembly;
- minimum financial investment;
- reliability and durability: nothing to break.
Flaws:
- there is no saturation of the solution with oxygen;
- not suitable for large plants;
- relatively low growth rate compared to cultivation in active type systems.
Floating platform (or deep-sea culture) system
This is the simplest active type installation. Consists of an open reservoir with a nutrient solution with a connected compressor for aeration. Floating bases with holes for plant roots are installed on the surface of the solution. Or mesh trays are fixed to ensure free hanging of the root system. The roots directly receive everything they need from a nutrient solution enriched with oxygen.
Often such systems are used in the industrial cultivation of greens, where long pools with a mineral solution act as reservoirs. And beginners can assemble such a system on their own, having only an aquarium with a compress and a piece of foam plastic.
Advantages:
- the cheapest active installation, you can start with it when trying your hand at hydroponics;
- simplicity and reliability of design;
- high plant growth rate;
- a large tank provides the plants with everything they need for a long time;
- The setup is ideal for quickly growing succulent greens.
Flaws:
- the tank will have to be cleaned regularly to avoid root rot;
- you need to monitor the level of the solution so that it does not cover the root collars;
- the need to regularly replenish the reservoir with solution;
- This method is not suitable for large tall plants.
Installation of periodic flooding
It is often used in greenhouses and is distinguished by its versatility: any plants can be grown using this method. The design consists of 2 containers, united by a drainage tube and additionally equipped with a pump and timer.
The roots of the crops, placed in a container with a substrate, are filled with a nutrient medium using a pump when the timer turns on. After a while, the solution returns to the tank through the drainage.
Expert opinion
Torsunov Pavel Maksimovich
The activation of the timer is adjusted to suit the cultivation of different crops.
Advantages:
- does not require serious expenses;
- ease of operation: it works automatically, only configuration is required;
- good saturation with the solution and its accumulation in the substrate;
- quickly obtaining high yields.
Flaws:
- dependence on the power grid;
- if the circulating solution is not changed from time to time, microbial infection and root rot are possible;
- possibility of breakdowns and blockages: requires repair and service.
Drip distribution
A very popular system with a relatively simple design. When the timer is triggered, the nutrient medium is directed through the pump into the watering tubes with droppers, and slow watering is carried out.
Having passed the substrate and saturated the plants, the liquid returns through the drainage to the reservoir, so that, enriched with oxygen, it again goes to the droppers. This type of drip irrigation is called reversible. If watering is adjusted without excess, and everything is absorbed by the plants, they speak of a non-reversible drip system.
Advantages:
- effectiveness has been confirmed by use at large agricultural enterprises;
- ensures sufficient saturation of plants with moisture and essential minerals;
- aeration of the roots and solution is maintained.
Flaws:
- requires regular cleaning to prevent blockages;
- in circular media return systems there is a risk of molding of the root area;
- the tendency of small droppers to clog and break.
Nutrient layer
The operating principle is based on the application of gravity. It consists of two reservoirs: the lower one contains a fertilizing solution, which is continuously pumped to the bottom of the upper inclined reservoir. In the upper container, on stands without substrate, the seedlings are installed so that only the tips of the roots touch the bottom. It is they that are continuously fed by moisture, after which it flows down the slope into the lower main cube. And the circle resumes.
Advantages:
- the roots are effectively enriched with oxygen;
- compactness of the system;
- there is no need for substrates, which reduces costs;
- rapid growth of crops.
Flaws:
- dependence on the power grid;
- it is necessary to carefully monitor the operation of the pump, because if it stops, the roots dry out abruptly;
- Regular maintenance and cleaning is required.
Aeroponic
These are the most technologically advanced installations, where air serves as the medium for the roots. There is only one reservoir with the fertilizer mixture. Seedlings are planted at the top on a stand with holes for roots to emerge so that the roots hang freely in the air. The timer automatically turns on the pump, which delivers a solution rich in oxygen and minerals to the nozzles, where it irrigates the roots with small droplets.
Irrigation alternates with pauses, and the entire process is fully automated.
Advantages:
- the fastest growth and maturation rates;
- maximum nutrition and aeration;
- Saving space when placing seedlings in multiple layers, the aerosol will reach all the roots.
Flaws:
- dependence on the network: it is better to ensure an uninterrupted power supply system;
- frequent blockages of tubes and nozzle holes require careful regular cleaning;
- impossibility of using condensed nutrient solutions.
DWC installation
DWC is a deep water culture method. With this method of cultivation, the root system of the plant is completely immersed in a nutrient solution, which is constantly aerated. An example of such a system is a ready-made AquaPot installation. It is excellent for growing large annual crops. Thanks to its compact size, it can easily be placed even on a windowsill. All that is needed for high yields is to change the solution every 7-10 days, monitor the pH and EC indicators. If desired, you can assemble a similar installation yourself.
For this we need:
- container with a volume of at least 20 liters with a lid;
- mesh pot with a diameter of 16 cm made of non-toxic high-strength plastic;
- sprayer ASC-02;
- single-channel compressor.
Build process
It is necessary to make a hole in the lid of the tank to match the diameter of the pot. Directly under the cover, another hole should be made for the wire of the compressor connected to the aerator. The connection points should be sealed.
The germinated seed in a rockwool plug should be placed in an inert substrate such as expanded clay drainage or rockwool. Accordingly, place the substrate with the seedling in the planting area. 12-15 liters of nutrient solution are poured into the tank. The compressor in such a system must operate 24 hours a day. The nutrient solution must be changed once every 7-10 days. Remember that when growing hydroponically, it is important to control the pH and EC levels of the solution.
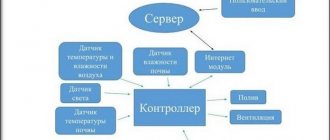
Plant staking and installation control
It is not enough to just know how to do hydroponics. You also need to learn how to use it correctly. And, if the assembly of the system and planting of plants is successfully completed, this does not mean that the installation can be ignored.
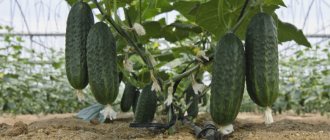
Figure 6. Hydroponic plants require regular care.
Over time, the plants will actively grow and their stems will begin to tangle. In addition, overgrown crops can overturn the installation. To prevent this from happening, it is better to immediately provide for the possibility of gartering them. To do this, you can place a small peg next to each pot or hang a lattice over the hydroponic installation, to which the stems will be tied. The garter is carried out with ordinary clips or twine for plants (Figure 6).
The system itself also requires some control:
- Every day you need to check the volume of liquid in the tank, and also test the water for the level of hydroponic fertilizers and acid-base balance.
- Pay attention to the operation of the pump: it must function without failure, since without saturating the water with oxygen, plants will not be able to develop normally.
- Inspect your plants regularly. If necessary, they should be pruned and tied up, and if you find crops with signs of disease or pest damage, they must be immediately removed from the garden bed so that they do not infect neighboring plants.
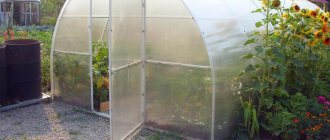
It should also be taken into account that it is better to install hydroponics indoors rather than outdoors, since in an enclosed space the risk of infection by fungi or pests will be significantly reduced. If desired, you can equip the installation with additional equipment, for example, for automatic supply of nutrients. This system operates on the principle of drip irrigation and supplies fertilizer in the right quantities and at the right time.
Drip irrigation system
It should be considered as temporary help for plants, especially when you are not at home. If assembled correctly, this system will be able to irrigate plants without your presence. Often, growers use drip irrigation to irrigate their pets grown on coconut or any other inert substrate.
Here's what you'll need to create a drip irrigation system:
- tank for nutrient solution (depending on the number of plants);
- two 16 mm main pipes made of durable plastic;
- microtubes;
- seals;
- microfittings;
- G-fitting;
- punch.
How to assemble drip irrigation:
- Make a hole in the tank for the main main pipe (seal with a sealant);
- Place lines from 16 mm pipes;
- Using a punch, make a hole for the microtube
- Next, the micropipe is connected using a microfitting to the main pipe;
- Droppers are installed;
- A pump should be placed in the tank;
- At the end of the line we install a drain valve.
You can assemble a drip irrigation system yourself. You won't have to look for components for a long time. Everything you need for assembly is in our store.
Advantages and disadvantages of hydroponics
Most people prefer to grow plants in regular soil. In this case, breaking established stereotypes is quite difficult. Nobody wants to buy special pots or installations and prepare an aqueous solution. It is believed that plants can grow well in ordinary soil. In reality, things are somewhat different. Hydroponics has a number of advantages:
- There is no need for constant application of fertilizers. All nutrients are already present in the aquatic environment.
- Plants are provided with uniform nutrition. They will never suffer from a lack or excess of fertilizers.
- There are absolutely no problems with soil pests.
- Crops do not require labor-intensive replanting or transhipment.
The disadvantages of the hydroponic growing method include high initial costs. In the future, they will, of course, pay off, but first you will need to invest a fairly decent amount.
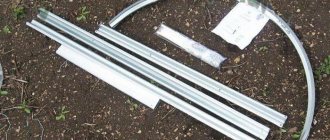
DIY aeroponics
The term aeroponics refers to growing plants in a soilless environment. Only unlike hydroponics, their roots are in the air and irrigated with a nutrient solution supplied from nozzles.
Accessories:
- large capacity 70-100 l;
- PVC sheet;
- mesh pots.
- water pump with a capacity of 3000 l/hour;
- part of metal-plastic 50 cm;
- 2 adapters for metal-plastic;
- injectors.
Assembly diagram
- One end of the adapter must be screwed into the pump, and the other must be connected to the turntable through the barrel;
- Place the structure at the bottom of the pot;
- Cut a plastic lid to the diameter of the top of the pot;
- Make holes in the lid for seats;
- Perforate the pots using a soldering iron;
- Close the central hole with a plug;
- All that remains is to add the substrate to the pots, place the plants, fill the container with a nutrient solution with an adjusted pH level (5.8-6.2) and turn on the pump.
Adviсe:
- pour no more than 50 liters of solution;
- select a watering mode lasting 15 minutes at intervals of 30 minutes;
- use large expanded clay as a substrate.
What can be successfully grown hydroponically?
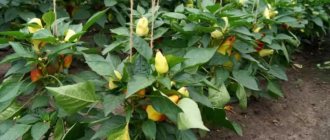
Theoretically, the hydroponic system is suitable for growing any plant, even shrubs and trees. In practice, the method is used only for planting herbs (parsley, dill, onions, basil and lettuce) and vegetables (tomatoes, cucumbers, radishes and legumes). Hydroponics is not used for growing beets, carrots and potatoes, since a full harvest is obtained only on real soil.
Products grown using new technology are usually marked with a special symbol. Hydroponic vegetables differ from classic vegetables in their brighter color, almost identical shape, and practically no smell. The peel and leaves are shiny and have a long shelf life.
Where can I get the components?
Many elements of hydroponic installations and drip irrigation systems can be purchased at regular hardware and gardening stores. You can save your time and buy most of the components at a progressive plant growing store. For example, in the product catalog of our online store Agrodom.com you will find compressors, pumps, filters, containers, tubes, as well as connecting elements, substrate, fertilizers and water quality monitoring devices. This list is far from complete. There are also ready-made hydroponic systems on sale. Among them is the Easy2grow Extension Kit for home use. It is enough to purchase a tank and a suitable substrate (coconut-perlite, earth-expanded clay, expanded clay-mineral wool) and add the solution as necessary. High yields will be guaranteed!
Rules for transplanting plants into hydroponics
Hydroponics helps you easily grow at home not only flowers, but also vegetables propagated by seeds or cuttings. Optimal conditions for transplantation occur when the plant is sufficiently strong and has developed a developed root system. If you repot plants too early, the weak roots may be damaged, causing the sprouts to become stressed, their growth will slow down, and in the worst case, the plants may die.
To do everything correctly, follow the following recommendations for replanting plants:
- Remove the entire plant from the pot and place its roots in clean water.
- Carefully wash off any remaining soil and rinse the roots with warm water.
- Straighten the root system, fix it vertically in the pot so that it does not touch the water.
- First, water the plant with clean warm water, and after a week - with a nutrient solution.
Rating of quality hydroponic systems for 2022
| Name of hydroponic installation | Production | Crop area, sq.m. | price, rub. |
| Seed germinator 4-module Health Treasure X4 | Russia | 0.16 | 2200 |
| AquaPot Trio hydroponic system | Russia | 0.12 | 6500 |
| Hydroponic installation Wilma Small4 11 l | Holland | 0.18 | 8251 |
| Hydroponic system Dutch Aero Complex 1m2 | France | 60 seats 0.24 | 44000 |
| Hydroponic installation Panda System Aero Box GHE | France | 40 seats 0.12 | 34000 |
| RainForest | France | 0.12 | 26000 |
| Ecogrower max GHE | France | 0.12 | 18000 |
| Aero Flo 10 GHE | France | 0.22 | 21000 |
| AeroFarm 3 GHE | France | 0.16 | 9500 |
| Cutting Board 27 GHE | France | 27 seats 0.12 | 7000 |
Plants suitable for growing hydroponically
Using the soilless method, you can grow almost any crop, tomatoes, cucumbers, flowers, even melons and watermelons. Only some types of plants are not suitable for this:
- crops with rhizomes and tubers;
- plants that need constant cleaning of dried flowers;
- Fast-growing crops with large roots, they need to be replanted frequently.
Advice. When growing vegetables in water, experts advise choosing varieties with the shortest growing season.
Vegetables or flowers suitable for hydroponics must be prepared before being placed in the unit.
Tomatoes in cotton wool cubes
First you need to grow seedlings. This can be done in the usual way. When the seedlings are completely ready for picking, they are placed in water and checked to see if there are any soil particles left on the roots. They must be removed, otherwise dirt will get into the installation.
Sometimes seedlings placed in small stone wool cubes are also grown in a hydroponic setup. The cubes are placed in a shallow container filled with a nutrient solution. The concentration of the product should be two times less than usual.
Experts say that no matter where you work, in the country or on a balcony greenhouse, the crops grown using a hydroponic system will delight you and your loved ones.
A kick in the ass. To the stars
They say that the right path has a favorable beginning. Well, my path has something similar, if you look at it from a completely perverted point of view. In January, I fell ill with pneumonia, took time off from work, feeling unwell, and was told to come out when you were cured. Well, I was sick for 14 days, after which I was safely kicked in the ass. To be honest, there was no longer any enthusiasm left for work, so this was a natural outcome.
And then I just thought about the possibilities
.
No, well, you shouldn’t sit and cry, right? I decided to do a hydroponic setup. If everything worked out, then I planned to start selling these. I wrote to the author of the above video, asked a bunch of questions and got down to business.