This article is about what most startups/young companies involved in the development of laboratory or production equipment love.
And specifically about an aluminum profile frame for a metal body - what kind of jungle it can lead you into if you don’t catch yourself in time and take action. About alternatives, their pros and cons. A frame made of an aluminum profile (or aluminum frame) for a metal case is great: precise cutting of aluminum profiles, extremely simple assembly of the frame: one or two, and the body of the future device is already showing off at the exhibition.
But the frame remains beautiful as long as you are required to do no more than one or two cases per year. As soon as you want to move to a slightly more serial product, the aluminum frame immediately turns into a pumpkin problem.
Disclaimer
We in no way claim that a frame made of an aluminum profile for a metal case is a jamb of jambs and in general, don’t take a profile, ugh. No. This frame perfectly performs its functions, but to certain limits. We’ll tell you which ones now.
Typical situation: as a rule, the idea to build a device (or installation) on a frame made of aluminum profile and cover the device with casings is one of the first to arise.
Among the developers something goes like: “Let’s hurry up, we need to start selling, we’ll finish the details later,” and the basis for the body design is a prefabricated frame made from a profile. And when the device has already proven its right to exist, it’s time to think about scaling, that is, serious, completely “grown-up” production - problems begin, namely:
- the cost of the housing suddenly increases sharply;
- it turns out that the structure is not rigid enough;
- it turns out that the finished device is not transportable - partially or completely.
All these problems can be solved. But first you need to realize: the current version of your product is not a full-fledged serial product, as it seemed, but just a prototype
(also known as a
test sample
).
You can show this sample at exhibitions and even, with a certain level of finishing, sell it to your first customers. But there is no way to produce it in series: such a design is very limited in its suitability for scaling, and in some cases it is not suitable at all.
Andrey Gursky, designer
:— If you are making a bench sample (or a single one - only for internal use) or just a frame to “hang” the equipment and see how it works, then an aluminum profile frame is an ideal option. This is a profile of standard sizes, which will be cut with high precision, it is easy to assemble - you can do everything yourself; These are standard fittings that can be bought anywhere - brackets, hinges, etc.
But it's expensive. And if for one thing it’s normal to pay so much money for the frame, then for a series it’s very bad. And it can start with two copies - depending on who you are, the concept of serialization is very flexible; for other equipment, even ten machines can already be a large series.
There is an exit? Of course I have. An aluminum frame is not the only possible option. Let's try to look at them all - with examples.
Advantages and disadvantages
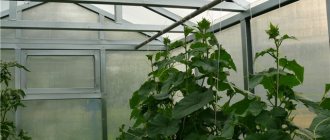
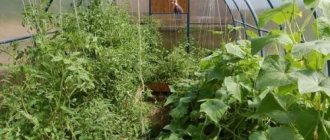
A greenhouse with an aluminum frame is a fairly reliable structure
- they are durable;
- reliable, durable;
- do not rot or collapse under the influence of atmospheric conditions;
- safe;
- practical;
- ergonomic;
- easy to transform, wash and clean;
- have high light transmittance;
- simply beautiful and stylish.
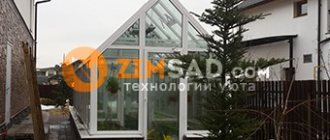
Capital greenhouse made of aluminum and glass
We cannot remain silent about the disadvantages of such structures:
- the need to build a foundation due to the heavy weight of the glass;
- the likelihood of damage to the glazing due to heavy hail;
- ability to retain heat, which is good in cold weather, but can damage plants in hot weather.
These problems are easily solved - due to the presence of a foundation, the structure takes on a solid appearance, damaged glass is easy to replace, and to ensure optimal temperature inside the greenhouse in hot weather, it is enough to ventilate it.
Glass greenhouses, despite the fact that innovative materials for the construction of such structures have recently appeared, are the most popular. They began to be built a very long time ago, due to the availability of material and ease of work.
Glass greenhouses favorably promote the growth and development of plants. Classic glass greenhouses are quite often found on personal plots.
Such structures require site preparation. The advantages of such structures are also expressed in the fact that you don’t have to build a glass greenhouse yourself.
Modern companies offer ready-made buildings for sale.
A glass greenhouse has many advantages, among them the following should be highlighted:
- long service life;
- high level of thermal insulation inside the structure;
- the possibility of creating a greenhouse from used material;
- easy cleaning of glass from dirt;
- possibility of replacing glass if it is damaged.
All crops grown in greenhouses need sunlight. A glass greenhouse can provide such conditions - ultraviolet light easily penetrates through transparent surfaces, which reduces ripening time.
In addition, a glass greenhouse looks as attractive over time as it did immediately after construction. However, this applies only to those structures whose frame is based on metal. As for wooden structures, under the influence of the sun, moisture and other negative factors, they quickly lose their appearance.
Main disadvantages
Before you build a glass greenhouse, you should consider its main disadvantages. Among others, the need to create a solid foundation and a strong frame structure should be highlighted. In addition, glass is still quite fragile; it can be broken if dropped or handled awkwardly, and will also become cracked if it is accidentally hit.
Glass has significant weight, and the powerful frame and foundation take up a lot of space. A glass greenhouse quickly warms up under the influence of ultraviolet radiation, which requires high-quality ventilation. Such a greenhouse can only be made in the form of a gable house.
A greenhouse made of wood and glass has many advantages. For example, it should be noted that the material at the base of the frame is environmentally friendly. In addition, you can find it in large quantities in your barn. Therefore, you won’t have to spend money on purchasing materials. This makes the process cheaper.
Wood is also good because it is easy to process; there is no need to purchase additional equipment to connect elements together. You can assemble such a greenhouse even from existing scraps, and if it is not needed, the system can simply be disassembled.
The frame of a glass greenhouse can be made of wood, which has some disadvantages. For example, the material will have to be treated with antiseptic agents from time to time. There will be high temperature and humidity inside, which creates an ideal environment for the development of fungus and putrefactive formations. This reduces the durability of the structure, making it not very attractive.
The most popular greenhouses after those based on wooden frames are aluminum structures. They are lightweight and are most often manufactured in a factory. The manufacturer supplies such greenhouses with glass of high strength and light transmittance. Although glass has an impressive weight, the greenhouses themselves are designed for a long service life.
Greenhouses made of glass and aluminum look more attractive than those that you can make yourself using a wooden frame. Assembling such a system from the manufacturer can be quite simple, because the products come with instructions from the factory.
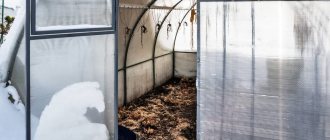
The shape of the greenhouse can be absolutely any, even round. Snow will easily roll off the surface of such a roof without putting a load on the foundation and the structure itself.
Therefore, it will be possible to leave the greenhouse even for the winter, without fear that snow loads will deform the material.
The material can be coated with epoxy or polyurethane paints, which can ensure the service life of the base material up to 35 years. However, if you install the structure in a difficult climate, it will be ready to serve properly for more than 10 years.
The appearance of the aluminum frame is quite attractive, so consumers also choose such systems as a decoration for landscape design. Aluminum profiles are offered for sale in a wide range.
It is easy to process, so you can make the structure yourself, realizing the most daring design ideas.
When choosing an aluminum profile for a glass greenhouse, you must also take into account the disadvantages of this material. Among others is the need to build a foundation. It is required in order to provide strength and rigidity to the greenhouse.
Another disadvantage is the rather high cost of an aluminum-based greenhouse. If you decide to choose such a system, you will have to choose one of the existing foundations:
- from wooden beams;
- on screw piles;
- tape;
- concrete block.
Although a greenhouse house made of glass and aluminum does not corrode, upon contact with the ground it becomes covered with a coating, which is also called white rust. Therefore, the foundation will need to be separated from the frame, eliminating the cause of the problem. This complicates the construction process and makes it longer and more expensive.
Some home craftsmen refuse to independently assemble a greenhouse made of aluminum for another reason that this material, although easy to process, requires welding with an inverter and special electrodes.
Choosing the location of the greenhouse on the site
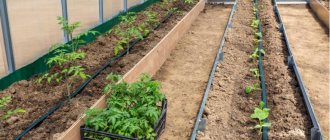
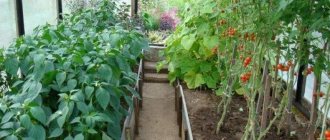
A warm glass greenhouse is a good helper in growing delicious tomatoes, cucumbers and peppers.
For an excellent result, you need the correct location of the greenhouse, so the location for the greenhouse is selected, taking into account the following aspects:
- Location - select a place away from other buildings and trees that create shade for greenhouse plants;
- In a small plot, space is limited. Here the greenhouse is placed to the south of the building so that it receives a large amount of sun rays;
- The structure cannot be placed on a slope, where there is a high risk of additional stress and damage to the foundation;
- When choosing a place, you need to take into account the wind rose. In drafts, the glass surface cools down rather quickly, and the internal temperature does not reach the optimal temperature;
- It is important to have water close by and be able to connect to the electrical network;
- In areas with squally winds, the frame and foundation are strengthened.
Assembling the frame
To assemble the frame, you will need 8 guides. We connect them two at a time, twisting them with teks so that we get 4 blanks, each 6 meters long. These will be the top and bottom parts of the space frame, forming the long side of the greenhouse.
For the end sides we use three-meter profiles. The length of the profile for the vertical parts of the frame will be 1.43 m. We cut 12 blanks of 1.5 meters each (7 centimeters are needed to connect to the roof trusses).
Now you can proceed to assembling the frame. We sequentially twist together the four blanks of the lower horizontal part of the spatial frame. The result should be a rectangle of a profile measuring 6 x 3 meters.
Then we screw the side posts of the vertical part of the frame to it on both sides. To prevent them from falling apart, you can grab their upper parts with a profile. In the same way, we install the vertical parts of the spatial frame of the long sides of the greenhouse.
We insert a wooden beam into the profile and fasten it with self-tapping screws. This is necessary for the weight and stability of the structure. Then we screw the prepared roof trusses to the resulting structure.
We suggest you read: When to sow begonia for seedlings
On the side of each triangle we set aside a distance of 10–15 cm on each side. At this level, we screw the profile in such a way that it consistently connects all the triangles together.
To strengthen the connections of vertical and horizontal structures, we cut L-shaped blanks from the remains of the profile and screw them with one side to the vertical profile, and the other to the base of the triangular structures that form the roof. The frame is ready.
To prevent the polyethylene from collapsing at the junction with the metal, I covered the profile with strips cut from the laminate backing. That's why I needed tape. You can use thick fishing line for these purposes. The film is pressed against the frame with wooden slats and screwed with self-tapping screws.
Greenhouse size – 18 sq.m. I spent eight hours assembling the frame, working without an assistant.
Since aluminum profiles are available on the market in a wide range, this allows you to create various designs of greenhouse structures. Frames of various shapes allow you to implement bold design solutions, and greenhouses become a real natural decoration of landscape design.
Different types of aluminum greenhouses depend on the shape of the frame, the choice of which always takes into account the preferences of the owner of the site related to the development and execution of its design. There are the following forms of aluminum frames having:
- A pitched roof, which is characterized by a low price, small area, a greenhouse can be classified as such types of structures as a greenhouse or winter garden adjacent to the wall of a house.
- A gable roof with a large usable area, no rounded shapes, glass is most suitable for covering.
- Arched frame design, which can be characterized by increased resistance to snow loads and good illumination.
The latter type of design has its disadvantages associated with the presence of dead zones in which it is impossible to grow tall plants. Arched and gable structures are in greater demand on the market, in which you can grow an excellent harvest of peppers and low-growing tomatoes.
1. A frame is assembled from four sections to attach the door to it (the window will be made in the door itself). Four more cuts are mounted at the bottom and in the middle of the length of the frame on both sides of it. The edges of the segments are applied to the edges of the lower side parts, which together form a teardrop-shaped arc.
First, their lower ends are secured, then they are attached to the middle side sections, after which their upper edges are brought together and fixed. The second end part of the structure is made in the same way.
2. Next, the frame of the door itself is assembled from 4 elements. The rectangle is divided into three equal parts and segments are installed in the division zones to impart rigidity to the canvas. A rectangle of smaller segments is mounted in the upper segment, which will act as a window.
aluminum profile
galvanized profile
semicircular greenhouse frame
rectangular greenhouse frame
3. New elements are laid on top of the stacked end walls of the structure, from which the internal support arches will be made. The bending of the elements is carried out according to an already made template so that all the parts are the same.
4. Horizontal stiffeners are cut to the same length. Their number is calculated as follows: to connect every two arcs, 4 segments are needed on one side, and 8 pieces on both sides. A structure with five arcs will require 32 elements.
5. The first end is temporarily not rigidly mounted to the foundation. To prevent it from leading, supports are installed under it. Next, the first arc is mounted, which is connected to the end using 8 previously cut elements.
6. In this way, all remaining sectors and the second end are mounted.
7. Sheathing is done using thermal washers that secure the polycarbonate. The step between the fastening elements is about 30 cm. The fastening of the elements on the wall towards which the door is closed is carried out at a distance of 10 cm from its edge.
8. The fastening element must not damage the integrity of the surface of the cladding material. Otherwise, there will be frequent leaks in these places, which will lead to damage to the frame and contamination of the internal space of the cells.
9. The edges of the sheets are closed using a special end profile, and the joint of the sheets on the roof is closed with a metal ridge.
assembly of a frame from metal profiles 1-6
assembly of a frame from a metal profile 7-9
aluminum profile greenhouse
The teardrop shape of the structure is most desirable for aluminum frame elements. During bad weather, precipitation does not accumulate on such a roof, as a result of which the frame is not subject to excessively heavy loads.
1. The lower supporting parts to which the vertical posts will be attached are laid and fixed onto the foundation along its entire perimeter.
2. First, the side walls are assembled. Vertical posts are attached to the lower element in increments of 50 cm, which are connected at the top by exactly the same horizontal element as at the bottom.
3. Supports for the ridge are installed in the middle of the ends. The edges of the parts are attached to the tops of these supports, the second end of which is attached to the corners of the assembled side walls (two on each side of the supports).
4. A ridge is mounted on top of the supports. From the top edge of the walls to the ridge, parts are laid at a distance of 50 cm from each other. A profile for fastening polycarbonate sheets on the roof will be attached to them.
5. At the ends, 4 additional vertical parts are installed, which rest against the ridge. At the height of the doorway, one horizontal part is mounted, which is attached to the corner posts of the side walls.
6. Doors and windows are installed. After which the building is sheathed with polycarbonate using a special profile.
It is extremely difficult to make an arched structure from a profile of this type. It’s easier to purchase a finished product and just assemble it yourself. An arched frame is the best option, since this form of roof allows the sun's rays to penetrate better inside, the room warms up faster, which has a beneficial effect on plants.
To assemble the frame, you will need a profile aluminum pipe 2 x 2 cm with walls 0.15 cm thick or an aluminum channel with parameters 20 x 20 x 20 x 1.5 mm. The U-shaped profile, included in the finished greenhouse kit, has special grooves for glass, sized to match its thickness.
Assembly of an arched aluminum frame
If you purchased a factory-made aluminum frame, then it is most likely equipped with fasteners - tees, bolts, nuts. It doesn’t cost anything to assemble such a structure, read the instructions and use a wrench.
Tip: assembly using connecting profiles is faster, such a structure is easy to dismantle, but the first option is more reliable in terms of strength.
When you assemble a greenhouse frame from aluminum elements prepared by yourself, you will have to choose the assembly method yourself.
Assembling an aluminum frame for a greenhouse with a gable roof
Preparatory work
An aluminum greenhouse with a glass coating can be used all year round. Because glass helps retain heat in a building. Greenhouses are:
- Foldable. Quite functional, since the structure can be easily disassembled and stored in the garage when not in use;
- Stationary. An important factor is the correct choice of location for installing the frame. Choose flat, well-lit areas;
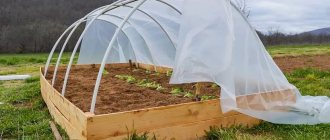
- Portable. They are easy to use and easy to install. The structure does not require a foundation, so it can be easily moved from one site to another.
You also need to ensure that you have the following materials and working tools:
- The required number of aluminum pipes for assembly;
- Special material for coating (polycarbonate, glass, polyethylene);
- Galvanized parts for fastening;
- Grinders with a cutting wheel;
- Wooden beams or special cement paste treated with antiseptic agents;
- A wrench to firmly secure the aluminum profiles with hex bolts;
- Large capacity concrete mixers to prepare concrete mixture for the foundation;
- A tool to cut the appropriate covering material;
- Doors with which holes will be made in aluminum pipes.
From a wide range of welding machines, you can choose an inverter for independent use. The presence of tools greatly simplifies the welding of metal parts. For luxury aluminum greenhouses and arched greenhouses, a bent profile is used.
To bend the aluminum profile as correctly as possible, use:
- A profile pipe with a bending machine, a ruler with a grinder, a simple marker and a welding machine;
- A constant fire source (acetylene burner, propane torch or blowtorch);
- Special pipe bender.
Greenhouse made of glass and aluminum 10x4 meters. Winter installation of the structure:
DIY aluminum greenhouse
It is recommended to take a ready-made, standard design for a metal greenhouse; ergonomics, dimensions, and loads are calculated in it. For simple structures, independent drawing will not be difficult. Next, we will offer step-by-step instructions on how to make a greenhouse from an aluminum profile with your own hands, but in this design it is also permissible to use a steel profile.
Drawing of a greenhouse made from a profile for plasterboard; for reinforced structures, it is recommended to install cross-sections in increments of 50 cm instead of diagonals
Having studied the drawing, it is clear that the entire greenhouse consists of several units:
- end with bevels for a roof with a door;
- blind end with slopes under the roof;
- side walls are rectangles consisting of vertical pillars and cross-sections for rigidity;
- the ends are tied together by a long transverse metal profile - a ridge;
- 2 diameters in the middle of the slopes, between them the ribs - rafters - are installed perpendicularly;
- We cover the frame with polycarbonate film.
We invite you to familiarize yourself with: The most productive potato varieties for the Moscow region
Assembly
According to the proposed algorithm, we assemble elements from a metal U-shaped profile for drywall, connecting the parts with a crab, as in the photo below.
How to connect a metal profile
We cut the profile to size, according to the drawing, and assemble the ends on a flat area.
The distance between vertical posts is 900-100mm, but not more than 1200mm
We install the end units on the foundation, check the geometry, fasten them to the corners and long screws. Using the same scheme, we make the sides, the roof, install it in place, and make a connection.
How to correctly connect perpendicular parts from a metal profile
We check the metal structure for strength, if necessary, we strengthen it inside with diagonal inserts or add cross-sections.
The polycarbonate greenhouse structure on a metal frame is reinforced with additional transverse parts
All that remains is to sheathe the metal structure with covering material. Such a greenhouse made of galvanized profile with polycarbonate will last more than 10 years, without additional investments. We also suggest watching how to make an arched film greenhouse from a metal profile for plasterboard with your own hands, in the video the step-by-step process.
If you have the appropriate amount, you can always purchase a ready-made greenhouse, but even if this is not possible, you should not decide to replace an aluminum greenhouse with a more budget-friendly option. You can buy a kit and save on installation costs by doing it yourself.
With some effort, you can build a greenhouse yourself
Do-it-yourself greenhouse from a profile: instructions, drawing of a greenhouse from a profile. Creating a greenhouse from a profile with your own hands will not only allow you to significantly save money when building a greenhouse.
Here the opportunity arises to use one’s own resources in equipping the dacha area with this irreplaceable attribute. The galvanized profile has all the required qualities to create a greenhouse. They are distinguished by ease of processing, anti-corrosion properties and the highest load-bearing capacity.
In addition, this material has a lower cost. Often it remains after renovation work in the house.
The advantages of profile greenhouses include the ability to use any size and shape. These parameters will depend only on existing needs. Let's look at the list of the required set of materials and tools for installing a greenhouse, the assembly sequence and the advantages and disadvantages of this solution.
When working with drywall profiles, you do not need complex tools. It is quite easy to cut, bend and fasten the elements used.
It is enough to use the following devices:
- Screwdriver.
- Building level.
- Roulette.
- Metal scissors.
If future work has a fairly significant volume, especially when constructing a greenhouse with a large height and area, then you need to use a small grinder to trim the profile.
The metal frame is only the “skeleton” of the greenhouse. To complete the final design of the structure, it is necessary to ensure that it is covered with a material that is capable of transmitting sunlight. At the same time, it is necessary to retain a significant portion of moisture and heat inside the structure.
Sheets of cellular cellular polycarbonate cope ideally with this issue. It differs in its thickness, but professionals advise using a material that is no thinner than 6 - 8 mm. Such parameters can provide adequate resistance to snow loads during the winter period.
To select a suitable greenhouse frame from a profile, it is necessary to determine the required area, as well as the aspect ratio and height. Polycarbonate sheets have a width of 2.1 m, so the length of the greenhouse can be selected as a multiple of this parameter.
Such calculations can save material, and the amount of waste is reduced. The following standard dimensions for greenhouse length are obtained:
- 10.5 m.
- 8.4 m.
- 6.3 m.
- 4.2 m.
You can increase the size, everything will depend only on the parameters of the existing site. The height of the greenhouse is left the same, and it depends on the growth of the gardener. Work inside the structure should be carried out comfortably, so that you do not have to constantly bend down or hit the ceiling.
It is more convenient to create a gable roof of a greenhouse, which is assembled with your own hands. This solution allows us to simplify the entire structure in comparison with arched greenhouses. The result is the optimal option for transmitting and dispersing sunlight. The angles of the slopes correspond to 25 - 30°, so the snow will not linger in a thick layer on the roof.
After completing the selection of the dimensions of the future greenhouse, it is necessary to begin frame design. First, a scale diagram is drawn up, where individual elements, their parameters and installation locations are indicated.
A durable and reliable profile greenhouse should be installed not just on the ground, but using a shallow concrete foundation.
It is recommended to use a strip foundation, the depth of which is from 15 to 29 cm, and the total height is from 50 to 60 cm.
To accomplish this, at the site where the greenhouse is installed, trenches are dug along the entire perimeter of the site, having a width of 20 - 25 cm and a depth of up to 20 cm.
Then they begin to build wooden formwork around it with a height of 25 to 40 cm, and the free space is filled with concrete.
It takes 2 to 3 weeks for this foundation to harden, but the formwork can be dismantled after a week.
At the time when I decided to get a greenhouse at my dacha, I had no gardening experience at all. I didn’t dare to start experiments with expensive versions of ready-made greenhouses, you never know how it could all end.
The same one that is used for installing plasterboard partitions. DIY aluminum profile greenhouse
More than 7 years have passed, the greenhouse serves me faithfully. And I see no point in changing it to another. Cucumbers, tomatoes, radishes, greens are on my table from the beginning of June to the end of September.
Since the experience turned out to be very successful, I decided to share the secrets of construction.
The materials needed for a greenhouse are the simplest; you can buy them anywhere. You will need:
- aluminum profile (partition),
- wooden beam and slats,
- polyethylene film,
- backing for laminate,
- self-tapping screws.
Tools: saw, metal scissors, screwdriver, stationery knife, tape or thick fishing line. First, a little about the quality of materials. The profile and guides must be partition walls, not wall ones, and certainly not ceiling ones.
You cannot buy cheap soft material for a greenhouse. The metal will work in an aggressive external environment: moisture, wind, temperature changes. Therefore, its anti-corrosion properties are very important. In addition, the frame must be stable and durable, and this also largely depends on the quality of the material.
Profile for drywall
I started construction by assembling structures for the roof. To ensure that there was as little waste from the profile as possible, I decided to build along the length of the profile (it is 3 m). Therefore, the width of my greenhouse is 3 m and the length is 6. The roof consists of 4 triangles, the base of which is 3 m and the height is 0.6 m.
The length of the sides is 1.615 m. When preparing the profile for the sides, you need to make ten-centimeter allowances at both ends of the workpiece for attachment to the base.
Both sides of the triangle are made from the same profile. To do this, its shelves on both sides are cut to the base of the profile and bent at the desired angle. We extend the missing tails or cut the base to size.
We get the upper part, which we screw to another whole profile (the base of the triangle) so that the top of the triangle falls in the middle of the base. We screw a 60 cm long profile from the top to the base.
We suggest you read: Potassium sulfate fertilizer: application for tomatoes
It will give the structure rigidity. To assemble the frame, you will need 8 guides. We connect them in 2 pieces, twisting them so that we get 4 pieces, each 6 m long. These will be the top and bottom parts of the space frame, forming the long side of the greenhouse.
For the end sides we use three-meter profiles. The length of the profile for the vertical parts of the frame will be 1.43 m. We cut 12 blanks of 1.5 meters each (7 cm are needed to connect to the roof trusses).
Profile cutting
Nuances of choosing a finished greenhouse
When choosing a prepared greenhouse or placing an order for it, you need to pay attention to the details that allow you to make a worthy choice:
- Frame - how well are the fasteners screwed in and how tightly do the windows with glass fit to the frame? The service life of the structure depends on this;
- Greenhouse dimensions. For a better harvest, green spaces must receive a lot of light;
- Sealant - a good element eliminates the shaking of glass in windy weather and does not allow water to leak inside;
- Frame coating. It is good when the profile is powder coated. This method of painting is environmentally friendly, protects the metal from moisture and creates a beautiful appearance;
- Glass - can be used plain or tempered, there are requirements for thickness, it must be at least 4 mm. Using tempered glass has advantages - it is 3-4 times stronger;
- The greenhouse must have a convenient entrance;
- Availability of windows. An essential component of a well-crafted greenhouse. Most plants do not tolerate overheating, and with the help of windows or transoms you can regulate the microclimate;
- Availability of an automatic microclimate system. A useful device for those owners who cannot constantly be on a country site.
How to make a greenhouse yourself
Before you create a greenhouse with your own hands, you will need to prepare the following materials and tools:
- Aluminum pipes.
- Polycarbonate, glass or polyethylene.
- Galvanized fasteners.
- Grinder with cutting wheel.
- Wrench for securing aluminum profile.
- Concrete mixer and containers.
- Drill for drilling holes.
To assemble the greenhouse you will need to correctly bend the aluminum profile. You should not believe popular opinion or the advice of craftsmen who say: bend an aluminum profile only using professional equipment. This material can not only be bent, but also sawed and welded.
Widely used aluminum, which is easy to process at home, is bent using an inverter welder. You can use a bent profile if you plan to assemble a luxury greenhouse.
To correctly bend an aluminum tube, you will need tools and materials such as: a ruler, bending machine, marker, profile pipe, grinder and welding inverter. Often, before bending an aluminum pipe, they begin to make an aluminum greenhouse using a pipe bender.
To create a beautiful and durable structure, you must follow the following installation steps:
- Choose the most open area without shading or outbuildings.
- Level the site correctly and carefully.
- Choose a foundation option taking into account the dimensions of the future structure.
- Install the frame and bend the aluminum tube according to the instructions.
- Cover the frame with a special covering material.
The finished structure requires proper operation, so it must be regularly ventilated and treated with various disinfectants.
The use of aluminum profiles for greenhouses involves the use of polycarbonate coating and the use of double-glazed windows. A high-quality greenhouse must have a foundation, for example, a concrete strip foundation. As an option, you can make a lightweight foundation on driven piles.
An aluminum greenhouse must have a reinforced frame with a pitch of no more than 650-670 mm for glass or 1 m for polycarbonate. The frame structure must be manufactured using “no welds” technology.
Before bending the profile to create a frame of the desired shape, you should compare it with the prepared material for covering the greenhouse. Optimal ventilation is ensured by wide skylights with automatic windows.
The greenhouse should have large double doors to allow easy access for both buckets and wheelbarrows. If the greenhouse is made of glass, then gutters must be provided.
Types of metal enclosure designs
There are three main design options for metal instrument housings:
- on an aluminum frame (aluminum profile frame);
- on a steel frame;
- carrier.
Housing on a frame (frame) made of aluminum profile
Here is the body of the e-liquid filling machine on an aluminum profile frame:
It has a lot of advantages: during the assembly process you don’t need to use welding, that is, you don’t need to look for qualified welders: profile pieces cut to the required size are ordered at the factory, all the fittings are standard, assembly couldn’t be faster, you can even give a screwdriver to your secretary, and she can handle it .
But this particular building was not assembled for sale, but for one’s own use; in the quantity of one piece - two; three - the car turned out to be non-transportable: where it was assembled, that’s where it will die and it will have to work.
This case was assembled by a manager and an electronics engineer, for example
- the case turned out to be expensive in mass production. If you make a welded steel frame, it will be cheaper in series - about three times;
- insufficient rigidity;
- non-transportability. The body can be moved, but there is nothing to load it with, because it is not rigid: by the time it gets from point A to point B, the bolts will unwind and everything will fall apart;
- the aluminum profile does not allow for shaping - whatever one may say, the output is a rectangle or square.
Pros:
- the frame (materials for it) is quickly purchased and quickly assembled;
- You don’t need to look for highly qualified specialists for assembly: if you have a drawing or even a 3D model, then anyone can assemble the body.
There will be no design
One more nuance: in the case of an aluminum profile frame, you cannot afford a good design. You can only make a box, a box for so and so long. This is due to insufficient rigidity and, as a consequence, non-transportability of the finished device: you can hang your steel or plastic panels on this aluminum frame - that’s the whole design; but when you deliver the case to the client, you will be very surprised after unloading: what will arrive at point B is not exactly what you loaded.
And not only that: practice shows that if you look for devices with an aluminum frame, they all look like rectangular boxes, or at best, boxes with glass doors.
Design selection
Greenhouses are classified according to their design:
- Arched - the frame consists of arcs installed vertically and converging to the ridge or a U-shaped aluminum profile that can be bent in any way. In such a greenhouse it is convenient to grow plants that are generally of short height, while tall plants can only be placed in the center. It is good because it clears itself of snow - it simply does not linger, sliding down the slope. The area for its construction requires a large area, which is not entirely convenient when the area is small. Glass is not used in such structures.
Arched greenhouse with polycarbonate cover - Tunnel – aluminum profile pipes are used for the frame. The structure is spacious, tall, super stable, designed for cultivating plants that stretch strongly upward. The width of such a greenhouse can reach 10 m and the height – 5 m, but almost half of it is in the ground. The structure is covered with film or polycarbonate, although sometimes a glass roof is also made.
- Gable - considered classic. Their walls are vertical, which allows you to place several of these plant houses with a large usable area nearby. It fits better under glazing than others.
Greenhouse made of aluminum and glass with a gable roof - Mono-pitched - usually small in size. You can attach it to the wall of the house and organize a winter garden there.
- Pyramid - mainly seedlings are grown in them. They are compact; it is believed that this shape contributes to the accumulation of strong energy, so the plants in them germinate faster and produce the most useful fruits.
Profile for entrance groups
Metal frames are produced in accordance with GOST 22233. They have high levels of corrosion resistance, load-bearing capacity, impact strength, and durability. The heat transfer resistance indicator for combined and insulated profiles is from 0.5 °C/W. For decorative processing of the frame, modern technologies of lamination, anodizing, and powder coating are used. This gives a wide choice of colors and textures: bright or muted shades, imitation wood or precious metals.
We choose a place and arrange the foundation
The location for the future greenhouse should be well illuminated by the sun, have an even topography and be at least 1.8 m away from other structures, otherwise there will be difficulties with installation. If the greenhouse is long, it is located from west to east, and ventilation vents are installed in the southern slope of the roof.
Although the greenhouse is not such a massive structure, and aluminum is not subject to corrosion, you cannot do without a foundation and it must be done according to all the rules. It increases the rigidity of the structure, relieves it from wind loads, and prevents the appearance of white deposits on the aluminum profile at the point of contact with the ground.
Choose a place to build a greenhouse so that no shadow falls on the structure
The most reliable option is a strip foundation. To equip it, you need a trench with a depth equal to the level of soil freezing. At the bottom of it we place what is more accessible - crushed stone wedges or sand; the compacted pillow should have a thickness of about 10 cm.
Before pouring concrete, we install formwork and lay reinforcement. When the poured concrete begins to set, we insert metal elements - anchor bolts, brackets or something else to secure the frame to the base.
You can reduce the cost of building a foundation by installing racks, for which:
- We dig holes around the perimeter of the future house at a distance of 1 m from each other, arrange a cushion of sand and crushed stone, and install the formwork. Here the boards will be completely replaced by roofing felt.
- We lower the aluminum posts into the hole, and around them we place 3 pieces of round reinforcement vertically and weld a horizontal rod to them to ensure rigid fixation.
- The next step is pouring concrete.
Construction of a frame for a greenhouse
An even cheaper option is a wooden foundation. It has no other advantages other than a low price, and a significant drawback - an expensive aluminum greenhouse standing on such a foundation is like a “colossus with feet of clay.”
Dimensions and drawing of a frame for a truss of 8 cards
The mining frame of 8 video cards has the following dimensions:
- 80 cm long.
- 40 cm wide.
- 33cm high truss
The manufacturing process is similar to assembling a frame for 6 video cards. The tool is similar, as will be described below. Again, the frame may have slightly different dimensions depending on the placement of the truss components on the frame.
Before manufacturing, the miner needs to make a sketch on paper and decide on the placement of the power supply, motherboard and video cards on the structure itself. With the proper approach to this process, you can save on material by reducing the size of the structure. But it's better not to do this. The cost of the frame is negligible in relation to the cost of computing equipment, and if you have found the money for 6 or even 8 video cards and other components, then spend a little more and assemble a large frame, it is best that there is room for one or two more graphics cards adapter in case you want to increase the power of your rig. The main thing is that there is somewhere to put it in the room.
Installation of a greenhouse frame with your own hands from an aluminum profile and its cladding
All commercial summer residents must have a greenhouse built on their property. It can not only fulfill its main function, but also correspond to the general style of the estate. Greenhouses made of aluminum and glass fit perfectly into landscape design.
Profile cutting
Then we screw the prepared roof trusses to the resulting structure. On the side of each triangle we set aside a distance of 10–15 cm on each side.
At this level, we screw the profile in such a way that it consistently connects all the triangles together.
To prevent the polyethylene from collapsing at the junction with the metal, I covered the profile with strips cut from the laminate backing. That's why I needed tape. You can use thick fishing line for these purposes. The film is pressed against the frame with wooden slats and screwed with self-tapping screws.
The film is pressed against the frame with wooden slats and screwed with self-tapping screws
The area of the greenhouse is 18 m². I spent 8 hours assembling the frame, working without an assistant. I hope my experience will be useful to you.
Assembly
Installation of frame and covering material
The installation of the frame begins with the installation of the guide profile; other profile parts are then attached to it, depending on the selected model. The main methods of securing profiles are by welding or bolting.
The welding connection method is reliable, but it requires specialized equipment. A small frame can be constructed using bolts.
Greenhouse glazing
To glaze a greenhouse with an aluminum profile frame, double-glazed windows or ordinary glass are used. The first option is expensive, but reliable, it allows you to operate the greenhouse in winter, and the double-glazed window looks aesthetically pleasing.
A greenhouse made of glass and aluminum will not only serve you for many years, but will also decorate your garden plot
If sheet glass is used, it is secured using non-hardening sealant and special clamps. In this case, the sheets are assembled with an overlap of 60 mm to prevent raindrops from getting inside.
Glass and aluminum are the best materials for building a greenhouse. By investing a decent amount of money once, you will get a capital structure that will serve you for many years.
Tags: aluminum, profile, hand, own, greenhouse
About the author: admin4ik
« Previous entry
Frame for soap! By choosing a frame from a standard profile, you can get a lot of bang for your buck. Let's talk
This article is about what most startups/young companies involved in the development of laboratory or production equipment love. And specifically about an aluminum profile frame for a metal body - what kind of jungle it can lead you into if you don’t catch yourself in time and take action. About alternatives, their pros and cons.
A frame made of an aluminum profile (or aluminum frame) for a metal case is great: precise cutting of aluminum profiles, extremely simple assembly of the frame: one or two, and the body of the future device is already showing off at the exhibition.
But the frame remains beautiful as long as you are required to do no more than one or two cases per year. As soon as you want to move to a slightly more serial product, the aluminum frame immediately turns into a pumpkin problem.
Disclaimer
We are in no way claiming that a frame made of an aluminum profile for a metal body is a jamb of jambs and in general, don’t take a profile, ugh. No. This frame perfectly performs its functions, but up to certain limits. We’ll tell you which ones now.
Typical situation: as a rule, the idea to build a device (or installation) on a frame made of aluminum profile and cover the device with casings is one of the first to arise. Among the developers something goes like: “Let’s hurry up, we need to start selling, we’ll finish the details later,” and the basis for the body design is a prefabricated frame made from a profile.
And when the device has already proven its right to exist, it’s time to think about scaling, that is, serious, completely “grown-up” production - problems begin, namely:
- the cost of the housing suddenly increases sharply;
- it turns out that the structure is not rigid enough;
- it turns out that the finished device is not transportable - partially or completely.
All these problems can be solved. But first you need to realize: the current version of your product is not a full-fledged serial product, as it seemed, but just a prototype
(aka
the tent sample
).
You can show this sample at exhibitions and even, with a certain level of finishing, sell it to your first customers. But there is no way to produce it in series: such a design is very limited in its suitability for scaling, and in some cases it is not suitable at all.
— If you are making a bench sample (or a single one - only for internal use) or just a frame to “hang” the equipment and see how it works, then an aluminum profile frame is an ideal option. This is a profile of standard sizes, which will be cut with high precision, it is easy to assemble - you can do everything yourself; These are standard fittings that can be bought anywhere - brackets, hinges, etc.
But it's expensive. And if for one thing it’s normal to pay so much money for the frame, then for a series it’s very bad. And it can start with two copies - depending on who you are, the concept of serialization is very flexible; for other equipment, even ten machines can already be a large series.
There is an exit? Of course I have. An aluminum frame is not the only possible option. Let's try to look at them all - with examples.
Assembly tools
It is clear that to manufacture either a frame or a body, you will need a tool. If the choice fell on a structure made of aluminum or steel, you will need the following tool:
- Bulgarian.
- Drill.
- Screwdriver or riveter.
- A needle file or a file.
Without this tool, high-quality assembly of a frame or frame for a truss is impossible. If you can’t buy a tool, you can find it from your roommate or a friend. If you are assembling a metal frame, then use rivets or bolts with nuts to connect the planks.
A self-tapping design will be less durable. In addition, when installing or removing components, you may be injured by sharp edges. But for assembling a wooden frame, self-tapping screws are ideal.
Short iron corners will help make the structure as reliable as possible, but you can use glue and nails. The main thing is that the frame is stable and you do not experience any inconvenience when servicing the rig.
Don’t forget that the components need to be regularly blown out and, if necessary, additionally cleaned of accumulated dust. The main thing is that the equipment is well ventilated and does not short out . Happy mining!