Watering is one of the hardest gardening jobs. It’s scary to remember how many ten-liter watering cans were dragged onto the beds. We are in the 21st century, but many people are still wary of irrigation systems - it seems that it is terribly complicated and expensive.
Liss1970FORUMHOUSE Member
A lot of people come to our site, and I don’t understand people’s reaction: “Oh! How interesting! But we’d rather carry around with watering cans and then complain about back pain and drought!”
At FORUMHOUSE we talked about the different types of irrigation systems available to every gardener. Today we’ll talk about how to make a drip irrigation system on your site - from the simplest, from what is at hand, to the serious, from normal components.
What materials are required for a drip irrigation system:
Metal-plastic pipe of the smallest diameter (16mm). As a rule, the smaller the diameter of the pipe, the cheaper it is. What are its positive features - it is soft and flexible, it can easily be bent in the desired direction and placed in the garden as needed.
What are its disadvantages - the pipe itself is quite cheap, but the metal tees and angles for it are quite expensive.
Polypropylene pipe.
Drip irrigation made from such a pipe will be an order of magnitude cheaper than from a metal-plastic one, but installation of such a pipe requires a special tool - a pipe soldering iron and the ability to work with it. In addition, such a pipe bends poorly, unlike metal-plastic ones.
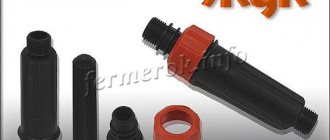
Water filter.
It is advisable to install it immediately after the water container. Purifying the water will prevent the holes in your pipes from becoming clogged. If the holes become clogged, they can be cleared with a drill of the required diameter or simply with a pin, needle, etc.
Water container.
The larger its volume, the better. If you don’t have a large container, you can take several smaller barrels and connect them together.
To create the required pressure, you need to raise the container with water above the ground.
In this case, there is a direct relationship between the height of the container and the water pressure. The higher the water container stands, the greater the pressure in the pipes and the more water will flow over a certain time. In our case, a height of 1-1.5m is quite enough.
Another point is that the pipes must be cut into a container of water about 5 cm above the bottom of the container. What is it for. Sediment and dirt particles will collect at the bottom. Thus, less of this dirt will enter the drip irrigation pipes and less holes in the pipes will become clogged.
At the end of the gardening season, it is recommended to clean the bottom of the container from accumulated debris. To flush out dirt from the bottom of the container, you can embed a separate tap directly into the bottom of the container.
It is advisable that the water container be made of a dark or opaque material. This is necessary so that its material does not transmit light. Without light, algae will not grow in the water, the water will not bloom and, therefore, there will be less chance that the holes in the pipes will become clogged.
Timer for watering.
It must be installed immediately after the water filter. This timer does not require high water pressure and works with water that flows by gravity. The timer runs on two mini AA batteries. The timer has a menu in Russian and has two scales.
Frequency of watering and duration of watering. By setting this timer once, you can forget about watering altogether. You just need to monitor the water level in the container.
If you are unable to monitor the water level in the container, then you can buy plastic fittings from a toilet flush tank and install it in the container. This way the water container will be automatically filled with water.
There are also a number of special sensors that monitor the water level in the tank.
Garden timer for drip irrigation. Works with low water pressure. Suitable for drip irrigation with water container.
There is also a timer available for sale, designed for drip irrigation with increased water pressure. If you connect the pipes not to a container with water, but to a water supply system, then you will need a similar timer.
Garden timer for watering. Works with increased water pressure. Suitable for drip irrigation with water connection.
These timers can be found for sale on the Aliexpress website simply by typing a query in the search bar - “garden water timers”.
Ball valve.
This tap will be needed if you need to simultaneously water plants that require different watering, such as tomatoes and cucumbers. Also, instead of a ball valve, you can install a second timer for watering. This way, you will be able to water different beds with different frequency and duration of watering.
Drip irrigation device
After the drip irrigation system was invented, it gained great popularity. At first, the main branch of its application was greenhouse farming, and then open soil where vegetables and fruits are grown. This system is also used in viticulture.
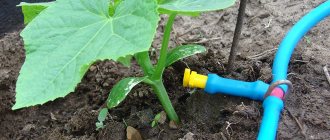
A modern drip irrigation device is a flexible hose into which droppers are mounted.
Droppers help to even out the moisture supply around the entire perimeter. This hose is installed on the surface of the earth. In some cases, it is buried in the soil along the entire required irrigation perimeter. Today, drip systems are presented on the market in a wide range.
It will also not be a problem to create drip irrigation for your dacha with your own hands. However, the drip irrigation device, despite the differences in different models, has no fundamental differences. It consists of the following mandatory elements:
- node that takes in water. Its role can be played by various containers that rise to a height of one to two meters. Water is supplied either independently, or a suitable pump is used for this purpose. Water can come from a river, pond, well, borehole, lake or water pipe. It all depends on your desires and capabilities;
- The filtration unit is one of the most important elements of the system, determining its performance indicators and service life. It is designed to purify water and protect droppers from clogging;
- main-type pipeline - its task is performed by pipes made of polyethylene or PVC with a diameter of at least 32 mm. This is where the drip tape or tube fittings are installed. When creating drip irrigation with your own hands, you can use the simplest option, like a regular garden hose, with which you water your garden.
The only condition is that it should not allow light to pass through so that algae does not grow inside;
- distribution-type pipeline – these are pipe lines into which droppers are mounted. They can have different shapes - flat or cylindrical, a certain gap must be maintained between them, ranging in size from 10 centimeters to one meter;
- hardware elements and fittings – connect all of the above elements, creating a single system. It is possible to use both threaded connections and adapters in this capacity. To connect the system to the water source, a variety of elements are used in the beds, such as tees, corners, reducers, couplings, plugs and fittings.
The latter can be with or without a faucet. Taps allow you to water crops that require different amounts of water.
When creating drip irrigation with your own hands, you should keep in mind that the use of fittings made from ferrous metal alloys is prohibited. This material is not resistant to corrosion processes, and rust subsequently clogs the system.
Drip irrigation scheme
A drip irrigation scheme is an extensive water supply network that supplies moisture to the root systems of plants. The drip irrigation scheme is very simple - first, it is supplied from a well, lake, water pipe or other source of water to the water intake unit, and then, through main pipes and drip tubes, it moves directly to the roots of the plants.
Drip irrigation, compared to conventional irrigation, does not disturb the natural structure of the soil. Plants will not get burned even with excessive sun activity, which is caused by moisture getting on the leaves.
You can create a similar scheme both in a greenhouse and in open ground. You should do drip irrigation in a greenhouse with your own hands in order to provide plants that are not provided with precipitation with the necessary amount of moisture. Lack of water will lead to their death.
Do-it-yourself drip irrigation in a greenhouse is a significant help for a person who does not have the opportunity to constantly care for cultivated plants.
After you create drip irrigation in a greenhouse with your own hands, you will notice a significant increase in plant productivity, the incidence of plant diseases will decrease, and their appearance will improve. This will provide you with economical water consumption.
In this case, excessive moistening of the surface layer of soil will not occur, with normal moistening of the deeper layers. Each plant will receive water in the required quantity.
The design of a modern drip system can be automatic - this allows you to determine the exact dosage for each plant and will facilitate the organization of fractional watering. The circuit can be equipped with connected rain sensors - if it rains in sufficient quantities, water will not be supplied.
Automatic elements allow you to determine convenient conditions for turning on irrigation, for example, at night, when a sufficient amount of water is collected in the water supply system or well.
The fairly high price of automatic elements is justified by the numerous advantages of such a scheme - it absolutely does not require human participation, so you can leave the dacha for a fairly long period of time.
Benefits of drip irrigation
Drip irrigation has many advantages over traditional site irrigation using a watering can or hose:
- water consumption is significantly reduced, since it is supplied directionally and is not spent on moistening the entire soil and feeding weeds;
- labor costs are reduced and, as a result, time is saved;
- water does not get on the leaves of plants, which reduces the risk of fungal diseases;
- along with the water supply, you can organize root feeding;
- even when watered with cool water, plants experience less stress;
- As a rule, with drip irrigation, the root system of plants develops better, which contributes to the rapid growth of your green pets.
Pros and cons of self-made irrigation organization on a personal plot
The advantages include:
manufacturing a system specifically for a specific plot size;- calculation of all parameters for a specific area with different types of plants;
- reducing the cost of the entire structure as a whole;
- modernization of standard parameters;
- creating a high-quality product that can serve for many years.
Minuses:
- the entire system can cost significantly more than the factory one;
- possible problems with the correct calculation of parameters;
- problems with operation and maintenance;
- high costs for individual components.
Drip irrigation system options
A drip irrigation system can be assembled from components purchased in a store. In this case, in appearance and functionality it will be close to industrial designs.
Or you can use the inventions of folk craftsmen and build an irrigation system from plastic bottles or medical droppers. The choice of circuit and components depends only on your budget and skill level.
Traditional design
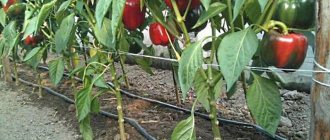
The most common drip irrigation scheme includes a water source (river, lake, well, well or just a barrel of water), a branched pipeline with plugs, drip hoses and a tap so that it is possible to stop the water supply if necessary.
Hoses for drip irrigation, thanks to the special design of the labyrinths, provide the same water pressure throughout the entire line, which usually does not depend on the terrain. These hoses can serve you for up to 10 seasons.
You can also use thinner drip tapes, the service life of which is up to 4 seasons (thin-walled ones - 0.1-0.3 mm - are laid only on the surface of the ground and last no more than 1 season). But they have a serious drawback: drip tapes are often damaged by rodents.
To lay the pipeline from the water source to the garden bed, pipes and connecting fittings made of polypropylene or polyvinyl chloride are used.
They do not corrode when exposed to water and most fertilizers, and do not release substances that can cause significant harm to your plants. The most popular pipe diameter for installing a pipeline used for watering a small garden, greenhouse or lawn is 32 mm.
If different plants have settled in your garden that require uneven soil moisture, you can install taps after the tees, which will allow you to limit the water supply to certain areas.
If you use water from a well or borehole to water your plants, a fine filter will be sufficient. If the system receives water from a river or lake, a coarse filter will also be required.
Drip irrigation using plastic bottles
This is perhaps the most inexpensive and most popular way of watering plants in summer cottages. In part, it is reminiscent of local watering using clay jugs, which was used several thousand years ago and is now being reintroduced in the United States in the wake of the popularity of organic farming.
If you have several large-capacity plastic bottles, use an awl with a needle diameter of 1-2 mm to make small holes 2 cm above the bottom, and then dig the bottle into the bed between the plants (the depth depends on the location of the root system).
The holes should be directed towards the roots of the plants. It is not advisable to make punctures at a level below 2 cm from the bottom of the bottle, since this distance will act as a sump that protects the drip holes from clogging
When organizing drip irrigation in this way, it is important to take into account the soil structure. If the soil on your site is loose, rich in oxygen and absorbs moisture well, you will need a small diameter awl to ensure that the holes for drip irrigation do not get too large.
Otherwise, the water will be used up too quickly. If the soil is hard to absorb water, it can cause the plastic bottle to shrink due to the vacuum created inside. In this case, it is necessary to additionally punch a small hole in the upper part of the bottle protruding above the ground (preferably in the lid).
If the plants have grown a lot and the plantings have become excessively dense, making it difficult to fill the bottles with water, you can use a watering can with a piece of hose attached to the spout.
You can determine how well the soil in your area absorbs water by looking at the bubbles inside the bottle.
But it’s better to leave the bottle in the ground for a while, and then dig up the ground around it and check whether your green pets are getting enough moisture. The inside walls of the bottles become silted, so at the end of the season it is advisable to dig them out and wash them or replace them with new ones.
For those who want to keep everything under maximum control, there are more complex designs with bottles.
One of them involves the use of thoroughly washed ballpoint pen tubes. They are inserted into a small slot on the bottle and directed towards the plant. The end of the tube is closed with a plug (toothpick or match) and a small hole is made with a needle. The bottle is partially dug into the ground.
You can also hang upside-down bottles, the lids of which have been pre-pierced, above the beds.
Drip irrigation using this scheme is especially easy to organize if you have droppers with bags for medical solutions.
Pipe problems and their elimination
The effectiveness of drip pipes is highly dependent on operating conditions. The equipment can last a month, or maybe five years - it all depends on following the basic rules of its use.
The main causes of problems with drip pipes are:
- clogging;
- root germination;
- improper storage during the off-season.
Next, the listed problems will be considered in more detail, and options for their prevention will also be proposed.
Clogging and flushing the system
Country irrigation is often carried out with water from a well or natural reservoirs, so periodic clogging of pipes is understandable.
To purify groundwater, a mesh filter will be sufficient, but when watering from reservoirs, you need to install an additional disk filter device. In the absence of preliminary cleaning, clogging of the droppers can occur within a few days.
Regardless of the presence of filters, drip pipes must be regularly cleaned of mechanical sediment using water pressure. To do this, you need to open the far end of the pipeline and supply water to the system at a speed of 6-7 l/min. Washing continues until the sediment is completely cleared.
You can make a clogged hole in the dropper using a regular foot-operated car pump. It is enough to place the pump hose to the hole in the empty pipe and pump sharply
Elimination of bacterial mucus from the system is carried out by flushing with a 0.5% sodium hypochlorite solution. It is necessary to fill the system with the mixture and leave for 12 hours. After this, drain the chlorine liquid and rinse the pipeline with clean water for 10 minutes.
As contamination occurs, the drip system is also cleaned of salt deposits with 0.6% nitric, orthophosphoric or perchloric acid. The water used should be as warm as possible. The pipeline is washed with an acid solution for 50-60 minutes. After the procedure, you should rinse the system with clean water for half an hour.
Preventing roots from growing into pipes
Drip systems with round holes for water outlet are most susceptible to germination. The more moisture deficit plants experience, the stronger their roots are drawn to its source. Therefore, the basis for preventing root germination is sufficient watering.
Additionally, you can periodically move the pipes a few centimeters to the side so that the roots do not concentrate near the droppers.
The germination of plant roots into the holes of drip pipes in compact closed soils is especially important. In such cases, it is recommended to periodically change the location of the water supply rod
If the problem cannot be solved by these methods, then it is possible to use special chemicals that inhibit the growth of the root system. But it is recommended to use them carefully so as not to destroy the plants being grown.
Storing pipes in winter
You need to plan cleaning of the drip line in advance so that unexpected cold does not freeze the water in the system and damage the pipes.
Winding pipes onto a drum is an ideal option for long-term storage: hoses and built-in emitters are not crushed, and the roll can be easily protected from rodents
Before cleaning the pipeline for the winter, it is necessary to clean it of mechanical sediment, mucus and lime deposits. You need to wind up the drip system slowly, raising the hoses high to drain the water. Rolls should be stored in a dry place, preventing the entry of rodents that can chew on the equipment.
Compliance with these rules will allow you to operate drip pipes without problems during the entire warranty period.
Watering using medical droppers
This type of watering is extremely convenient for several reasons:
- low cost of components;
- easy water supply to any plant, which is very convenient if your beds are not perfectly level;
- The water pressure can be adjusted using the wheel located on each dropper.
Do-it-yourself drip irrigation: examples of devices
There are many options for designing the system - it easily adapts to any conditions. Most often the question arises about how to organize watering independent of electricity. This can be done if you install a sufficiently large water container at a height of at least 1.5 meters.
This creates a minimum pressure of approximately 0.2 atm. It is enough to water a small area of a vegetable garden or garden.
Water can be supplied to the container from a water supply system, pumped by a pump, drained from roofs, or even poured into buckets. A tap is made at the bottom of the container, to which the main pipeline is connected.
Next, the system is standard: a filter (or a cascade of filters) is installed on the pipeline up to the first branch on the irrigation line, and then there is distribution to the beds.
For the convenience of introducing fertilizers on the highway, it is possible to install a special unit. In the simplest case, as in the photo above, it can be a container on legs, in the bottom of which a hole is made and a hose is inserted. A shut-off valve (faucet) is also needed. This cuts into the pipeline through a tee.
If necessary, you can water both shrubs and fruit trees.
The whole difference is that the tape or hose is laid around the trunk at some distance. One line is allocated for each tree; bushes can be watered several times on one line. Only in this case you need to use a regular hose into which to insert droppers with the required water flow.
If the low pressure in the system does not suit you, you can install a pump on the main water supply to increase the pressure (see photo below) or a full-fledged pumping station. They will provide water even to far-flung areas.
Can water be supplied directly from the source? It is possible, but not advisable. And this is not due to technical difficulties - there are not many of them, but to the fact that plants do not like cold water. That is why most small-scale drip irrigation systems - for greenhouses, vegetable gardens, orchards and vineyards - use storage tanks. The water is heated in them and then distributed throughout the area.
How to make a control panel for a greenhouse?
Organizing drip irrigation for a greenhouse is not much different from planning a similar system in open ground.
Calculations and planning
Step-by-step instruction:
- It is necessary to prepare a container for supplying water.
- Considering the length of the beds, their number and location of seedlings, calculate the number and length of pipes or ribbons.
- Calculate the required number of branches from the common drainage pipe.
- Calculate the required amount of water for plants and the diameter of the droppers to supply it.
Based on the site plan and the location of the water tank, you need to prepare all the necessary materials.
You will need the following:
- Tank. It must be made of stainless steel or plastic.
- Filter for water purification.
- Main shut-off valve. Secondary taps may also be needed to regulate the moisture supply to individual beds.
- The main pipe across the width of the section with a diameter of 32 mm.
- Distribution pipes or hoses equal to the length of the bed with a diameter of 16 to 25 mm.
- Fittings, couplings, elbows, tees, plugs.
All necessary elements are selected taking into account the diameters of pipes or hoses.
Various scheme options
The installation schemes for a drip system for greenhouses are also identical to irrigation in open areas. The main difference is the location of the distribution lines themselves. They can be arranged according to the following schemes:
- Looped circuit . It involves connecting all distribution lines into one system. This type of irrigation is suitable for small greenhouses with 2-4 beds.
- Single circuit . It assumes the location of one line to supply water to 2-4 beds. Point supply to plants is carried out using long hoses with droppers or regulators. The system is suitable for areas larger than 50 square meters, with a large number of plantings.
The choice of irrigation scheme can play an important role in calculating the total water consumption for irrigation and its overall quality for individual plant species.
Tape
Tape-type drip irrigation is the optimal solution for greenhouses of any size. To create such a system yourself you will need:
- a water tank connected to the water line;
- flexible hoses, thickness up to 0.8 mm and diameter up to 22 mm;
- main pipe with a diameter of 22-32 mm;
- couplings, adapters and tees, according to the number of beds;
- drippers or water supply regulators.
After purchasing everything you need, you should collect all the elements into a single system:
- Place the container on a height up to 2 m.
- Connect it to the water supply system. You can use a regular hose or stretch a plastic pipe with a diameter of 25 mm, insulating it in advance.
- Connect the main shut-off valve to the tank on the site side.
- Attach the filter to the tap through the coupling.
- Stretch a vertical main pipe with a diameter of 32 mm from the filter. The pipe is pulled to the ground, and then through a connecting angle along the width of the area.
- Depending on the number of beds, cut connecting tees into the main pipe and attach adapters to them.
- Connect the prepared hoses to the adapters.
- Plug the ends of the hoses.
- At the final stage, make holes in the hoses next to the plants and insert water supply regulators into them. You can attach long drippers with regulators to provide water to 2-3 rows from one hose at once.
If necessary, the system can be supplemented with an electric pump and timer.
From pipes
To assemble a pipe irrigation system you will need:
- water container;
- stopcock;
- additional taps;
- filter;
- main pipe;
- distribution pipes;
- connecting elements - adapters, couplings, fittings, tees, plugs;
- water supply regulators.
Build process:
- Place the water tank on an elevated position.
- Install a shut-off valve into it.
- Attach the filter to the tap through the coupling.
- From the filter, lower a main pipe with a diameter of 32 mm to the ground.
- To the pipe, through the elbow, bring the main pipe across the width of the section.
- Embed pre-prepared tees into it. The elements are cut exactly parallel to the beds.
- Connect distribution pipes with a diameter of 22-25 mm to the tees.
- Plug the ends of the pipes.
- Make holes in the distribution lines next to each plant.
- Insert water supply regulators into the holes.
The pipes retain the initial pressure better, since they do not bend or twist.
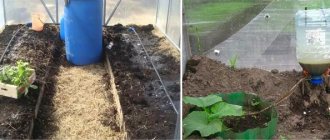
From plastic bottles
To create an irrigation system from plastic bottles you will need:
- the bottles themselves, in quantities equal to the number of plants on the site;
- holders - regulators or ordinary strong wire.
The assembly process can be carried out in 3 ways:
- The bottles can be buried in the ground next to the roots of 1-2 plants. Before this, 5-6 holes are made in the container, near the bottom. Pour water into the installed bottle, close the lid and make a hole in it for air access.
- The hanging option involves mounting the bottles on a wire or rope pre-stretched over the plants. One hole is made in the bottles suspended above the plants.
- Ground option. For it, you need to purchase special dropper holders. Water is poured into the bottle and the nozzle is screwed onto the neck. The bottle is installed with a nozzle in the ground, next to the plants.
There is an easier way to create such an irrigation system. To do this, simply place a plastic bottle with a hole made closer to the bottom next to the seedlings. The housing of a stationery pen can be inserted into the hole to ensure the correct direction of water supply.
Drip irrigation: how to calculate the system
There can be one container from which water is supplied to the system - common, as in the picture above, or separate for each section. If there is a significant distance between irrigation objects, this may be more profitable than pulling a main pipeline.
The required volume is calculated depending on the number of plants and the volume of water for their normal development.
How much water is needed to water vegetables depends on the climate and soil. On average, you can take 1 liter per plant, 5 liters for bushes and 10 liters for trees. But this is the same as the “average temperature in the hospital,” although it is suitable for approximate calculations. You count the number of plants, multiply by the consumption per day, and add everything up. Add 20-25% of the reserve to the resulting figure and you know the required volume of capacity.
There are no problems with calculating the length of the main line and drip hoses. The main line is the distance from the tap on the tank to the ground, then along the ground to the watering site, and then along the end side of the beds.
By adding up all these lengths, the required length of the main pipeline is obtained. The length of the tubes depends on the length of the beds and on whether water will be distributed to one or two rows from one tube (for example, using spider drippers you can distribute water for two to four rows at the same time).
The number of tees or fittings and taps (if you install them) is determined by the number of pipes. For each branch using tees, take three clamps: press the hose to the fitting.
The most difficult and expensive part is the filters.
If water is pumped from an open source - a lake or river - you first need a coarse filter - gravel. Then there should be fine filters. Their type and quantity depend on the condition of the water. When using water from a well or well, a coarse filter does not need to be installed: primary filtration occurs on the suction hose (if a pumping station is used).
In general, there are as many cases as there are solutions, but filters are needed, otherwise the droppers will quickly clog.
How to use?
The frequency of drip watering of the garden and vegetable garden may vary depending on the type of soil, but should be at least once a week. In the process, it is necessary to provide irrigation to the root system at a depth of 15-20 cm. In hot weather, it is worth drip-watering the plants in the garden about three times a week for 2-3 hours.
It is recommended to irrigate flower crops immediately after planting daily, supplying moisture to the soil to a depth of 5-10 cm. During the growing season, drip irrigation is carried out every three to four days, depending on weather conditions.
We make an irrigation and watering system from pipes
When installing a main pipeline from a water tank to an irrigation site, pipes and fittings made of the following materials are used:
- polypropylene;
- PVC;
- HDPE;
- PVD.
These pipes withstand contact with water perfectly, do not corrode, are chemically neutral and do not react to the flow of fertilizers through them. To irrigate a small area, in most cases a diameter of 32 mm is used.
Main pipes must be plastic. And what type you will need, choose for yourself.
It is necessary to connect tees at the points where the lines are branched off. And connect drip hoses or tapes to their side outlets. For this you also need to purchase adapters. They are attached using metal clamps.
For additional convenience, after each tee you can install taps that will regulate the water supply. This is convenient when different vegetables are grown in the garden.
Installation:
- We install the barrel on an elevated platform. This will help get pressure to supply water.
- We attach the main pipe (32 mm in diameter) to it. It will supply water to the distribution pipe.
- A PVC distribution pipe is laid along the entire perimeter of the garden.
- Holes for taps are made in it. This can be done with a screwdriver.
- Taps are inserted into them. And drip tapes or hoses are already installed on them.
- System installation is ready!
Polypropylene pipes - main characteristics
Compared to conventional metal pipes, polypropylene products have a set of advantages that make them a good choice for installing a drip irrigation system on a personal plot.
Polypropylene pipes
It is worth highlighting the following advantages of PP pipes:
- light weight;
- cheapness;
- ease of installation;
- no condensation;
- almost complete absence of deposits on the internal walls;
- service life is about 50 years.
Polypropylene pipes and fittings
In order to standardize characteristics, all polypropylene pipes are marked, dividing them into four groups.
- PN10 - pipes designed only for cold water (up to +45 degrees) and exclusively at pressures up to 10 atmospheres. Due to relatively weak characteristics they are rare.
- PN16 - pipes designed to operate at pressures up to 16 atmospheres and temperatures up to +60 degrees. Suitable for drip irrigation system.
- PN20 – maximum operating pressure is 20 atmospheres, can withstand temperatures up to +95 degrees.
- PN25 - the permissible temperature is similar to the previous type; the pressure in them can reach up to 25 atmospheres. They are equipped with reinforced layers that increase the strength of the pipe.
Designation of the main indicators on the pipe
Types of polypropylene pipes
In drip irrigation lines, the operating pressure does not exceed 2-3 atmospheres, and the water temperature is equal to or lower than the ambient air temperature. Therefore, polypropylene pipes PN10 and PN16 can be used here. The use of PN20 and PN25 is acceptable, but their characteristics are redundant for such a system.
Prices for polypropylene pipes
polypropylene pipes
Drip irrigation design mistakes
When looking for an answer to the question of how to make drip irrigation in a greenhouse, people often make mistakes at the design stage, as well as during operation:
- excessive water saving, and small volume of supplied moisture. Since the drip system results in increased yield and growth, the root system requires more moisture. The drip system can rationalize water consumption. However, water should be provided in the amount the plants need to avoid the exact opposite of the desired result. Therefore, the container should be selected in accordance with the needs of the crops being grown;
- choosing the wrong drip irrigation system. The system should be selected based on the conditions of a particular site. A pipeline with a diameter that is too small is not suitable for a large area. You should also pay attention to the pressure level of the system;
- choosing a dripper with the wrong flow rate - it may not be suitable for the soil type. A properly selected dripper turns the ground into a smooth, damp strip;
- errors made during installation. When installing an irrigation system, you should strictly follow the instructions.
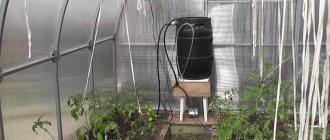
Installing the container
The water tank must be located at a certain height so that the force of gravity acting on the liquid creates pressure in the pipes of the drip irrigation system. On average, the container is raised to a height of 2 meters - thus, the pressure in the line is sufficient for effective watering of 40-50 square meters. If the area with beds has a large area, then either the tank is raised higher or a pump is installed in the main line.
Step 1: Build a support for the container. The easiest way to make it is from timber with a large cross-section and thick wide boards. Drive the beam to a certain depth into the ground, lay the boardwalk on top. For greater strength, install crossbars between the supports. Instead of timber and boards, you can use bricks or steel pipes.
Water container with wooden support
Step 2. Mount the connection to the drip irrigation line on the container. Install the fitting and tap at a height of 5-10 centimeters from the bottom of the container - this will prevent large particles of dust and dirt from getting into the pipeline.
Step 3. On the opposite side of the container, install a connection to the water supply. Use a shut-off valve with a float mechanism - the device will automatically open to refill the tank and close when the water level reaches its maximum.
Shut-off valve with float mechanism installed in water tank
Step 4: Lift and place the container on the support. Postpone the direct connection of the tank to the water supply until the last stage of arranging the drip irrigation system.
Due to its large dimensions, the container along with the support should be installed outside the greenhouse
An open tank can be used as a container - in this case it will be partially replenished by rain. But at the same time, take care to install a good filter - along with precipitation, a lot of dust, debris and leaves will get into the container, which can cause the pipes to become clogged.
Tips for installing drip irrigation
The following tips will help you understand how to make drip irrigation in a greenhouse as efficient as possible :
- before installation, draw a detailed diagram of the room, indicating its size and location of plants;
- select hoses of the appropriate type;
- think about how the water containers will be located. What volume will be optimal for your site, how the tank will be filled, how the pipelines will be laid, and where the fittings will be located;
- if possible, it is best to use rainwater for irrigation;
- the water container must have a minimum volume of one hundred liters, regardless of the size of the greenhouse;
- calculate what spare parts and system elements you will need, and in what quantities.