Arrangement of passages delimiting the area allocated for a vegetable garden is a pressing issue for those who have stationary beds on the site. When thinking about how to make paths between the beds, summer residents have several goals. This means comfort and convenience when caring for plants, preventing the growth of weeds, reliability and durability. Considering the cost of modern building materials, owners try to save money by using everything that is more or less suitable or lying around unnecessarily in the barn: old carpets, scraps of linoleum, sheets of roofing felt. The last thing people think about is how aesthetic the result will be, not to mention the environmental side of the issue. But if you approach the problem correctly, it is quite possible to find the optimal solution.
Hardworking farmers sometimes sow the free area with lawn grass, creating a beautiful, natural “carpet” that is pleasant to walk on barefoot.
Reasons for the need to arrange row spacing
For those gardeners who every year completely dig up the plot with a cultivator or walk-behind tractor and change the location of the beds, this issue is not so pressing. Covering the passages with any kind of non-decomposing material would complicate the digging process, so the paths are mulched with hay and grass clippings. Beds with fences require a different approach, since mowing in narrow rows is not very convenient.
Overgrown paths don't just make it difficult to care for garden crops. Weeds grow into the beds with their roots, shed seeds, taking over the territory for themselves, taking away nutrition from the planted vegetables. This affects the quality and quantity of the harvest, negating the gardener’s efforts in loosening, weeding, fertilizing, and watering.
Summer residents who come to the site once a week sometimes fail to see the planted vegetables in the riot of weeds.
Cleared of weeds, the bare earth turns into a slimy abyss in bad weather. In the heat, the mud mess dries out, forming a hard, airtight crust; in addition, it is trampled underfoot. Under the compacted layer of soil, the roots of cultivated plants begin to suffocate. Faced with such a problem for the first time, plot owners initially find a way out by covering the rows with all sorts of available materials.
How to use?
The use of black covering material can be different. Users can place it both in the country and in the garden. Let's look at the most popular methods of application:
- frame;
- frameless;
- mulching.
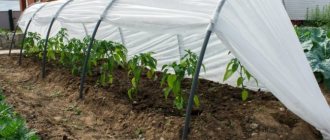
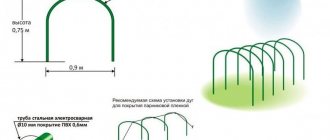
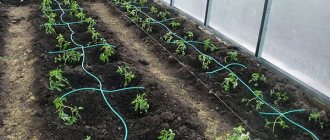
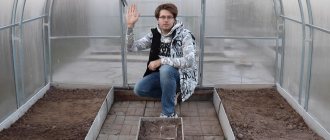
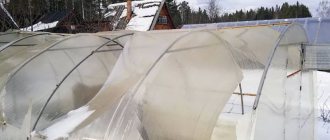
In the first case, the material is stretched onto a specially prepared frame. The purpose of greenhouses is precisely to allow the soil to warm up as early as possible so that seedlings can be grown in it. The canvas should be quite dense, since it will be subject to significant stress in the form of precipitation, wind and lower temperatures. However, at the same time, sufficient humidity and the necessary temperature conditions must be maintained inside the greenhouse or greenhouse so that the plants grow and develop more actively.
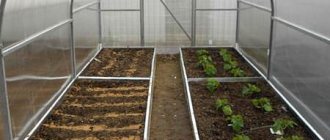
The frameless method is suggested when you need to warm the ground and hide the seedlings from sunlight. A material that is not too dense is quite suitable for this. The soil is covered immediately after the seedlings are planted. This fabric will allow air and water to pass through, but will also provide protection from sunlight. Since it does not weigh too much, the seedlings as they grow will be able to easily lift it without breaking.
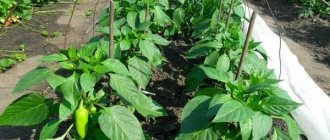
When mulching, any of these non-woven materials can be used. In this case, the soil will not overheat and dry out, and weeds will also stop actively growing. Since water and dirt do not get under the canvas, the fruits remain clean and do not rot. The microclimate is optimal for the plantings to develop properly.
Covering material must be laid on a bed prepared in advance. Next, crosswise cuts are made along the marks. Seedlings are planted in these places. It should be noted that in this case the seedlings will not require frequent watering and weeding. The harvest will be abundant and of high quality.
For information on the use of covering material in a summer cottage, see below.
Disadvantages of waste coatings
of linoleum are laid out as a covering . The first negative point that is worth noting right away is that the smooth surface is extremely slippery. Even in dry weather, this quality makes linoleum dangerous. Therefore, it is better to place it wrong side up.
Accidentally spilling water or liquid fertilizer on a smooth surface increases the risk of slips and falls.
In any case, such material is a bad choice for use on the site for many reasons:
- does not allow moisture and air to pass through;
- when destroyed under ultraviolet rays, it releases toxic polymers and phenols;
- heats up, creating unfavorable conditions for the root system;
- cannot withstand low temperatures in winter, warps and bursts.
Tar paper contains lead, copper, benzene, toluene, acetone and gasoline solvents, and bitumen. To minimize the concentration of volatile toxic compounds and their release into the air, felt is specially coated with protective compounds that lose their properties over time. When heated by the sun's rays, chemical substances inevitably decompose unnoticed by the eye, evaporate, and pass into the soil, that is, into the environment. It is pointless to talk about the safety of a material that has become unusable over a long period of use on the roof as a primer.
In garden conditions, natural carpets are impractical and short-lived, while synthetic ones are unsafe
Leaving aside individual aesthetic perception, all that can be said about synthetic carpets is that they are impregnated with fire retardants, which can also be released under the sun's rays. The rugs are a fairly reliable obstacle to unwanted growth growing from below. However, it is worth considering that nothing will prevent the seeds that fall on the surface from taking root. It will be difficult to clear away debris and pull out the “green aggressor” from the tightly woven threads of the carpet with your bare hands.
It is appropriate to lay the listed materials to combat perennial, difficult-to-eradicate weeds, in shaded areas where the sun's rays do not linger for long during the day, or to use them instead of a substrate for backfilling with gravel, sand, or laying tiles or bricks.
How to cover beds: covering material and its types
Materials intended for plant protection are most often called spunbond, agrotextiles and agrofibre. From a technical point of view, these are different names for the same covering product. In practice, only the specific gravity and color of materials, their ability to retain ultraviolet radiation and transmit water are important. Geotextiles occupy a special place among such products. It has a higher density than other analogue covering fabric. The use of geotextiles by gardeners is limited to creating a substrate for growing plants. In this way, effective weed control is carried out.
Covering material for beds is called spunbond, agrofibre or agrotextile.
The average shelf life of agrofibre is 6-7 years, and geotextiles (as a more durable analogue) last even longer. Such a long period of operation makes it economically feasible to purchase covering materials as opposed to quickly tearing polyethylene.
Nuances of arrangement
The row spacing sometimes has to be changed. If the design of the beds is collapsible, then it makes sense to organize removable and portable coverings. In a number of cases associated with periodic relocation of tracks, they are not designed in a major way. The gaps between the fragments are not filled with cement mortar, bonding them tightly, but filled with filler (the same sand, gravel, etc.).
To prevent grass from growing, the paths between the beds are covered with bulk materials, laying them on a substrate
It is advisable to make the distance between the rows such a width that there is enough space to turn around with equipment, drive a cart, put a box with seedlings and garden tools. Elderly people sometimes need a stool to rest on. The legs of a bench, like the wheels of a loaded wheelbarrow, can fall through or get stuck in muddy soil or too soft mulch. All these nuances are taken into account when arranging paths in the country.
Weed control film
Until recently, black weed film was the main material used by gardeners. Since it has excellent darkening properties, weeds actually do not survive under it. The disadvantage of this material is that since it does not allow water to pass through, the condensation that accumulates under it causes the development of fungal diseases. In addition, it is usually enough for one season.
Advice! In order not to change it every year, you can purchase reinforced film - it is stronger and can even be used to cover the passages between the beds.
Coverage selection criteria
Wear-resistant to high atmospheric and mechanical loads, the opaque coating must be resistant to ultraviolet radiation, damage by mold fungi, and destruction by moisture. It is important that it be “breathable”, moisture- and air-permeable, as environmentally friendly as possible, and in no way come into contact with plants or soil during its entire service life. What is needed is a material that has low thermal conductivity , is not afraid of strong drops in temperature , has anti-slip properties , and is easily cleaned of moss , dirt , and minor surface growth .
To cover the paths between the beds from weeds, various building materials are used that require compliance with laying technologies
Each type of coating has its own advantages and disadvantages. In factory products intended for use in outdoor conditions, almost all of the specified options are met.
The essence and purposes of mulching
Mulching is an agrotechnical technique designed to create favorable conditions for the growth and development of plants. The top layer of soil is covered with special materials of a different texture, which produce one or another effect.
Basic goals:
- preventing excessive evaporation of moisture;
- protection of plants from frost and overheating;
- improving soil fertility;
- maintaining the breathability of the earth;
- prevention of soil erosion - washing out and weathering;
- slowing down the growth or completely destroying weeds.
The type of coating is selected in accordance with priority tasks.
The simplest installation method
First, weeds are carefully removed from the surface and the roots are uprooted. On a cleared and leveled area, a base is laid that ensures tolerable movement and inhibits the growth of nettles, grass, wheatgrass and other harmful types of vegetation. Suitable remnants of recycled materials available in almost every household include: thick cardboard, thick plastic film, newspapers, and magazines. Geotextiles in this regard are the most preferable option, as they fully possess the required properties.
Wide passages when arranging narrow beds (according to Mitlider) are usually covered with a mulch layer of mown grass, pine needles, and bark
The base is additionally secured with a lattice of slats, mesh, or weighted, sprinkled with sand, crushed stone, gravel, expanded clay, river pebbles, lumber (sawdust, chips, shavings). In this way, the laid substrate is fixed in a designated place so that germinating herbs and their rhizomes, wind or walking movements do not move it. At this simplest, relatively cheap and quick stage, the arrangement work can be considered complete. But you need to understand that the embankment paths are quite soft and unsteady. Small pebbles will get into your shoes when walking and scatter throughout the area; the sand will have to be leveled and renewed frequently, just like a rotten, torn base. It will last no more than one or two seasons.
How to carry out installation correctly?
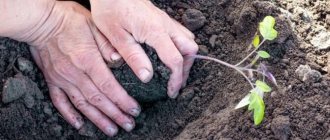
According to the rules, in any material for covering plants you need to make a hole crosswise - and then plant it in it.
But the experience of many summer residents shows that it is much more rational to cut a small round hole. After all, the corners often cover the plant, but it is easier to fill the hole with soil later. Correct Application:
- Step 1. Level the soil in the beds.
- Step 2. We spread the purchased film nearby on the ground and mark the location of future bushes or seedlings on it.
- Step 3. Using a small saucer, cut out circles along its edges (or make cross-shaped cuts). The distance between the circles should be about 40-45 cm - or depending on the characteristics of growing your crop. Just don’t plant too close (remember Mittlider’s science), otherwise you will end up with a dense and poorly ventilated strip.
- Step 4. Spread the roll on the beds and press it along the edges with pebbles.
- Step 5. We lay a new plantation in the holes made. You can, however, not cut circles of holes in advance, but make cross-shaped holes right in the garden bed - this is something that is convenient for someone.
Even if just one weed grows, which is unlikely, it will be so weak that you can pull it out without effort. You can feed the plants in the same holes where strawberries or any other plant are planted.
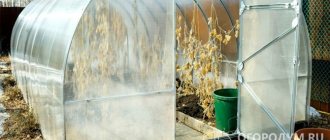
Here are detailed instructions on how to get rid of weeds on a path in a greenhouse once and for all:
Step 1. Prepare the necessary tools: a board, a hand cultivator, a wheelbarrow, a shovel and a scoop. Step 2. We purchase any inexpensive non-woven material: spunbond, agrotext, agrospan or geotextile. It is advisable to take black - it is called “mulching”. It will let water and air through, but not light - and therefore you won’t see puddles on the path between the greenhouse beds, but you won’t see more weeds either. Step 3. We collect the mulching substrate: crushed stone, slate, bark, expanded clay, decorative stone or just gravel. Step 4. Remove the top layer of soil from the path, using a board or plywood for convenience.
It is important that the soil surface is strictly horizontal. Step 5. Compact the path well and, if necessary, remove excess soil
The path should be neat. Step 6. Cover with prepared covering film. Lay the joints overlapping so that seeds do not accidentally fall into the cracks. If you have beds in the greenhouse and not boxes, then leave a little allowance at the edges so that later gravel or something else does not mix with the soil. Step 7. Fill in the mulching substrate so that its level is level with the ground or slightly lower. Step 8. Level the crushed stones or stones and trim off the excess edges.
That's all - now you will forever forget about the problems with the greenhouse path. Clean, tidy and long lasting.
By the way, enterprising summer residents have learned to build this interesting thing for attaching film. So, from thick wire with a diameter of 0.3, we cut several pins 20 cm long and bend it in a vice. Lay out the cover and use the same pins to secure it around the edges. Pieces of wire will easily fit into it - even into the thickest non-woven fabric; now nothing will blow away or touch the material, and you no longer need to lay a bunch of stones or bricks. Very convenient and neat. And in the fall, when the film or non-woven needs to be removed, just take out the pins and hang them on the fence - it’s quick.
If the film is handled carefully, it can be used next year by planting seedlings in existing slots. They are often used in this way: in the spring we cover them with glassine to choke out all the weeds. Afterwards, we dig it up, and then cover it with film with a density of 70 or more and lay it in two layers.
Durable options
It is more rational to use lightweight bedding and agrofibre as a shock-absorbing and drainage layer for more durable and reliable materials. The compacting layer must be at least 5 cm. A good hard coating is laid on top. The passages between plantings are made using flat stones, bricks, tree cuts (various types of wood) or industrial products - paving, rubber or plastic tiles.
Capital construction in a vegetable garden is only appropriate for permanent placement of high beds planned for many years
You can cast concrete blanks yourself using molds of various configurations. Making homemade blocks will allow you to save a lot of money, while they also effectively fulfill their role. Whatever category of covering for organizing interbed space is chosen, you need to inquire in advance about its characteristics and application features.
Covering material for beds of strawberries and other types of berries and vegetables
Protective coverings made of polypropylene were first used for greenhouses using a frame base. But it soon turned out that if you reduce the specific gravity of such material, it can also be successfully used in garden beds. For example, for strawberries, the density of polypropylene fibers should be from 17 to 30 g/cm³ of surface. This coating used for this berry is excellent for growing raspberries, cucumbers, potatoes and peppers. The lightest materials (with a density of 17 g/cm³) are used to cover early greens: dill, parsley, onions and basil.
How to cover plants for the winter: methods and materials (read more)
Strawberries feel great under the covering material. The absence of problems in caring for plants makes it possible to reduce the labor costs of gardeners for growing this crop several times.
Covering material allows gardeners to reduce labor costs when growing strawberries.
As a result of using this type of material, we get a number of advantages: strawberry yields increase significantly, berries ripen faster under cover, and the beds are not afraid of frost. In addition, during dry periods, moisture loss is reduced - therefore, water spent on irrigation is saved. It becomes virtually impossible for birds and harmful insects to reach the crop.
Note! The prices of covering material for beds from different manufacturers do not differ too much. Pay attention not so much to the cost and brand, but to the density of polypropylene.
With a relatively modest financial investment, you can equip a strawberry bed with a drip irrigation system. It will pay for itself within a few years by saving water and electricity. At the same time, it will eliminate the difficulties of watering berry crops through holes in the substrate. Plant roots will never dry out, producing stable shoots and abundant harvests.
It is recommended to plant strawberries on black covering material in spring and autumn.
Planting strawberries on black covering material can be done in spring and autumn. It is recommended to grow this crop in one bed for three to four years in a row. Agricultural experts emphasize that when young seedlings are used for planting, their yield will increase every year, regardless of the chosen strawberry variety.
Features of using different materials
Brick is attractive because it is absolutely easy to lay, resulting in a neat, smooth surface with a beautiful pattern. paving slabs and paving stones are ideal in this regard . Thanks to the rectangular shape, paving is done without much effort. Fragments are easy to replace in case of damage. It must be taken into account that porous material absorbs moisture. It is recommended to treat both fragments and solid elements with a hydrophobic solution.
Brick is sometimes combined with crushed stone and gravel, creating spectacular patterns
Another combination: brick and stone
Flat stones with uneven edges ( slate , flagstone ) will have to be carefully adjusted to each other in size to reduce consumption, but this will only add originality to the paths.
If it is decided to install board flooring between the beds , they are first impregnated with antiseptics. To prevent the boards from sagging in the middle, reinforcing bars are placed in the center (along or across, depending on the direction of laying).
To protect wood cuts from rotting and gradual destruction, round pieces are covered with several layers of drying oil or immersed in cement mortar. This manipulation will almost forever protect the loose structure of the blanks from damage, but the natural pattern will be lost.
Rolled coverings made from crumb rubber are a good alternative to piece products: it is easier to calculate the amount of flooring to purchase in terms of width and length, and easy to install. They are obtained from used car tires, which, after disposal, meet environmental requirements.
Domestic industry produces products of different colors
Since the material itself is moisture-proof, it is necessary to provide for the outflow of rain and snow water in advance, which is done by perforating, drilling holes in the sheets.
Installation of a modular plastic covering requires mandatory fixation with a cement-sand mixture, which keeps it from moving. Plastic squares are very convenient for walking and moving carts on wheels. Organic additives in the composition guarantee an anti-icing effect, despite the apparent smoothness. Lawn grates with cells and cavities will certainly get soil, and you will have to constantly wash it out or mow it regularly with a trimmer to prevent heavy overgrowth on top.
Garden parquet or decking is very decorative and reliable in all respects.
When laying the decking completely, it is impossible to do without a precisely leveled surface that does not have any distortions in height
Parquet is extremely expensive, especially if you need to pave a large area, so it is not practical to use it for rows where there is a lot of dirt.
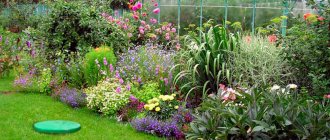
Choose plants that will replace each other
Plan your flowerbed in such a way that the plants bloom for as long as possible, throughout the season, or replace each other. As a rule, these varieties are easy to propagate plants that will grow little by little, which is convenient if you need a large, lush flower bed or a flowering lawn in front of the house.
Perennial flowers that bloom all summer include:
- Petunias.
- Calendula.
- Armeria seaside.
- Marigold.
- Astilbe.
- Astrantia.
- Heliopsis.
- Blue delphinium.
If you choose perennials, you will save yourself the trouble of removing faded varieties in the fall and planting something to replace them in the spring.
Instagram: @elenalimonchenko Instagram: @lenuk_pleshkova
5 successful plant combinations for a spectacular flower bed
Homemade canvas
To make tiles with your own hands, you will need plastic molds for pouring. They can be disposable or reusable, soft or hard, shaped or of a strict geometric configuration. Food packaging also comes in handy here.
The AliExpress website offers a wide range of such shapes: multifaceted, brick, turtle-shaped, human feet and others.
Adding coarse gravel, other reinforcing fractions, special plasticizers, and coloring pigments to the cement mortar will help increase the strength and aesthetics of such workpieces. Such technologies are known and have been tested many times by hardworking summer residents. A competent, thoughtful approach to the stamping process and the low cost of consumables provide craftsmen with the opportunity to obtain raw materials in unlimited quantities, which are not inferior to purchased products in terms of technical properties.
When poured directly on the ground without the use of a backing, the concrete becomes only a temporary and minor barrier to weeds.
Forms generously greased with machine oil or covered with cellophane are placed on a vibrating table and carefully filled with prepared cement mortar. A vibrating table can be made from a spacious stand attached with springs to a driving mechanism, for example, an electric motor from a tool sharpening machine, a motor removed from a circular saw or a washing machine. It is desirable that the engine speed be from 1800 to 3000 per minute. Vibrocompression (manual or mechanical) is carried out to compact the mixture and release air bubbles. After shaking and shrinking the mixture in the molds, it is left to dry for a day until completely hardened on racks or chipboard sheets arranged in layers. It is not recommended to keep the workpieces in this form for longer, otherwise it will be difficult to get them out without damage or chips. After removing from the molds, the blanks are finally dried in air at positive temperatures (from 10 to 20 degrees).
Making a path
Agrofibre will help get rid of weeds not only in the garden bed, but also on the paths of the plot or in the garden. First, let's prepare all the tools necessary for this. Then, you should purchase any of the inexpensive non-woven materials, but preferably it should be black. It allows air and water to pass through well, but does not allow light to pass through, so after finishing work on your paths you will not have to see any weeds or puddles. Now let's start arranging the tracks. To do this, we prepare a substrate that serves as mulch for the paths: crushed stone, expanded clay, gravel, stones.
Now we remove the top layer of soil from the paths. It is necessary to ensure that the surface of the earth is strictly horizontal.
Then, carefully compact the path. If necessary, we remove excess soil, then the path will turn out smooth and neat.
Now we spread the prepared black film along the path. The joints must be overlapped so that seeds cannot penetrate into the cracks. If your greenhouse, where strawberries and other crops grow, has beds instead of boxes, then you need to leave some material for allowances on the edges. This is done so that crushed stone or other mulching substrate does not mix with the ground.
After this, we pour crushed stone or any other substrate that you have prepared for mulching onto the path so that it is level with the ground, or slightly lower. We level the crushed stone and remove excess material sticking out from under the substrate.
That's it, the work is finished, the path will look clean and tidy for a very long time.