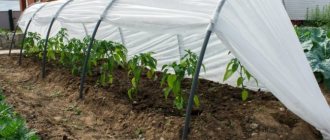
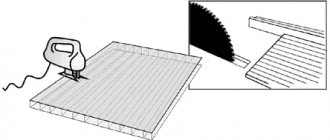
The beds must be arranged so that they are easy to care for. To get a rich harvest, you need to wisely choose a greenhouse, choose the right varieties, and arrange the beds. The most popular greenhouse option among gardeners is 3x6 houses. They are suitable for small areas. You can make a greenhouse yourself from glass, wood, film, or buy a ready-made one. Greenhouse houses made of polycarbonate have become especially popular. The material is stronger than glass structures, diffuses sunlight well, and its lightness allows you to quickly install or dismantle the room.
How to plan beds in a 3 by 6 greenhouse: orientation to the cardinal points
When using greenhouses in garden plots, it is necessary to correctly position the structure relative to the cardinal directions and wind loads. Failure to comply with these conditions may affect the quality of seedlings and lead to low yields.
When preparing beds in a greenhouse, experienced gardeners focus on the cardinal directions:
- For low crops, it is better to place the greenhouse from North to South; it is this planning of beds that will give the fruits more sunlight.
- However, to illuminate tall plants, the placement of the beds is done from West to East. Dense foliage can cause shadows, and this arrangement will allow the sun's rays to penetrate between the rows and illuminate the lower leaves of the crop.
- If the surface is sloped, we turn the greenhouse towards the south, and create the beds using a stepwise method.
Orientation to the cardinal points and wind direction is important when arranging beds in a greenhouse
Such principles will give plants the opportunity to be on top of each other and fully receive an equal amount of sunlight.
Choosing a foundation
Let's say right away that the undisputed leader among foundations for greenhouses is a foundation made of timber 100 x 100 or 100 x 150, the latter is also called a “larch board foundation.”
Greenhouse on timber from the inside
But, as already mentioned, each case is individual, and first of all you need to decide whether the greenhouse can subsequently be moved to another location. It depends on this whether the foundation will be permanent or collapsible, and whether it will exist at all. Greenhouse foundations are as follows:
- Slab (monolithic)
- Tape
- Pile and point
- Beam or board
- Without foundation
Slab, strip, and pile foundations are capital foundations; they are non-removable, while timber foundations can be disassembled. We have already discussed these issues previously, and if you need more detailed recommendations, you will find them in the article choosing a foundation for a greenhouse here on the website.
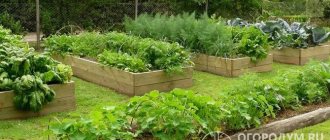
Layout of beds in a greenhouse 6x3 m
In pursuit of a large harvest, gardeners try to use every centimeter of the greenhouse.
When planning beds in a greenhouse, consider your physical capabilities.
Wide beds make it difficult to care for plants.
There are the most common ways to arrange beds:
- 2 wide ridges that will stretch from the beginning to the end of the structure. The width of the seats will be 1.2 m, and the width of the path will be 60 cm. There is one drawback with this planting option; some will find it difficult to reach the outer crops.
- 3 identical beds and 2 paths of 60 cm each. In this case, the planting area will be slightly reduced, but convenient care of the plants will be ensured.
- Plant a bed more than a meter wide in the center, with an approach from both sides. In greenhouses with a similar layout, plants will receive the greatest amount of light and heat, but the size of the usable area will remain small.
- You can place narrow planting rows around the entire perimeter of the house, and one wide one in the center.
One of the options for arranging beds in a greenhouse
The layout of the greenhouse depends on the selected vegetable crops. Each plant has its own microclimate in which it will fully develop. Plants for the neighborhood should be selected with similar growing conditions.
Let's find out everything about sizes
The dimensions of the greenhouse are calculated based on your own wishes and compliance with the standard dimensions of the profile pipe with polycarbonate. This is done to eliminate waste of materials, unnecessary scraps and unnecessary work that can be associated with arranging these scraps in an attempt to save money. The latter is absolutely not worth doing.
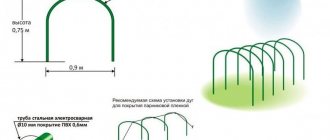
To make arches, it is best to take a metal profile 6 meters long. One whip will make an arc 2.2 meters high and 3 meters wide. This width is suitable for placing two beds and a path between them.
The standard dimensions of polycarbonate are 6x2.1 m. When covering the frame, you will not need to cut its sheets.
The height can be increased artificially: using a strip foundation. Another advantage of such a foundation is protection from the penetration of rodents or other pests.
The distance between each arch is set to 1 meter. That is, for every three arches - one sheet of polycarbonate (6x2.1 m). If, for example, you are planning a six-meter-long greenhouse, then you will need 7 profile rods for the main arcs and 3 polycarbonate sheets.
The optimal section of the corrugated pipe for the arches and the lower support frame: 25x25x2 mm. For lintels and vents, a section of 20x20x1.5 mm is suitable. For the door frame – 25x25 mm.
If you need a greenhouse more than 6 m in length, also focus on the standard parameters of polycarbonate to avoid overspending. For example, 8-10-12 m.
If you have a greenhouse that is larger in all dimensions, then for the base of the frame, take a profile pipe with a cross-section from 30x30 to 40x40 mm.
Advice: purchase material in reserve in order to avoid unforeseen situations with its shortage.
Make the entrance to the greenhouse at least 0.7-0.8 m, this will ensure the convenience of bringing in seedlings and tools, and there will be enough space for a regular garden wheelbarrow to enter.
If the greenhouse will be used during the cold season, make a small vestibule. It will protect against drafts when entering and exiting. It is also practical to store gardening tools.
Thickness of polycarbonate for greenhouse
For an arched shape, 4-6 mm is enough, but it is better to take 6 mm polycarbonate, the roof will be stronger and more stable.
But 4 mm may not survive the winter, depending on what the weather is like. If you live on your property all year round, you will be able to control the snow load, clearing away the accumulated snow if necessary.
If the greenhouse is sheathed with 4 mm polycarbonate, the distance between the arcs is reduced so as not to lose load. But saving in this way, you still spend more on metal profiles. And it’s not a fact that the reliability of the roof will increase from this.
And with polycarbonate 6-8 mm thick in winter there is much more guarantee that the sheets will not bend under the weight of snow.
Country greenhouse 3 by 6: how to arrange the beds
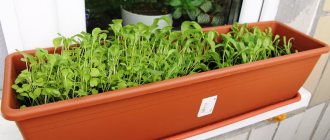
Depending on climatic conditions, gardeners decide to what height the warm bed should be raised. The height of the ridges varies from 20 to 50 cm. With this arrangement, there is convenient access to the plants and the soil does not dry out quickly. For the device, for the sides, boards, bricks, polycarbonate sheets, pieces of slate are used, which prevent the earth from falling off. All kinds of waste are placed at the bottom of the beds: straw and leaf litter, rotted tree bark, dust, wood chips. All this is poured with boiling water to start the fermentation process and covered with manure on top. When rotting, heat begins to be released, which affects the growth rate and scale of the crop.
To effectively use space, you can use the vertical method. Vertical beds save space and help you get an equally rich harvest.
In a country greenhouse, it is best to arrange the beds vertically
You can install such structures in several ways:
- Garter beds. They are made specifically for crops that require tying to a support. Various shields and partitions, and plastic meshes serve as a vertical surface. Growing plants begin to cling to the support and stretch upward.
- Beds-shelves. They represent a structure of several boxes stacked on top of each other. The height between shelves depends on the crop being grown. Such shelves are good for growing short plants with a shallow root system.
- Beds made of plastic pipes. Holes are drilled in the pipe, soil is filled in, and the structure is installed vertically in the greenhouse. It is very good to grow strawberries in such devices.
What distance should be from the greenhouse to the neighboring area? — answers from 7dach.ru experts
Other posts about greenhouses
As soon as the snow melted, the earth gave me small, strong sprouts. I planted greens in winter, when the soil was oaky. I sprinkled the seeds with purchased soil, and they lay there all winter, becoming stratified. I threw snow on the beds so that it would melt...
I live in Rostov on Don. I have a polycarbonate greenhouse, its walls are covered with a green coating. How can I remove it?
At the time when I decided to get a greenhouse at my dacha, I had no gardening experience at all. I didn’t dare to start experiments with expensive versions of ready-made greenhouses, you never know how it could all end. That's why the idea was born...
Hello! Chickens winter in a polycarbonate greenhouse. Please tell me, during deep processing and if you bring additional soil from the garden, can you plant cucumbers and peppers, or is it better to move the greenhouse to another place?
Is it true that in film greenhouses, cucumbers bear fruit better under a green film, and tomatoes bear fruit better under an orange film? And what does this have to do with?
At the dacha I built a simple greenhouse from scrap materials. These are wooden window frames, which are now being intensively replaced with metal-plastic ones. The size of the greenhouse is 6m x 2.5m. The greenhouse is built on a brick foundation, the frames are fastened with screws,…
See all materials about greenhouses: See all
Small greenhouse 3 by 4: how to arrange beds using a new method
Greenhouses measuring 3x4 are suitable for gardeners with limited garden space. The average height of such structures is 2 meters. These sizes are optimal for many crops. The planting pattern is similar to the order of placing beds in a 3 by 6 greenhouse.
Along with the traditional solution for the location of seats, new technologies have emerged using the Mitlider method, which derived a formula for the width of the beds.
According to the invention, plants receive maximum light and air with a bed width of 45 cm and a passage between them of 90 cm. With such planting, the soil does not need to be loosened, and balanced fertilizers and good watering will give a large harvest.
In a small greenhouse, beds can be arranged using a new method
Gardeners are often interested in the question of how many crops can be grown on one ridge. Mittleider's second invention is narrow beds with one stripe. On one ridge, 2 types of crops with similar climatic requirements are placed. The crops ripen at the same time and 2 harvests can be harvested per season.
Compacted beds are used to save space, while taking into account the difference and period of development of vegetable crops. Lettuce and parsley are added to the onion seeds. Early ripening crops reach the table within a month, and space in the garden bed is freed up.
It is advisable to grow plants close together that have a beneficial effect on each other, thereby improving the taste and getting rid of unwanted pests.
Choosing a location for installation
To realize aesthetic ideas, the construction of a greenhouse structure should be treated as an architectural object. The key factor when choosing a location for its installation is the maximum level of illumination. This means that during daylight hours it should not be shaded by buildings or plantings. To achieve maximum illumination, experts advise positioning the greenhouse so that the ends are located in the west and east. The normal place for a greenhouse is considered to be one that is partially shaded only in the morning (or at the height of the day's heat), ideal - if there is no shade at all.
When determining the location of the vegetable shelter, you should take into account whether the vegetables will be grown in winter or early spring, when natural light will not be enough for plant development. Then the presence of the necessary communications must be in suitable proximity. At this stage, you should also worry about the convenience of watering and heating (if it is planned).
Also, when determining the future location of the greenhouse, experts advise choosing a place protected from the winds. A good barrier for them can be low (2 m) fences or hedges, which ideally should be located at a distance of at least 7–7.5 m.
To place a greenhouse, you need to take into account the topography of your garden plot, as well as the type of soil on which it will be located. The area should be flat (it’s good if it’s a natural hill) and without stagnant water. It is easier to find a good place to build this structure when initially planning the site than to fit its location into an existing landscape.
It is worth noting that small greenhouses made of glass or polycarbonate, located near the southern wall of the house, are especially popular among gardeners. It is difficult to overestimate the convenience of such a structure. It is always protected from the wind and well lit. It is easy to organize heating and watering here if desired.
Recently, more and more often in garden plots you can find domed greenhouse structures that fit very effectively into the backyard design. They are more functional and economical. They are made of glass or polycarbonate.
Arrangement of beds in a 3x6 greenhouse (video)
In conclusion, it is worth noting that vegetable crops that require different agricultural conditions cannot be combined. The best option would be to place these plants on opposite sides of the greenhouse. The process of preparing beds requires a competent and serious approach; a convenient location will bring pleasure to the gardener and a rich harvest.
It's nice to have fresh vegetables from your own plot in early spring. To get a good harvest, you must maintain the distance between the greenhouses in accordance with SNiP standards and correctly orient them relative to the sun. By protecting the passage between the greenhouses from drafts, the owner receives an area with a wonderful microclimate for garden plants.
Tools required for work
To make a polycarbonate greenhouse with your own hands, you will need the following list of basic tools:
- Pipe bender (profile bender) for bending arcs;
- Welding machine;
- Drill;
- Screwdriver;
- Bulgarian;
- Pliers, hammer;
- Measuring tool (tape tape, plumb line, level).
Any owner can find other small tools in his workshop or garage.
If you strictly adhere to the work plan and have all the important tools, you will get a do-it-yourself greenhouse that will last at least 10 years.
Where to put the greenhouse
When planning where to put a greenhouse, you need to familiarize yourself with the regulations in order to maintain the recommended distances from each other if there are several buildings. Greenhouses should be installed only in accordance with technological design standards. In addition to the requirements set out in SNiP 2.10.04-85, greenhouses are installed taking into account the rules:
- orientation relative to the cardinal directions;
- snow loads per 1 m2 should be provided;
- do not fill the soil in the area where the water supply and drains pass;
- do not place in a draft or protect from it;
- Correctly calculate the minimum distance to the neighbor's fence.
In addition to sanitary standards and fire safety rules, there are insolation requirements, according to which it is impossible to shade the neighboring territory, block the access of air and the view from the windows.
The greenhouse should be designed from east to west. In this case, it is illuminated and heated by the sun as much as possible. There should be no trees nearby that will shade the structure. Snow will accumulate in the narrow space between the transparent walls and tall vegetation in winter.
Lawn
The easiest way to improve the area on the outside of the fence is to sow it with lawn grass. Such unpretentious vegetation does not require special care and looks neat throughout the season.
Water the grass when it's dry, feed it periodically, and trim it regularly to maintain its decorative appearance.
This option is suitable for “lazy” summer residents, as well as those who do not have the opportunity to “swing wild” in their fantasies due to the limited space between the fence and the road - even a narrow strip of lawn will look much more aesthetically pleasing than sloppy weeds.
How to install a greenhouse correctly
For any greenhouse and greenhouse designs, the issue of solar lighting is one of the main ones, especially if there are two greenhouses next to each other and have a large area with several rows of beds. The location and distance should be such that all planted vegetables and berries are illuminated as much as possible.
At noon, the sun shines from the highest point, its rays are most active. Structures with single-span and multi-span greenhouses, regardless of area, are placed with their side facing south. This position provides maximum natural light.
In multi-span greenhouses the length to width ratio is small. In this case, orientation to the cardinal directions plays a lesser role. If tall plants are planted from the south, they will be able to shade the low ones. In such cases, a south to north orientation will allow sunlight to penetrate along the rows and will be more efficient.
In spring greenhouses, heating from the sun is of great importance. They should be placed sideways to the south. Considering that the sun is more active in the afternoon, it has been proven in practice that the optimal location for seasonal greenhouses is from northwest to southeast.
Single-row seasonal buildings should be located at a distance of at least 1.5 meters, but it is better if the distance is greater. In the narrow space between two buildings, pollution prevention is impossible. But it is enough to make the passage 50 cm wider, and then it will be possible to plant moisture-loving crops, which will be intensively watered from 2 roofs during each rain.
Winter greenhouses
Between multi-row and winter greenhouses with plants, a distance of at least 6 meters should be taken. Experts recommend protecting the spaces between greenhouses from drafts, and in the summer a space will be created for beds with comfortable conditions for heat- and light-loving plants. To prevent silting of the soil, the passage must be equipped with a drain. It is necessary to make a groove along the entire length to drain water and fill it with gravel.
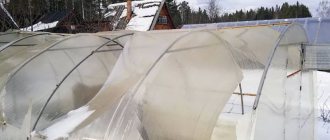
If the greenhouses are made of polycarbonate or glass, snow loads should be taken into account during installation and installation. In the calculations, the strength coefficients of the construction material and coatings are used.
It is better to make the roof semicircular or gable. This will allow the sediment to partially slide down on its own. The rope and belts securing the transparent sheets to the frame from above should be located across the structure, in the direction of the water drainage. In areas with a lot of snow, it is better to design greenhouses with a wooden frame, as it is more durable and can withstand temperature changes.
The photo below shows a greenhouse.
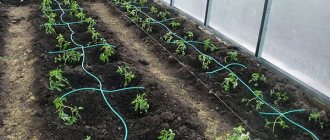
To avoid cold air flows from the surface of the earth, it is necessary to provide heating for the beds themselves and install pipes for heating the soil.
The rules for installing a greenhouse provide for water heating of the soil of the beds. When multi-tiered planting, it is recommended to install pipes in the middle and lower levels of plantings. Above, the warm air will warm itself.
In the warm season, the sun heats up the air too actively under transparent walls. Therefore, a ventilation device in the greenhouse is necessary. To protect against overheating, windows should be installed at opposite ends of the building.
Watch a video on this topic.
Features of materials
What to make a greenhouse from? Of course, from proven and long-proven materials on the market. This is a profile pipe for the frame and polycarbonate for the coating. Let's pay attention to their production features.
The greenhouse can be made by welding or using bolted connections. This depends on the choice of profile pipe, galvanized or uncoated pipes.
Galvanized
This material is good because it is not susceptible to rust, is not afraid of sudden temperature changes, and does not require additional processing. But it also has significant disadvantages:
- It is not suitable for welding in domestic conditions, since the galvanization on the seams quickly burns out, causing the metal to rust. Therefore, bolted connections are used for assembly. But they do not provide such strength and reliability as welded structures.
- It is not advisable to bend galvanized pipes, as this violates the integrity of the protective coating. But what if you need an arched greenhouse? Therefore, only pitched structures can be made from them.
- They are more expensive than uncoated pipes, which is not practical for the family budget.
Uncoated pipes
This is an inexpensive and pliable raw material, unlike the previous one. They can be welded and bent with confidence to any bend radius.
The only thing they need is additional treatment against corrosion. To do this, the finished frame is cleaned of scale and other roughness, then degreased, primed, and painted. Children or a wife can come to help with coloring, and then the working family process will delight all participants.
Choosing polycarbonate
When buying polycarbonate, pay attention to the presence of a protective layer against UV radiation.
Trying to save money can only harm yourself. Cheap material without a protective layer will fall apart in 1-2 years. Why redo something and spend money when you can do it once for many years to come and enjoy your vegetables every season.
If you violated building standards
The reason for non-compliance with the rules for the construction of outbuildings may not only be their deliberate violation. For example, you might buy land that already has a greenhouse on it, too close to other construction sites.
In this case, the only way out is an agreement with a neighbor. You can explain to him in the correct form that the violation of the rules was already present at the time of purchase, and ask him to give certified consent to this layout. But it is important to remember that:
- not required to give permission;
- at any moment the neighbor may change his mind and ask to demolish the greenhouse;
- the permit has a validity period.
Therefore, violating building codes is always a risk. If you are building a storyline yourself, do not neglect the established rules. And if you buy land on which a greenhouse is located, installed closer than permitted to other objects, you can use it until a dispute arises with a neighbor.
We think about protection from wind and dampness
It is these factors that determine how correct the microclimate inside the greenhouse will be. Immediately abandon the space that is between buildings or an unsaleable fence. In such conditions there will always be drafts, which is unfavorable for the plants growing inside. The walls of the greenhouse will be blown from all sides, so there can be no question of maintaining heat inside.
The following conditions will help to avoid such problems:
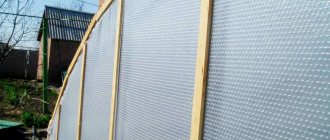
When constructing a protective screen, it is better to use flat slate, and it must be installed so that the distance between it and the greenhouse is at least three and no more than 5 meters. No shadow should fall on the greenhouse, and the structure must fulfill its protective functions.
If you prefer to use ornamental shrubs as protection, you need to plant them at a distance of up to 15 meters from the greenhouse. It happens that the owners decide to install a greenhouse on a plot not far from the trees: this cancels the construction of a protective structure. In this case, you need to remember about the shadow and falling leaves: they should not fall on the roof of the greenhouse and prevent sunlight from penetrating inside.
To prevent dampness from accumulating in the soil near the greenhouse and penetrating into the root system of plants, waterproofing of the foundation is considered at the construction stage. In some cases, gutters are constructed on the outside that will collect excess moisture and carry it to a certain place (several meters from the base of the greenhouse).
What else do you need to know?
Considering the following small list of recommendations explaining how to properly position the greenhouse, you can equip it even more competently:
Surely every farmer has heard about heat losses. It is important to be able to avoid them. The following recommendations will help with this:
Even if there is plenty of natural light in the greenhouse, additional lighting needs to be considered. After all, due to cloudy weather, disruptions in the growth and development of crops are possible. Therefore, you will have to maintain an optimal balance. For some plants, the indicator is calculated hourly.
Selecting a flat area for a greenhouse
Before starting construction design, you should find a large, flat area on your land and mark the dimensions of the greenhouse at its corners. On a slope, water will always flow in one direction during irrigation, and the structure itself will gradually slide down.
First of all, the distance from the neighboring site and other objects that require regulatory removal is determined.
The perimeter of the building and the distance should be marked if there are 2 or more greenhouses. Even if the second greenhouse will be built later, it is better to immediately make a project for all buildings.
The optimal installation of the greenhouse is from east to west or with a slight deviation to the side. From the south, the site should not be shaded by tall trees.
If a neighbor does not comply with SNiP requirements
If the offender owns a neighboring property where the recommended distances are not observed, you can:
- turn a blind eye to violations of building codes so as not to spoil your relationship;
- try to resolve the issue peacefully, explaining your position during a calm dialogue;
- forcing a neighbor to forcibly remove a greenhouse.
In the latter case, this can be done out of court and in court.
Claim for the removal of obstacles to the use of the site
Regardless of where you plan to go to resolve the issue, you must begin the process by submitting your requests in writing. To do this, send a complaint to your neighbor to remove obstacles to the use of your land. The document is drawn up in any form indicating:
- these parties;
- description of the problem: indicate what inconvenience a greenhouse installed not according to the rules causes;
- requirements for the neighbor: dismantle the building or move it to another place;
- consequences of non-compliance with the complaint - indicate where it will be applied to solve the problem.
The document is drawn up in 2 copies; you can send it to your neighbor in person or by registered mail. It is best to choose to send by mail, as with a personal transfer you will not have proof that you have met the requirements.
Complaint to the administration or partnership
If a neighbor refuses to remove the greenhouse or ignores your needs, you can write a complaint to the administration or association asking them to take action in case of non-compliance with building regulations.
It is also drawn up in any form, indicating all the data specified in the complaint, and is sent personally or by mail. In the first case, you need to put an acceptance mark on your copy.
The application review period is 30 days from the date of receipt.
Based on the results of consideration of the complaint, the violator may be fined and ordered to dismantle the greenhouse.
Going to court
you can file a complaint immediately after it has not been answered, or contact the management first and wait for their response. Based on the results of the trial, you can not only get rid of the disturbing greenhouse, but also receive monetary compensation for moral or material damage.
A claim for compensation is filed according to the general rules of Art. 131 of the Code of Civil Procedure of the Russian Federation and is submitted to the praetor’s court at the place of registration of the site. The act can be presented in person to the court secretariat or sent by registered mail.
Attached to the agenda:
- copy of personal passport;
- a copy of the request and preliminary complaint (if available);
- a certificate from the BTI confirming the boundaries of the plots;
- other materials indicating a violation of your interests.
The duration of the process depends on the circumstances of the particular case, the maximum period for consideration is 2 months.
Soil preparation
After examining the site and choosing a suitable location for installing the greenhouse, you need to determine the suitability of the soil. The most suitable soil is one that contains sand. It is very good when the groundwater is deep enough.
To determine the type of soil, it is necessary to dig a hole. This is a vertical pit measuring 70x70 centimeters and approximately 1.2 meters deep. The soil taken from the pit should be crumbly and not roll into a ball. If this is the case, then the soil is suitable for installing a greenhouse on it. Otherwise, the soil must be amended before installing the structure.
While examining the soil, pay attention to whether water is accumulating in the hole. If water accumulates, additional drainage is necessary, but if this is not done, all the efforts of the gardener will be nullified.
By choosing the driest area, you will not need to arrange drainage. To install it, you need to dig a pit the size of the greenhouse to a depth of about 70 centimeters. The bottom of which needs to be filled 10 centimeters with crushed stone, then pour sand in a layer of about 40 centimeters, and fill the rest of the space with fertile substrate.