After home renovations, owners often end up with old windows that they no longer need. Some people rush to throw them away, others find rational uses for the products.
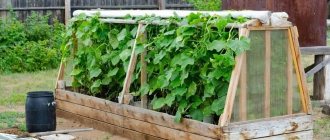
One of the acceptable options is to build a greenhouse on the site from existing items. Let's look at how to make a greenhouse from old window frames with your own hands, what nuances need to be taken into account, and what advantages it has.
Ready greenhouse Source sveklon.ru
Advantages and disadvantages of the design
The structure is characterized by a considerable number of advantages. The main parameters are the following:
- inside such a greenhouse, high-quality ventilation is always ensured, since the old windows are equipped with vents;
- thanks to window frames, you can quickly build a stationary structure;
- in the microclimate created by windows, it is permissible to grow plants at any time of the year;
- a greenhouse made from old windows has excellent thermal insulation characteristics;
- in such a building you can use combined lighting.
The advantages of this choice also include the affordable cost of the project. Old windows will be quite useful; you won’t have to purchase new blocks. When erecting a structure, no special tools are required: it is enough to have a hammer, nails, and pliers.
Even before making a greenhouse from window frames with your own hands, it is advisable to familiarize yourself with some of the disadvantages of such material:
- the structure can easily collapse during hail;
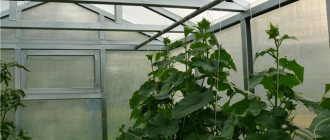
- the room can be very hot;
- For such structures, a mandatory foundation is required, since the frames are heavy.
It can be very hot inside the structure Source grounde.ru
Tools required for work
During the installation of a greenhouse you will need:
- cord and pegs;
- hammer;
- screwdriver;
- a circular saw;
- building level;
- drills of various diameters;
- square;
- roulette;
- shovel;
- polyurethane foam.
During work, it is convenient to use a tool with a battery or a power tool.
Step by step guide
If you plan to install a greenhouse with your own hands from window frames, but it is not clear how to build it, we recommend following the step-by-step instructions. The construction of the structure occurs in several stages:
- creating a sketch of the future structure;
- carrying out preparatory activities;
- arrangement of the base for the object;
- floor arrangement;
- frame construction;
- performing roofing work.
Preparation of drawings
When figuring out how to make a greenhouse from window frames, you definitely need to understand that you first need to sketch a sketch of the future object. You can use ready-made projects, of which there are many on the Internet and they are described in detail. When drawing up your own drawing, pay close attention to certain parameters:
- Correspondence between the dimensions of the window frames and the required height of the structure. The walls are certainly made higher than the parameter 180 cm. When it is not possible to join the height of the frame, then it is necessary to build up the walls below with other materials.
- Roofing _ Often, timber or a metal frame is used to construct this structure. This choice is due to the fact that these materials are quite reliable and dense, capable of withstanding loads from snow in winter.
Option for a roof that can withstand a snow load Source i1.wp.com
Also, when developing a drawing of this building, it is important to consider the issue of the roof ridge . It is advisable to place it along the north-south axis. This approach will ensure proper lighting in the greenhouse.
Preparatory stage
When starting to implement the plan, you need to choose the right site for the facility. To install the structure, you need to choose the most flat surface possible, perfectly illuminated by the sun on each side. The site must be reliably protected from constant winds. No buildings or trees should be placed near the proposed structure, which will shade the space, which will negatively affect the growth of plants. If there is vegetation, then it is better to choose another place, or sacrifice plantings.
The soil under the object must be clean and dry. Experts recommend that there be a sand cushion under the chernozem. The soil under the structure must be compacted, since the glass in the frames is heavy. This is especially important when building a greenhouse without pouring a foundation.
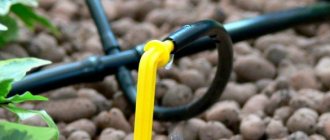
Drainage system for a foundation on a summer cottage with a high groundwater level Source mastergrunt.ru
When choosing a site for a greenhouse, it is also important to consider the location of groundwater. It is necessary to find a place where they are located at a depth exceeding 1.5 m. When the soil on the site is too wet, it is not recommended to build a heavy greenhouse.
The preparatory stage also includes preparing window frames for further use:
- you will need to clean them of nails, hinges, hooks and latches;
- sand the wood, removing the facing material (old wallpaper, self-adhesive paper);
- It is advisable to cover the bare wood with an antiseptic several times, then with paint or varnish to protect the product from further damage.
Foundation
When exploring the problem of how to make a greenhouse from window frames with your own hands at home, it is worth emphasizing that you will have to start work by arranging the foundation. Here everything depends on the landscape of the site, the type of soil and the design features of the structure; the foundation is performed by choosing one of the following options:
- Tape version made of concrete . First, they dig a trench to a depth corresponding to the freezing of the soil. Its width is approximately 20 cm. Next, formwork is built from boards. Sand is poured onto the bottom to create a “pillow”. Then the concrete solution is mixed and poured, completely filling the formwork with it. If you fill everything at once, cracks will not develop later.
Strip version of a concrete foundation Source chonemuzhik.ru
See also: Catalog of companies that specialize in garden furniture and greenhouses.
- Dense timber. Dry material, pre-treated with a special solution that resists rotting, is suitable for the foundation. Remove the top ball of soil, dig a trench, maintaining the size of the timber. Its bottom and walls are covered with roofing felt to protect the wood from moisture. The timbers are placed in the trench and fastened together to form a rectangle.
- Columnar option . This is the simplest base option. It requires minimal costs and little time. First, they dig narrow holes in the corners, about half a meter deep. Between them (if the greenhouse is long), additional holes are made every 3 m. The cells are enclosed with formwork, sand is poured inside, crushed stone is laid on it, compacted, and watered. After this, all that remains is to pour the concrete mixture into the formwork.
Floor arrangement
Considering further the question of how to make a greenhouse from old window frames, we will study the topic of arranging the floor. First, it is necessary to ensure drainage, since stagnant water will cause the wooden frames to begin to rot.
To ensure quality drainage, you need to dig a trench to the depth of a spade bayonet. Its bottom is covered with fine gravel. Sand is poured on top, scrupulously compacting it.
Properly arranged floor Source i0.wp.com
Tips for choosing frames
A glass greenhouse can be built from one long or several window frames. The best option is a rectangular frame with large glass, as it will give the plants more light. Although there are no special criteria for choosing this construction raw material. The main thing is that the glass is intact and the wood of the frame is not rotten.
To create a greenhouse, it is preferable to take large window frames
Windows left after renovation are suitable for creating a mini-greenhouse. You can find used windows through an advertisement in a newspaper or at a company that dismantles old wooden frames and installs plastic double-glazed windows in their place.
All frames taken as building materials for the construction of a greenhouse must be exactly the same. If you use different wooden windows, it will not be possible to make the greenhouse airtight, since the frames will not fit tightly to each other.
It is advisable to find window frames with vents. They will allow you to ventilate the greenhouse without raising its glass roof.
The window frame used to build the greenhouse will become a ventilation hole
It is recommended to prepare window frames for further use as greenhouse material. This involves replacing broken and rotten parts, as well as dismantling handles, latches and unnecessary fittings. The wooden elements of window frames need to be sprayed with an antiseptic, which inhibits the process of wood deterioration under the influence of precipitation.
Video description
From this video you will learn how to make a greenhouse from polycarbonate and window frames:
Frame assembly
To assemble the frame, you need to buy beams similar in size to those present in the unnecessary windows. They must be attached to the constructed frame, maintaining distances corresponding to the width of the frames. Additionally, when deciding how to build a greenhouse from window frames, you need to install similar beams along the very bottom edge and on top, so that the resulting frame is sufficiently rigid and has the necessary strength.
Roof
It’s definitely worth clarifying in advance what kind of roof the structure will have when solving the problem of how to build a greenhouse from old window frames with your own hands. The most ergonomic configurations for roofing are triangular “houses” or their arched hemispherical analogues.
Roof for a greenhouse Source avatars.mds.yandex.net
Building a frame
After pouring the foundation, you can proceed to manufacturing the frame of the future greenhouse. The most suitable materials for this are timber or board. However, you need to know the width of the frames in advance.
Next, along the perimeter of the foundation, you should measure segments that exceed the width of the window opening by 5-7 cm. At the junction of the segments, you need to make a mark. In the marked places, risers made of timber are installed. They should all be the same height.
A thick thread is pulled along the tops of the pillars. It is best to use a level to immediately see how level the pillars are. Protruding tops need to be corrected.
The pillars themselves must be smooth on all sides, so it is better to cut down branches and bulges. Once they are completely leveled, timber can be laid on them. It is placed on the tops in a horizontal direction.
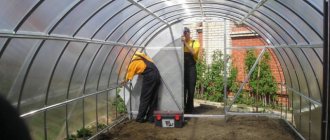
Now it is possible to see the cells in which it was originally planned to install window frames. Next, you can begin installing the windows. The glass should be fastened carefully so that there are no gaps. It is important to be careful not to accidentally break the glass.
The resulting cracks and joints are covered with a layer of polyurethane foam. To prevent the dried foam from drying out under the rays of the sun, it is treated with putty or paint.
Briefly about the main thing
A greenhouse made from window frames is an environmentally friendly and inexpensive structure that provides good ventilation in the greenhouse thanks to the vents, but it cannot be built in an area with high groundwater levels.
Before making a greenhouse from frames, you will need to make a foundation: optimally, a strip or columnar one made of concrete. And also - arrange drainage to remove moisture from the soil using a sand and gravel cushion.
It is better to make the roof of the greenhouse from polycarbonate, so the structure will be lighter. Standard roof shape: gable (triangular) or arched. The frames are fastened using special beams.
After completing the main work on installing the greenhouse, you need to seal all the cracks between the frames with silicone sealant.
Calculation of the required amount of material
We make all preliminary calculations based on the previously drawn up drawing. You need to calculate the number of frames depending on the size. With a standard frame size of 1200x900 mm, the length of the greenhouse will be a multiple of 90 cm, and the height will be 120 cm + foundation height + roof height. Taking into account that the optimal width of the beds is 1 m, and the distance between them varies from 40 to 60 cm, the most convenient width of the greenhouse will be 2.7 m, i.e. 3 frames. If the windows are larger, two frames may be sufficient.
The length of the greenhouse is a multiple of the number of frames
Hinged windows are large in size and significantly fewer of them will be required.
If there are few frames, you can make a greenhouse with a pitched roof by attaching it to a house or other building on the south side.
In addition to the required number of frames, you will need:
- Entrance door. You can use a standard balcony door, shortening it if necessary, or you can make it yourself according to the size of the opening.
- Bars for building a frame. For a small greenhouse you will need 4 bars of length equal to the height of the building. If a long structure is planned, support beams can be used to strengthen it.
- Foundation materials. For strip formwork, you will need formwork material - posts and boards, a mixture of concrete, crushed stone and cement, reinforcement or large stones. For an ordinary wooden foundation, you will need a beam 15x15 cm long, equal to the perimeter of the greenhouse, and roofing felt for waterproofing.
- Anchor bolts, screws.
- Wooden bars for rafters. Depending on the type of roof, their number will vary significantly. The largest amount will be required for a gable roof.
- Roofing material. This can be polycarbonate with a thickness of at least 6 mm or polyethylene film.
Step-by-step instructions for constructing a greenhouse from window frames on a foundation with photos
Detailed step-by-step instructions for erecting the main part of the greenhouse:
| Illustration | Process |
| Cover the foundation and base with roofing felt sheets for waterproofing. | |
| Mount beams for the bottom trim on top of the anchors. Connect with corners. | |
| Make markings for vertical supports. | |
| Install the corner posts, checking their level. Install intermediate supports. | |
| Using bars, make a temporary fixation so that the supports do not warp. They can be removed only after completing the entire installation. Build a harness on top. It will prevent the racks from tilting. | |
| Attach the frames to the frame using self-tapping or ordinary screws. This will prevent damage to the glass that may occur when using nails. Seal all cracks with foam. | |
| Build a roof. | |
| Install doors and caulk gables. You can use film or polycarbonate on the roof. |
Note! If the structure is long, intermediate posts will be necessary to ensure the structure is secure.
How to make a mini-greenhouse from window frames with your own hands
Of course, such a greenhouse will not fit on a windowsill, but it can be placed on the site and it will not take up much space.
Step-by-step assembly instructions:
- From the windows, form a square frame with outer parts 2 by 4. You should get a box, closed on all sides, incl. below. Leave the top open.
- Nail the legs to the corners like a table.
- Strengthen the structure with horizontal bars, sawn at an angle of 45 degrees. Place them around the perimeter of the greenhouse.
- Cover the top of the box with wooden boards or polypropylene.
- For attractiveness, you can build a gable roof from frames.
Fertile soil is poured inside such a mini-greenhouse and plants are planted in it. This structure is more of a decorative nature and it is recommended to place several specimens of flowers (even indoor ones) in it, rather than vegetables.
Do-it-yourself mini-greenhouse on the windowsill from photo frames
If you want to make a small greenhouse for growing seedlings on a windowsill, it is best to use photo frames for this rather than large window frames. They are very inexpensive, and the finished greenhouse will be not only functional, but also very beautiful.
| Illustration | Process |
| It is best to use wooden frames. You will need:
Before use, they must be polished to remove paint. |
| First of all, the frame is assembled. The 28 x 35 frame is combined with the 20 x 25 cm frame so that their 28 and 25 cm sides touch, the back side of the 25 cm frame must be pressed against the outside of the 28 cm frame. |
| You need to connect the frames by drilling a small diameter hole through the inside of the larger frame and going through to the middle of the smaller one. Then fasten the frames using a screw that matches the diameter of the drilled hole. |
| Continue connecting frames until you have a rectangle formed by the four largest frames (two 28 x 35 cm frames and two 20 x 25 cm frames). | |
| The next step is to assemble the roof. You need to connect four small frames with dimensions of 13 x 18 cm. Connect them in pairs and fasten them together, making a triangular roof. Attach a hinge so that you can open the greenhouse and water the plants. Place two 13 x 18 cm frames side by side so that their short sides touch. Connect them using 5 cm strip steel plates, screwing it to both parts. To make your task easier, you can drill a pilot hole. Repeat for other 13 x 18 cm frames. Connect the structure of small frames, placing them at a 90° angle along the long boards and secure it with corner brackets. |
| The next step is to attach the roof to the main structure using inch hinges, placing them on the connecting boards at equal intervals. |
| Afterwards you need to seal the triangular hole in the roof; you can use a piece of plywood. It can simply be nailed to the frame with small nails or screwed with screws. |
| Paint the finished frame with wood paint before installing the glass. |
| Insert glass. The greenhouse is ready! |
Roof
In addition to the single-pitched, gable and polyhedral roofs described above, there are also arched and hemispherical types:
- Arched roof with polycarbonate roofing. For this roof, arc-shaped pipes are purchased. We fix them on the frame, at a distance of one and a half meters. Next, the polycarbonate is fixed.
- The more classic gable version is usually assembled on the ground; a frame is created from strong boards, similar in size to window frames.
If you want to make the roof light, then the roof should be made of polycarbonate or dense polyethylene.
When building a greenhouse, remember that its service life largely depends on the quality of the work you have done.