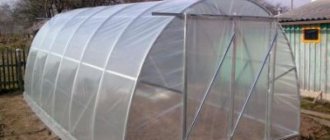
The greenhouse is small in size and most often mobile. As a rule, it is used only from mid-spring to autumn; mainly seedlings and seedlings are grown in it. A greenhouse is a different structure. It is larger in size and is installed for a long time. You can grow plants in it all year round, because heating and lighting are sometimes provided inside. In a greenhouse, a crop can go through its entire development cycle (from sowing seeds to fruiting). Both designs are not cheap in specialized stores. However, you don’t have to spend money on them; you can make them yourself. A well-built greenhouse or greenhouse made from window frames with your own hands is not inferior in characteristics to purchased ones. The material for construction will be quite cheap.
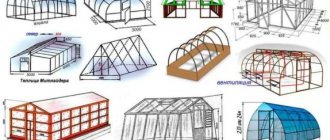
Types of greenhouses and greenhouses made of window frames
There are different design options.
Single-pitch
In the case of a greenhouse, this is an attached structure, i.e. one of its walls is adjacent to another building (barn or house). Thanks to this, it is possible to save space in the garden. However, this type also has a significant drawback - lighting is only on one side. Because of this, the plants will be in the shade for most of the day. This will not be a problem if you grow shade-loving crops in such a structure. As for the greenhouse, it is often made with a single slope; its small size allows it to be built separately.
Single-pitched greenhouses:
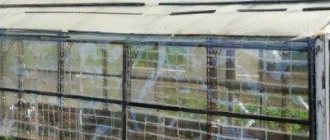
Construction of a wall-mounted greenhouse from window frames:
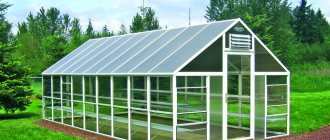
Gable
This is a classic option; greenhouses of this type have a house design with a ridge on the roof. And the greenhouses of a small house. Greenhouses are quite easy to install and convenient to operate, but they have a significant drawback - they are stationary. A greenhouse of this type is quite simple to make.
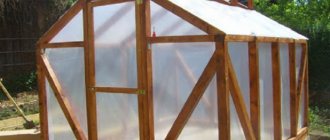
Gable greenhouse and possible design option:
Gable greenhouse:
Polygonal
Only greenhouses are built of this type. These are structures with six or more sides. Typically, such a structure is used for greenhouses and gazebos, which are always warm. Making one yourself will be quite difficult.
Polygonal greenhouse option:
Photo master classes with examples of construction
Project #1:
Project #2:
Project #3:
- Author: Konstantin
Rate this article:
- 5
- 4
- 3
- 2
- 1
(9 votes, average: 4.4 out of 5)
Share with your friends!
Greenhouse made of PVC pipes: we analyze the procedure for constructing a lightweight and durable structure
In which direction can the doors and windows of the Harvest greenhouses open?
Calculation and drawings of greenhouses and greenhouses made from window frames
It is necessary to count the number of frames and measure their dimensions. It is desirable that they be the same, then they will not have to be aligned in height. Only after this is it recommended to start drawing up a design diagram. You can come up with it yourself and make a drawing on paper or take a ready-made one, for example, one of the following options.
Drawing of a gable greenhouse:
Based on the exact dimensions of the frames, make adjustments. For example, if it is necessary to increase the height, it is recommended to place the windows in a horizontal position at the top.
An example of a lean-to greenhouse diagram:
At this stage, you need to decide on the type of foundation. If you plan to use the structure for a long time, it is better to opt for a strip one. If the greenhouse will stand for several years, you can use timber insulated with roofing material or treated with an antiseptic. For a greenhouse, you don’t have to make a foundation at all. Below we will provide step-by-step instructions for building different types of greenhouse foundations using window frames.
You need to think about the roof in advance. It can be single-pitch, gable, as we have already said in the types of structures. There are also greenhouses with a flat roof, but for most regions of Russia this is not the best option, because... Snow will accumulate on it, under the weight of which the roof may simply not withstand.
It is not recommended to construct a roof from window frames. In winter, they may not be able to withstand the weight of snow. It is better to use polycarbonate or boards.
Before installing the roof, you also need to draw up a detailed drawing of it and think about reliable fasteners.
Two drawings of greenhouses made from window frames:
Drawing of a recessed and lean-to greenhouse made from window frames:
Selection of materials and calculations
The set of materials for such construction is the simplest:
- sand or crushed stone for the base;
- wooden beam for supports;
- frames and glass;
- nails, screws;
- sealant, insulation;
- paint or protective impregnation, if it is wood;
- polyurethane foam.
You can get by with the tools that almost everyone has. For convenience, it is better to take a screwdriver, jigsaw, or a special wood drill, but you can use a hacksaw or screwdriver. In order to make the structure level, you need to use a square, a level, a plumb line, and a tape measure.
Glass greenhouses are one of the most durable options. It is structurally more complex than a simple geofabric greenhouse...
To make calculations, you need to lay out the frames on the ground, choosing the narrowest for the end sides, the widest for the sides. Having adjusted the dimensions and aligned the sides, you need to measure the contour. The optimal width of the greenhouse is 2.5 meters. Two beds one meter wide and a sufficient passage can be placed in such an area. The height must be at least 160 centimeters, the width depends on the number of frames. When calculating materials, it is necessary to take into account that a thick beam will be required for each of the four corners, slats for the lower, middle and upper trim. This step can be skipped if the frames are metal-plastic. It is mandatory to install stiffening ribs and supports every one and a half meters of length. Additionally, you need to use slats to strengthen the middle of the greenhouse. The timber for the roof is calculated according to the same parameters if frames are installed.
On a note!
The connections will be stronger if you use metal corners and special transition elements for the roof.
How to choose windows and prepare them
In order for wooden frames to last a long time, you need to carefully choose them. If they have darkened, their paint is peeling, this indicates decay. It is not advisable to use such windows. If the defects are minor, the frames can be used in construction, but will not last long. The presence of damage must be taken into account at the drawing stage.
It is advisable that the damaged part is located at the top, under the roof itself. Thanks to this, less moisture will enter this area, and a DIY greenhouse made from old window frames will last longer.
Preparatory work:
- remove unnecessary fittings;
- clean the paint;
- treat the surface with an antiseptic to prevent rotting and insect activity;
- remove the glass so that it does not break if a hammer and nails are used during installation;
- seal the windows with tape so that they do not open and interfere with assembly;
- hammer in unnecessary sashes.
Important! Frames should not be too old, because glass has its own service life. Once it has expired, it may crack due to subsidence or even strong winds.
Recommendations and common mistakes
Thanks to the presence of vents in the window frames, it is convenient to ventilate the greenhouse in hot weather. This ensures good ventilation and does not allow putrefactive bacteria to develop.
Important! It is not recommended to build a greenhouse in areas with high groundwater. High humidity can lead to root rot and death of vegetable crops.
Experts recommend that the width of the foundation on loamy soils be within 20 cm. On sandy soils, movement may occur, so the width of the foundation is chosen to be 35-40 cm.
Carpenters recommend sealing the resulting cracks with weather-resistant sealant. This way the wood will last longer.
Preparation of building material for the greenhouse frame and greenhouse from window frames
The calculation of the material is made on the basis of the drawn up drawing. Standard frames have dimensions of 1.2 * 0.9 m. Then the length of the structure will be 90 cm, height 120 cm + base and top. The optimal width is 2.7 m, that is, 3 frames. Then the beds will be 1 m wide, and the distance between them will be 0.4-0.6 m.
In addition to windows, the production will require:
- door;
- beams for the frame;
- base material;
- anchors, screws;
- bars;
- roof.
You need to think about all this in advance so that you don’t have to go to the store while working.
Preparation for construction
Frames for a greenhouse
A greenhouse made from window frames with your own hands is often made from wooden frames. Preliminary preparation of wooden windows will extend their service life:
- Inspect all frames thoroughly prior to installation.
- Put aside products with defects or signs of decay (darkening of color, change in structure, peeling paint).
Having selected the elements of the future greenhouse, prepare them. Basic actions:
- Remove all unnecessary handles and hinges from the frames.
- Remove layers of old paint with sandpaper, wash the glass with soapy water.
- To protect against damage by pests and rotting, treat all products with an antiseptic in several layers.
- Uneven frames can be filled with putty.
- Remove the glass to avoid damaging it during installation.
- Lock the windows in the closed position.
- Windows that you do not intend to open in the future need to be sealed with sealant or nails.
- Paint all elements of the future greenhouse with light-colored paint (optional).
Cleaning the window frame
In addition to old windows, you will need other components and materials. Required kit:
- Entrance door. You can use a standard balcony door (just shorten it if necessary) or make a suitable door yourself according to the size of the opening.
- Bars. Will be needed for the frame. For a small structure you will need 4 beams of length equal to the height of the structure; for a long one, use support beams.
- Foundation materials. For an ordinary wooden base, you need a beam 15x15 mm long, which will be equal to the perimeter of the building, and roofing felt for waterproofing. For a strip foundation, formwork materials are needed: boards or posts, a mixture of cement, crushed stone and concrete, large stones or reinforcement.
- Bars for rafters. The quantity depends on the type of roof. Most of the bars are needed for a gable roof.
- Roofing material. You can use polyethylene film or polycarbonate with a thickness of 6 mm or more.
Window frames for greenhouses
Tools for work
When building a greenhouse from old windows, it is convenient to use a power tool or a tool with a battery. In general, for work you will need:
- cord, pegs;
- anchor bolts, screws;
- building level, plumb line, tape measure;
- screwdriver;
- drills of different diameters;
- a circular saw;
- hammer;
- shovel;
- square;
- polyurethane foam.
Choosing a location for a homemade greenhouse
Choosing a location for a greenhouse
Not only its shape and size, but also the internal microclimate depends on where the greenhouse made from old frames will be located. Useful tips:
- For good lighting of the building and protection from northern winds, erect it in front of tall plantings or structures. No shadow from trees should fall on the structure.
- Do not build an object next to a green hedge, otherwise it will be inconvenient to care for the plants.
- Build the structure on the south, southwest or southeast side of the site.
- It’s good if the chosen location has a hill, otherwise arrange a drainage layer.
- Assess the condition of the soil. Cover the clay soil with gravel and fill it with black soil.
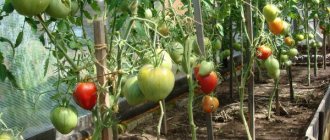
- Place the tomato greenhouse as far as possible from the potato area. This is for the prevention of late blight.
- A good direction for the roof ridge is north-south. Plants will receive maximum sunlight from the south and east.
- Build the greenhouse as close as possible to the necessary communications to provide it with heating, watering and lighting.
Drawing up a drawing
Window Frame Greenhouse Drawings
Write down the dimensions of the exact number of frames you have. If they are the same, you will avoid adjusting the height. Then draw up a diagram for installation. In it, determine the installation sequence, mark the locations for the windows and doors. If you need to increase the height of the walls, then place the windows horizontally, attaching them above the main frames. Selection of building form:
- for a nursery, choose a box-shaped structure that is tilted to one side;
- for grown seedlings and growing greenery, it is convenient to use a gable mini-greenhouse;
- for tomatoes or cucumbers, build a greenhouse-house with a height of 1.8 m with windows and doors.
Greenhouse for seedlings
Select a foundation. For long-term cultivation of crops, install the building on a strip foundation. If the greenhouse is designed for 1–2 years, then a columnar base made of timber, pre-treated with an antiseptic and insulated with roofing felt, is suitable. The roof in a greenhouse can be made pitched, gable or arched.
The number of required elements must be calculated depending on their size. If the old windows have a size of 120x90 cm, then the length of the building should be a multiple of 90 cm, and the height will be 120 cm + the height of the roof and foundation. The optimal width of the beds is 1 m, and the distance between them should be 40–60 cm. Taking this into account, the convenient width of the building will be 2.7 m, i.e. 3 old frames. Swing products are larger in size, so less of them will be required.
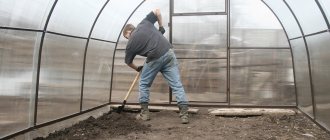
Greenhouse from frames step by step
DIY foundation for a greenhouse made from window frames, if needed + photo
If the greenhouse will be used only in the summer, then the most economical option is a foundation made of beams. It must be clean and dry, without signs of rotting or insect damage. The cross-section of the beams depends on the size of the greenhouse (the larger, the larger it should be). The best option is larch material treated with an antiseptic. If it is not treated in advance, then you need to do it yourself, otherwise the foundation will rot and insects will infest it.
How to build a foundation step by step:
| Illustration | Process |
| Make markings so that each angle is 90 degrees. Remove the top layer of soil. Dig a trench around the perimeter. For timber 10*10 cm, a depth of 15 cm is sufficient. In this case, the width of the trench should be 7-8 cm greater than the thickness of the timber. | |
| Place roofing material on the bottom. | |
| Place the beams on top. | |
| Fasten with corners. | |
| Level the foundation to the spirit level. Minor deviations can be corrected by adding gravel or sand |
A strip foundation is more reliable, but its construction will also be a little more complex. Step-by-step instruction:
| Illustration | Instructions |
| Make a marking and dig a trench along it 30-50 cm deep and 15-20 cm wide. If the greenhouse will be used in winter, then you need to dig deeper, just below the soil freezing level. | |
| Make formwork from boards. Strengthen if necessary. Lay the film so that the cement does not stick to the boards. | |
| Make a belt from reinforcement. If there is no metal, then pour 20 cm of sand or at least 5-10 cm of gravel onto the bottom and compact it. | |
| Pour the concrete in one go to avoid uneven hardening. Wait about 20 days until completely hardened. Then remove the formwork. |
If the structure is light in weight and used only in the summer, you can build a columnar foundation:
| Illustration | Process |
| Make markings, place pillars (piles) in the corners and along the perimeter at a distance of 0.7-0.9 m. Make a trench about a meter deep between the pillars. | |
| Lay roofing material at the bottom, which will become formwork and waterproofing. | |
| Make a frame of 2-3 reinforcements. | |
| Pour concrete. |
Above were only the simplest methods for installing a foundation; there are other options.
Stage III. Laying the floor in a greenhouse
For the floor in the greenhouse, you need to dig a space at least 15 cm deep. The entire base should ultimately be well leveled and compacted. You can pour concrete into the floor directly over this compacted earth for extra strength.
So, it is necessary to pour fine gravel onto the prepared base, in a layer about 10 cm thick. Next, the gravel is covered with plastic or roofing felt - this will be an excellent barrier to dampness and undesirable growth of weeds underfoot. On top of everything you need to pour 5-10 cm of good construction sand and compact it again. To ensure that the floor in the greenhouse is compacted well, you can use a vibrating plate. And finally, it is better to lay the bricks closer together on the floor and fill them with construction sand so that all the cracks are filled.
Step-by-step instructions for constructing a greenhouse from window frames on a foundation with photos
Detailed step-by-step instructions for erecting the main part of the greenhouse:
| Illustration | Process |
| Cover the foundation and base with roofing felt sheets for waterproofing. | |
| Mount beams for the bottom trim on top of the anchors. Connect with corners. | |
| Make markings for vertical supports. | |
| Install the corner posts, checking their level. Install intermediate supports. | |
| Using bars, make a temporary fixation so that the supports do not warp. They can be removed only after completing the entire installation. Build a harness on top. It will prevent the racks from tilting. | |
| Attach the frames to the frame using self-tapping or ordinary screws. This will prevent damage to the glass that may occur when using nails. Seal all cracks with foam. | |
| Build a roof. | |
| Install doors and caulk gables. You can use film or polycarbonate on the roof. |
Note! If the structure is long, intermediate posts will be necessary to ensure the structure is secure.
Where can I get the material?
This is the first question that arises when thinking about creating a greenhouse. In fact, there is nothing supernatural here. Many companies (kindergartens, various institutions) prefer to replace wooden windows with modern plastic ones. Old window frames, as a rule, are not very valued by their previous owners, and therefore anyone can take them.
Another option is to contact any company that installs plastic windows. Usually they dismantle the old frames and remove them themselves. If you find out where old windows are taken, you can not only pick them up for yourself, but also, importantly, choose from such a variety of materials the ones that are suitable in size.
Please note: if you find intact windows, try to preserve the glass in them.
Most often, summer residents themselves start replacing windows in their country house. In this case, it would be short-sighted not to take advantage of this opportunity by sending the old frames to scrap.
Don't rush to throw away used window frames
Do-it-yourself greenhouse from window frames: step-by-step instructions with photos
If there is not much space, then the structure can be made in a mini format; such a greenhouse can even fit on a balcony. The walls of the structure will be made of wooden planks, and the roof will be made of window frames. During the day it can be opened for ventilation. The width of the frame must correspond to the size of the greenhouse. It is more convenient if it has the shape of a rectangle.
If the greenhouse is installed in an open area, then installation proceeds as follows:
| Photo | Manufacturing |
| Make markings and dig wooden blocks in the corners. Make shields from boards. | |
| Attach the top layer to the lower shields, which should be higher on one side of the structure and lower on the other. Thanks to this, the roof will have a slope and moisture will not linger on it. Secure the panels to the supports with nails. | |
| Position the frames at a 90 degree angle to the high side. Secure the windows to it with hinges. | |
| Attach a rail between the windows so that there is no hole between the frames and one frame rests on this rail.. | |
| Mount handles on the roof to make it convenient to open and close. | |
| Install clamps on the short side. Build a small plank that will serve as a support for the open frames. |
This completes the construction of the mini-greenhouse. The work usually takes a maximum of 2-3 hours.
Wooden and plastic frames: pros and cons
What is better: a greenhouse made of plastic windows or a greenhouse built with your own hands from wooden frames? Both options have their pros and cons. Let's try to figure it out.
A greenhouse made of plastic windows has the following advantages:
- Reliability. Even after long-term use, plastic windows are still very reliable. Such a structure (if the frames are well connected to each other) will not be destroyed by any wind. Its service life can be several decades.
- Thermal insulation. The excellent thermal insulation properties of plastic windows allow you to maintain an optimal temperature level inside the greenhouse.
Flaws:
- These windows are quite heavy. This means that they are very difficult to install alone. Also, they require a reliable and strong foundation.
- Very expensive glass. And if it breaks over time, this will become a serious problem.
Wooden frames have the following advantages:
- Simple repair. If a window breaks or the base of the frame breaks, you can fix it with the help of improvised means.
- Ease of installation. Wood is lighter and easier to work with.
Flaws:
- Short service life. Even boards up to 10 centimeters thick wear out very quickly when used outdoors. In accordance with this, wooden frames require constant care: painting, treatment against rotting, etc.
Do-it-yourself in-depth greenhouse from window frames: step-by-step instructions with photos
This type of greenhouse is perfect for those who live in regions with cold climates. It has natural heating + it can be additionally insulated with straw from the outside. Early seedlings are often grown in such a greenhouse. Here's what you'll need for construction:
- straw as insulation;
- wooden boards for the frame;
- old window frames;
- manure or droppings for natural heating.
Approximate diagram of an in-depth greenhouse:
| Illustration | Description |
| If the top layer of snow has already melted, it’s time to start building a deep greenhouse. Mark with pegs and dig a trench 60 m deep and 100 cm wide. The length can be any, at your discretion. By the way, if the soil is too loose, it must be additionally strengthened with boards. | |
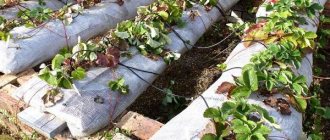
| The next step is to lay manure mixed with straw or rotted sawdust (1:2) 30 cm thick. This should be done 2-3 weeks before planting. Sprinkle 20 cm of fertile soil on top and cover it with a small layer of straw to protect against weeds. | |
| Build a box and insulate it with bales of straw. Having made a frame from boards for the roof, place it at an angle, placing one side on the straw and the other resting on the ground, you will get a lean-to in-depth greenhouse. | |
| Attach the window frames to the frame of the recessed greenhouse. | |
| After all the work you need to warm up the greenhouse. To do this, pour hot water over it and close the structure tightly. It makes sense to cover the top of the window frames with film while warming up. Afterwards you need to leave the greenhouse for 2-3 weeks, as we already wrote above. |
Greenhouse installation
The frames are prepared and they will need to be attached to the frame, which should be made. A wooden beam is best suited for these purposes. Which should be prepared in advance.
The most optimal cross-section of the material will be 50/50. You can also use 40/40, this is exactly the thickness of the old frames; the structure on the bars will be attached with the entire plane, but the 50th will add rigidity.
- We install the frame, which consists of three parts, lower, upper, and racks. We cut the elements to the size indicated in the drawing;
- We lay out timber around the perimeter of the foundation and begin taking measurements. We carefully measure the diagonal, we should get the correct geometric shape;
Proper execution of frame fastening
- We fasten the corners. To do this, it is worth using long self-tapping screws and to secure the fastening to the inside of the corners, fasten the corners made of metal;
- We nail a board along the bottom of the trim. It will hide all the cracks that remain from the frames;
- According to the previously completed numbering, we begin to mount the frames to the harness.
Note: Some people recommend installing the racks first. But here is a small question, what to do if the docking does not match. After all, two structures should be attached to the beam. It will be better if you install the frame and stand together.
- Do not fasten with nails. Screws are a little more expensive, but this type of fastening is much more reliable;
- We make the top trim using a beam and use self-tapping screws and a metal corner;
- Installation cannot be completed completely without gaps. Therefore, after installation, all cracks should be treated with polyurethane foam. If the gaps are very large, additional pieces of polycarbonate should be attached from the inside;
- To be safe, the wood should be treated with an antiseptic. After this prime and paint. Use paint for external surfaces.
How to make a mini-greenhouse from window frames with your own hands
Of course, such a greenhouse will not fit on a windowsill, but it can be placed on the site and it will not take up much space.
Step-by-step assembly instructions:
- From the windows, form a square frame with outer parts 2 by 4. You should get a box, closed on all sides, incl. below. Leave the top open.
- Nail the legs to the corners like a table.
- Strengthen the structure with horizontal bars, sawn at an angle of 45 degrees. Place them around the perimeter of the greenhouse.
- Cover the top of the box with wooden boards or polypropylene.
- For attractiveness, you can build a gable roof from frames.
Fertile soil is poured inside such a mini-greenhouse and plants are planted in it. This structure is more of a decorative nature and it is recommended to place several specimens of flowers (even indoor ones) in it, rather than vegetables.
Tips for choosing frames
A glass greenhouse can be built from one long or several window frames. The best option is a rectangular frame with large glass, as it will give the plants more light. Although there are no special criteria for choosing this construction raw material. The main thing is that the glass is intact and the wood of the frame is not rotten.
To create a greenhouse, it is preferable to take large window frames
Windows left after renovation are suitable for creating a mini-greenhouse. You can find used windows through an advertisement in a newspaper or at a company that dismantles old wooden frames and installs plastic double-glazed windows in their place.
All frames taken as building materials for the construction of a greenhouse must be exactly the same. If you use different wooden windows, it will not be possible to make the greenhouse airtight, since the frames will not fit tightly to each other.
It is advisable to find window frames with vents. They will allow you to ventilate the greenhouse without raising its glass roof.
The window frame used to build the greenhouse will become a ventilation hole
It is recommended to prepare window frames for further use as greenhouse material. This involves replacing broken and rotten parts, as well as dismantling handles, latches and unnecessary fittings. The wooden elements of window frames need to be sprayed with an antiseptic, which inhibits the process of wood deterioration under the influence of precipitation.
Do-it-yourself mini-greenhouse on the windowsill from photo frames
If you want to make a small greenhouse for growing seedlings on a windowsill, it is best to use photo frames for this rather than large window frames. They are very inexpensive, and the finished greenhouse will be not only functional, but also very beautiful.
| Illustration | Process |
| It is best to use wooden frames. You will need:
Before use, they must be polished to remove paint. |
| First of all, the frame is assembled. The 28 x 35 frame is combined with the 20 x 25 cm frame so that their 28 and 25 cm sides touch, the back side of the 25 cm frame must be pressed against the outside of the 28 cm frame. |
| You need to connect the frames by drilling a small diameter hole through the inside of the larger frame and going through to the middle of the smaller one. Then fasten the frames using a screw that matches the diameter of the drilled hole. |
| Continue connecting frames until you have a rectangle formed by the four largest frames (two 28 x 35 cm frames and two 20 x 25 cm frames). | |
| The next step is to assemble the roof. You need to connect four small frames with dimensions of 13 x 18 cm. Connect them in pairs and fasten them together, making a triangular roof. Attach a hinge so that you can open the greenhouse and water the plants. Place two 13 x 18 cm frames side by side so that their short sides touch. Connect them using 5 cm strip steel plates, screwing it to both parts. To make your task easier, you can drill a pilot hole. Repeat for other 13 x 18 cm frames. Connect the structure of small frames, placing them at a 90° angle along the long boards and secure it with corner brackets. |
| The next step is to attach the roof to the main structure using inch hinges, placing them on the connecting boards at equal intervals. |
| Afterwards you need to seal the triangular hole in the roof; you can use a piece of plywood. It can simply be nailed to the frame with small nails or screwed with screws. |
| Paint the finished frame with wood paint before installing the glass. |
| Insert glass. The greenhouse is ready! |