Buying ripe, juicy watermelon in a store or market is not difficult. But some plant lovers, closer to spring, have a desire to grow this wonderful berry themselves. But is it really possible to do this if you don’t even have a plot of several hundred square meters at your disposal, but only a balcony?
How to grow a watermelon on the balcony, because in order for it to grow and ripen in a field or garden, you need space and a lot of sun. Let's see what conditions are necessary for this and whether it is realistic to provide them in the apartment.
Is it possible to grow watermelons at home from seeds?
Increasingly, garden and field crops are taking root on apartment windowsills. Usually peppers, cucumbers and tomatoes are planted in pots, and such an exotic fruit as watermelon is chosen only by the most daring plant growers. But caring for this berry is not as difficult as it seems, and the taste of the homemade fruit is not inferior to melon specimens.
Selecting a landing container
For subsequent transplantation of sprouts into the ground or greenhouse, you need to be careful and remember that when choosing a container, you can damage the roots when you remove the sprout from the container. Many people simply use plastic pots. Many people also choose peat and paper cups.
The advantage of cups is that you don’t have to pull out the plant before planting it in the ground. The roots of the plant will very easily and quickly cope with this obstacle and establish themselves in the way they need in the ground.
It is important to know that the depth of the cups should not be more than 10 centimeters
What varieties are suitable for this?
Watermelon is a crop that is sensitive to heat and light. It is easy to maintain a high temperature in a heated apartment, but providing the plant with enough light in autumn and winter is problematic. Therefore, give preference to varieties that bear fruit in short daylight conditions. The timing of ripening is also important. It is better to plant early varieties at home; in this case, the harvest will be harvested within three months.
The following varieties of watermelons are grown on a windowsill or covered loggia:
- Gift to the sun;
- Volgar;
- Rose of the Southeast;
- Ogonyok;
- Stokes;
- Siberian.
Seed selection
This stage of preparation must be approached with all responsibility, since the further outcome of all your work and efforts depends on it. A wide range of products allows you to choose exactly those varieties that are best suited to your climate.
What differences between watermelons can be:
- Variety;
- Immunity;
- Rate of ripening;
- Resistance to various diseases.
It is recommended to choose hybrid seeds for planting, as they are the most resistant to weather conditions and unfavorable factors that may be present in the external environment
Necessary conditions for growing watermelon at home
If you do not provide the melon crop with a comfortable climate and care, you may not expect fruit. Growing watermelons indoors has its own characteristics that are important to consider.
Place
The watermelon will feel best on the southern windows, but the northern side is not at all suitable for it. In rooms facing east or west, it will also be possible to grow this exotic crop.
Watermelon does not like cold and drafts. You can place it on the windowsill, under which there is a central heating radiator.
Attention ! If you plan to plant a crop on the balcony, it is important to create additional heating.
Tara
Watermelon seedlings are grown in plastic cups, small pots or special cassettes. A stronger sprout will need a larger container. A bucket, basin or other container with a volume of at least 10 liters will do. You can independently put together a box 50*50*30 cm from wooden boards.
It is not advisable to plant seeds immediately in large containers, because water often stagnates in a large lump of earth, and the plants may die. If you don’t want to bother with seedling cassettes, watering will have to be carefully controlled.
The soil
Loose, nutritious soil is prepared in advance. It is made from equal parts of humus, turf and sand, with a little ash added. Before planting, the soil is disinfected by scalding it with boiled water.
Light and temperature
The plant needs a 12-hour daylight hours, so during cloudy periods it will require additional lighting sources: LED, fluorescent or phytolamps.
Important! During the period of ovary formation, the plant should not be overcooled. The optimal temperature regime, which must be regularly monitored, is +25...+30°C during the day and +18°C at night.
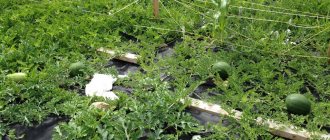
Site preparation
Choosing a location is an important stage in planting a watermelon, which largely determines its further growth and productivity:
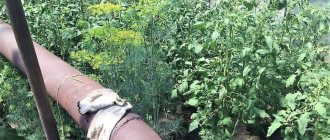
- Watermelon loves places with a lot of light; in shady conditions it develops poorly and will not be able to produce high yields. For planting, sunny areas are allocated that must be protected from the wind;
- due to its highly developed root system, watermelons are highly drought-resistant; planting in places with close groundwater is unacceptable;
- Light sandy loam or sandy soils with neutral acidity are most suitable for cultivating melons. In areas with acidic soil, watermelon produces small fruits that crack while still green.
These plants are undemanding to soil fertility; they grow well both on black soil and on poor sandy and rocky soils. However, to obtain large yields, well-cultivated areas are needed. To do this, in the fall, the future planting site is dug up and fertilizers are applied:
- superphosphate, azofoska (according to instructions);
- wood ash (1 l);
- humus (5 l).
The calculation is given for 1 m2 of plot area. Applying fertilizers before planting eliminates the need for regular fertilizing during the growing season of the plant.
For watermelon you need to choose a well-lit place
Landing
Seeds with hatched sprouts are planted in plastic cups filled with lightly compacted earth - 4-5 pieces each. in each. Make sure that the soil always remains moist and the air temperature is about +25°C. If these conditions are met, shoots will appear in 7 days.
After 2-3 weeks, when the seedlings have grown a little, it is necessary to pull out some of the sprouts, leaving one of the strongest seedlings in each container. After a month, the plants are moved to a permanent place along with a lump of earth.
Calibration
The germination of seeds and the further development of young plants depend on this procedure. This issue must be approached with full responsibility. It is necessary to select the strongest and most viable seeds.
How to do it? Create a saline solution: pour 1 liter of water and add 50 grams of salt to a glass of water. Mix everything well. Empty and smaller seeds will float to the surface, while the best ones will remain at the bottom of the glass. These are the ones we need.
Selected seeds can simply be dried. Stronger seedlings develop better, thereby destroying poorer and smaller seedlings. When you size the seeds, they grow more uniformly and abundantly.
There is another option for sizing seeds: simply scatter all available seeds on the surface and manually select large and powerful seeds. Everything is simple here: large seeds have more nutrients, which will further affect the growth and harvest of your crop.
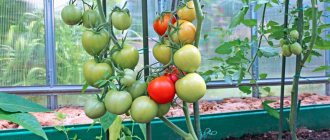
Growing in a pot and care
After transplanting the crop into spacious pots, its root system begins to develop rapidly. Pinch the third or fourth leaf, giving the side branches a vertical or horizontal direction. You can also leave just one lash. In this case, the harvest will be obtained faster.
When the flowers bloom, perform artificial pollination. Without this procedure there will be no fruit. Using a soft brush, transfer pollen from a male flower with a thin stalk and stamens to a female flower with a thick stalk and pistil. The beginning of berry growth is signaled by an increase in the size of the female stalk. If the whip with the ovary is in a vertical position, it must be secured to avoid breakage.
Attention! You should not leave more than two fruits on one bush, otherwise they will not have enough nutrition.
Watering
Water generously but rarely (once a week) to prevent the soil from turning sour. If the soil is waterlogged, the taste of the fruit will deteriorate. Experts recommend limiting the water supply after the berries begin to ripen. It is believed that a slight moisture deficiency makes watermelons sweeter.
Feeding
The plant begins to be fed after the formation of three large leaf blades. First, the watermelon is watered with water, and then with a solution of complex fertilizer. At this stage, preparations with equal contents of potassium, nitrogen and phosphorus or with a slight predominance of nitrogen are suitable.
The second fertilizing with potassium and phosphorus fertilizers is carried out during the formation of the ovaries. After 2-3 weeks, the procedure is repeated a third time.
How to grow melon on the balcony
Melon, beloved by many, also belongs to the Bakhchev family. To grow successfully, it needs the same conditions as a watermelon. But before you grow melon on the balcony, you need to choose the right varieties.
Varieties of melons for the balcony:
- “Altaiskaya” is an early ripening variety with an average number of shoots. The fruits are orange or yellow, oval, weighing about 1 kg. Ripen 70 days after sprouts appear. The variety is resistant to diseases.
- “Rime” is an early ripening variety with long vines. The ripening period is about 90 days after the sprouts appear. The fruits are round or oval, yellow, orange, with a mesh pattern on the thin bark. The pulp is white, very sweet. Needs fertilizer and watering. Disease resistance is average.
- “Kolkhoznitsa 749-753” is a mid-season self-fertile variety. The fruits are small, spherical, yellow-orange in color with dense, sweet pulp. The variety is resistant to anthracnose and angular spot.
Features of growing melon on the balcony
The ripening period of melon, depending on the variety, ranges from 2 to 6 months. The root system of the plant is superficial. It weakly absorbs moisture and evaporates it twice as fast as a watermelon. Therefore, the melon needs water much more than the watermelon. But you don't need to fill it up.
Add water at a temperature of at least 22°C only when the top layer of soil dries out. When it is absorbed, lightly loosen the soil to provide air access to the roots.
To grow a melon on the balcony and get the fruits, you need to know what it doesn’t like:
- dense soil with high acidity;
- stagnant air;
- temperature below 20°C;
- watering with cold tap water;
- applying fresh manure;
- frequent feeding.
Preparing Melon Seeds
It is better to sow melon seeds collected independently in the second or third year. Then the plant will have more female flowers.
It is better to sow in February. Then the melons will have time to ripen before the cold weather, and the seedlings will receive a sufficient amount of light. If you sow the seeds earlier, you will have to supplement it with a phytolamp, because the daylight hours in January are too short.
Disinfect the seeds in a solution of potassium permanganate. Then soak in clean water for 12 hours, remove and ventilate every 4 hours.
The stratification procedure (keeping in the refrigerator for 2-3 days at a temperature of 1-3 degrees below zero) will make the plants more resistant to cold.
The further process of germination of melon is the same as for watermelon. The minimum volume of containers in which seedlings are planted on the balcony is 45 liters.
Caring for melons on the balcony
Before fruit formation, it is recommended to limit watering so as not to provoke rapid growth of stepsons, and there will be few fruits and their weight will be small.
You need to feed the melon; it is better to alternate organic matter and mineral fertilizers. But an excess of nutrients will be destructive; a lot of nitrates will accumulate in the fruits.
Melon is more often affected by fungal diseases than watermelon. They appear as gray, brown spots on leaves, stems and fruits.
The most common diseases are:
- Powdery mildew.
- Anthracnose.
- Fusarium.
It’s easy to tell when a melon is ripe. It will change color and emit a pleasant aroma. They pick it and eat it.
How to grow Torpedo melon:
Diseases and pests
Watermelons are susceptible to a number of diseases, which especially often develop due to errors in care. When growing crops at home, the following pathologies are common:
- Fusarium wilt is a fungal disease that leads to intoxication and death of the plant. For preventive purposes, the soil is disinfected and dried lashes are removed in a timely manner.
- Anthracnose occurs when there is high air humidity. The rind of the watermelon becomes covered with yellow spots, which merge with each other over time. Keep equipment clean, disinfect the soil, and treat planting material with Fundazol.
- Root rot - occurs when overwatering. The disease destroys the root system and appears as black-brown spots on the lower part of the stem. Copper sulfate and wood ash are used for treatment in the initial stages. In advanced cases, the diseased plant is destroyed.
- Powdery mildew develops when the soil is infected with a fungus. The leaf blades become covered with white spots, the berries become deformed and become tasteless. Powdery mildew is combated using a 25% karatan solution.
- Bacterial spotting - spots appear first on the leaves, and then on the peel of the fruit. There is no effective drug against this disease yet, so the affected parts of the crop are cut off.
Pests enter the pot from the street or from untreated soil. Watermelon is damaged by the following insects:
- melon aphid;
- germ fly larvae;
- spider mite;
- wireworm;
- thrips;
- root-knot nematode;
- cutworm butterflies;
- locusts
To get rid of pests, plants are sprayed with chemicals (BI-58, Fitoverm, etc.). Among the folk remedies, an infusion of wormwood, a solution of wood ash and laundry soap, as well as a chamomile decoction are effective.
Creating trellises
Once the room, container and seeds have been chosen, you need to decide how to grow watermelon at home. To prevent the fruits from drooping and to ripen normally, trellises are used. They are made of wood, plastic, metal. Most often, they stand alone to ensure uniform lighting.
Experts recommend knocking down wooden trellises. A few recommendations on how to do this:
- First, knock down the frame using nails or self-tapping screws. If you wish, you can get creative and give the structure a triangular, trapezoidal shape. Provide space for legs on the lower edge of the product.
- Longitudinal and transverse beams are placed on the sides of the frame. They serve for structural rigidity. The beams are placed perpendicularly or at a certain angle.
- Support legs are attached to the bottom of the frame (to prevent contact of the frame with the surface of wet soil). Typically, metal corners are used as legs.
- The structure is varnished or painted.
For fruits that are too heavy, special nets are used.
Harvesting
When the fruit ripens, its stalk dries out and the rind becomes glossy and smooth. Check the ripeness of the watermelon by lightly flicking it with your fingers. If it is ripe, the sound will be dull and deep.
The weight of home-grown berries usually does not exceed 600-800 g. If the plant has enough light, watermelons will be as sweet and tasty as fruits brought from the south.
Hardening
This method can usually be used in different ways. Everyone chooses the necessary option for themselves.
1 hardening option. Temperature drop. The swollen seeds can be placed in the refrigerator or room where the temperature is not higher than 0 degrees. Place for several hours, stirring occasionally. If you do all this in the spring, then you can immerse the seeds in the snow for several hours.
Don’t forget to put them in some kind of bag before immersing the seeds in the snow.
Hardening option 2. Variable temperature. Swollen seeds can also be placed either in the refrigerator or in a room where the temperature is below 6 degrees. The need for exposure in this room is about 6 hours. Next, you should leave this bag of seeds in a room where the air temperature reaches 18 - 20 degrees. The time period is 6 hours. It is necessary to repeat the procedure several times (preferably 3 times).
Before sowing, it is advisable to dry the seeds a little
Thus, it becomes clear that planting watermelon seeds for seedlings takes more than one day. The process is quite labor-intensive.