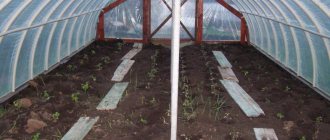
After the garden is harvested, the harvest is harvested, and pickles and preserves are lined up in dense rows on the pantry shelves, you want to enjoy the fruits of your labors. However, it’s too early to rest, because you need to prepare the greenhouse for the winter.
Simple care and proper preparation before winter allow you to keep the structure safe and sound, thanks to which you will again be able to get a magnificent harvest in the spring.
Cleaning a polycarbonate greenhouse in the fall
Why is processing needed?
Garden crops need moisture and heat created in the greenhouse. Unfortunately, the same characteristics are also important for various microorganisms that infect greenhouse plants with diseases, and the structure itself with mold and mildew. All this accumulates during the summer, reaching its maximum in the fall.
Autumn cleaning of the greenhouse is very important
It is very important to begin preparing the greenhouse for the season in the fall, when all the plants in the greenhouse have completed their fruiting cycle.
Terms and rules for processing polycarbonate greenhouses
What to do in the fall:
- fertilize and disinfect the soil;
- remove fungus and clean moldy areas in the room;
- remove, clean and repair the structure.
Infographics. What to do in the greenhouse in the fall
Each stage of the event should be considered separately and in detail.
Soil preparation
The greenhouse creates ideal conditions not only for the growth of plants (including weeds), but also for various pests that can ruin the standing crop if they are not dealt with. Treatment of the greenhouse in the fall against pests and diseases should be comprehensive. The use of chemicals - various insecticides during the growing season is not a very good idea. Chemicals that accumulate in plants eventually enter our bodies.
Therefore, special attention should be paid to disinfection and other soil treatment in the greenhouse in the fall.
Soil replacement
This is a rather labor-intensive and expensive process, but after it the number of pests is reduced by several orders of magnitude. It is recommended to carry out such a procedure as preparing the soil in a greenhouse in the fall, with a complete replacement of the fertile layer, at least once every three years. The soil is removed to a depth of 7-10 cm. Then peat, humus (manure), sand and ash are added in its place, the proportions vary depending on the presence of a particular ingredient, but rarely exceed 1 bucket per 1 m2 of soil. Tilling the soil in a greenhouse in the fall may include fluffing, for heavy and oily soils, using sawdust. However, with this method you need to be careful and, if possible, not use sawdust from coniferous wood (spruce, pine, larch) and wood species with a large amount of tannins (oak, walnut).
The resulting mixture is dug up. Distribute evenly over planting areas and cover with a thick layer of straw or fallen leaves on top. After snow falls in winter, you need to throw some of it into the greenhouse yourself with a shovel (a layer of 15-20 cm) to prevent deep freezing of the soil and provide the ground with the necessary moisture in the spring. Some gardeners additionally water the enriched soil mixture with a weak solution of potassium permanganate before adding fertilizers.
A thick layer of fallen leaves will help keep you warm
Soil infected with pests and diseases does not need to be thrown away, but rather treated. How to treat the soil in a greenhouse in the fall in order to effectively disinfect it without resorting to strong chemicals. To do this, a pile is formed with an area of 1-2 m2 and a layer thickness of 20 cm. When constructing it, each layer is generously sprinkled with lime at the rate of 250 g per 1 m2. It remains in this state for the entire next year, having frozen out over the winter, the pile will need to be dug up again next fall and used after the second winter.
Soil fertilization
How to fertilize the soil in a greenhouse in the fall depends not only on the type of soil, but also what crops are planned to be planted in the spring. To achieve the highest yield, not only special means are used, but also special methods for processing perennial plants:
- Strawberry. After the last harvest, at the end of August, all the greens are mowed down so that the top buds remain intact. The bed is watered abundantly and the soil is loosened. Potash and superphosphate fertilizers are applied in the proportions recommended by the manufacturer. All this is sprinkled with a small layer of fertile soil so that the new shoots do not dry out. Before the onset of cold weather, no later than October, the strawberry roots are earthed up and covered with peat. In winter, be sure to pretend to be a thick layer of snow to prevent freezing.
- Tomatoes. One of the most common greenhouse crops. They are very demanding on the quality of the soil and the composition of fertilizers. For tomatoes, soil preparation in a greenhouse in the fall consists of applying organic, chemical or combined fertilizers, which must necessarily contain:
- Manganese – promotes faster ripening of fruits;
- Copper, boron – stimulate flowering and abundant fruiting;
- Potassium, magnesium, phosphorus, nitrogen - contribute to the rapid growth of the plant.
- Cucumbers. The most common “resident” of greenhouses. There are many varieties designed for growing in greenhouses. However, processing a polycarbonate greenhouse in the fall to plant cucumbers in it has its own specifics. First of all, you need to check the acidity of the soil. If the acidity is more than 6.5-7 pH in the fall, it is necessary to lim the soil. Also in the fall, the soil is fertilized with the following specialized mixture:
- Potassium salt – 10-25 g;
- Ammonium sulfate – 10-25g;
- Ammonium nitrate up to 25 g.
Important! There is a very simple way to test soil acidity at home. You need to pour a handful of dry soil with simple 9% table vinegar
If a reaction begins with the release of gas, then there is enough lime in the soil and it is neutral.
Determination of soil acidity using 9% vinegar, reaction to neutral soil
Stage 1. Cleaning
From the greenhouse you need to remove plant tops, weeds, supports, garters - all this should be burned to prevent subsequent infection of the planted plants.
All plant remains must be removed from the greenhouse.
Material that cannot be burned must be treated with an antifungal drug - potassium permanganate or phytosporin. The equipment is soaked for 30 minutes in the solution, after which it is thoroughly washed, dried and stored in a dry place until spring.
Cleaning up debris within the greenhouse
In order to provide the greenhouse with the most optimal soil composition, you should know what components should be included in its composition.
Table. What components should be included in greenhouse soil?
| Components | Density (g/cm3) | Porosity (% by volume) | Lowest moisture capacity (% of volume) | Total moisture capacity (% of volume) | Cation exchange capacity (mg-eq/100 g) |
| Organic | |||||
| Humus | 0,4-0,7 | 65-80 | 60-70 | 300-400 | 200-250 |
| Lowland peat | 0,1-0,3 | 80-90 | 75-85 | 350-1000 | 150-200 |
| High peat | 0,05-0,1 | 80-96 | 70-80 | 800-1500 | 100-120 |
| Hydrolytic lignin | 0,18-0,2 | 80-90 | 70-80 | 400-500 | 100-150 |
| Vermicompost | 0,3-0,5 | 70-85 | 65-75 | 300-450 | 200-250 |
| Sawdust | 0,2-0,3 | 80-90 | 50-60 | 400-450 | 100-120 |
| Bark of tree | 0,3-0,4 | 70-85 | 40-45 | 100-150 | 100-120 |
| Straw | 0,1-0,2 | 85-95 | — | 200-300 | — |
| Mineral | |||||
| Humus horizons | 1-1,4 | 40-65 | 20-35 | 28-65 | 10-70 |
| Perlite | 0,25 | 90 | 50 | 360 | — |
| Sand | 1,6 | 34 | 5 | 23 | 1-3 |
| Expanded clay | 0,6 | 80 | 25 | 130 | — |
| Vermiculite | 0,2 | 90 | 65 | 450 | 100-150 |
| Zeolite | 1 | 60 | 40 | 60 | 50-130 |
Universal fertilizer for seedlings
Iodine acts not only as an antiseptic and bactericidal agent, but also as an additional feeding. And this applies to feeding potato tubers with microparticles of iodine, and to foliar spraying or root watering.
Why feed this way: despite the fact that iodine is inferior in importance to such nutrients as nitrogen, phosphorus and potassium, the role of this microelement in the life of plants is very significant.
Owners of garden plots with fertile black soil are much more fortunate than it seems at first glance. Such soils, in addition to the high content of humic compounds, also show the presence of a sufficient concentration of iodine, which has the best effect on the quality of the resulting crop.
But sandy soil, when examined, shows extremely low levels of iodine in its composition. And they are reduced to almost zero if the soil is also acidic: at low pH values, iodine, entering the soil naturally from the atmosphere, is instantly washed into the lower layers of the soil and becomes inaccessible to plants.
Therefore, in such conditions, additional treatments of plants with iodine solution are especially important, because they solve the problem of iodine starvation.
From reviews: On my acidic sandy soil, the effect of using an iodine solution is observed by the evening of the next day. The leaves of the treated crop become rich green, and it seems as if they were painted with watercolors. I have only seen such luscious foliage on plants growing in coastal regions!
What does iodine do:
- regulates the flow of water and nitrogen metabolism in plant tissues,
- normalizes the process of oxygen absorption,
- improves the process of photosynthesis.
At the initial stage of plant development, iodine serves as the key to active growth, the formation of high resistance to diseases and adverse environmental factors.
During flowering, it helps to achieve abundant flowering and the formation of a large number of ovaries.
When fruits ripen, it increases the weight of the fruit, increases their keeping quality and improves their taste characteristics.
How to use
Many summer residents are already running out of potassium permanganate supplies left over from the times when it was freely sold in pharmacies.
What alternative means for disinfecting seeds is better to choose during the spring sowing season? In this case, the same iodine turns out to be no less effective - a powerful antiseptic that copes with the task perfectly.
Here you only need 1 drop of iodine, dissolved in 1 liter of settled water.
It is necessary to soak the seeds in this solution for 6-8 hours, and then, without washing them, dry them slightly and sow them in a previously prepared container or in a garden bed.
But to disinfect potato tubers before planting, use a solution prepared at the rate of 2 ml of iodine per 10 liters of water. For this purpose, a couple of hours before planting, lay the tubers in one layer in a shaded corner of your garden and moisten them generously with an iodine solution from a sprayer.
When the tubers are dry, turn them over to another side and repeat the procedure. Tubers treated in this way germinate faster, produce more lush bushes, show high resistance to adverse weather conditions and delight with a generous harvest.
To feed seedlings with iodine, you can water the seedlings with settled water “flavored” with iodine. For children, 1 drop of this drug diluted in 3 liters of water is enough. Even such a mini-dose perfectly strengthens the immunity of seedlings and has a beneficial effect on their development.
If, after planting seedlings in open ground, cold, rainy weather suddenly sets in, pour 1 liter of a solution prepared at the rate of 20 drops of iodine per 10 liters of water into each hole. This measure helps plants mobilize strength and withstand bad weather.
But if I use such root feeding on nightshade crops, then I start treating them leaf by leaf with iodine solution in order to prevent late blight only 3 weeks after such an event.
Don't overdo it!
However, if you exceed the above-described doses of iodine for preparing solutions, do not take into account the frequency of treatments, and also use additional fertilizers enriched with this microelement, you can achieve the opposite effect - undermine the health of cultivated plants.
Signs that plants have a lot of iodine:
- leaves die. At the same time, the leaf plates begin to dry out evenly from the edge to the middle;
- young shoots and leaves “grow up” too quickly and, after treatment with iodine, change their shade from the usual light green for their age to a rich dark green color in just a couple of days.
Based on materials from an article by I. Kudrina
Stage 2. Disinfection
There are several methods for disinfecting a polycarbonate greenhouse.
Effective methods for disinfecting a greenhouse
It is quite dangerous to introduce aggressive chemicals (such as chlorine or vitriol) that can damage the soil and future harvest. That is why experienced gardeners advise that during seasonal cleaning of the greenhouse structure, remove about 7 cm of soil and take it outside. This makes it possible to remove areas of land that are most populated by pests, weed seeds, larvae, and harmful bacteria. Replenishment of the soil occurs due to dry humus, leaves, sand, manure, herbs, ash and peat.
Replacing topsoil
Peat prices
peat
Autumn work in the greenhouse
Fertilizers and soil from last year are carefully dug up. The prepared soil is covered with fresh straw.
The soil in the greenhouse is dug up
Autumn digging of soil in a greenhouse
Important! If the technical features of the greenhouse allow, it is better to remove the covering. This will allow beneficial microbes to overwinter in the soil. This approach allows you to avoid depletion of the layer in which the maximum useful elements are located.
It is not always possible to remove the top layer of soil or, alternatively, this does not give the desired result. Therefore, it is necessary to treat the soil with a solution of iron sulfate.
inkstone
Prices for iron sulfate
inkstone
To prepare the solution you need:
- water;
- 250 g of vitriol;
- bucket.
The chemical is dissolved in 10 liters, after which the solution is sprayed on the ground.
Need to know! You should treat the soil with chemicals only in the fall, since doing it in the spring can harm the plants.
Video - Autumn treatment of a greenhouse without replacing the soil
If possible, you should return to the greenhouse in winter. After the first snowfall, you should throw snow there. In spring, this provides the soil with melt water.
After the first heavy snowfall, you need to throw snow into the greenhouse (20-30 cm layer)
What and how to treat the land from diseases and pests
I will tell you about the correct use of popular means for treating greenhouse soil, which will help achieve their maximum effectiveness.
Fitosporin
One of the most recognized and popular biological products among gardeners is Fitosporin. I appreciate it for its low cost and high efficiency. The drug has a complex effect on organic soil inclusions: organic matter decomposes, having a negative effect on harmful microorganisms living in the soil. The advantage of “Fitosporin” is that it does not destroy beneficial microflora and saturates the substrate with microelements necessary for plant development.
As for disinfection, I dilute Fitosporin-M at the rate of 100 g per 10 liters. I treat the soil twice, waiting an interval of 2 weeks. Be sure to use settled water, or better yet, rain, melt or well water: chlorinated water reduces the effectiveness of the drug.
processing the garden using Fitosporin-M
Potassium permangantsovka
The use of potassium permanganate solution for soil disinfection is typical for both gardening and indoor floriculture. It’s easy to work with the product - dilute a 1% solution. The result will be a pale pink liquid. Sprinkle it evenly over the soil. Use the same solution to disinfect glass, film and polycarbonate parts of the greenhouse.
potassium permanganate
Copper sulfate
I value this traditional garden remedy for its effectiveness in controlling cladosporiosis, late blight and powdery mildew. It is difficult to overestimate its properties:
- good antiseptic;
- suppression of the development of insect pests;
- remedy for mold, rot, fungus;
- replenishment of the microelement copper in the soil.
To achieve greater efficiency, I recommend using only fresh vitriol solution. Be sure to mix it in a metal container, otherwise the iron and copper sulfate will react with each other.
Using this substance is very simple:
- For 10 liters of water - 100 g of copper sulfate + a little freshly slaked lime. Treat the greenhouse soil - this method is used no more often than once every 5 years.
- Add a little crushed household soap shavings to the prepared solution - the resulting product is used to treat the covering material and greenhouse structures. I spray the liquid from a spray bottle and then clean the surface with a brush.
Remember that copper sulfate is a moderately toxic drug, which is why you need to wear thick gloves and a respirator when working with it.
Stage 3. Processing of the structure
After this, it is necessary to clean the parts of the greenhouse - the covering, the frame. If the plants have not been sick this season, you just need to wash the walls with water, going over parts of the frame. Glass elements and polycarbonate should be washed with 400 g of bleach dissolved in a bucket of water.
Polycarbonate greenhouse cleaning products
Sometimes it is enough to wash the inside with laundry soap.
Cleaning polycarbonate greenhouse elements
Washing and treating greenhouse walls
Important! It is easy to spoil the polycarbonate coating, so you should only use soft rags, sponges or rags. It is prohibited to use metal brushes, hard meshes, or fabric for bags.
Do not use abrasive materials to clean polycarbonate.
Cleaner composition
Copper-based preparations are commonly used in gardening. A preparation based on copper sulfate can also be used for processing.
You can also use hydrogen peroxide (37%), you will need to purchase a canister. Perhydrol is diluted in a ratio of 1:10. It can be used for metal processing. It has a bactericidal effect and removes rust.
Hydrogen fluoride glass cleaners are very powerful and also produce fumes. The released substances are poisonous to humans and harm crops. Therefore, it is important to thoroughly ventilate the greenhouse after using hydrogen fluoride.
Stage 4. Fumigation
Proper soil cultivation is not just washing the surface. This is why it is necessary to fumigate the greenhouse. To do this, use checkers of sulfur or cuttings of sulfur.
First, you need to tightly close the windows and doors and carefully caulk the holes. To achieve maximum effect, it is better to wet the structures.
Option #1. Cutting sulfur. It's easy to use. To treat the greenhouse, you should take cuttings of sulfur at the rate of 1 kg per 10 cubic meters of room. It is finely crushed and mixed with coal. The resulting mixture is scattered onto metal baking sheets. They are placed in containers like basins, which are filled to the middle with water. After this, you need to place the containers over the entire area of the room and set fire to the sulfur.
Trademarks of sulfur preparations "Cherenkovaya"
Purified sulfur: piece and powder; cutting sulfur: pieces and powder
Dangerous! When burned, sulfur releases toxic substances that are hazardous to human health. Therefore, this fumigation is allowed only if the respiratory tract, eyesight, etc. are protected. If a gas mask is not available, you can use a respirator, but you must wear special glasses for protection. It is very important to protect your hands by wearing gloves.
Fumigating a greenhouse with sulfur is a dangerous procedure
Option #2. Sulfur checker. It is easy to calculate the amount of the drug: 60 g of checkers are used per cubic meter of room. They are laid out on sheets in the same way as the previous fumigation, after which they are placed around the area of the room and lit.
Sulfur bomb "FAS"
Prices for sulfur smoke bombs
sulfur smoke bomb
Sulfur checker on a plate
Greenhouse manufacturers do not recommend this treatment. Combustion products can damage the metal structures of the greenhouse, so you need to carefully study the instructions, which will indicate whether this method of disinfection can be used. If such disinfection is allowed, but the metal frame is damaged, it is also better not to use sulfur.
Fumigation of a greenhouse with a sulfur bomb
The sulfur will smolder for about 5 days, so during this time it is better not to enter the greenhouse or open it. When the time is up, doors and windows should be opened and the room thoroughly ventilated. It is better to wash polycarbonate surfaces with pemoxol solution using a sprayer. After wiping, you need to spray the surfaces of the greenhouse with clean water from a hose.
Option #3. You can carry out wet disinfection. To do this, you need to prepare a bleach-lime solution, which is sprayed on all surfaces. Of course, before using the solution you should put on a protective suit and a respirator.
Lime bleach
Option number 4. A large number of summer residents prefer to do without sulfur, replacing it with Bordeaux mixture or other remedies against protozoa and insects. Such solutions are sprayed with a spray bottle over the surfaces of the polycarbonate structure.
Components of Bordeaux mixture
Preparation of Bordeaux mixture
Note! If the frame is made of metal, before fumigation with sulfur it must be treated with solid oil - this makes it possible to avoid corrosion.
What to do if polycarbonate becomes dull
If it becomes dull from dust, wash it. But most often, dullness is caused by destruction under the influence of UV. The leaf first fades, then turns yellow, then cracks, holes, etc. appear. The light transmission of the leaf decreases, it is no longer suitable for planting.
Fading can be avoided if you buy a quality sheet with a UV protective layer. Unfortunately, not all manufacturers apply UV protection of the required thickness and concentration. To be sure of the durability of the selected polycarbonate, ask the seller for a document confirming the manufacturer’s financial responsibility for the quality of the sheets.
We thank SafPlast LLC for assistance in writing the article.
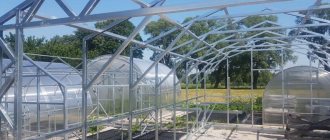
Stage 5. Strengthening the frame
Even the best polycarbonate greenhouses can collapse under the weight of snow. In winter, the load on structures can suddenly exceed the planned value. To avoid these troubles, you should install additional supports for the frame.
Sometimes greenhouse manufacturers offer to purchase additional arcs, but you can do it much simpler - make your own wooden supports in the shape of the letter “T”. Such structures support the upper part of the greenhouses. A fortified structure can be left for the winter without fear that its roof will collapse.
Preparing the greenhouse for winter by strengthening the frame with supports
About 4 supports are used per room (if the length of the greenhouse does not exceed 6 meters). However, if the greenhouse is located in an area where too much snow accumulates, their number should be doubled.
Strengthening the greenhouse frame before winter
To prevent the supports from getting stuck in the ground, they need to be placed on a hard surface.
Another option for reinforcing supports for a polycarbonate greenhouse
To reduce the likelihood of snow accumulating on the roof and walls of the greenhouse, in late autumn it is worth opening the doors and windows of the room. This can achieve two goals at once. Firstly, the frost will destroy the remaining pests from disinfection. Secondly, the same temperature inside and outside the room makes it possible to avoid the formation of ice. In this case, layers of snow will not be able to linger on the surfaces, sliding off them.
Important! Even the most expensive and high-quality greenhouses with reinforced structures may not withstand heavy snowfalls. For this reason, surfaces should be regularly cleared of snow.
Cleaning the greenhouse roof from snow
Soil preparation
Some of the work involved in preparing the soil for next season may have already been done, since it involves removing any remaining organic matter. Summer residents perform these actions during general cleaning of the greenhouse.
However, this procedure is not limited to just harvesting the remaining plant roots. Next you need to do the following:
- replace the depleted top layer of soil (about 5cm);
- treat the soil with bactericidal agents or scald with boiling water.
It is better to avoid fertilizing in the fall. It is useful to hold such events in the spring. With the onset of winter, in the event of snowfall, experienced summer residents recommend periodically scattering snow over the entire ground surface in the greenhouse. This will allow:
- provide reliable protection of the soil from severe frosts;
- additionally moisten the soil as a result of melting snow with the onset of a warm period.
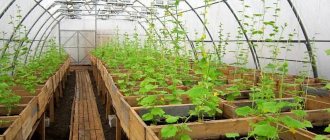
Wintering a greenhouse for tomatoes
If only tomatoes are constantly grown in a polycarbonate greenhouse, work in the fall should be carried out according to a slightly different scheme.
In the first days of October, you need to remove the tomato tops from the ground and put them in a sunny place. After the stems dry, they are burned, the ash is collected and stored until it warms up - next year it will benefit the crop, protecting young plants from pests. The most important thing is that the stems are not covered with mold or rot.
Autumn work in the greenhouse after harvesting tomatoes
It is best to treat the soil in a polycarbonate greenhouse prepared for tomatoes with vitriol and then carefully dig it up. After thoroughly cleaning the greenhouse, holes are dug in the ground and filled with leaves and dry grass, which are sprinkled with soil. With the onset of warm April days, this composition will begin to melt, heating the soil and accelerating the growth of tomatoes. Of course, the temperature will be low, but it is ideal for plant roots. In addition, rainwater penetrates into such soil more easily, bringing fertilizers with it.
Greenhouse “Uralochka reinforced”
In this article you will find everything you need to know about the design, types and installation of the “Reinforced Uralochka” with your own hands! We also recommend reading our other article about the density of polycarbonate.
It is also necessary to restore order around the greenhouse - remove the remains of grass and cultivated plants, level the soil. Having finished cleaning around the structure, you can leave the greenhouse for the winter - now it is not afraid of frost, wind, or snow. In addition, thanks to the efforts made, next year the harvest will be excellent.
Where disinfection is necessary
Disinfection must be carried out in the following cases:
- in clinics, children's hospitals and similar institutions. In such cases, treatment is carried out after each dose;
- in kindergartens and other preschool institutions;
- in public places and crowded places, including train stations and airports, train carriages, airplanes, cinemas, dormitories and similar places;
- at food industry enterprises, as well as in places of food trade and general catering;
- at waterworks;
- in places where services are provided to the population, including beauty salons, bathhouses, gyms and swimming pools;
- in places where raw materials of animal origin are stored and processed.