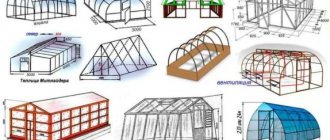
Country greenhouses 2DUM - comfortable, strong, durable. They appeared on the market back in the 90s, when household plots contained only rapidly deteriorating wooden greenhouses and rusting metal structures. And so - the first models of the “Ogurchik” tunnel, “Tomato” and “Perchina” greenhouses, and a little later a whole series of “Dachnaya”, “Dachnaya-2D” and “Dachnaya-2DU” was born. These were large and fairly cheap greenhouses with windows, doors and a well-thought-out fastening system. Over the years, they became more and more famous throughout Russia, and many summer residents did not even want to hear about any alternative to them.
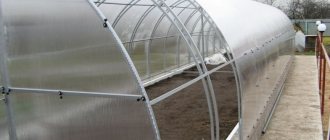
But in the 2000s, the design department of the Volya company developed new models of such greenhouses, which combined all the best qualities of world analogues. And this time the new frames were designed not for film coating, but for polycarbonate - these are “Perchina-M” and “Dachnaya 2DUM”. Moreover, many enterprising summer residents use “Perchina-M” as an excellent addition to “Dachnaya 2DUM”, because the first one is very small, with wide hinged doors and no windows at all. But the Dachna Doom 2 greenhouse, on the contrary, is spacious, high, with two windows and doors at opposite ends. And since 2011, it has been produced with a new reinforced frame, which is not afraid of even the harsh Siberian climate. Indeed, according to the manufacturers of this model, its frame is capable of withstanding gusts of wind, without exaggeration, up to 20 meters per second, and a 10-centimeter layer of snow without installing any additional supports.
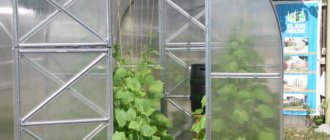
In total, the Dachnaya 2 DUM greenhouse is three meters wide, two high and 4-6-8-10-12 m long. Inside it there are three strong spacers for rigidity, which need to be installed at the joints of polycarbonate sheets, namely at the 5th, 9th and 13th trusses. It is not without reason that after the particularly snowy winters of recent years, the demand for Dachnaya-2DUM and Kremlevskaya has increased incredibly.
- 2 Design assembly features
- 3 Independent modernization of such a greenhouse
- 4 How to care for the “Dachnaya 2DUM” greenhouse?
Instructions for installing a greenhouse “dacha - 2dum” 4 meters
Table of contents
1. Instructions for installing the greenhouse “Dachnaya - 2DUm” 4 meters……………………………………………………….. 2
2. Assembled frame indicating typical components………………………………………………………………………………………… 5
3. First stage…………………………………………………………………………………………………………………………………… …………………………….. 5
4. Second stage…………………………………………………………………………………………………………………………………… ……………………………… 5
5. Third stage…………………………………………………………………………………………………………………… ……………………………… 6
6. Fourth stage…………………………………………………………………………………………………………………………………………… …………………….. 6
7. Fifth stage………………………………………………………………………………………………………………………… ……………………………….. 6
8. Sixth stage…………………………………………………………………………………………………………………… ……………………………. 6
9. Arrangement of arcs for a greenhouse 4 m long…………………………………………………………………………………. 7
10. Arrangement of longitudinal elements in a greenhouse 4 m long…………………………………………… 8
11. Node A view from the inside…………………………………………………………………………………………………………………… ……………………. 8
12. Node B outside view…………………………………………………………………………………………………………………… …………………… 9
13. Knot B view from the inside…………………………………………………………………………………………………………………… ……………………. 9
14. Unit G outside view…………………………………………………………………………………………………………………… …………………… 9
15. Unit D outside view…………………………………………………………………………………………………………………… ………………… 10
16. Unit E outside view…………………………………………………………………………………………………………………… ………………… 10
17. Window assembly and components. Exterior view……………………………………………………………………………………….. 10
18. Door assembly and components. Exterior view…………………………………………………………………………………………………………………. eleven
19. Location of end wall parts. Exterior view……………………………………………………. eleven
The general view of the frame is shown in Figure 1. 1. The parts are installed so that the side flanges of the profile face the coating. The frame is made up of numbered elements, some of which are assembled from several parts that have the same number, but differ in indices. 2. Indices: k - extreme (along the length of the greenhouse); с - docking (joint of covering panels); n - lower; c - upper; p - right; l - left; The direction of the arrow indicates the top of the part when installed. 3. Terminology for end parts: Left side
- on the left when you are outside the greenhouse in front of the door.
Right side
- on the right when you are outside the greenhouse in front of the door.
4. The joints of the parts are made by overlaying profiles and fastening with screws and nuts along the holes. The greenhouse should be assembled without final tightening of the screws (except for the connections between parts 1 and 3); slack in the connections is necessary to level the greenhouse at the installation site. 5. When assembling, be careful not to damage the parts, since they do not have sufficient rigidity until final assembly. Use stands (such as chairs) during intermediate stages of assembly to evenly raise the assembled frame. To align holes in difficult joints, use a 4mm nail or a tapered nail. 6. In some parts there are free holes, which are a consequence of the same type of parts. 7. Connections between parts 1 and 2 when assembling the frame are made through the lower hole of part 1, the upper hole must be left for the screw securing the clamp and polycarbonate.
Installation sequence.
1. Assembly should be performed near the greenhouse installation site. 2. Initially, you need to make a covering template. To do this, assemble half the end from arc parts 4VK, 4NK and straight parts No. 1, 8L, 11-1, 11-2L, 21L, 9-1L, 9-2L, 9-3L. To obtain a template, place half of the end on a panel of cellular polycarbonate - the edge of the panel is strictly aligned with the outer edges of parts 9-1L, 9-2L, 9-3L. Outline with an allowance of 1-2 cm along parts No. 1, 4VK and 4NK and cut out the template. 3. Assemble according to the photographs of the assembly steps. 4. At the selected location for installing the greenhouse, it is necessary to dig a trench around the perimeter of the frame to the depth of a spade bayonet. Check the equality of the diagonals of the trench with a cord. Place the greenhouse in the trench. The overall settlement of the greenhouse into the ground is such that the lower parts of the 10th doorway touch the ground. Check again with the cord that the diagonals of the frame are equal and adjust the position of its corners. 5. Level the frame by filling or deepening the trench so that the longitudinal elements are straight, horizontal and parallel to each other, and so that the arcs are even when viewed from the side. Perform final tightening of all screws.
Fastening the covering.
1. To cover the greenhouse, you need 4 panels of cellular polycarbonate, 4 mm thick, measuring 2.1 x 6 m. Cellular polycarbonate is installed with a strictly defined side outward (towards the sun), which has a protective layer, be sure to check this when purchasing or before installation. The transport film must be removed after cutting the pieces, immediately before installing them on the frame. 2. First, the ends of the greenhouse are covered. Using the cut out template, cut out the remaining 3 parts of the ends without any allowance. Using the overlay method, outline the assembled frame of the door and windows without any allowance, and cut out the parts. The polycarbonate part located above the window is cut out at the installation site.
Cutting is best done with a jigsaw, but you can also use a hacksaw with a fine tooth or a narrow blade. 3. Place the cut out parts of the covering in place using clamps. When installing the covering parts, allowance should be left along arcs 4vk, 4nk and part 1, but along the doorway (9-1,9-2,9-3) allowance is not needed. Holes for screws are made with a drill with a diameter of 4 mm from the inside of the greenhouse through ready-made holes in the frame parts. First, holding a piece of covering, secure it with two screws, and then drill and fasten along the remaining holes. 4. Use a knife to trim the covering parts along arcs 4nk and 4vk and parts 1, and then cover the resulting cut with tape so that the covering is pressed against the frame.
5. The top of the greenhouse is covered with three panels, bending them along the internal ribs. Before installing the panels, tape the ends of the panels to prevent moisture from entering. First, install the middle panel so that its edges lie on parts 4 with the index “C”. Secure the bottom edges with short clamps on the parts 1, except for the clamps at the edges of the sheet. Then install the outer panels overlapping with the middle one, securing them to the arches with clamps-arcs.
6. The cracks in the doorway are covered with plastic film or isolon. To seal the doors when closed, make cuffs from strips of film or isolon. Seal the joint between the greenhouse end covering and the top panels with silicone transparent sealant. Install turntables to close doors and windows.
Operating rules.
1. Before starting operation, the greenhouse must be assembled and installed on the ground in accordance with the instructions. 2. The greenhouse should not be exposed to impacts that could create permanent deformations of the frame or covering. 3. There is no need to remove the greenhouse cover for the winter period. If the greenhouse is left unattended, be sure to install 3-4 supports from poles for the winter under the junction points of the arcs (part 4c) and longitudinal parts (part 2) evenly along the longitudinal axis of the greenhouse.
Greenhouse care DUM 2
How to care for the structure, some tips
To extend the life of the greenhouse, it requires care. It consists of several regular manipulations:
- Periodically wash the polycarbonate with water and non-aggressive detergents and a soft brush, otherwise access to light may become difficult over time.
- In winter, systematically sweep or clear snow from the roof to avoid excessive load on the frame and the formation of an ice crust.
- If the owners do not permanently live at the dacha, it is advisable to install additional supporting elements before winter so that if a huge amount of snow falls, the frame of the greenhouse will not be destroyed or damaged.
When ventilating (when it is very hot), it is not recommended to open the doors to avoid sudden temperature changes. It is better to open the windows, and only over time - the doors.
Tips from experienced gardeners
Owners who have been growing good harvests of vegetables and herbs for years after installing 2 DUM greenhouses give some recommendations:
- When installing additional U-shaped supports for the winter, it is necessary to do this based on the number of arches. In this case, the load on the greenhouse frame will be halved.
- To achieve absolute reliability of the greenhouse, you can replace the frame strips with bends at the installation stage, but this will significantly increase the cost of the greenhouse.
- To avoid loosening of the nuts (over time), during the installation of the greenhouse, you can simply coat them with paint.
- DUM 2 greenhouses will require careful selection of lighting. Consult with specialists, state your wishes, they will offer you a choice of different options for lighting fixtures with or without a heating function. Perhaps reflector lamps or high-pressure sodium lamps, which have a photosynthetic effect, would be suitable.
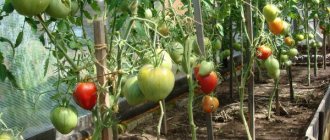
In early spring, when the temperature in the greenhouse is quite high during the day and still drops below zero at night, you can additionally cover the planted plants with a cut plastic bottle.
Results
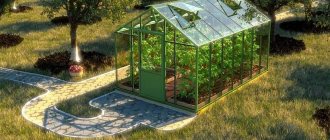
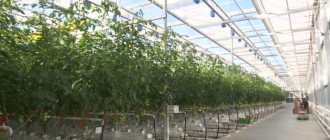
The most rational purchase for any summer cottage is a dacha greenhouse 2dum. For a very reasonable price, you get a reliable structure with a convenient distribution of beds and the ability to secure climbing plants. Thanks to the combination of centuries of experience and the latest developments in the field of greenhouse farming, this greenhouse creates an optimal microclimate for the growth of crops.
0 Galina 05/21/2015 16:48 The greenhouse is not bad.
I especially like that there is no need to disassemble it for the winter. In heavy snowfalls, I carefully sweep away the snow and that’s it. But initially, I listened to the advice of more experienced neighbors and installed the greenhouse on the foundation. Otherwise, they say, it is moved by a strong wind. Quote
Recommendations for ventilation of the structure
How is a ventilation window used?
A well and properly ventilated room is aimed at creating good conditions for growing plants and vegetables. Let's take a closer look:
- If the air in the room does not constantly circulate, the temperature begins to increase or, conversely, decrease. Then the plants will not be able to develop fully.
- Timely ventilation will avoid temperature changes. But, at the same time, it is worth paying attention to drafts, which are not permissible.
- If you open the doors wide, this can damage the plants, since the air humidity changes especially in the evenings.
- Air flow is provided by vents and transoms; door leaves are used only for their intended purpose.
Brief introduction
proved itself in the greenhouse construction market at the end of the last century. Over the entire period of production and improvement, the greenhouses he produced were in high demand and had positive consumer reviews. The “Dachnaya” series of greenhouses aroused particular interest. Thanks to its convenient design, durability, strength, and most importantly, spacious internal space and low cost, this model was very popular and had a wide range of consumers. It has a well-thought-out fastening system and provision of ventilation vents and entrance doors.
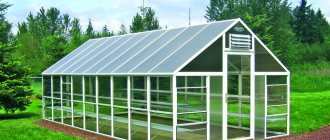
The greenhouse model 2dum provides everything for convenience and proper growing of plants: a reliable fastening system, vents for effective ventilation and high-quality outer covering material
Years later, designers developed a new model of a polycarbonate greenhouse that has no equal. The “Dachnaya 2dum” greenhouse combines all the best qualities of greenhouse models on the world market.
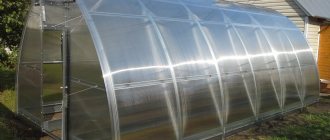
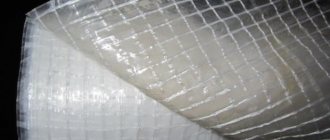
“2dum” is an arched structure made of galvanized iron profile and four-millimeter polycarbonate. The covering material itself is maximally resistant to temperature fluctuations, atmospheric phenomena, and has uniform light transmission. The greenhouse package includes detailed instructions for assembling the structure.
Lighting ↑
For greenhouse farming, the issue of lighting is important, especially if you will be growing long-day plants. The use of powerful lamps with reflectors provides both light and heating. Modern energy-saving light bulbs, despite consuming a small amount of energy, have only a small level of heating. For rapid plant growth, it is impossible to do without the necessary light waves, but not those that are detected by the human eye. Installing certain lighting promotes the development of shoots and fruit set. The selection of energy-saving lamps should be carried out by specialists.
If you equip the greenhouse with ordinary fluorescent lamps screwed into lamps, then comfortable conditions will be maintained for absolutely all plants. Although there is also the option of selecting a suitable lamp for each instance. High pressure sodium lamps are often mentioned. They have photosynthetic radiation and influence the active development of plants.