If you do not ignore the rules for locating a greenhouse on a site with an eye to the cardinal directions, you can significantly make the task of growing crops easier for yourself. Excess heat that remains inside after daylight has a huge impact. Competent owners use them for night heating.
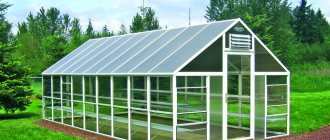
A neat greenhouse with glass walls at the dacha Source mrrestavrator.ru
Glass greenhouse on a foundation in a local area Source remstroiblog.ru
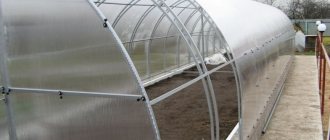
Greenhouse with a compartment for ventilation in the upper part of the frame Source homeli.ru
What does correct placement provide and what is wrong with it?
The correct location of the greenhouse solves the issues of lighting and heating. For example, if the frame is set in accordance with the requirements, then the plants receive the right dose of light. This affects the process of photosynthesis, thanks to which crops receive sufficient amounts of nutrients. The issue of heating the greenhouse is also being resolved at the same time.
If the greenhouse is placed incorrectly on the site, the following consequences are possible:
- the need to install heating equipment and lighting for normal plant growth, and this is an additional financial expense;
- reduction in yield. This is due to a lack of sunlight. If there is not enough of it, plants begin to lag behind in development.
- not the usual taste and smell of fruits and cultivated crops. When they are eaten, it immediately becomes clear that the crop was harvested in a greenhouse.
When designing a greenhouse, it is necessary to be guided not only by the cardinal directions, but also by the location of outbuildings and directly residential buildings. It is equally important to take into account the fertility of the soil in the chosen location. But this is easier, since the soil can be pre-fertilized.
Triangular greenhouse made of polycarbonate on a metal frame Source rus-teplitsa.ru
Semicircular durable greenhouse on a site with easy access Source cms-bx.ru
Small greenhouses made of polycarbonate without a foundation Source USSR.online
Block foundation
There is a huge selection of blocks on the market now. Whichever one you choose, they all need to be laid using a strip method.
How to make a foundation from blocks?
- Dig a trench, pour sand into the bottom, wet it and compact it.
- Lay the first row of blocks on cement mortar.
- Place 2-3 rows of blocks high in the corners. At this stage it is important to maintain verticality.
- Next, you need to pull the rope between the corners to maintain horizontality.
- Lay out the remaining rows, securing the blocks with cement.
It is important to note that the dimensions of the greenhouse must be a multiple of the dimensions of the blocks. Blocks cannot be cut due to the presence of voids in them.
The block foundation has good waterproofing, but poor thermal insulation and strength. It is durable and inexpensive to install.
Accommodation options from a scientific point of view
Experts in the field of agronomy and gardening emphasized the importance of proper placement of beds. To capture as much sunlight as possible, the beds are placed latitudally or meridionally (from east to west or from north to south). The second option is not very relevant, since only the beds on the southern part are illuminated, while the “northern” crops receive little light. Accordingly, they will bear fruit worse.
Using the tactics of placing a greenhouse according to cardinal directions and sunny days Source Pinterest
On a note! Modern greenhouses in most cases are made of polycarbonate. They get enough light and heat. Therefore, to ensure maximum illumination and the absence of “blind” spots, the beds should be arranged strictly along the long side.
Latitudinal location: advantages
The latitudinal location of the greenhouse on the site is quite common. It has a number of advantages that should not be forgotten:
- all plants without exception are illuminated and heated;
- optimal heating (only provided that the slope of the roof slope is located to the south, and its angle is equal to the slope of the area where the greenhouse room is located);
- “bonus” warmth due to sun activity before lunch.
When the question arises about greenhouse lighting options (in the first or second half of the day), it is better to give preference to the first option. Since during this period the atmosphere has sufficient transparency and plants receive 8-12% more light than after 1 pm.
Latitudinal placement of a greenhouse on a house plot Source a-teplic.ru
The latitudinal location of the greenhouse is permissible only in isolated cases Source 7dach.ru
Meridian placement: when possible
It happens that it is impossible to install a greenhouse in the right direction on a site (free space does not allow or the required type of soil is not available), then a meridional installation is also possible.
In such situations, note when the greenhouse will function most. For example, if you plan to plant seedlings in the middle of the spring season or harvest cucumbers in early autumn, then it is advisable to use a polycarbonate structure, and it is preferable to install it meridionally.
The meridional location of the greenhouse is suitable for most regions Source postroitbanju.ru
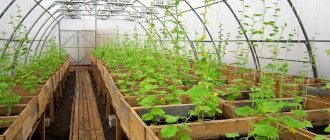
In wide meridional greenhouses, plants are comfortable due to the abundance of light and plenty of space Source rimolgreenhouses.com
Important! For year-round cultivation of crops in a greenhouse, this method of installation on the site is extremely undesirable. This is due to insufficient lighting for crops. The result is stronger stems and thick leaves, but poor fruiting.
In addition, when installing greenhouses in northern regions, you cannot adhere to the direction “from north to south”. Here the sun does not rise high even in summer. Such circumstances are typical for lands with a latitude of 60 degrees.
The meridional placement of the greenhouse has a rather favorable effect on the growth of crops Source rimolgreenhouses.com
At what distance should greenhouses be placed from each other? How to improve a greenhouse
The recommendations that guide experienced gardeners contain information on how to install a reliable greenhouse that will not be affected by seasonal soil shrinkage. In this regard, the following is being done:
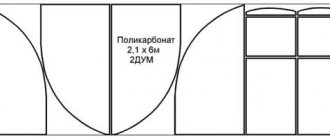
Diagram of the greenhouse frame structure.
- The bottom of the structure is treated with special anti-corrosion paint or bitumen solution before installing it in the ground.
- Before installing the greenhouse, its frame must be installed on a corner, taking into account the entire perimeter, which will avoid structural defects as a result of increasing its size.
- In winter, the surface of the greenhouse should be cleared of snow, otherwise the material will become covered with small cracks, which will cause it to shift. In this case, for the winter period, special supports made of bars should be installed, the size of which can be 40x40 cm.
- Each arch in the greenhouse is secured with reinforcements, the number of which determines its overall stability.
- Polycarbonate greenhouses can become very hot, which leads to the formation of centimeter-long gaps. To avoid this, polycarbonate should be implanted at the points of contact between the side walls and the roof. You can use a 10 cm strip of polycarbonate for this purpose.
- April daytime temperatures on average can range from 20 to 25 degrees and drop to 5 degrees at night, so additional heating of the greenhouse is necessary for planting.
- In summer, a stable temperature is established in the greenhouse, which requires ventilation, which can be done in different ways. For example, by not only opening transoms and doors, but also watering polycarbonate with water and installing automatic windows.
Choosing the right location for the site
In addition to correct orientation on the terrain, it is necessary to take into account some other features so that the climate inside the greenhouse is optimal for the growth of cultivated plants:
- Free open space. There should be no large trees or tall buildings on the site. They can subsequently create shade for the greenhouse. If there is no such area, then you can move the greenhouse closer to the south side. But keep in mind that in winter, snow falling from the roof of a residential building can destroy the greenhouse foundation and frame.
- A place that is too flat or elevated will not work. In such areas, water stagnates, which is unfavorable for the root system and will cause it to rot. The same applies to clay soils. They are not breathable at all.
- Assembly of the greenhouse is allowed on a southern slope. Under these conditions, the soil will warm up faster, which is very good for the development and fruiting of plants. Often in such areas the yield is much higher than in flat ones.
If you take into account every factor when planning a greenhouse structure, you can be sure that the illumination and heating of the soil will be at the highest level.
On a note! Good lighting and sufficient heat for plants are not enough. It is important that the design is also freely accessible. It is advisable to equip paths for it and select an area so that after the rain it will not be dirty.
Point foundation
The design of this foundation is quite simple and even a beginner can handle its installation. Such a frame is not suitable for massive and large greenhouses, only for small, temporary ones.
Procedure:
- Mark the perimeter of the greenhouse.
- Dig support posts in the corners flush with the soil.
- Next, install additional posts every meter.
- Make a rigid frame by connecting the posts. The greenhouse itself will be installed on it.
Supports for this type of foundation are made of various materials. Wood, brick, concrete, foam concrete - all this is suitable. It is important to remember that the heavier the structure, the more durable the material you need to choose. Roofing felt can be used as formwork when pouring pillars. A point foundation will be cheap, but will last a long time and reliably.
We think about protection from wind and dampness
It is these factors that determine how correct the microclimate inside the greenhouse will be. Immediately abandon the space that is between buildings or an unsaleable fence. In such conditions there will always be drafts, which is unfavorable for the plants growing inside. The walls of the greenhouse will be blown from all sides, so there can be no question of maintaining heat inside.
The greenhouse should be protected from the wind with the help of plantings located a few meters before the structure Source proroslo.ru
Protection from the wind can be created by the walls of a residential building or outbuildings on the south side Source mrdachnik.com
The following conditions will help to avoid such problems:
- The place for illumination should be chosen from the leeward zone;
- plant perennial shrubs nearby, but only so that they are low;
- make a protective screen.
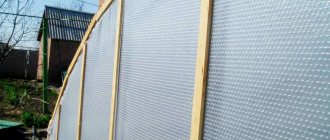
When constructing a protective screen, it is better to use flat slate, and it must be installed so that the distance between it and the greenhouse is at least three and no more than 5 meters. No shadow should fall on the greenhouse, and the structure must fulfill its protective functions.
Placing a greenhouse in an area where there is a shadow from a tree is highly undesirable Source zaggo.ru
If you prefer to use ornamental shrubs as protection, you need to plant them at a distance of up to 15 meters from the greenhouse. It happens that the owners decide to install a greenhouse on a plot not far from the trees: this cancels the construction of a protective structure. In this case, you need to remember about the shadow and falling leaves: they should not fall on the roof of the greenhouse and prevent sunlight from penetrating inside.
Correct location of the greenhouse building on the site Source thededicatedhouse.com
To prevent dampness from accumulating in the soil near the greenhouse and penetrating into the root system of plants, waterproofing of the foundation is considered at the construction stage. In some cases, gutters are constructed on the outside that will collect excess moisture and carry it to a certain place (several meters from the base of the greenhouse).
Placing a greenhouse on a site on the south side of which there is a wall of a residential building, which acts as a wind protection Source mynewsdesk.com
Note! Excess dampness not only harms crops, causing their death, but also destroys the greenhouse structure and foundation, in particular.
Strip foundation
This type of foundation is suitable for large greenhouses that will be in use for about 10 years. It consists of masonry laid in the ground around the perimeter of the greenhouse. It can be made from the following materials:
- Concrete or rubble concrete. It is necessary to install the formwork in a shape that follows the base of the greenhouse and pour the material into it.
- Brick or blocks. Small-sized material is installed on a sandy base and secured with cement mortar.
- Wooden beams or sleepers. If sleepers are used, they must be installed on roofing felt or roofing felt. If timber is used, it will have to be additionally treated with an anti-rotting compound.
The procedure for installing a strip foundation:
- Trench marking and digging
- Preparing the base (bed of sand, gravel or roofing felt)
- Final waterproofing
What else do you need to know?
Considering the following small list of recommendations explaining how to properly position the greenhouse, you can equip it even more competently:
- install the structure only on flat terrain. If there are slopes and hills, level the area by adding soil.
- During construction, do not trample down too much, much less compact the soil yourself. In this regard, it will lose its properties.
- Conduct a geological examination of the soil, this will allow you to find out how suitable the chosen location is for growing greenhouse crops.
- Build a drainage system that will allow excess moisture to be removed after watering, even from inside the greenhouse.
- Consider ventilation. It is important to ventilate the interior daily in warm weather to avoid the appearance of mold and mildew on the walls. Plants are strictly forbidden to breathe such air.
Greenhouse with ventilated structures for access of fresh air and oxygen to plants Source el5.ru
Timber foundation
The foundation for the greenhouse is a wooden frame that fits the perimeter of the greenhouse. This design is good because it is easy to attach a frame made of any material to it. For greater strength, you can install columns made of concrete or blocks at the corners of the foundation and attach a wooden frame to it.
Procedure:
- Mark the area for the foundation.
- Dig a trench.
- Lay roofing felt or roofing felt overlapping as waterproofing.
- Place the timber on the base and fasten the frame with corners.
- If necessary, level by adding sand.
This design has good thermal insulation, is cheap, and easy to install. But it won't last long.
It is important to remember that any wood must be treated with impregnation before use to protect it from moisture and rot.
Let's start construction: stages from A to Z
In this section, we suggest that you familiarize yourself with the construction algorithm, which describes all the details of constructing a greenhouse.
In order for the plants to receive both warmth and light, it is necessary to choose a well-lit place on the site Source build-experts.ru
Stage 1: viewing the landscape
It is very important that the chosen landscape design does not interfere with the growth of greenhouse crops. Therefore, it is worth choosing a place where both objects will not overlap. Ideally, construct a greenhouse right next to the south wall of the house. It can even serve as a basis for construction. In this case, the structure will be combined with a residential building. It is easier to equip such a room with an irrigation system, provide additional lighting, and install heating.
But when trying to make a greenhouse on a site of a similar type, it is better to use solid materials for construction: double-glazed windows, concrete (for building the foundation). If the option of a free-standing structure is envisaged, then it is best to choose a place where there will be free access to the necessary communications.
On a note! Choose a place where there have been no plants for a long time, and the soil has had time to be saturated with the necessary microelements.
Stage 2: orientation by cardinal directions and wind
If you plan to install a greenhouse structure near your house, then be sure to choose a location on the south, southwest or southeast side. Of course, the wall should be without windows.
In another case, it is necessary to orient the building from east to west. To do this, it is recommended to first determine these sides on the ground. You will have to go out to the site with a compass, determine the position, and then sketch the layout on paper.
Ventilation of the greenhouse
And here the direction of the cardinal points matters in the case of room ventilation. Always open south-facing windows. Keep in mind that in spring, northerly winds blow more often. And by opening the transoms from the south, we protect the vegetables from the cold north wind getting inside.
Carefully seal all joints on polycarbonate sheets and glass. Rainwater, snow or cold air will get into the cracks between the joints. You will get the opposite effect from such “ventilation”, and this will definitely affect plant growth and yield.
Concrete foundation
This type of foundation is the most difficult to construct, but also the most durable. It is used in situations where no other structure can serve as a basis. For example, if a greenhouse needs to be installed in a place where groundwater flows close to the surface or on a slope, then only a concrete foundation will help.
How to install it?
- Dig a trench around the perimeter of the greenhouse, fill it with sand and gravel, and compact it flush with the ground.
- Install the formwork above the deck.
- Install the reinforcement, securing it with wire.
- Pour concrete, compact it, install anchors.