In the photo we see an example of arranging a greenhouse with metal shelving.
What is a common problem that all greenhouse owners have? Lack of light? Difficulties with watering? Difficulties with heating in winter? No, all this can be solved quite simply. But lack of space is already a difficulty, which is much more difficult to solve.
Not every site is capable of accommodating a large greenhouse, so the owners have to look for some way out. And in this article we will tell you how to increase the usable area and talk about shelving for greenhouses.
Features of greenhouse arrangement
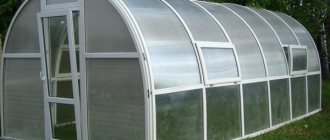
A greenhouse is a space that is intended for growing plants, as well as for preparing crops for planting in open ground. It is important to properly organize the greenhouse inside, taking into account its size and the needs of the gardener. A certain temperature and humidity level must be maintained inside the room. If you follow the basic recommendations, tips and tricks during the work, then it is possible to grow several types of plants in one greenhouse, using the available space as competently as possible.
Since greenhouses vary not only in size, but also in purpose, the internal arrangement will also differ significantly. For example, in some it is necessary to create beds, in others it is necessary to arrange shelving. If necessary, you can add additional equipment, which will greatly facilitate the process of growing crops.
Advice! If necessary, you can see the interior arrangement of a polycarbonate greenhouse in the photo.
Insulation of the room
The main thing in insulation is high-quality work and the selection of appropriate materials.
Insulating the foundation is the key to further heat conservation. Its base should be below the soil freezing level, and it is better to use adobe blocks as a material, which are not thermally conductive. They are covered with roofing felt. The interior is insulated with polystyrene foam and sand.
Heat loss affects not only the financial side of the issue, but also threatens the life of plants. When using polycarbonate, a specially designed plastic material, heat loss is minimal. But during the assembly of sheets, the use of rubber gaskets is mandatory, otherwise all the advantages of this material will be negated.
More heat will be retained in the soil if they are raised by 400–500 mm.
When all the issues with insulation have been resolved, it’s time to figure out how to arrange the inside of the greenhouse.
Construction of beds and paths
Before you begin the interior layout of the greenhouse, it is recommended to consider some important rules:
- First, decide what crop will be grown in a greenhouse: some types of plants are best grown in beds, while for others it is best to use racks;
- many gardeners advise initially spreading plastic film in the greenhouse, then covering it with soil; then, after watering the plants, the water will not go into the ground;
- in order to prevent the soil from the beds from crumbling into paths during the care process, it is worth fencing them; for convenience, you can lay out the paths with bricks, tiles or boards;
- All building materials used as fencing must be moisture-resistant and treated with special protective compounds that prevent the appearance of fungus and mold.
It is recommended to carry out all arrangement work before the start of the summer season.
Location
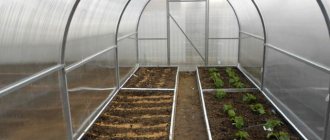
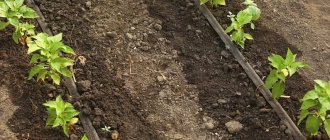
The inside of the greenhouse should not only look beautiful, but also be as comfortable as possible. In addition, it is worth focusing on the cardinal directions, which significantly affects the level of yield. The optimal solution is to arrange the beds inside the greenhouse along an east-west line, as a result of which the crop will receive a sufficient amount of sunlight throughout the day.
It is important not only to look at the design of the greenhouse inside in the photo, but also to understand how wide the beds should be and how many of them should be made:
- beds whose width varies from 70 to 90 cm are considered optimal; under such conditions, seedlings will receive the required amount of light and moisture;
- The width of the path is 40 cm, making it convenient to move around the greenhouse.
When arranging a polycarbonate greenhouse 3 by 6 m inside, you can make 3 beds 70 cm wide and 2 paths 45 cm wide.
Advice! If the greenhouse is narrow, two meters high, then it is recommended to make 2 beds of 75 cm each and one path in the middle.
Borders for beds
In the process of arranging beds inside a polycarbonate greenhouse, everything must be done in such a way that the soil does not crumble after irrigation. Sides are used for these purposes:
- if you want to choose the simplest method, you can bury boards in the ground; the wood is pre-treated with special protective substances to prevent the appearance of fungus and mold;
- you can use facing or ordinary bricks to decorate the beds inside the greenhouse; it is important to understand that such a design has an attractive appearance, but it also takes up a lot of space;
- budget option - using polycarbonate sheets, which are pre-cut into strips of the required height;
- If necessary, asbestos-cement slate can be used in the case.
The deeper the sides are in the ground, the better this will affect the crop being grown.
Attention! The height of the side can reach 4 cm - this will be quite enough so that during the process of caring for the crop inside the greenhouses, the soil does not crumble from the beds.
Path covering
You can decorate the inside of the greenhouse not only with sides and a beautiful arrangement of beds, but also with paths. If necessary, the paths inside the greenhouse can be covered with gravel or crushed stone, and then the following types of materials can be laid on top:
- paving slabs;
- brick;
- flat slatted stones;
- boards (when using wood, it must be treated with protective compounds, which will significantly extend the service life of the material).
The most durable option is considered to be a concrete screed, which can be used to pour paths between the beds inside the greenhouse. In addition, there will be much less weeds.
Soil Pie
Its duty is to allow moisture to pass through normally, so that it is always saturated with it and at the same time, so that the liquid does not stand in puddles. The soil should warm the seedlings and seeds and prevent the seedlings from dying during frosts.
Only raised beds can provide this. The height of the bed should be 20 centimeters. To prevent the soil from falling onto the path, the bed must be supported on the side with a shield of boards. The height of the shield should be 25 cm. This height will allow the housewife to calmly dig in the ground, without fear that the soil will spill onto the path and the greenhouse will become dirty.
A board made of boards is placed on its edge and secured on both sides with pegs. Tall and strong pegs driven in on both sides will prevent the shield from bending under the weight of the soil. After the “boxes” for the beds are ready, it is necessary to correctly fill them with soil “pie”.
Any housewife dreams of light, nutritious soil that does not contain:
- weed seeds,
- pest larvae or eggs
- and spores of pathogenic fungi.
The best option is purchased soils. They are mixed and sold immediately for the crop that is planned for breeding. But this option can be expensive. Therefore, owners must be able to mix the soil for the greenhouse beds themselves. To begin with, it is worth dividing the greenhouse area for different crops.
Solanaceae
These are potatoes, tomatoes, peppers, eggplants. The optimal ratio for them is:
- 1 part humus,
- 1 part forest or regular soil from the garden,
- 1 part sand.
The composition is kneaded and sifted. For each bucket of soil you need to add 100 grams of chalk or eggshells and 100 grams of plant ash.
Melons
These are zucchini, cucumbers, pumpkin, etc. They require:
- 6 parts regular soil or loam,
- 4 parts humus.
You can prepare the ground for melons:
- 3 parts peat,
- 3 parts humus,
- 4 parts loam
Melons grow well on soils:
- 4 parts loam,
- 1 part peat
- 2 parts humus.
To this mixture you need to add 1 part of sawdust.
This soil is steamed in the same way as for nightshades. The best solution for a greenhouse is to plant plants in one group. If the owners plan to plant cucumbers and tomatoes at the same time, then they will have to install an insulator in the middle of the greenhouse. In this case, a film curtain can serve as an insulator.
More heat-loving crops (tomatoes) should be planted on the south side, and less heat-loving crops (cucumbers) should be planted on the north. On the “cucumber” half the air will be cooler and drier. The soil is poured into the beds to the top of the sides. She will settle down later.
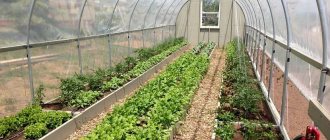
Separation of crops in a greenhouse
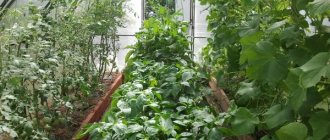
Every gardener, having a greenhouse at his dacha, wants to use it to the maximum. Even if you plan to plant in a 3m by 6m greenhouse, the planning must be done correctly. Separation of crops is necessary, since not all plants can be adjacent to each other. For example, tomatoes and bell peppers prefer sparse irrigation and fresh air, while cucumbers require regular watering and high humidity levels.
In order to be able to grow several different crops simultaneously in one greenhouse, it is necessary to create favorable conditions for them, namely, to divide the space using partitions for these purposes. Curtains made of polyethylene film or polycarbonate sheets are ideal as partitions. To understand exactly how the interior decoration of the greenhouse will look, you can look at the photo.
Supports for greenhouse shelves
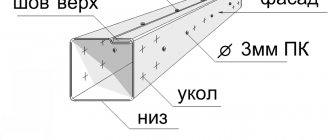
Next, from the remnants of narrow and wide drywall profiles (I don’t know what they are called correctly), I made supports for the shelves. For the ends of the greenhouse I used narrow ones. For each support, I cut two blanks, and then inserted them into each other in pairs to form a square pipe, and connected them with self-tapping screws. On one side I then made a 45° bevel so that the support could be screwed to the greenhouse frame with self-tapping screws (photo 3). For the second attachment point, I drilled holes with a diameter slightly larger than the screw head. Through them I screwed the support to the frame of the greenhouse (photo 4).
I made the rest of the supports from wide profiles. To do this, I cut out blanks, made cuts in them to the corners and bent them into boxes. On one side it was bent at a right angle. And on the other - at an angle equal to the inclination of the stiffening bar to the vertical. I do not indicate the lengths of the blanks for the supports for the shelves, since some will want to make the shelves narrower, others wider. I have them 400 mm long. Then I tightened the support boxes with self-tapping screws. From the end where the bend is 90°, I drilled holes with a diameter of 4 mm for the cable.
Then I inserted all the supports with an inclined end into the grooves between the support and the inclined stiffener bar, and the result was an approximately horizontal surface - a support for the shelves. Then he took the cable, threaded it through the holes in the support, made a loop using a clamp and put it on the hook. There is no need to cut the cable into blanks in advance - there will be less waste. Then I put on the second clamp, using a level to approximately set the horizontal, tightened the clamp and bit off the cable (photo 5). I made other supports using the same principle.
How to equip a greenhouse
Today, there are a large number of options, thanks to which it is possible to intelligently think through the layout inside 3x4 m, 3x6 m greenhouses. If the available space is used as competently and correctly as possible, then the process of caring for the crop can be significantly simplified. In order to increase the level of productivity, it is worth taking care of heating, the presence of shelving, heating, and an automated irrigation system. If necessary, you can equip the greenhouse inside with your own hands, without the help of specialists.
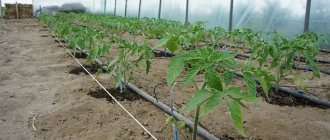
Drip irrigation system
It is impossible to imagine setting up a home greenhouse without a drip irrigation system, which greatly facilitates the process of watering the crop. It is also recommended to take care of this system at the beginning of designing a greenhouse in order to avoid unforeseen issues and problems in the future. If you do all the work correctly, then caring for the plants will be very easy, and it will take a minimum amount of time.
Lighting and heating
Additional lighting inside the greenhouse is required when daylight hours become short and the seedlings do not receive the amount of sunlight necessary for growth and development. When choosing lighting, it is recommended to give preference to multispectrum lamps that have blue ultraviolet radiation. In a specialized store you can purchase LED, fluorescent and gas-discharge lighting devices.
Since the main thing in any greenhouse is heat, in addition to solar heat, additional heating will not hurt. Many experts recommend using several types of heating to arrange the inside of a greenhouse:
- gas-burners;
- stove for using wood, peat, coal;
- electric convector;
- water heating system;
- solar collector;
- biofuel.
It is important to understand that you need not only to obtain heat, but also to retain it inside the greenhouse. That is why this issue should be given due attention at the design stage of a greenhouse made of polycarbonate sheets. First, it is recommended to first look at the photo on how to make a greenhouse inside as competently as possible.
Ventilation
It is important not only to look at the photo on how to properly decorate the inside of the greenhouse, but also to equip it with everything necessary. Thus, a ventilation system together with heating is required when it is planned to grow crops quite early or it is necessary to significantly increase the yield level.
A ventilation system is required in the following cases:
- so that the heat is distributed evenly inside the greenhouse;
- to ensure cross ventilation;
- for access of air flows through the roof.
In most cases, artificial ventilation is used in conjunction with stove heating. For these purposes, large fans are used, which are placed in close proximity to the heat source. This approach allows heat to be dispersed throughout the entire greenhouse.
Arrangement of shelving
Using shelving inside the greenhouse allows you to make maximum use of all available space. In addition, it becomes possible to grow both tall and short types of crops.
If you plan to grow seedlings on racks, then you should take into account the following advantages:
- the space inside the greenhouse can be used to the maximum;
- caring for seedlings is much easier and more convenient;
- if necessary, seedlings can be placed depending on the level of thermophilicity of a particular crop;
- in the case when the racks are additionally equipped with wheels, they become mobile, thanks to which the structures can be rearranged and turned to sunlight on any side.
When arranging the shelving, it is recommended to take care of the concrete base first. This is due to the fact that the weight of the rack along with the containers for seedlings, which are filled with soil, will be quite large, as a result of which the soil under the structure will begin to sag.
Important! For clarity, you can see what the arrangement of shelving inside the greenhouse looks like in the photo.
Shelving material
The arrangement inside a 3 m by 8 m greenhouse must be done correctly so that caring for the crop in the future does not cause difficulties. Any type of building material can be used to make shelving. In addition, you can independently weld a durable metal frame at home or use timber.
For horizontal shelves, boards are used that are pre-treated with special protective compounds that prevent the appearance of mold and mildew during operation. It is recommended to determine the distance between shelves and their number based on the maximum growth of the crop. Thus, if we consider a greenhouse whose height is 2 m, then a rack of 6 shelves can be placed inside.
Installation of shelving
The improvement of the greenhouse inside, the photos are presented below, should come first. Since the most important thing is to use the available space correctly, some gardeners, when setting up greenhouses, install shelving above the beds inside. It is precisely because of space saving that multi-tiered and suspended structures appear. Such structures can be the same size or taper from bottom to top.
Construction of a quarantine zone
When arranging a greenhouse inside with a width of three meters or more, you can take care of the presence of a quarantine zone. For these purposes, aquariums with a volume of 100 liters or more are used, into which seedlings susceptible to diseases are placed. Such a container should definitely be placed in the darkest corner so that direct sunlight does not harm the leaves of the seedlings. If you isolate infected plants in a timely manner, you can prevent mass infection of all crops.
Arrangement of the vestibule
Another important point that can be implemented in the process of planning a greenhouse at a dacha 3 m by 8 m is the vestibule. In the future, the vestibule can be used to store garden tools. It is very inconvenient to constantly carry everything you need to care for your crop from home or a barn to the greenhouse; it is much more convenient and comfortable when everything you need is at hand. To do this, it will be enough to fence off a small space at the entrance to the greenhouse where you can place shovels, rippers, fertilizers, gloves, and a hoe.
For maximum convenience, during the internal arrangement of a polycarbonate greenhouse, it is recommended to install special fasteners for fixing the cuttings of working tools, which will allow you to properly use the free space.
Quarantine for new plants
In any greenhouse it is necessary to set aside a corner where plants brought from outside will be placed. They may be affected:
- fungus
- thrips
- or other pests
- the soil may contain eggs or larvae of pests.
Therefore, all “newcomers” are quarantined.
For seedlings, flowers in pots, or seedlings, you can take a regular aquarium with a tight lid. It should be placed in a shaded area. Otherwise, the plants in it will simply burn. It is forbidden to ventilate or work with plants inside the greenhouse. To do this, you need to take the aquarium out into the fresh air.
Quarantine for all plants, seeds and seedlings is two weeks.
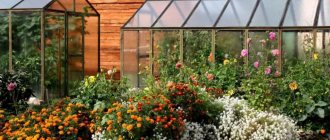
Ideas for beautiful interior design of a greenhouse
Today, there are a large number of options for arranging the inside of a greenhouse with your own hands, as a result of which you can get confused. Before you begin arranging the space, you need to take appropriate measurements and decide what crop will be grown. Only after this can you begin installing shelving or arranging beds. In order to properly equip a 3x6 m polycarbonate greenhouse inside, it is recommended that you familiarize yourself with already implemented projects.