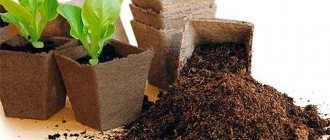
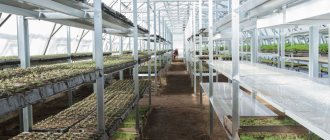
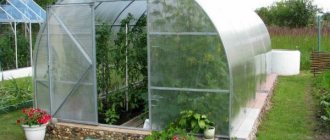
Those who visit their dacha on short visits or are physically unable to water the plants every day, dragging a ton of water in the evening, will be interested in learning how to make drip irrigation with your own hands in a greenhouse or in garden beds. The implementation of this idea frees you not only from hard work, but also from worries about plantings that may not wait for the arrival of the owners who work in the city or who have even left for vacation. A smart automated system will take care of them.
It is especially important to ensure regular watering of young plants and seedlings Source market.yandex.ru
What it is?
The system of uniform delivery of moisture to the root is called drip irrigation.
The irrigation method saves water and labor resources and
is characterized by the following features:
- Weeds do not germinate, their seeds do not receive water.
- No soil erosion occurs.
- Moisture does not reach the leaves, so late blight and other plant pathogens do not develop.
The drip irrigation system in the greenhouse avoids waterlogging, moisture and air deficiency, and reduces the need for fertilizers.
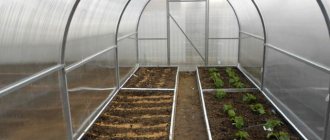
Laying the main line
For the main water supply supplying water to tapes with droppers, HDPE pipe, plastic, polyethylene, polypropylene, is used. There are practically no restrictions here. The main thing is that the material does not corrode and does not accumulate plaque on the walls.
The pipe is installed in compliance with the specified level on a solid surface. This can be a concrete gutter, half a large-diameter steel pipe, dry brickwork, without mortar, but only to obtain a solid and even base.
It is important to secure the pipe so that it cannot be moved from its place by foot, simply by stepping, or by catching it with garden tools. Violation of the level can limit the flow of water to certain belts and impair the uniformity of watering.
In the pipe, at the row marks, tees are laid or sub-connector holes are drilled, which are mounted manually with the installation of gaskets, and also lightly pressed with a wrench. It is to these connectors that drip irrigation tapes are connected!
Advantages and disadvantages
The drip irrigation system has the following advantages:
- plant growth and development accelerates;
- productivity increases;
- watering is automated;
- soil washout is prevented;
- fertilizers are applied to the right place in precisely calculated quantities;
- ensures irrigation of large areas at low water pressure;
- the water is heated by the outside air temperature;
- installation of a drip irrigation system does not require complex mechanisms or special preparation.
Gardeners note the following disadvantages of drip irrigation systems:
- additional costs for the purchase of equipment and materials;
- water with a high salt content is not suitable for irrigation - the droppers quickly become clogged;
- you need to clean the filters often, otherwise water will not flow into the system;
- drip tapes quickly fail and require replacement every 2 years.
The droppers quickly become clogged, so you need to install a filter that needs to be cleaned periodically. Despite maintenance, the service life of water pipelines is limited to two years.
Device
For drip irrigation of plants in a greenhouse, the following elements will be required:
A storage tank in which water is heated, chlorine evaporates if the water comes from a centralized water supply.- A filter that prevents clogging of droppers.
- Main lines with outlet hoses.
- Drip tapes.
- Cranes.
- Connecting elements.
- Controllers that set watering time and intensity.
- Timers to provide a special watering regime for a specific group of plants.
When watering from a water supply, a storage tank is not needed. If the water source is a well, wells, or pond, a pump will be required.
How to calculate the time and how often to water?
The duration of watering from the water supply is determined by the gardener. Using a timer, the time and frequency of irrigation are set . Determine the moisture requirement of one plant.
For example, a tomato, on average, needs 1.5 liters of water per day. If the owner has installed drip irrigation from the water supply in his personal plot, he configures the controller so that 1.5 liters of water are supplied daily in 15 minutes.
Its owner comes to the dacha once a week. Therefore, he sets the timer so that in 105 minutes 10.5 liters of water flows under each plant. Electromechanical timers ensure that watering is turned on daily for a week with a maximum duration of up to two hours.
When water flows out by gravity, the watering time depends on the height of the barrel and ranges from 3 to 6 hours. Vegetable growers recommend watering plants 3-5 times a day in small doses so that the total amount of water is not lower than the daily needs of the plants.
How much water should I supply per day?
The need for moisture depends on the type of plant, variety, and outside temperature. It is believed that a tomato bush consumes, on average, 1.5 liters of water per day, and one cucumber plant consumes 2 liters.
In a greenhouse 4 m long and 3 m wide, for ease of maintenance, a passage 70-75 cm wide, with an area of 0.75 * 4 = 3 m2, is provided. The usable area is 3*4-3=9 m2. At a planting rate of 3 plants per 1 m2, 27 bushes are placed in the greenhouse. Their daily need for water is 27*1.5=40.5 liters.
The cucumber vine needs 2 liters of water per day . 4 plants are placed per square meter of usable area, therefore, per 9 m2 - 36. Their water requirement is 36 * 2 = 72 liters.
What is the approximate cost?
Factory-made systems are designed for a certain area of the greenhouse. When a gardener uses a structure of a different size, he purchases each element of the system separately.
To set up a drip irrigation system in a greenhouse, you will need the following elements:
- Storage tank: watering from a water supply is not the best solution. The water is colder than the air, and it is also chlorinated. Chlorine is a toxic element for plants. Therefore, the water must enter the container, where it is heated and the gas evaporates. Plastic containers are most often used. A tank with a valve to control the amount of liquid, five hundred liters, costs 11 thousand rubles, plastic barrels with a volume of 127 liters - 2500 rubles.
- A garden pump for pumping water from a well costs about 7 thousand rubles. The mechanism is necessary if there is no main water supply.
- Hose for supplying water from source to reservoir, 20 m, cost 1500 rub.
- Coupling for connecting the storage tank with the main hose - 150 RUR.
- Trunk hoses are made from a plastic tube with a diameter of 15-20 mm at a price of 30 to 50 rubles/m, 10 m = 400 rubles.
- Pressure reducer, average cost 500 rub.
- Filter for purifying mechanical contaminants of water that comes from a well, a well, an external reservoir, the average cost is 50 rubles.
- Drip tape: retail price 4 rubles/m, price for 50 m - 200 rubles.
- Fittings, taps, plugs, tees. At a low cost, from 10 to 50 rubles per piece, a lot of them are required, so the cost of these system elements can be impressive, approximately 1000 rubles.
- Timers or controllers are used to automate irrigation. The cost of the mechanisms starts from 1500 rubles, plus the cost of batteries - 250 rubles.
In total, the minimum cost of a do-it-yourself drip irrigation system (without a pump) is approximately 2500+ 1500+150+400+500+50+200+1000+1500+250=8050 rubles.
For installation, you will need piercing tools, punches, or an electric drill to drill holes through which the dropper connects the line to the tape. To ensure that the container is automatically filled with water, a valve from the toilet cistern is inserted into the barrel.
Pseudo-drip irrigation system for garden beds
Lukaed created an irrigation system for cucumbers, which it called “pseudo-drip” due to the fact that it used non-core products. To manufacture the system, we purchased: a metal-plastic pipe and a meter of silicone hose that fits tightly onto this pipe, and six pharmacy systems, which were assigned the role of droppers.
Next, Lukaed rolled out the pipe in the center of the cucumber bed, cut it to size, and sealed the far end with a wooden chopper.
Using a 3.5 mm drill, I drilled holes for the dropper tubes, and cut the tubes to fit the cucumber stem with a margin of 2-3 mm. I inserted the tubes into the holes.
LukaedFORUMHOUSE user
The tubes should be cut at an angle, so it is more convenient to insert them into the holes.
I connected the irrigation system to a water tank using a connector and a piece of silicone hose. I secured the pipes with wire hooks.
Each cucumber bed took six meters of pipe. This system does not comply with the basic principle of drip irrigation - moisture does not continuously flow to the roots of the plants; Lukaed opens the water for 30 minutes a day. But the plants felt good, and everything was in order with the harvest. And most importantly, the cost of installing an irrigation system for two beds was 700 rubles.
Lukaed
The metal-plastic pipe can be reused - unnecessary holes can be wrapped with tape or plugged with an M4 screw.
Step-by-step installation instructions
In greenhouses, irrigation systems are used with:
- droppers,
- plastic tubes,
- bottles,
- drip tapes,
- an automated irrigation system is used.
The container is installed at a height of 30-50 cm to ensure the required water pressure. The coupling is cut in, the filter is connected, and main hoses are supplied in the form of rigid tubes made of polymer material, which are pressed to the ground with plastic clamps. If the system operates from water supply, a storage tank is not needed.
The tank should be made of opaque plastic to block the photosynthesis of blue-green algae, which forms a biofilm and clogs the system.
How to install droppers correctly?
Droppers are divided into adjustable and non-adjustable . Using adjustable droppers, the required water flow is manually set.
Unregulated dispensers are divided into compensated and uncompensated. In the first case, when the pressure weakens, the outlet hole expands, and the amount of water pouring out does not decrease.
Such drippers are installed when the beds are located at different levels , and water is supplied under pressure - from a water supply or using a pump.
When a gardener waters the beds by gravity from a barrel, he uses uncompensated drippers, which he attaches to the connector using long, up to 40 cm, thin tubes.
For installation you will need the following tools:
- piercer;
- adjustable wrench.
Materials:
- hard hose;
- connecting elements;
- droppers;
- stubs.
Installation consists of the following steps:
A filter and a timer are connected to the water source.- Mount the collector.
- The highway is assembled and stretched across the entire width of the installation.
- Pierce a hard hose.
- Insert a connector into the hole and attach a dropper or splitter to it to install several dispensers.
Greenhouses are located on leveled surfaces, and water is supplied by gravity, so gardeners prefer to use unregulated, uncompensated drippers.
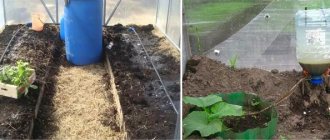
From bottles
For installation you will need the following tools and materials:
- awl;
- paper cutting knife;
- plastic bottles with corks.
Installation consists of the following steps:
- Cut out the bottom.
- Punch 2-3 holes in the cork with an awl.
- They dig it into the ground and plant seedlings nearby.
- Water is poured by hand.
A liter bottle provides the plant with moisture for 4 days, a two-liter bottle for a week. This is the most economical drip irrigation system that does not require any cash costs. The disadvantage is the need to fill the containers manually.
Drip irrigation from bottles, video instructions:
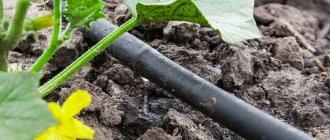
From plastic pipes
To install durable drip irrigation, you will need the following tools:
- soldering iron for polymer pipes;
- adjustable wrench;
- electric drill.
Materials:
- polymer pipes with a diameter of 20 mm;
- filter;
- corners, valves, taps, adapters;
- stubs.
When installing the system, the following stages go through:
- A line is welded to the filter.
- Install a common tap.
- Attach the collector.
- Valves are installed on each pipe.
- Drill holes with a diameter of 2 mm every 30-50 cm.
- Install plugs on the end sections.
Valves regulate water pressure. The barrel must be elevated to provide sufficient pressure to allow water to pass through the ends of the pipeline. Clogged holes are cleaned with a sewing needle or drill with a diameter of 2 mm.
To prevent dirt from the barrel from entering the system, the tap is cut 5 cm above the bottom. To drain dirty water and wash the barrel, a second valve is cut into the bottom.
The video will show you how to make drip irrigation in a greenhouse using pipes:
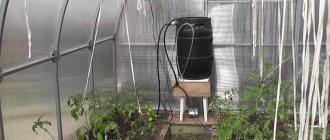
Automatic
For installation use the following tools:
- adjustable wrench;
- piercer
Materials:
- pump, if water is supplied from a well or open reservoir;
- filter;
- pressure reducer;
- automatic electronic timer;
- main hoses;
- connectors;
- droppers;
- stubs.
The system is installed in the following sequence:
Install a pressure reducer.- Attach the filter.
- Install an automatic timer.
- Attach the collector.
- Collecting highways.
- They pierce the hard hose and install droppers.
- Set up drip irrigation mode. Check the operation of the system.
The device waters vegetables in a summer cottage, which the owner visits once a week. The water supply system is left on constantly.
After the water filter, a timer is installed and programmed to turn on at specified intervals. The device runs on batteries. The source of replenishing the tank with water must be turned on at all times.
Most timers have built-in solenoid valves that automatically fill the tank with water.
With drip tapes
For installation use the following tools:
- adjustable wrench;
- piercer;
- scissors.
Materials:
- filter;
- mechanical timer;
- main hoses;
- collectors;
- tees;
- garden hose;
- drip tapes.
The system is installed in the following sequence:
- A filter is mounted to the container.
- Set a timer.
- Attach a garden hose.
- The main hose is pierced and 2 connecting elements for drip tapes are inserted into the holes.
- The lines are connected with a tee, into the free end of which a garden hose from the barrel is inserted.
- Attach the tapes with the holes facing up.
- Cut off the excess with scissors, bend it across, then lengthwise and put a tube from a piece of tape on the end.
- Check the filling of the pipeline.
With low water pressure, the belt labyrinths become clogged with dirt, biofilms or precipitated salts. Therefore, after the main filter you need to install a mesh filter.
The video will tell you which drip tape to choose:
TOP 3 ready-made options on the market
Vegetable growers use ready-made drip systems designed for a certain number of plants. The first places in the market are occupied by the following brands:
Bug
Manufactured in Russia . It works from a water supply or a barrel, which is installed at a height of 1 to 2 m. The set includes a pump, an electronic timer, a main cabin, bends, and droppers. The device waters 60 plants in a greenhouse with a usable area of 18 m2.
The cost of the set is from 2000 rubles. The Zhuk drip system can be used for watering plants in a greenhouse and open ground.
AquaDusya
The system from a Belarusian manufacturer operates from a barrel with a pump located at a height of 20 cm. The kits are designed to serve 50, 60, 70 plants. It can use up to 280 liters of water in an hour. Operating parameters are adjusted using a timer.
Timers can be started at 6 intervals; 12 hours; 1; 3; 4 days or once a week. The cost of the set is 7000 rubles. A device without automation costs 2,300 rubles. The droppers can be moved exactly to the root of the plant. Water flows underground.
Gardena
The system from a German manufacturer works automatically from the water supply. There are models on the market designed for greenhouses measuring 10 m2 or more. The price of the device is from 5000 rubles.
Set manufacturers
On the sales market, different manufacturers presented their models taking into account the needs of customers :
Bug
This is a drip irrigation system of a domestic manufacturer, one of the simplest and most convenient and inexpensive types of devices. Their peculiarity is that many small pipes extend from the main pipes, arranged in pairs opposite each other. The design is easy to install.
The manufacturer offers the following types of models:
Drip irrigation “BUG” from a container of 60 plants.- Drip irrigation “BUG” from a container of 60 plants with a timer.
- Expansion kit “BEETLE” from a capacity of 20 plants.
- Drip irrigation “BUG” from a water supply with a timer for 60 plants.
- Drip irrigation “BEETLE” with 24 meter emitter tape.
- Drip irrigation “BUG” from a container of 30 plants with a timer.
- Drip irrigation “BUG” from a water supply with a timer for 30 plants.
Details are in this article.
Aqua Dusya
Product made in Belarus. Aqua Dusi sets are similar to each other. They differ only in the number of droppers and additional equipment.
The manufacturer offers the following models:
- “Start LCD” - basic set without automation;
- “AquaDusya Plus”, the ability to water up to 120 plants;
- “Expansion” to expand the basic set;
- “AquaDusya Start LCD” for 50 plants, automated model.
More details can be found here.
Green Helper
Product made in Russia. It is possible to complete models taking into account the consumer.
The manufacturer offers the following models:
- "GN-023N" with a timer for gravity irrigation.
- "GN-001N" is a stand-alone kit, not automated.
- "GN-003" automatic watering.
Read more in this article.
Aqua Planet
Country of origin: Russia. The total operating time does not exceed 1 hour. It is possible to independently adjust the operating mode and set individual frequency.
The manufacturer offers the following models:
- “Aqua Planet 60 without automation”;
- "Aqua Planet 60 Tap-Timer";
- "Aqua Planet 60 Automatic".
You can find out more here.
Dewdrop
The domestic product offers a drip irrigation kit, which consists of a temperature-resistant hose, a fine filter and 50 pcs. drip dispensers. It is possible to organize both subsoil and above-ground irrigation. Details are in this article.
Water strider
Product from a domestic manufacturer. Its feature is the presence of an automatic controller, which allows you to select the interval and duration of watering.
Design models:
- “Water strider” (Basic) is designed for 2 ridges 4 m long.
- The insert for the Water Strider irrigation system extends the basic set by 2 m.
Read more here.
Boutte
The product of a joint Russian-French manufacturer, which represents many models:
- "Harvest-3" (tape 25 m);
- “Drip tape” (50 m);
- Set for watering potted plants “GARD”;
- Drip irrigation set “VOLGA” (pressure reducer included) for greenhouse 3x6;
- Drip irrigation set "OKA" (for 30 points from the barrel) irrigation area - up to 20 m2;
- Drip irrigation kit SKO-50 with a hose of 18 meters;
- Drip irrigation set “Urozhay-1”;
- Drip irrigation set "Urozhay-2".
Read about Boutte drip irrigation here.
Gardena
Product from a German manufacturer. The kits are universal and can be used both on the terrace and in the garden, vegetable garden or flower garden.
Design models:
- Basic set for terraces, 13000-32.
- Basic micro-drip irrigation kit, 13001-20.
- Basic set for beds, 13015-20.
- Basic kit for above-ground installation, 13010-20.
This article will tell you about drip irrigation in Gardena.
Karcher
Product made in Germany. drip irrigation models currently available on the market
- “Karcher” irrigation system kit;
- system for watering flowers in pots.
How to connect to the water supply and tank?
The detachable connection is connected to the ball water tap and the following steps are performed sequentially:
- Attach a pipe that supplies water to the greenhouse.
- Install distribution pipes.
- Dispensing taps are installed.
- Attach dispensing tapes or hoses.
- Install plugs at the end section.
- They start the system, check for problems and fix them.
A drip irrigation system from a water supply is installed by summer residents so that the plants are supplied with water during the owner’s prolonged absence.
The dispensing container is installed near the greenhouse or inside at a height of 0.5 to 1 m.
Connect a garden hose to replenish the water supply and perform the following steps:
- Equip the container with a float valve so that it is replenished automatically.
- A faucet is connected, after which the filter is mounted.
- Install the controller and configure the watering mode.
- Connect the main pipe.
- If necessary, install a faucet in front of each drip tube or tape.
So that the container can be washed, an additional tap is cut into the bottom to drain the water.
DIY drip irrigation from plastic bottles
For a small area, the simplest system of ordinary plastic bottles is suitable.
They are hung on a peg, with the neck down, and a narrow tube or simply the refill of a ballpoint pen is inserted into it. Be sure to make a hole for air to escape.
The second option is to make holes in the bottom. Here it is important to take into account the type of soil and its ability to absorb moisture, since the number of holes depends on this:
- sandy - 8;
- clay -12.
Their size is small so that the liquid does not spill out quickly. You can make them with a needle.
A simple option is underground watering: the bottle is buried in the ground, and the neck remains above the surface. When the amount of water decreases, add it. The advantage of this method is that there is no crust on the surface that needs to be loosened. For example, in a greenhouse, one tomato bush will need 1 liter of liquid for 7 days.
The holes quickly become clogged if there is clay in the soil. To prevent this:
- put ordinary nylon tights on the part of the container with holes;
- make a little drainage - put burlap or grass in the hole before burying.
This is a good idea for people who are often away. The bottle is placed in the ground, tilted at 30-45° to reduce the water pressure and the rate of its consumption.
Operation and Maintenance
The irrigation system is installed after spring tillage, when positive air temperatures are established. After installation, seedlings are planted exactly under the droppers.
During the growing season of plants, filters are cleaned monthly, sections of damaged tape are repaired, and if necessary, replace it.
After harvesting, the water is removed from the system, and the tapes and tubes are left for 5 days until completely dry . Drip sleeves are stored stretched inside the greenhouse. Gardeners recommend attaching tapes to the wall of the structure.
Numerous bends damage the tape, so it does not need to be rolled.
Adjustment
A distinction is made between automatic and manual regulation . After setting the timer, it is adjusted to the required operating mode. They monitor the growth of plants and change parameters.
Manual regulation consists of monitoring the plants and turning on or off the water supply. This method leads to mistakes, excessive water consumption, and loss of harvest.
Preservation for the winter
The system is cleaned of dirt, biological films resulting from the precipitation of salts, and the activity of microorganisms.
Most often, it is enough to rinse pipes, containers, and connections with water . To dissolve sediment of organic origin, use strong acids while observing safety precautions when working with caustic substances.
Pipes and hoses are dismantled and stored inside the greenhouse. Controllers, filters, sensors, and other devices that use electronics are cleaned of dust and dirt and stored in a heated room.