Today, the greenhouse market is replete with a variety of greenhouse structures, so anyone, even the most fastidious gardener, can find the necessary design. One of the most interesting options for our compatriots is the English greenhouse - such a structure is not only functional, but also extremely stylish, because it looks like a real greenhouse.
Design features of the English greenhouse
There are several distinctive features of English-type greenhouses. The most significant of them are the following.
- Base. Due to the presence of the foundation and the basement part, the beds are located above ground level, which, in the presence of a heating system, allows them to avoid freezing, and allows the gardener to use the greenhouse even in winter. In addition, the base gives the building a complete and neat look.
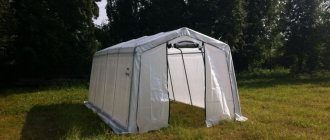
- Glass coating. An English greenhouse covered with another material, even if it is the most convenient for a summer resident - polycarbonate - will, in fact, no longer be English, because then all the plantings inside it will be covered with opaque material, and the building itself will not look so luxurious.
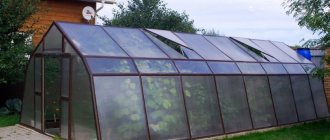
- Gable roof. Thanks to the steep slopes located at an angle of 45 degrees, snow does not linger on the greenhouse, and the structure itself looks like a neat house.
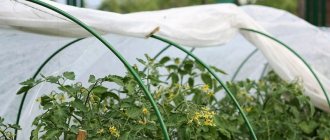
- High walls. Due to this design feature, growing high varieties of plants in an English greenhouse is not difficult. In addition, you can arrange shelves for boxes or pots with plants and thereby further decorate the structure.
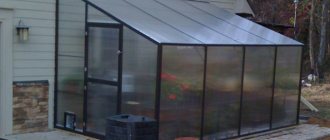
- Connection to the wall of a residential building. An optional condition, but in this case the structure turns into a real greenhouse, which, if there is a special second door, can be accessed directly from the house.
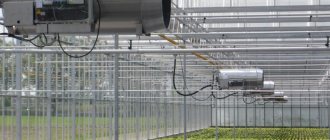
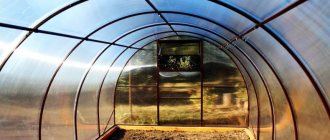
- Availability of good drainage and ventilation systems. This makes it possible to provide the planted crops with the necessary conditions, and due to the ability to regulate temperature and humidity levels, even tropical varieties of plants can be grown.
Thanks to the design features listed above, English greenhouses are often used for growing capricious and heat-loving plants, including in winter. And due to their appearance, they become a real attraction in a garden, dacha or personal plot.
Assembling the frame
To put the prepared parts together, you will most likely need an assistant.
To begin, install one wall and the end onto the plinth. Supporting with your hands, connect the walls with bolts. Then lift and connect the remaining parts in the same way. Connect all walls with pre-prepared bolts. You should end up with one large frame without a roof that sits firmly on a plinth, secured with dowels and angles.
Kinds
There are two main types of designs in the English style:
- ordinary , glazed with single glass - beautiful, suitable for growing plants in winter and quite inexpensive compared to elite ones;
- elite - look like real, traditional English greenhouses, but are distinguished by their extraordinary strength and high price.
Is it worth installing
A similar structure has been known to gardeners for many years. Over the entire period of operation, professional and novice seedling lovers have identified the following distinctive characteristics of the structure:
The cost of an English greenhouse largely depends on the thickness of the glass used. In budget models there is only 1 layer, while in more expensive ones double-glazed windows are installed. Other advantages include a 2-pitched roof. Both slopes are made at a large angle, which does not allow precipitation to linger on the roof. From a physical point of view, such a roof reduces the pressure on the entire structure.
In an English greenhouse you can install drainage and ventilation of various capacities. In manual or automatic mode, the greenhouse will regulate the temperature inside. Such construction on the site is also beneficial in relation to irrigation costs. A special system collects rainwater, filters it and uses it to water the seedlings.
Advantages and disadvantages
The main advantages of English greenhouses include:
- high degree of illumination (due to the light transmittance of glass);
- the ability to retain heat well and protect plants from bad weather (wind, rain, snow);
- strength and durability of the structure (with proper care, glass lasts much longer than polycarbonate);
- interesting appearance;
- chemical inertness (the greenhouse can be treated with absolutely any disinfectant - the covering material will not be harmed even by the most aggressive substances).
At the same time, such structures:
- are characterized by high cost (for growing ordinary tomatoes it is much more expedient to build an English greenhouse with your own hands);
- unstable to mechanical stress (large hail can cause significant damage to the structure, so it makes sense to cover such a greenhouse with impact-resistant glass);
- have a large mass (such a greenhouse cannot do without a foundation);
- do not allow some of the types of rays that plants need to pass through.
A little history
The first greenhouses in history were strikingly different from the usual transparent domes made of plastic or glass. The ancient Romans were very fond of demonstrating their wealth and generosity: they served the rarest fruits and outlandish vegetables at banquet tables, and decorated the feast with luxurious flowers. But bad luck - the climate in the vicinity of Rome was not suitable for growing heat-loving exotic plants.
And then Roman gardeners invented a method that allowed them to harvest a rich harvest of tropical fruits and vegetables, regardless of climatic conditions. They placed pots of flowers and garden crops on small carts and rolled them out to the warmest place protected from the wind. In the evening, when the coolness set in, the carts were returned to special insulated and heated rooms. And in the cold season, the carts were not placed outside at all. Thus, the ingenuity of ancient gardeners allowed the Roman aristocracy to enjoy luxurious flowers and fruits all year round.
The first documented stationary glass greenhouses appeared in 1599 in Holland. But these were more like greenhouses for year-round cultivation of exotic trees and flowers. The British also loved luxury and had the opportunity to purchase plants brought from tropical countries. They wanted not only to enjoy fruits, but also to grow them in their garden. Practical Englishmen approached the matter with all seriousness: they built real houses from glass panels for the plants, equipped them with lighting, stove heating and water supply inside.
Attention! According to archaeologists, the first experiments in growing greens indoors were made by the ancient Chinese about five thousand years ago. And these were definitely not decorative indoor plants - the fashion for flowers in pots appeared thousands of years later.
Creating an English greenhouse with your own hands
Materials
Conventionally, any standard English greenhouse can be divided into a brick base, a metal or wooden frame and glass walls. Therefore, to create it you will need the following materials.
- Brick or concrete for the foundation. Without it, the greenhouse will begin to bend, or even collapse, within a year. The best option is a strip concrete foundation with a brick base.
- A narrow metal profile or wooden blocks 10x10 cm to create a frame. In the first case, you will need the skills of a welder, so if you don’t have any, it’s easier to make the frame from timber - such material is quite easy to cut and fasten without any specific skills. But in order for wood to last almost as long as metal, it must be painted regularly (at least twice a year) and correctly (with preliminary priming, antifungal treatment and three layers of paint).
- Fittings and fasteners : locking mechanisms, thermal actuators, handles, corners, self-tapping screws. Without them, it will not be possible to assemble a greenhouse, give it functionality and a finished appearance.
- High-quality glass with shockproof coating.
- A plastic or metal pipe for a drain drive to collect water for watering plants. Typically, gutters are used to drain rainwater into a specially designated container.
Tools
Also, to create an English greenhouse with your own hands you will need:
- saw, hacksaw or jigsaw;
- drill and screwdriver;
- glass cutter;
- hammer;
- tape measure and building level.
Construction
Step-by-step instructions for creating an English-style greenhouse yourself look like this:
- Drawing up a detailed design diagram indicating all dimensions. The more detailed the markings, the easier the construction process will be.
- Construction of the foundation and plinth.
- Frame construction. In the case of using timber, it is necessary to pre-treat it with an agent against parasites and rot, and assemble the greenhouse structure. The optimal frame size is 45x50 or 70x140 cm.
- Glazing. You can cut standard window glass to strictly measured dimensions yourself using a glass cutter. To do this, you need to first wash the glass and start cutting using a marker and a ruler, and then draw a glass cutter along the resulting line with pressure, lightly tap on the glass and break off the cut piece. It is important that the line is immediately straight, otherwise the sheet may crack. Glazing should be done from the bottom up, closing the lower frames and moving upward. You can fasten the glass using slats and small nails.
- Installation of doors and windows using awnings.
- Installation of fittings.
Rules for choosing when purchasing
When buying a ready-made English design, be prepared to spend a decent amount of money. But it is also worth considering that the high cost of a structure does not always indicate its quality, so we will figure out how to choose a ready-made greenhouse so that it lasts a long time, is easy to maintain and creates optimal conditions for growing plants in adverse weather conditions. First of all, pay attention to the material that was used to make the frame of the structure.
It is preferable to buy a structure with an aluminum frame; it is more durable than wood, does not require additional maintenance and has minimal weight, which minimizes the load on the foundation. When buying a structure with a wooden frame, you should give preference to oak or walnut materials, which will last as long as possible. It is also necessary to stock up on paint or varnish, which the wood is treated with every season to preserve its water-repellent properties and prevent rotting of the natural material. In addition, the tree is susceptible to insect damage, so it is additionally treated with special compounds.
Video: basic rules for choosing a greenhouse
It is possible to purchase a super-strong structure made from an alloy of metals, but you will have to order it delivered from England, since companies that produce similar greenhouses in other countries are trying to reduce the cost of structures by using aluminum and wood. The next point that people pay attention to when buying an English mini-greenhouse is the quality of the glass.
Important! The glass of a high-quality English greenhouse must be darkened by 10% so that the plants do not suffer from an excess of light.
Structures can be made from different types of glass:
- double - its thickness is 3.2 mm, which allows the manufacturer to produce dimensional elements while maintaining maximum sunlight penetration;
- showcase - the thickness of such glass is from 2.5 to 6 mm, but it is better to choose the maximum thickness. Such glass usually has a lot of weight, so it requires additional strengthening and ensuring the strength of the fasteners;
- multilayer - several glasses are combined into one frame, the empty space between which is filled with dry air, which retains heat. When purchasing a greenhouse with laminated glass, it is better to choose double-chamber packages that are suitable for winter use;
- hardened - has a thickness 4 times greater than usual, this is very good from a safety point of view, since when broken, small blunt fragments cannot cause serious injury to a person. In addition, the likelihood of tempered glass breaking is minimal;
- heat reflective - can transmit infrared rays, which are beneficial for the plant, but retains harmful ultraviolet radiation;
- storm - has 2 glass layers, which are reinforced with polycarbonate. This glass is very durable and can withstand storm winds of up to 65 km/h. Its cost is as high as possible and the light transmittance is reduced, so without a significant need in regions with calm winds, storm glass is not worth purchasing.
English designs must be equipped with a drainpipe, which is subsequently used to collect excess water and subsequent watering when there is a shortage.
As for the manufacturers from whom you can purchase an English greenhouse, you should pay attention to companies that have been on the market for a long time, offering quality and durability for the optimal amount. Such companies include the Danish company Juliana and the Russian company Britton.
Installation of a purchased greenhouse
Often, buyers of ready-made English greenhouses order their assembly from professionals, but you can do it yourself using the following algorithm.
- Select a well-lit and level area for installation.
- Applying markings and creating a trench under the foundation to a depth of the freezing layer of 80 cm.
- Creating a sand and gravel cushion in the trench.
- Construction of formwork for the foundation.
- Preparation of concrete from cement, sand and crushed stone in a ratio of 1:3:5. After this, you need to fill the trench with it and let it dry for one month.
- Waterproofing the foundation by covering it with two layers of roofing material.
- Construction of a plinth made of concrete blocks or bricks and cement, covering it with finishing material. It is important not to forget to leave a recess under the doorway and check that the greenhouse is installed evenly.
After the preparatory stage is completed, you can begin installing the greenhouse itself. To do this you need:
- unpack all the design parts;
- start assembling the side walls: place long longitudinal and transverse parts on a flat surface;
- connect the cross-sections to the lower longitudinal elements with bolts;
- install bolts in special openings of the transverse parts;
- secure the top long element;
- assemble the ends in the same way;
- start assembling the structure together: install the end and side wall on the base and connect them with bolts;
- connect the remaining parts in the same way;
- secure the frame to the plinth using corners and dowels;
- install a ridge beam;
- assemble one of the windows and insert guides to the ridge;
- set the diameters;
- install spacers between the walls and roof;
- secure the spacers between the cross members with bolts;
- install and snap decorative parts onto the ridge;
- install a thermal drive for the window;
- start glazing: cover the glass sheets around the perimeter with special film;
- insert the glass into the frames and secure it using special latches;
- screw the decorative profile onto the frames to hide the latches;
- assemble the side window;
- similarly glaze all walls, ends and roof;
- assemble the doors and insert them into the grooves on the front end;
- assemble and install the internal shelves, securing them with bolts inserted into the grooves of the side parts of the frame;
- close the protruding parts of the bolts using decorative plugs;
- install the drain pipe on one of the corners and secure its lower part with a clamp.
That's it, the greenhouse is ready!
In conclusion, I would like to note that assembling such a greenhouse is quite time-consuming, so you should not count on its quick completion. However, the end result will please anyone, even the most demanding gardener.
Pouring the foundation
Once you have dug the trench, you need to fill it with a mixture of sand and gravel to create a cushion. The materials are mixed in equal proportions. Then you need to put together formwork from old boards and strengthen it in the trench. Now you can pour the concrete. It is prepared using classical technology. Mix one part cement, three parts sand and five parts crushed stone. Mix everything thoroughly with water until you obtain a creamy consistency. Pouring the foundation is the longest part of the work, since it takes about a month for the concrete to completely dry. A word of advice: try to pour the concrete quickly and continuously to avoid uneven curing, which can lead to cracking in the future.
Kinchev, Garkusha, Stingray and others shared their memories of the rock club
Vertical flower bed made of PET bottles: a great idea for a small summer cottage
Hand training helps: causes and prevention of “mouse” hand
Final touches
The greenhouse is almost ready. All that remains is to insert and secure the glass with special latches, since the design includes rubber parts that will protect against drafts and snow.
Start installing glass from the bottom, gradually moving upward. Glaze the roof last.
If desired, the beams can be painted with colored paint; the instructions do not prohibit this. Only the paint must be applied exclusively before installation, allowing it to dry thoroughly, otherwise the parts will stick together and the paint will protrude unsightly from the joints.
All that remains is to install doors and internal shelves on the walls. By the way, the shelves are attached only to bolts in the grooves, which were installed at the initial stage in the end parts.
If the bolts are left uncovered, then to avoid injury, the ends must be closed with special plugs. They are usually sold complete with bolts. If desired, decorative caps can be used to add authenticity to the Victorian greenhouse.
And the last thing is the drain pipe. It is usually placed at the corner of the greenhouse and secured with a clamp.
The greenhouse is ready, assembled with your own hands. When deciding to take such a responsible step, be prepared for the fact that you will have to spend a lot of time and effort on construction. Despite the fact that from the outside this task seems quite easy, in reality it is not, and it will take several months to raise the greenhouse from scratch. Therefore, count on your strength to finish the work before the onset of autumn rains.
Source
Base
When the foundation has completely hardened, lay several layers of roofing felt on it to create waterproofing. Now you can start building the basement. It is usually built of brick. This is the most accessible material. In some cases, concrete blocks are used. After the construction of the base, you can decorate it with additional decorative material. Don't forget to leave a notch for the door.
Making the markings
Nowadays, construction stores offer a wide selection of industrial-made greenhouses. They are ideal in all technical matters, but the price is not always acceptable. Assembling a greenhouse with your own hands will take a little more time, but it will allow you to select high-quality materials at an affordable price.
So. After choosing a site for constructing a greenhouse, clear it of debris and large grass, if there is any on the site. Tall trees and shrubs should not be a barrier to access to sunlight. Then the area needs to be marked. Use twine or tape measure to mark the outline of the future greenhouse. Dig a trench, focusing solely on the markings. The standard foundation depth is about 80 cm deep. This is the average value by which the ground freezes. This type of foundation is called strip foundation and is most often used for the installation of garden greenhouses.